Delete Directories From The Terminal In Linux

In your Linux journey, you’ll eventually want to delete directories as you do some housecleaning. Keeping your computer tidy makes you more efficient. Deleting directories you no longer need helps keep your system tidy. 

It’s easy enough to manage and remove directories while you’re in your graphic file manager. Though sometimes, if you’re managing files in the terminal, you might just as well learn to manage directories while you’re in there. It’s not too terribly difficult.

As an example of why this is worth knowing, you may be working with a headless system, something without a GUI desktop environment. In that case, you will have no choice but to delete directories from the terminal. It’s just something you’ll come up against as you learn file management.

Either way, being able to delete directories from the terminal is a skill that comes in handy, a skill that you should know. And so it should be something you have in your toolbox.

The tools we’ll be using for this article are rmdir and rm. They’re both basic commands that have existed since the earliest of Unix days, and they’re both useful commands today.

The rmdir command describes itself as:

rmdir – remove empty directories

And rm describes itself as:

rm – remove files or directories

So, with that in mind, let’s jump into the exercise.

Delete Directories From The Terminal:

Deleting directories from the terminal obviously requires said open terminal. If you don’t know how to open the terminal, you can do so with your keyboard – just press CTRL + ALT + T and your default terminal should open.

The first command is really simple. If it’s an empty directory that you want to delete, you can use the rmdir command. As you read in the intro, the directory MUST be empty for this command to work. It’s also really simple to run:

So long as the directory is empty, you should be all set to go. If the directory you want to delete is not empty, you have to use the rm command. It’d look like this:

If you’re curious, the -r flag means recursive – it’ll even delete directories (and the files within them) within the directory. The -f flag means force – it should delete all files and directories no matter what and without any confirmation.

If you’re curious about either of those two commands, and there should someday be an article about ‘rm’, and for now you can just check the manual. You’d use either man rmdir or man rm. There’s not much to the first, and the latter is complex enough to warrant its own eventual article.

Closure:

Whoop! There it is! It’s another article in what’s turning into quite a long list of articles. If I’m going to keep this up for a full year, I might just as well have fun with it – and this was a nice, easy, and fun article. It’s mostly aimed at new users, as long-term users would hopefully already know how to delete directories from the terminal.

Thanks for reading! If you want to help, or if the site has helped you, you can donate, register to help, write an article, or buy inexpensive hosting to start your own site. If you scroll down, you can sign up for the newsletter, vote for the article, and comment.

How To: Find Your Timezone In The Terminal

This article is about your system time, specifically how to find your timezone in the terminal. It shouldn’t be a very long article and it should be relatively easy and suitable for new Linux users.

Why would you want to find your timezone in the terminal? Well, for starters you may not have the proper time set and need to verify it. You may also be working with servers scattered across the globe and knowing the timezone may be important.

As you may need things synchronized, knowing the timezone could be important. Seeing as you’re not always able to access a GUI desktop, you might want to find your timezone in the terminal. So, to those end, this article will share a few ways to do so.

Find Your Timezone In The Terminal:

Obviously, this article requires an open terminal. If you don’t know how to open the terminal, you can do so with your keyboard – just press CTRL + ALT + T and your default terminal should open. If you’re operating remotely, you probably already have a terminal open.

Anyhow, there are multiple ways to do this. For starters, you can just use the date command. It looks like this:

The output will have your timezone in it. For example, the output of that command on one of my boxes looks like:

As you can see, the timezone is at the end. In my case, it’s “EDT” and that’s probably the easiest way to get the timezone information.

You can also use ‘timedatectl’ which looks like this:

That’ll give you the timezone and even tell you the adjustment from GMT. If you want, you can use grep with it.

That will, of course, just output the line containing your timezone. Also, I have no idea why it’s two words. I know it as one word, but here we are and I suppose it’s just not that important.

I have one more way to find your timezone in the terminal and it’ll output your timezone in text. It’s just:

The output from that would look a little like this:

So, there are a few ways. There are surely other ways, so feel free to leave a comment sharing them.

Closure:

And there you have it, another article. This one shares how to find your timezone in the terminal. It’s a relatively easy article to follow and not really a tool I expect most users to need. Still, it’s there if you need it and this article stands as a reference to it.

Thanks for reading! If you want to help, or if the site has helped you, you can donate, register to help, write an article, or buy inexpensive hosting to start your own site. If you scroll down, you can sign up for the newsletter, vote for the article, and comment.
A Little About The ‘tail’ Command

Today’s article is about the ‘tail’ command, seeing as the last article was about the ‘head‘ command. The tail command is the head companion’s counterpart. It only makes sense to cover one after covering the other, so today’s article will do just that.

Like the head command, the tail command has been with us for a long time, since pretty much the earliest days of Unix. Where head shows you the first lines in a file, the tail command shows you the lines from the end of the file. The man page describes tail as:

tail – output the last part of files

The tail command is pretty handy, often used by sysadmins to monitor log files. It can also be used like the head command to quickly check the contents of a text file, but it shows the material at the end of the file and not at the start of the file. That’s useful for remembering where you left off, for example. Anyhow, there are all sorts of ways to use it and this article will explain some of them.

Getting Started With The ‘tail’ Command:

I don’t think it’s all that important for this article (I’m not sure, I haven’t written it yet!), but we can start on the same page like we did with the head command. 

We’ll need to get started with the terminal open. You can do open your terminal with your keyboard – just press CTRL + ALT + T and your default terminal should open.

Once you get the terminal open, you can run the following two commands. Be sure to press the enter button after each of them and it will download a handy text file (just some random numbers) so that we’re all working on the same file.

With that complete, we can head on into the main article! It shouldn’t be all that long or difficult.

The ‘tail’ command:

Seeing as you’ve already got the rnd-num.txt file downloaded and your terminal is already open, I think we can just jump into using the tail command. If you just want to view last 10 lines of a file, you can use this command:

On the other hand, you can use the -n flag to show a specific number of lines. If you only wanted to see the bottom 5 lines, you’d use this command:

Assuming you’re all playing the home game, and just to show a good example, the output from the final command would look similar to this:

tail with the -n flag
As you can see, it only shows the last five lines of text. Pretty neat, huh?

Along the same lines, but not necessarily as useful, is the -c command. It works the same way it does in the head command, namely showing the specified number of bytes. If you wanted to see the final 5 bytes, the command would look like:

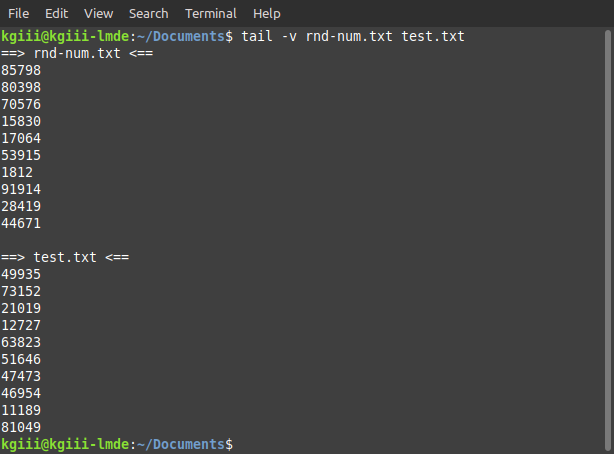
You can also use tail on more than one file at a time. If you do so, you can also use the -v flag and it will helpfully show the names of the files. The command would look a little like this:

The output would look similar to this:

tail being used on multiple files
It helpfully shows you the file names, which can be handy if you’re using multiple files.

One of the command options available with tail isn’t available with head. That flag is the -f mostly used for logs. What happens is you use the -f flag and then tail keeps running, outputting new lines to your terminal as the occur. In that case, it’d be something like:

That should show the last 10 lines of the log file and then update when new lines are added to the log file you’ve opened. Use man tail for more usage information.

Closure:

And that’s it! There’s another article for the site and another article closer to reaching the project’s goals. This article covers the tail command, seeing as the head command was covered in the last article. Feel free to leave a comment sharing how you use the tail command, or maybe even just a comment or question to motivate me.

Thanks for reading! If you want to help, or if the site has helped you, you can donate, register to help, write an article, or buy inexpensive hosting to start your own site. If you scroll down, you can sign up for the newsletter, vote for the article, and comment.
It’s Time To Learn A Little About The ‘head’ Command

Today’s article is about the ‘head’ command. The head command is a tool for viewing a file’s contents (or piped data), starting from the top. There’s not a whole lot to the command, and this will make be a pretty short article that’s fit for a beginner.

The head command has been with us since the heady days of Unix (See what I did there?) and is still a useful command today. In fact, the man page defines it like this:

head – output the first part of files

As you can guess, it does exactly what it says on the tin. There are any number of circumstances when you might want to use it, but I often use it when I don’t remember the exact filename I’m after and just want to see the first few lines of text as a reminder. There are better uses.

Anyhow, there’s not a whole lot to it, but I’ll show you the basics. Like we did recently, let’s see if we can all get started on the same page. So, open your terminal and enter the following:

Doing that will put you in the Downloads directory and will download a text file (it’s perfectly harmless) and it means we are all working with the same settings. You do not need to do this, but it could help.

About The ‘head’ Command:

Seeing as you’ve already got the terminal open, and that you figured it out without me having to repeat it like I do in almost every article, we’ll just jump right into the first command.

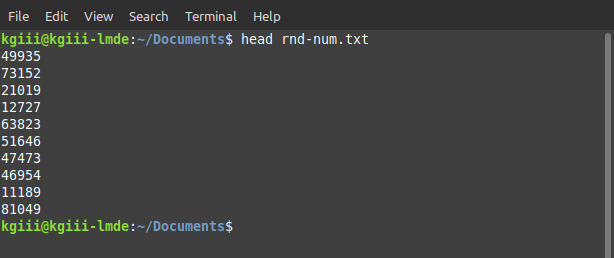
That should output the first ten lines of the rnd-num.txt file, looking something like this:

head in action
If you used the rnd-num.txt, your output should be the same. Pretty neat, huh?

That’s the first ten lines from the rnd-num.txt file or, in other words, the head of the file has been outputted to the terminal. This has a number of uses, including the pipe. You can easily pipe it to another command. It’d look something like this:

That’s not all that head can do, it can output a specified number of lines. To do that, you use the -n flag. It looks like this:

You can also use the -c flag to show the first x-number of bytes in a file. That’s not very complicated. In this case, we’ll look at the first 25 bytes.

You’ll find the output looks pretty similar to the output from the previous head command. You can even work with multiple files and the head command will handle them easily. If you’re going to use multiple files, you should use the -v flag.

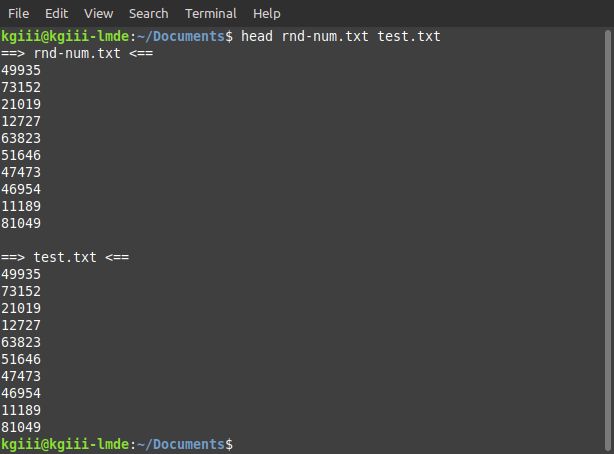
It’ll helpfully preface the start of each file with the name of the file. In this case, the first line of the output would look like this:

head with multiple files
See? It’ll handily list the filename before listing the output.

See? Pretty helpful!

As shown in the image, you can easily deal with multiple files and whatnot, but there’s really not much more to be done with the head command. If you’re curious, you can also enter man head to get more usage information.

Closure:

Yup… There’s another article. This is about the head command, a command that’s not used often but worth having in your toolbox. If you use it more often, feel free to leave a comment explaining what you do with it.

Thanks for reading! If you want to help, or if the site has helped you, you can donate, register to help, write an article, or buy inexpensive hosting to start your own site. If you scroll down, you can sign up for the newsletter, vote for the article, and comment.

Clear Cache, Buffer, And Swap Space

Many Windows users will want to clear cache, buffer, and swap space. It’s a holdover from their Windows days, and it’s possible to do those things with Linux. This article will explain how to clear your RAM cache, buffer, and swap space.

One of the first questions we should be asking is, “Will this help?” The answer is, like many things, “Well, it depends…” It depends on a number of variables, like how much RAM you have, and how aggressively the kernel is paging, or what your swap preferences are. For example, quite a few people have decided to forgo swap entirely. Cleaning swap space is not going to help them out one bit.

The second question should be, “What exactly are we cleaning, anyhow?” The answer to that is a bit clearer, thankfully. The things we’ll be dealing with are:

  1. PageCache/Page Cache; The Linux kernel stores data in unused sections of memory in case it needs it again. Since kernel 2.2, Buffer Cache and Page Cache have been combined and there’s just PageCache.
  2. Dentries; They’re “the in-memory representation of a directory entry” and include things like meta data.
  3. Inodes; Meta data about all the files on your mounted file systems.

Those things build up in RAM and they can be cleaned out. The Linux kernel is really good at managing these things and unused RAM is wasted RAM (within reasonable limitations), but they can be cleaned out and this article explains how.

Clear Cache, Buffer, And Swap Space:

This article requires an open terminal. To open one, you can just use your keyboard – press CTRL + ALT + T and your default terminal should open right up!

I took the time to explain what you’ll be cleaning in the article’s opening. That’ll make this section easier!

To clear PageCache by itself:

Or you can clear Dentries and Inodes:

Or even clear PageCache, Dentries, and Inodes at once:

NOTE: These work as advertised. Before you run one of these commands, run free -m before and after running the command. By doing that, you can see what the results are and what the results will probably look like in the future.

Frankly, I’d only see this as a very valuable tool if you have little RAM, or want to free up some resources before opening something that is resource-intensive. Other than that, just let Linux do its job – managing cache, memory, and other resources.

But, if you’re a Windows user and want the comfort of some familiarity, this won’t harm anything and could provide the very slightest of benefit. You could even alias it to an easier-to-type command and run it as often as you want. It’s your computer, you do what you want with it!

Closure:

There it is, another article! We’re rapidly approaching the 6 month mark and so far things have gone well. This time, you get an article letting you know how to clear cache, buffer, and swap. Who knows what the next article will be?

Thanks for reading! If you want to help, or if the site has helped you, you can donate, register to help, write an article, or buy inexpensive hosting to start your own site. If you scroll down, you can sign up for the newsletter, vote for the article, and comment.

Linux Tips
Creative Commons License
This work is licensed under a Creative Commons Attribution 4.0 International License.