Let’s Make A Linux Installation Drive

Today’s article might seem like a duplicate article, but it’s just another way that you can make a Linux installation drive. Today, we’ll be showing you yet another way to accomplish your goals. Why? Because we can! Because Linux has umpteen different ways to reach your goals – and that is awesome.

We’ll also be using a different tool for this exercise. It’s a pretty handy tool, suitable for more than just making an installation drive. Specifically, a USB thumbdrive! But, that’s just one thing you can do with this tool. It’s my way of introducing you to the tool in a useful manner. 

So, what tool will be using?

Introduction To ddrescue:​

The tool we’ll be using is called ddrescue and it’s a pretty handy tool. You probably won’t find ddrescue pre-installed, so you’ll almost certainly need to install it yourself. 

Also, if you want some confusion, if you’re using Debian, Ubuntu, Mint, etc., you’ll find it’s gddrescue at least during the installation process. Why? I don’t know. You’ll have to find out from the Turks.

Once you do have ddrescue installed, you’ll find the man page (man ddrescue) describes the application like this:

That’s right, it’s a data recovery tool! We won’t be doing any of that, however. You can probably install ddrescueview and do some of that good old data recovery with a handy GUI. I’m telling you, check the man page. This article is just going to scratch the surface.

Let’s Install ddrescue:

Yes, you can open up some GUI, type in an application name, and then install ddrescue. Or, you can open the terminal and install ddrescue without any GUI help at all. Let’s do that! Press CTRL + ALT + T to (hopefully) open up your terminal.

With your terminal now open, use the appropriate following command to start the installation process:

Debian/Ubuntu/etc:

Fedora/CentOS/etc:

Arch/Manjaro/etc:

If you don’t use any of those package managers, you may still have ddrescue in your default repositories. I just can’t confirm that you do.

Now, with ddrescue installed (even if you had to call it gddrescue during the installation phase), we can get into the meat of the article!

Make A Linux Installation Drive:

Remember that terminal that you opened to install ddrescue? Well, I hope you left it open because you’re going to need it. While the ddrescueview tool is a graphical tool, that won’t help with what we’re doing. We’ll be using the tool to make a Linux installation drive, which is almost an afterthought for this tool.

First, like a previous article about making a Linux install USB, we need to identify your target device. Plug in  your USB thumbdrive and use the following command to identify it:

You should be able to easily pick out your USB device by size. It will begin with an ‘sd’ (remember that it’s case-sensitive) and then may be broken down into partitions. Ignore the partitions and know that you’ll be removing any information on that USB drive.

You’re looking for something like sdb or sdc and you’ll add a ‘dev‘ in front of it. So, if your thumbdrive is sdb, your path is /dev/sdb. If your thumbdrive is located as sdc, the path you want is /dev/sdc. It’s pretty simple.

The syntax is as follows:

For example, this would be a command I could use:

This would let me write today’s current Lubuntu testing .iso to a USB drive so that I can test it on a laptop without having to waste the bandwidth to download the same file twice. 

Pretty handy, huh? 

Well, there’s a lot more you can do with ddrescue. I highly recommend reading the man page to learn more about this nifty application. It can do quite a bit more than this. Indeed, this is more an afterthought than anything else, or so it seems.

Closure:

Well, there you go. You have a new article. That happens regularly around here! Today we talked about yet another way to make a Linux installation drive. Frankly, you can just use balenaEtcher and call it a day. There’s no reason for most of us to do this in the terminal – but we can and it’s not even that difficult. You just need the right tools for the job and Linux has many tools on offer.

Thanks for reading! If you want to help, or if the site has helped you, you can donate, register to help, write an article, or buy inexpensive hosting to start your site. If you scroll down, you can sign up for the newsletter, vote for the article, and comment.

How To: Sort Text Alphabetically

Today’s article is mostly just a fun article, one suitable for a beginner, as we learn how to sort text alphabetically. We’ll be doing this in the terminal, of course. If you’re a new user and want to get acclimated to using the terminal, this might be a good article to read. It won’t be short, but it should be easy.

I dimly recall watching an old video about the Unix operating system. Of course, this was all terminal activity. I want to say that it was Dennis Ritchie or some other Unix founder, but they did things like cut and paste along with stuff like piping the output to a new document.

Even though I’d used Unix (and then Linux) before this, I still appreciated the demonstration video. It was indicative of how powerful the terminal can be. If I was less lazy, I’d go hit up YouTube to find the video again. I haven’t seen it in years.

Anyhow, we’ll be learning how to sort text alphabetically. It’ll be fun!

The Sort Command:

As I said, we’ll be doing this text sorting in the terminal. The tool we’ll be using is the sort tool. You won’t need to install anything to use the sort command. It’ll be there by default.

The sort command has a man page. You can access the man page with this command:

If you do that, you’ll see how powerful the sort command can be when used by someone who knows what they’re doing. We’ll just cover some basics. You can also see that the sort command is described as this:

sort – sort lines of text files

That description says that we’re using the right tool for the job. We want to sort lines of text files alphabetically. It’s not hard. You have to learn which tool is the best for the job you want to do. (Also, the tools I think are the best are the best for me, the tools you prefer are the tools that are best for you. This being Linux, there are always multiple ways to accomplish the same goal!)

While not necessarily a part of this article, you might also want to read this article to learn about using the output from these commands.

How To: Write Text To A File From The Terminal with “>” and “>>”

So then, let’s get into the meat of the article…

Sort Text Alphabetically:

For this exercise, we’re going to need an open terminal. This is quickly done. You can, more often than not, just press CTRL + ALT + T to open the terminal. 

With the terminal open, we need to do a little file preparation. This way, we’re all on the same page. I hope that it’ll be easier this way.

Create A Text File:

With your terminal open, I want you to enter the following commands…

You’ll first move to a directory and create a file:

Now, let’s populate that sort.txt file. We’ll edit the file with Nano.

Copy and paste the following text into that sort.txt file:

And, of course, we’ll now save the file. To save a file in Nano, you just need to press CTRL + X, then Y, and then ENTER. That should save the file as sort.txt. You can verify this with this command:

When the output from that command matches your expectations, you’re free to go to the next step. If it doesn’t, repeat the above commands carefully, following them one by one. If you still can’t manage to do this, you can download a copy of sort.txt here.

Using The Sort Command:

Now that you have a file called sort.txt in your ~/Documents directory, you can start to sort it. We’re just going to sort text alphabetically as a way to expose you to the sort command. 

If you want to sort the text alphabetically, you use this command:

It will send the results to standard output, that is it’ll post the sorted output to the terminal. (You can save this output as I’ll show in a minute.) The output of that command should look like this:

If you want to sort the content of the sort.txt file backward, you can do that. You just use the -r flag. That looks like this:

As an example, the output from that command should look like this:

I linked an article above and it’s worth reading if you’re new. But, if you want to output any of this output to a new file, you’d do so like this:

The command’s syntax would be:

That’s not very clear, so you can use this example to figure it out:

That will take the alphabetically sorted output and write it to a file named sorted.txt. It’s a good way to sort text and there’s quite a bit more to the sort command.

Please consider reading the ‘Closure’ bit, thanks!

Closure:

Well, this is a long article – but it should still be an easy article. I’m hopeful that this is written in a way that even a new user can follow. Please consider leaving a comment letting me know if this is easy to follow. Seriously…

See, as the author, I have no flippin’ idea if this stuff is really easy to follow. I legit have no idea if it’s as easy as I think it is to follow along in this article. One of the things I’ve done is play around with formatting and making the articles more verbose. I’ve tried to not increase the verbosity just for verbosity’s sake, but rather to explain more.

I mean, it’s easy enough for me to follow. After all, I wrote it.

Thanks for reading! If you want to help, or if the site has helped you, you can donate, register to help, write an article, or buy inexpensive hosting to start your site. If you scroll down, you can sign up for the newsletter, vote for the article, and comment.
Meta: The State Of Linux-Tips #20

Today’s article will just be a meta article, not a complicated article, and just the state of Linux-Tips. As you can tell by the numbering, I don’t remember to do this every month, but I try to. I figure it’s fun to share what’s going on behind the scenes.

The process of writing these articles can take as much time as it does to write a ‘regular’ article. They often take longer than that. That’s okay. I still try to write them.

Things are going well enough. The site continues to grow. The site attracts more and more attention. It is a slow growth, but it’s far more growth than I ever expected. Once upon a time, I was happy to see 20 visits (per day) in my logs. In the past month, we’ve had 4 days with over 1000 visits.

As you can imagine, this is expensive. It’s still well within the realm of affordable. The only two real expenses (I don’t count my time as an expense, though I probably should) are hosting and then paying for a CDN.

If you’ve donated in the past, thanks! You’re still invited to help pay for stuff – but, as I said, it’s still within the realm of affordable. There’s no chance I’ll close the site due to operating costs. Regardless of how large the site gets, I’ll keep the site up and running.

Hosting costs are up there. The server has been upgraded to 8x the RAM it had. I was running into resource limits and it was impacting the site’s public side. So, that had to be addressed.

How about some numbers?

Security:

I don’t talk about security much. I don’t want people to know a whole lot of what goes on behind the scenes, at least as far as security is concerned. What’s important is that I use a multi-layer approach. 

Spam is mostly eliminated. If it’s an automated bot, it’s going to have issues posting here. However, some people in low-wage countries have people who are willing to spam manually. It’s a nuisance as I have to go through and remove it manually. It never gets published.

How about some numbers… 

This is some automated spam protection:

automated spam protection
I do not need to manually remove that spam! So, that’s nice! (It should expand if you click on it.)

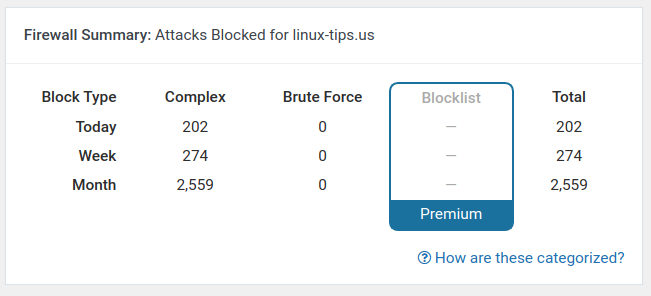
Oddly, these next numbers are low, they’re usually about 10x this amount. I suppose that means the site’s not under attack today. It could also be that other measures have stopped the attacks.

There are many varied attacks when you run a WordPress site.
Those numbers are usually much, much higher. The low numbers make me happy!

As you can see, the next numbers show that I’ve managed to block pretty much all brute force attacks. This is yet another layer of security.

WordPress gets lots of attacks.
Those numbers are pretty good too, which is nice. I do not pay for the premium subscription.

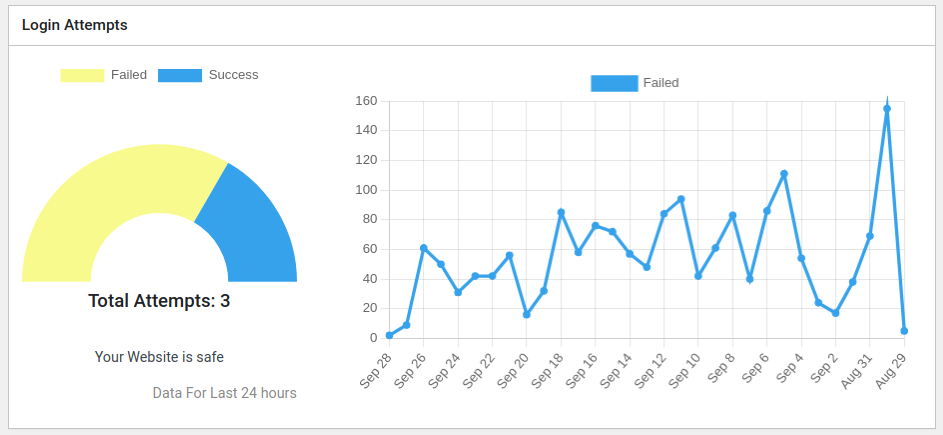
The next is one of the first layers of security – where I keep the login portion of the site secure. The image won’t make much sense, in part. I have no idea what the graphic is meant to represent – but the three successful attempts were all me. (I use 2FA, so ain’t nobody gonna access the ACP.)

You need to block brute force login attempts.
These are just people who tried to brute force or password guess to gain access.

I really could use a competent WordPress administrator to monitor all this for me. Then again, I don’t think I’d want to cede control.

Popular Stuff:

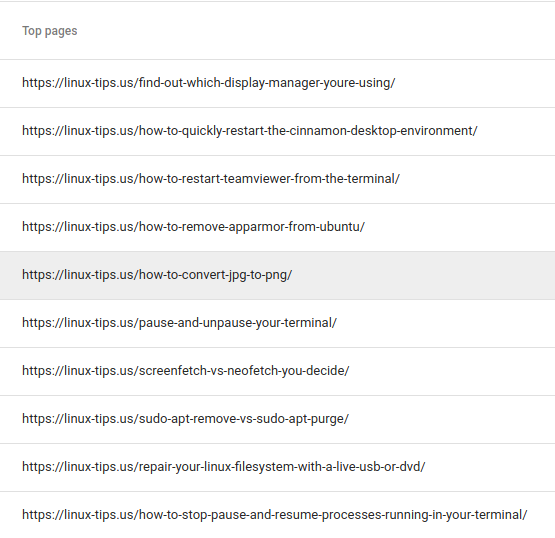
I’m just going to use Google for the next section. I won’t bother showing the numbers because they’re inaccurate. Google doesn’t seem to count those that block their scripts, meaning they’re useless for some analytic numbers. They’re still proportionately correct and easily visualized, so they’re not completely useless.

The vast majority of my traffic comes from Google. Like, 90% of my traffic comes from Google. People sometimes wonder why I deal with Google and the reason is that it’s worth it (to me) to do so.

These are the top 10 pages found by Google Search:

Top 10 pages found by Google Search.
Those are the top 10 pages that get the bulk of traffic from Google Search.

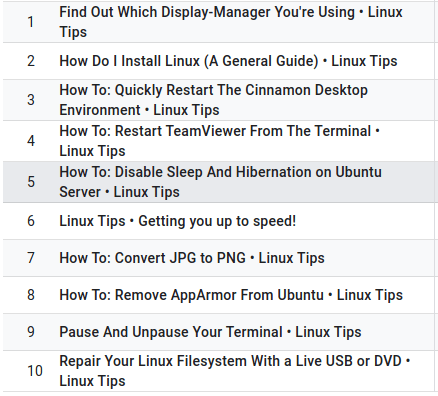
On the other hand, according to Google’s Analytics (again, these numbers are skewed but still sort of useful), different pages attract the bulk of my traffic. That’s a bit unusual but neat. 

Most active pages on the Linux-Tips site.
Those are (according to Google) the most active pages on the site.

So, there’s some new information for you.

Meta Article:

I suppose it wouldn’t be a meta article without some more numbers… Well, I have some more numbers! I love numbers and pay quite a bit of attention to numbers.

Also, I bought a new domain name and now I’m looking for motivation to write about being a WordPress admin. We’ll see how that goes, but I haven’t found much motivation yet.

This is the 450th article published on this site.
A new article is published every other day, so far without fail.
There are ​341,874 words.
It would take you 22 hours, and 47 minutes to read it all.
The longest article is How To: Ask A Good Support Question.
There have been 206 approved comments.
So far this month there have been 21,226​ visitors.
We’ve used 43 GB of traffic so far this month.

Closure:

Well, there are some numbers for you. I figured I’d spice it up a little bit and share some different information this time around. It’s just a meta article, after all. Taking, uploading, formatting, and filling in meta information for images can take a bit of time, so this article has taken me longer than normal. Imagine that!

Thanks for reading! If you want to help, or if the site has helped you, you can donate, register to help, write an article, or buy inexpensive hosting to start your site. If you scroll down, you can sign up for the newsletter, vote for the article, and comment.
How To: Show Disk Information With hwinfo

Today we’re going to be having some fun with hwinfo, available everywhere and used (in this case) to show disk information with hwinfo. This isn’t going to be the most complicated of articles, so it’s safe to assume you can follow along – even if you’re a beginner. You just need to follow the directions.

The tool we’ll be using to show disk information will be hwinfo. This probably isn’t installed by default, but is a very useful tool. We’ll just explore one aspect of hwinfo but there’s a lot more to the application. There may be other articles on this hwinfo application.

Anyhow, if you’d already installed hwinfo and checked the man page, you’d learn that the application defines itself accurately, specifically as:

hwinfo – probe for hardware

That’s a pretty good description and might also be a bit of a clue about hwinfo’s features and goals. In this case, we’re simply examining one particular feature and that is how to show disk information with hwinfo.

I suppose that it’s a bit archaic calling it ‘disks’, but there are plenty of people with spinning platters. It could also be ‘drives’, to ensure we also cover solid-state drives. But, for this article, we’ll use the words interchangeably. After all, you know what I mean.

The hwinfo application is a great application, with a ton of options. It’d be far too much to cover in a single article. There’s enough fodder here for multiple applications, which is nice.

Install hwinfo:

As hwinfo is a terminal-based application, you’re going to need a terminal. You could trivially install this via a GUI application, but I needn’t explain that. I will show you how to install hwinfo with the terminal. It’s available for most distros by default. Just press CTRL + ALT + T to open your terminal, or open it manually from your application menu.

Once you have your terminal open, you’re ready to install hwinfo. You can pick from the following, as it’s a fairly universal application. Try one of the following to do so:

Debian/Ubuntu/etc:

SUSE/OpenSUSE/etc:

RHEL/Rocky/etc:

Arch/Manjaro/etc:

Gentoo/Calculate/etc:

See? You’ll find that hwinfo is an option in pretty much all the default reports. You can get a head start, and learn a lot, by checking the man page (with man hwinfo) if you’d like.

Show Disk Information With hwinfo:

Don’t close your terminal after installing hwinfo. You’re still going to need an open terminal to use hwinfo to show disk information. Fortunately, the commands are a bit unusual but not taxing. As we’re just covering how to show disk information, that will make it easier.

NOTE: To get complete information, you will need elevated permissions. In our case, we’ll be using sudo. If your distro doesn’t support sudo, you’ll need to gain elevated permissions in the manner your distro has designed.

So, with your still open terminal, you can try the first command, which is simply:

That will spit out a lot of information about the various disks you have in your system. It’s a lot of information, perhaps more than you need. If you want to show a nice summary, you’d want this command:

If you want to see a nice summary of block devices, you can just use the following command to show said block devices:

Most folks are either going to want the full information for troubleshooting or one of the latter two choices for basic information. But, you can use any of them that you want to show disk information. It’s a pretty easy process and hwinfo is a very useful application. Perhaps we’ll explore its uses soon.

Closure:

Well, today we have had a “Nor’easter” and the remains of Hurricane Lee. I was expecting it to be much more mild, but we have trees down and power outages all over the place. In fact, one outage has started a fire. 

However, that didn’t stop me! Nope! I have still not missed a single publication date. I’ve published an article every other day for a long time. So far, so good.

This time around, you got an article about how you can show disk information with hwinfo. That seemed like a fine article to write. It’s not all that long, nor is it all that complicated. If you follow the directions, you should be all set.

As such, I assume a beginner will be able to follow along and able to learn something in the process. I sometimes get feedback about using the terminal in so many articles, but it is a fairly universal tool. There’s no reason to be afraid of the terminal. Instead, embrace it and learn to use it. Once you do, you’ll understand why I write about it so frequently.

Thanks for reading! If you want to help, or if the site has helped you, you can donate, register to help, write an article, or buy inexpensive hosting to start your site. If you scroll down, you can sign up for the newsletter, vote for the article, and comment.
Remove Unused Kernels From RHEL

Today’s article is only going to apply to some of you, specifically those who use RHEL and want to remove unused kernels from RHEL. That’s a pretty narrow subset of people, but it’s worth knowing this information if you’re a RHEL user.

Red Hat is one of the oldest Linux distributions out there. Along the way, they’ve turned into an ‘enterprise’ (business class) distro. They’ve made some strange strategic decisions lately, but I’m not going to get into that in this article.

As an enterprise distro, it is not entirely free (as in cost in dollars). They are a distro that has a great deal of support for long periods. They’re meant to be stable and ideal for business use. You’re expected to pay for RHEL – sort of.

RHEL has a free version if you sign up as a developer. You can learn about the RHEL developer program at this link. I thought it was free for a few devices, but it looks like I might be wrong and that it may be more than that. From the linked page:

An entitlement to register 16 physical or virtual nodes running Red Hat Enterprise Linux.

So, that’s more than three – but you’re not going to get support. If you want to go this route, you’re expected to support yourself. Fortunately, RHEL has extensive documentation and your dev subscription will get you access to any of that documentation that’s behind a paywall. Or, at least that’s my experience.

I don’t do enough with RHEL!

Linux Kernels:

I’ve explained what the kernel is before. Linux is just the kernel. We add stuff to the kernel to make an operating system. We then add more stuff to make it a specialized operating system – such as a desktop operating system, like the readers of this site use.

Along the way, as you update and upgrade, you’ll add new kernels. These are not necessarily removed by default. They can take up quite a bit of space and you might be paying for that space (especially if you’re using RHEL as a server somewhere). So, removing the oldest kernels is just good housekeeping.

That’s all we’re doing in this article. I suppose it’d probably also work for CentOS but I don’t pay any attention to that distro these days. It’s not that I’m angry or annoyed with RHEL’s decisions, it’s that I only care for things with long-term support. I’m old and changes scare me!

We’re just going to clean up any old kernels, probably while keeping the 2 most recent kernels, to keep things nice and orderly. This isn’t something you technically have to do. You can keep all the kernels you want. But, if you want to remove unused kernels from RHEL this might be the article for you!

Remove Unused Kernels From RHEL:

Now, if you’re using RHEL as a server then you’re already connected via SSH (probably) and already have a terminal open. If you’re using RHEL as a desktop OS, you will need to open a terminal. You can just press CTRL + ALT + T and your terminal will pop open.

With your terminal open, you first need to install yum-utils. That’s nice and easy, just use this command:

(You’ll need elevated permissions unless you’re logged in as root.)

Next, run the following command to see how many kernels you have installed:

If you have more than two kernels installed, you can run this command:

You can adjust that command if you’d like. That particular command will keep the kernel you are currently using and the previous kernel. (You can boot to older kernels via GRUB if you want. That article is actually about recovery mode on Ubuntu, but the pictures should clue you in until I write an article just for this purpose.)

If you use a --count= of 1 or 0, it will remove every kernel except the one in use, it will not remove the kernel that’s in use.

That’s all you have to do. There’s nothing more to it. The command will automatically remove older kernels at the level you decided. You can keep the most recent three kernels, four kernels, or however many kernels you want. It’s not terribly complex.

Closure:

I don’t do a whole lot of RHEL articles, but it’s nice to at least write one here and there. If you’ve got extra kernels, you now know how to remove unused kernels from RHEL. It’s a pretty easy task and something even a new user can handle. If you’re a new user, go for it! It won’t break anything – in and of itself. (I’d highly recommend keeping the current kernel and the most recent kernel, just in case.)

Thanks for reading! If you want to help, or if the site has helped you, you can donate, register to help, write an article, or buy inexpensive hosting to start your site. If you scroll down, you can sign up for the newsletter, vote for the article, and comment.
Linux Tips
Creative Commons License
This work is licensed under a Creative Commons Attribution 4.0 International License.