Want To See The WiFi Password In The Terminal?

It’s remarkably easy (assuming one can gain access to a privileged account) to get the WiFi password from the terminal. It does generally require sudo or root. It’s literally three commands. It’s the kind of attack you’d possibly worry about in an office where you don’t regularly log out of your device when you leave it. It might be an akin to attack from the ‘evil maid‘, as well, but not just quite. 

It really requires only two pieces of knowledge. The first is how to gain elevated permissions on the device and the other is the name of the network device – usually easy enough to surmise. It’s pretty easy information to get under those circumstances – circumstances we may all have been guilty of. Perhaps we typed a sudo command and then walked off to get coffsssee while it updated itself? Who knows – but it’s really just that easy.

Is it a security issue? Not if your security is any good, it isn’t. But, if anyone has physical access to the device, they pretty much own the device. If your security is any good, nobody should get this far and internal practices would prevent fellow employees from doing much harm. I could speak for hours about security, I just can not seem to do it coherently. 

Anyhow, here’s how you view the wifi password in the terminal.

WiFi Password From The Terminal:

Obviously, you need an open terminal. Just press CTRL + ALT + T and your default terminal should open.

First, you must change to the directory where this sort of information is stored. 

Find the network name (SSID)… You can usually guess that, or narrow it down rapidly on sight, but you can also just find the SSID by typing iwgetid Either way, just enter this:

The password will be happily shown to you in plain text. I’m not even kidding. This is what the whole process looks like and shows you how easy it is:

I am elite hackor!
Tada! There it is in plain ol’ text, easily captured and saved away.

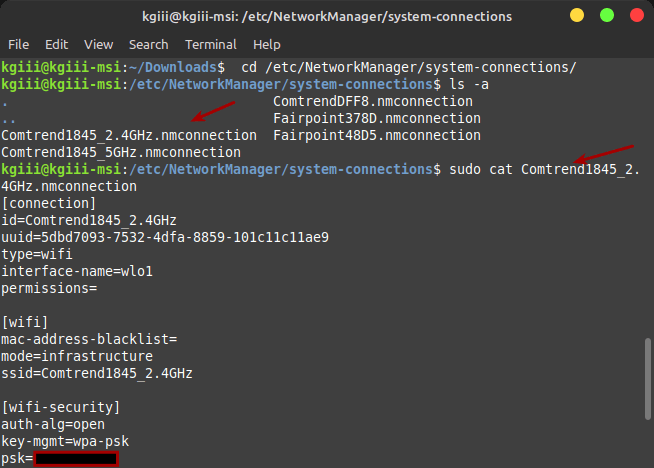
Obviously, I knew the sudo password – I’d have easily figured out the rest. Even if I didn’t, there really weren’t all that many choices and a little tab completion goes a long ways. It’s a good example of why you should lock your screen and logout of your computer if you’re going to be away from it. (Of course, there’s always a risk vs reward thing and it probably doesn’t really matter to most of us.)

Closure:

There you have it! You can now find the WiFi password from the terminal. This shouldn’t ever be a risk, because you already practice good security. But, it’s a fun little trick to know. It doesn’t take a whole lot of effort and it makes for another article. Another one is written and done!

Thanks for reading! If you want to help, or if the site has helped you, you can donate, register to help, write an article, or buy inexpensive hosting to start your own site. If you scroll down, you can sign up for the newsletter, vote for the article, and comment.

Show Date And Time In The Terminal

Today’s article is a nice and easy one, where I show you how to show the date and time in the terminal. It seems like a nice and easy article to write when I’m not feeling well. I’ll try to not let my ailments hamper the article in any way. 

Normally, I’d have a few articles written ahead of time. This time, I only have one article written ahead of time and it’s my ’emergency’ article. I’m not doing that poorly, so I’ll write this one. I’m pretty dedicated to doing an article every other day.

Anyhow, as I said, this article will show you how to get the date and time from the terminal. You can actually get the time just from running uptime, but there’s more to it. Linux actually has a ‘date’ command, which is what we’ll be using for this exercise. The date command’s man page describes it like:

date – print or set the system date and time

We will only be using the date command to print the time in the terminal. There are easier ways to set and maintain the time. With NTP being common, you really shouldn’t have to worry much about keeping the time accurate enough on your system.

Why would you want to know the date and time? Not everyone uses a desktop environment with a GUI and a clock. You may need to know the system time when you’re working on it remotely. There are all sorts of reasons. In fact, I once wrote an entire article about finding your timezone in Linux.

Show Date And Time In The Terminal:

This article requires an open terminal, just like many other articles on this site. Just press CTRL + ALT + T and your default terminal should open.

Now, this is nice and obvious… With your terminal open, just type in:

You’ll get an output similar to this one:

Tada! You’re done!

Just kidding! There’s more to it. If you want to show just the time, you can just use this command:

If you want to show the date and have it formatted like we do in the US, you can use this command:

Want to know the date 3 weeks ago? (You can also use days for this command)? Well then, you can try this command:

How about if you want to know how many days into the year you are? Well, you can do that with:

Those are about the most interesting ways to show the date and time in the terminal, at least the most interesting ways that I can think of at this moment in time. If you use the date command for anything else, let us know by leaving a comment!

Closure:

There you have it, yet another article! This one shows you how to show the date and time in the terminal, just in case you want to do that. It’s a nice and easy exercise and, as far as tools go, is one that’s at least easy to remember. It’s probably not the most important tool you can have in your toolbox, but at least it’s in there. (Please be gentle pointing out any errors, part of this article was written with the help of a heating pad.)

Thanks for reading! If you want to help, or if the site has helped you, you can donate, register to help, write an article, or buy inexpensive hosting to start your own site. If you scroll down, you can sign up for the newsletter, vote for the article, and comment.

How To: Shutdown Linux From The Terminal

Today’s article is going to tell you how to shutdown from the terminal. I’ve previously explained how to reboot a ‘frozen’ Linux system using the Magic SysReq keys. Today, we’ll shutdown from the terminal. It’s a quick and easy article – as the holidays are eating a bit of my “free” time.

Why would you want to do this? Well, if your Linux system isn’t quite frozen or your desktop GUI isn’t something you can reach, then you may want to press something like CTRL + ALT + F3. That should crack open a TTY where you can login and issue commands to your system. Maybe you’re working on a server and need to shut it down? Who knows, but the command is there and it’s a useful command to keep in mind.

For this article, we’ll mostly be using the shutdown command, and the man page defines it as:

shutdown – Halt, power-off or reboot the machine

And it does pretty much what you’d expect from such a command. However, it’s not just a basic command, there are flags and some options that go along with it. So, we might as well take the time to learn about it. After all, you never know when you want to shutdown Linux from the terminal.

Shutdown Linux From The Terminal:

Like oh so many articles, this one will require an open terminal. If you’re connected to a remote server via SSH, you already have a terminal to work with. If not, just press CTRL + ALT + T and your default terminal should open.

Once you’re ready to shutdown your Linux system, you can enter the following to shutdown immediately:

Obviously, that command will shutdown the system immediately, so don’t practice it unless you plan on shutting down – ’cause you will. You can even shutdown at a specific time by using this format (and 24h time):

You can also use the +MM function. To shutdown in 10 minutes, you’d use a command like this:

If you change that +10 to +0, it will also shutdown immediately. If you have users of the system who should be notified of an impending shutdown, then you can actually send them a message. That would look like:

So, what happens if you schedule a shutdown and need to stop it for some reason? Fortunately, the shutdown command will let you cancel an impending shutdown – so long as you get there in time. That’s done with the -c flag, of course.

If your cancellation will impact the users, you can even include a message in that. It’s done like this:

And that’s about it, really. There’s a bit more to the shutdown command, but it’s mostly going to be used in one of the ways mentioned in this article. If you want more information about the shutdown command, simply run man shutdown and read the help file.

Closure:

And there’s another article. This one will tell you how to shutdown Linux from the terminal, a handy skill to have as a user or as an admin. It may seem like a pretty basic command, but that doesn’t mean it can’t be included on the site. 

Thanks for reading! If you want to help, or if the site has helped you, you can donate, register to help, write an article, or buy inexpensive hosting to start your own site. If you scroll down, you can sign up for the newsletter, vote for the article, and comment.

History: How Linux Got The Name “Linux”

If you’ve ever wondered how Linux got the name Linux, then wonder no longer, as this article will tell you about Linux’s naming history. It’ll be a relatively quick and easy article, which is perfect for today.

Assuming I scheduled this properly, this article will be published on America’s holiday, “Thanksgiving.” I suppose that means two things – thanks and giving. So, I’m thankful for Linux and I’m giving you this article explaining how Linux got its name.

This article was almost all copied directly from Wikipedia. That’ll save some time and effort! And, really, they detail it better than I could.

How Linux Got The Name Linux:

Quoting straight from Wikipedia:

Linus Torvalds had wanted to call his invention “Freax”, a portmanteau of “free”, “freak”, and “x” (as an allusion to Unix). During the start of his work on the system, some of the project’s makefiles included the name “Freax” for about half a year. Torvalds had already considered the name “Linux”, but initially dismissed it as too egotistical.

In order to facilitate development, the files were uploaded to the FTP server (ftp.funet.fi) of FUNET in September 1991. Ari Lemmke, Torvalds’ coworker at the Helsinki University of Technology (HUT), who was one of the volunteer administrators for the FTP server at the time, did not think that “Freax” was a good name, so he named the project “Linux” on the server without consulting Torvalds.[52] Later, however, Torvalds consented to “Linux”.

According to a newsgroup post by Torvalds,[9] the word “Linux” should be pronounced (/ˈlɪnʊks/ (About this soundlisten) LIN-uuks) with a short ‘i’ as in ‘print’ and ‘u’ as in ‘put’. To further demonstrate how the word “Linux” should be pronounced, he included an audio guide (About this soundlisten (help·info)) with the kernel source code.[53] Contradictory, in this recording, he pronounces ‘Linux’ (/ˈlinʊks/ (About this soundlisten) LEEN-uuks with a short but close unrounded front vowel.

And there you have it. That’s how Linux got the name Linux – and how to pronounce it, in case you didn’t already know.

And, wow am I grateful for Linux. Linux has brought me so many things and has opened so many doors. So, I’m gonna take a minute to also thank those who have helped get me here. Thank you. You know who you are. Thanks!

Closure:

Yup… This isn’t much of an article, but it is an article! I deserve an easy day or two. It’s the holidays and I’ve been particularly well behaved this year. Also, I’ve been exceptionally busy this year. Don’t worry, there won’t be too many articles like this.

Thanks for reading! If you want to help, or if the site has helped you, you can donate, register to help, write an article, or buy inexpensive hosting to start your own site. If you scroll down, you can sign up for the newsletter, vote for the article, and comment.

Let’s Use ‘ls’ To Sort Files By Time

Today’s article is going to tell you how to sort files by time while using the ‘ls’ command in the terminal. I find sorting by time is often easiest when working with a lot of files that have less-than-helpful filenames. For example, it’s nice to sort by time when I’m dealing with screenshots, knowing that I took a new screenshot that’s helpfully named something like ‘kgiii@kgiii-msi: ~-Downloads_032.png’.

It’s usually easy enough to graphically sort files by time and date. In your file manager, you might need to select list view, add the column, and then select at least one of the time options. Different GUI file managers will have different options, and may not include all possible time values stored in the file’s meta information. Speaking of screenshots, it might look something like this:

sort by modification time
In this case, arranging items by ‘modification time’ is an available option.

The file’s metadata has several time options and we can sort by those with the ‘ls’ command while in the terminal. The output of ‘ls’ is usually sorted alphabetically. It’s not terribly difficult and will help you along your Linux trails. I find it useful when picking among a large number of files.

Parsing the output of the ‘ls’ command is generally considered a bad idea. We won’t really be doing that, but this is a good time to mention it. If you don’t know why, click this link. They explain it better than I can. That’ll save some time!

Today we will learn to use ‘ls’ to sort files by a few time value stored in the file’s meta information. It’s an easy enough process and a handy tool for your growing toolbox of Linux commands.

Sort Files By Time:

Obviously, you’ll need an open terminal. You can do so with your keyboard – just press CTRL + ALT + T and your default terminal should open.

Once you have it open, the /home/user directory is a fine choice. We won’t need to change directories – but you can. If you have a lot of screenshots saved in ~/Pictures, then you may find that directory more informative. Either way, let’s start with the basics:

This first one will show the last time the file was modified – which may be the creation date and time. That command is (the -l used in each command means use the long listing output):

You can sort by access time, sorting by the last time the file was opened. (Yes, this is all part of a file’s metadata.) To do that, you just use:

With that done, we have one more. This one shows the last time the metadata was changed for the files listed. If you were to use touch to change the last modified time, this would show when you did that. Make sense?

And there you have it! If you want to show the output in reverse order, you just use a -r flag and you can still use the -a flag to show hidden files, should you need to do something like that.

Closure:

That’s about it. You can now sort files by time. It’s a pretty handy tool and one you may find yourself using often. As mentioned above, I find it handiest (with my particular uses) when working with all the screenshots I take. I take a whole lot of screenshots. I assume I take more screenshots than most folks.

Thanks for reading! If you want to help, or if the site has helped you, you can donate, register to help, write an article, or buy inexpensive hosting to start your own site. If you scroll down, you can sign up for the newsletter, vote for the article, and comment.

Linux Tips
Creative Commons License
This work is licensed under a Creative Commons Attribution 4.0 International License.