Check Your Memory In The Terminal: Part II

Today’s article is all about how you can check your memory in the terminal. If it looks familiar, it’s because I’ve already written “How To: Find The RAM Total In The Terminal“, which covered a couple of ways to check your RAM – all of which were in the terminal. I left the article open for others to share how they check their memory, but nobody left any comments.

In the previous article, I invited people to comment and share other ways to check RAM, RAM total, RAM usage, etc… Seeing as nobody commented, I figured I might as well return to the previous article and throw in a couple more ways to do check your memory in the terminal.

The previous article includes some handy tools, such as the easiest way:

While also mentioning a much more extensive and informative tool:

Both of which are lovely ways to check your memory in the terminal.

This being Linux, there’s also other ways.

Me being me, I figure I might as well share them with you.

After all, it’s yet another article that I can write! So, as unoriginal as this article may sound, there’s also a couple of tools I really want to introduce you to. 

There’s always room for more tools, especially if they’ll help you…

Check Your Memory (in the terminal):

As the line above indicates, you’re going to need an open terminal to do the work in this article. You can open it from your start menu, or you can just press CTRL + ALT + T and your default terminal should open right up.

The first tool we’re going to use is ‘top‘. I think you’ll find top installed on pretty much everything, though some distros are including variants like htop. The venerable top application is a terminal-based task manager and has been with us since 1984.

Anyhow, the command is nice and simple. Just run ‘top’ in the terminal:

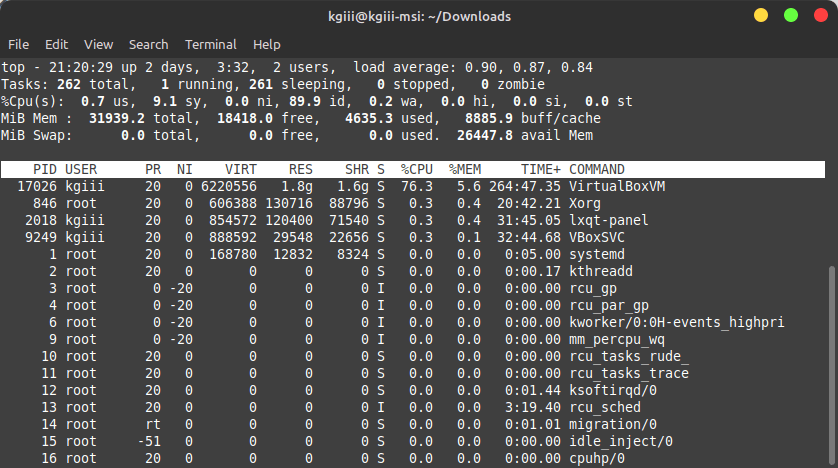
The output will look something like this:

using top tto find your memory information
Look up near the top, above the fold, you’ll see the memory information. Pretty easy, isn’t it?

The last two lines of data, above the list of tasks, tell you all you need to know (unless you need a ton of details, I suppose) about your RAM, your RAM usage, what’s buffered, etc… It also tells you about swap, another facet of memory. 

Next we have a lovely command called ‘vmstat‘ a tool for showing virtual memory statistics. This lovely tool has been around since 1985 and has a ton of options. It’s an excellent tool and you’re highly encouraged to use the man vmstat command.

We actually don’t need all those lovely options for this. We don’t have to dig down very far to get the information you need. In fact, once again, you’re going to run the command without a single flag, like so:

The outcome of which is also self-explanatory. It looks like:

vmstat showing information, including ram information.
Look under the line clearly marked memory. See? There it is! There’s the memory info!

Just look under where it’s clearly marked ‘memory’ and you’ll see that you can use this to check your memory. It’s a bit more cryptic as it doesn’t directly show the total – but it does show you the information that’s actually important.

The total doesn’t matter. What really matters is how much RAM you’re using and how much RAM you have free. But, vmstat being vmstat, it will of course give you that information if you want it. If you do want that additional information, just use the --stats flag – like this:

Where you can see an output similar to this;

use the --stats flag to get a ton of memory information about your memory.
It contains not just that, but all sorts of information about your memory!

Pretty sweet, huh?

Closure:

There you have it, a follow-up article that tells you how to check your memory. After all, nobody wanted to add them as comments! Either way, you got to play with a couple of new tools, or at least tools not really mentioned here on this site.

Speaking of the site, the end of my year long project is in less than 2 months. That’s right, I’ve kept this up for this entire time, with a few guest articles in between. I’ll do a meta article, but I have to say that this has been a pretty fun (and educational) project. Maybe we’ll keep it rolling? It seems likely that I will. I quite like writing these things.

Thanks for reading! If you want to help, or if the site has helped you, you can donate, register to help, write an article, or buy inexpensive hosting to start your own site. If you scroll down, you can sign up for the newsletter, vote for the article, and comment.

Disable The Caps Lock Key In Linux Mint

Sometimes, like software, an article is about scratching my own itch – and I really wanted to disable the caps lock key in Linux Mint. While I can type at a fairly decent clip, my keyboard is often at an angle and this results in me hitting the caps lock key unintentionally.

It also gets pressed fairly often when I’m inebriated! That can be pretty frustrating and, frankly, I have pretty much no use for the caps lock key to begin with. I suppose I could square up the keyboard and not type while inebriated, but ain’t nobody gonna believe it if I said I’d do those things.

Hmm… This is the point in my introduction where I’d explain the subject matter. This time, the subject is the caps lock key. I’m pretty sure I don’t have to explain that. If I have to explain the caps lock key, this is probably not the site for you. That’ll save a lot of time!

Normally, I’d go about this task by using xmodmap or maybe setxkbmap to accomplish this, but instead I figured I’d look for a nice and easy solution. I figured that I’d look for a handy GUI method. The method I learned may be old-hat to you folks, but I’ve always done this in the terminal and that means it’s new to me.

So then, as there’s nothing more to add to the intro, let’s learn how to disable the caps lock key (and more – and the easy way)!

Disable The Caps Lock Key:

For once, you don’t need to start with an open terminal! Instead, open your application menu and type “keyboard”. Click on the icon that is labeled exactly that.

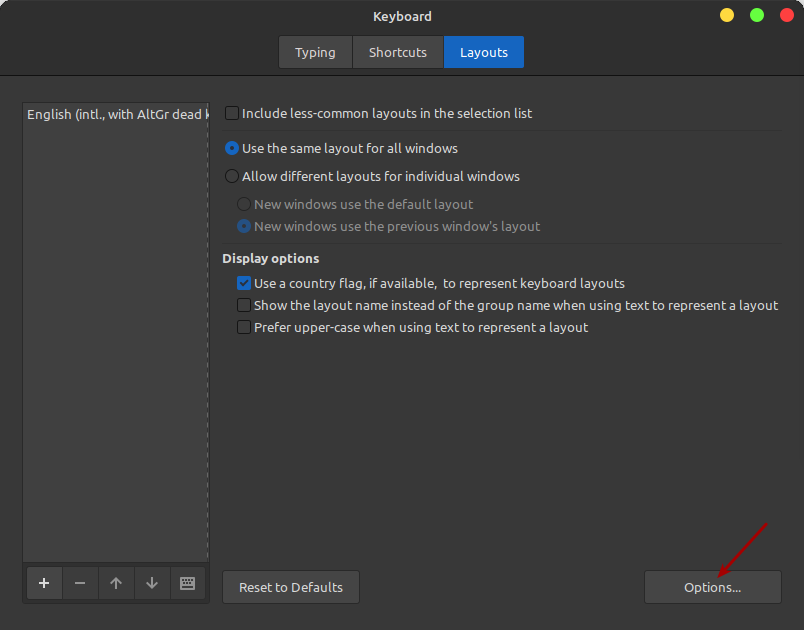
Next, click on the “Layouts” tab and click on “Options”. It should look a little something like this:

setting your keyboard up to disable the caps lock key
This one should be pretty self-explanatory. Just click where the arrow points!

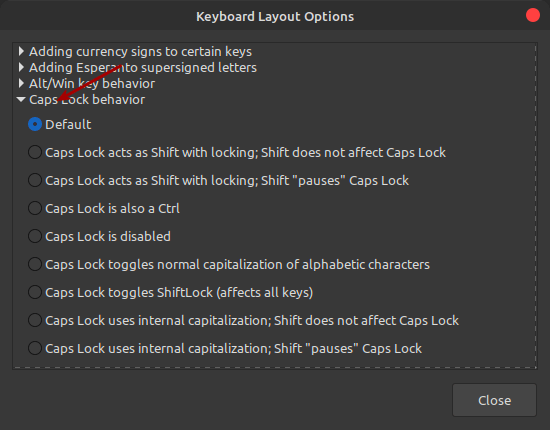
That will open a new screen, where you’ll click on “Caps Lock Behavior”. Once again, it’s going to look a bit like this:

the screen where you disable the caps lock key
You can disable the caps lock key – or you can pick other options.

As you can see, there are a variety of options – including setting the caps lock key to disabled. There are a number of other options that you can pick for the behavior of your caps lock key, but I simply disabled it and called it good. That is what I was after, after all. You do you and decide how you want your caps lock to behave, but this is how you disable caps lock if you really want to.

Closure:

There you have it, another way to disable caps lock key in Linux Mint. I suppose I could probably go ahead and write an article about how to do it in the terminal – which is actually on my list of potential articles to write about. Before delving into the terminal, I decided to see if it could be accomplished graphically and, sure enough, it can.

As you can see, there are all sorts of other options in there. You can change the behavior for quite a few of your keyboard’s keys. This is yet another way you can easily personalize Linux Mint to meet your needs. There’s nothing wrong with that, of course. Worst case scenario? Just hit the ‘Reset to Defaults’ in the Layout tab as indicated in the first graphic on this page.

Thanks for reading! If you want to help, or if the site has helped you, you can donate, register to help, write an article, or buy inexpensive hosting to start your own site. If you scroll down, you can sign up for the newsletter, vote for the article, and comment.

How Do I Install Linux (A General Guide)

Today, I will try to answer one of the most common questions asked by the newcomer to Linux; “How do I install Linux” To answer this I have prepared a step-by-step guide of how to install Linux with the minimum of technobabble. So, I hope you will find it simple enough to follow.

This is a guest article by one Brickwizard, who describes himself as thus:

I am Brian the Brickwizard. My interest in modern computers goes back to the days of the 8-bit IBM compatible. As a hobby, I have been repairing, upgrading, and building from-scratch computers for friends and family. I have done so since the late 80s/ early 90s. I have been a Linux user for over 20 years! Brickwizard is an upstanding member of Linux.org. This is my first contribution to Linux Tips.

This is a guide to most distros, a generic guide that’s useful for the most popular distros that have handy GUI installers. This isn’t a guide to things like Arch, Slackware, or Gentoo! It will work for Ubuntu, Debian, Mint, MX-Linux, and many more!

This also serves as a place people can link to, rather than clutter the forum up with long posts that really don’t get much formatting options. This is meant to be a time-saver, among other things. As a living document, it is also subject to change.

How Do I Install Linux:

Depending on the age of your machine you will need an installation medium, this is usually a clean pen-drive of 4 GB minimum (try not to exceed 16 GB), make sure it is of good quality and formatted to FAT32 or exFAT.

On older machines that are not USB boot-able, you will need a clean new DVD-R. You will also need courage, patience, and time. This is just the start of your journey, the step where you learn how to install Linux.

Make your ISO installation medium [pen-drive or DVD-r]

  • Choose your distribution and go to the official download page.


  • On the download page you will find an SHA sum, make a note of it.


  • Download your chosen distribution.


  • Burn a bootable installation medium.

For a USB pen-drive to do this, we recommend Balena Etcher.
Or for optical disc, select “burn as ISO image” in your burning software.

  • Whichever you use, now is the time to check the SHA sum (if you are unsure how, then see this article). 

To Install:

For best results, ensure your computer is either hard-wired to your router, or has a Wi-Fi card installed.

  • Connect the computer to mains power.


  • Insert USB into drive (or optical disc into drive).


  • Switch the device on and open the temporary boot menu (method will depend on the make and model of your computer).

Look down the list and find USB (or Optical Drive) click on it and enter, after a few seconds (depending on your choice of distribution) it will load a “live” session to RAM.

NOTE: You actually do not need a hard-drive installed at this stage if you only wish to check to see if Linux will work on your machine

NOTE: If you are making a dual boot system with Windows 8, 10 or 11, disable the windows quick-start (in the BIOS) and re-boot before continuing.

For best results, ensure your computer is either hard-wired to your router, or has a Wi-Fi card installed.​

  • Connect the computer to mains power.

  • Insert USB into drive (or optical disc into drive).
  • When the live instance of your chosen distro has loaded, your desktop will appear. Now is the time to ensure everything works okay, such as Wi-Fi, sound, and graphics. The easiest way to do this is click on the wireless icon find your router and enter the password. When you’re connected, go to your favorite music video site and pick something you are familiar with. If the video plays okay, the picture looks good, and the sound works, you can then decide if you wish to continue the installation.


  • To start full installation, double-click the installation button on the desktop (this may vary based on the distribution). The installer will then check the components of your machine. This may take several seconds or a couple of minutes, depending on how fast your computer is. If all goes well, the installation will begin shortly, asking you to input certain information – such as your username and password. Watch it install. When it asks about partitioning, this is your final chance to decide if you want to dual boot with your existing system (select installation alongside) or wipe the system and just install Linux.


  • During install, most distributions will ask if you wish to install non-free/proprietary drivers, tick the box for yes and enter. Non-free does not mean it will cost money to use. It just means that it’s supplied by the manufacturer and not FOSS (Free Open-Source Software). You can choose to not install proprietary drivers, but that will make your life more difficult and is beyond the scope of this article.


  • You may need to continually enter information as it installs, so keep an eye on it. A typical Linux installation can take from 10 to 20 minutes.


  • When it has installed you will get a message do you wish to re-start now, accept and enter. When prompted, be sure to remove the installation media.

Sit back whilst it reboots, then it will take a couple more minutes to clean up the installation and get rid of the installation files. Then if all goes well we will have a working Linux box

When your system has rebooted to your new Linux system, open the update manager and run a full update.

NOTE: When you have successfully installed your Linux distribution, we strongly recommend you install and activate some backup software, such as Timeshift

Being new to Linux, there will be learning curve. As I often say, “Relax, kick off your shoes, grab a beer, and enjoy the ride.”

Closure:

There you have it, it’s another article – and this time it’s a great article from Brickwizard. This one will tell you how to install Linux. It’s a basic guide, which is fine, because it can always be more complex and this is just to get you started. If you have any questions, you can ask below or head over to the Linux.org forum and ask questions there. Even better, it stands as a static page that can be linked to, saving time, effort, and space.

Thanks for reading! If you want to help, or if the site has helped you, you can donate, register to help, write an article, or buy inexpensive hosting to start your own site. If you scroll down, you can sign up for the newsletter, vote for the article, and comment.

Guest Article: Kickstart Vol. III

Today is the third guest article in a row, and is one more article about Kickstart. There will be more Kickstart articles, but we’ll release those in time. This is the third one in a row, so we’ll try to mix it up a bit.

By now, we should all have at least a little familiarity with Kickstart. Frankly, I’ve still not had a chance to use it – but it does seem like it’d be fun to play around with it. If I were an admin of anything major, I’d definitely look to Kickstart as a solution. Again, if you read this on day one, be sure to check back later as the author may suggest some edits.

See the previous articles here:

Guest Article: Kickstart Vol. I
Guest Article: Kickstart Vol. II

Kickstart Vol. III

Now we need to create a menu for your Kickstart, so you can select which OS you want to install.

Now edit a new file named grub.cfg. It must be named grub.cfg. Here is an example of what it should look like.

The set-default lets you pick which is the default install, it starts at zero, so the options here would be 0, 1 and 2.

Note the IP address of my Kickstart server is here, the path to my extracted iso directory is here, and the location of my boot kernels is here.You can change all of these to fit your needs.

Now we need the actual anaconda-kickstart.cfg files, this is what actually does all the work.The location of these, is set in the grub.cfg file above. You will want these to be in the extracted iso directory, but not in the “dvd” sub-directory.

Here is an example of what one of these would look like. This one is fairly basic.

Again you see the IP address of my kickstart server here, you see the location of my extracted iso files here.Now there are a few things you will need to know in advance.

What I typically do, is install the OS from a USB the first time.In the case of fedora/redhat/CentOS there will be a file at /root/anaconda.cfg. You can copy this file as a starting template for your kickstart of this OS.

(Yes I am re-naming the file here.)

Also you will need the password has strings for your users.

(Or whatever user name you use.)

You will need to know the name of the LAN interface, and you will need to know the size of your hard, and how big the partitions should be.All of these things will be in your anaconda.cfg file

Now change and edit a few things in your fed35srv/fed35.cfg file now.

Change the graphical install to..testskipx This uses a cli interface, not a GUI when installing.

Change the url line to the location of your extracted iso directory in your web server. Note you don’t put the full path, only the path from your webroot.

I like to turn off seLinux, but you can delete that line if you like.

Change your timezone to whatever is appropriate for you.

Using the two example user lines above (those aren’t real hashes, I just typed a bunch of random characters to simulate what it looks like). Edit the user lines to be whatever your values are.

That’s it, you’re don! Now boot your test computer on the kickstart network. A Kickstart menu should appear. Select the appropriate OS.

I’ve found this usually works best with a few settings on the test computer. CSM should be disabled. Network stack should be enabled. Some UEFI settings let you pick PXEboot IPv4 as a boot option. This is preferred. I’ve found it works best with a freshly formatted hard-drive, that way it doesn’t try to boot into the installed OS.

Good luck!

Closure:

And there you have it! You have a guest article, from dos2unix, about Kickstart. There are now three of them and there are a couple of others sitting in the potential queue. We’ll get to them. These few days off have been a very welcomed respite!

Thanks for reading! If you want to help, or if the site has helped you, you can donate, register to help, write an article, or buy inexpensive hosting to start your own site. If you scroll down, you can sign up for the newsletter, vote for the article, and comment.

Guest Article: Kickstart Vol. II

Today’s guest article is a continuation of the Kickstart theme. The first Kickstart article can be found here. Thanks goes out to dos2unix from the Linux.org forums.

I should mention again that I don’t actually know anything about Kickstart, other than what I’ve read in these articles. I’m extremely grateful, but you may want to check back a few times to ensure all the editing is complete!

Kickstart Vol. II:

Now that we have your web server, dhcp, and tftp server configured, we will need to enable the firewall for them.

On Fedora it looks like this:

Now we need to extract the iso files you have handy (you did already download these, right?) I should have mentioned you will need the “server” version of these iso’s. There is a way to make the workstation iso’s work, but that’s for another more advanced article.

For the example here, I put everything in: 

When that gets done copying, we can add another OS’s iso if you like:

If you have more iso’s repeat the same for CentOS or Redhat or whatever you have.

Again, when it gets done copying, simply umount the iso image. I confess, I’m something of a minimalist. I like short names like pub/fed35srv. If you like long names you could have something like /public/fedora35-server/x86_64/ I’m too lazy to type all of that in all my config files.

Now we will install the boot kernels. This isn’t actually the full kernel yet, just a lite kernel with enough parts to boot the system from the network.

Just about all computers have one of two types of internal configuration systems. Legacy BIOS and UEFI. Most newer computers in the last 8 years or so,are UEFI, but there are still plenty of Legacy BIOS systems around. For the purpose of this article we will set-up for both types.

In your /var/lib/tftpboot directory, we will make two directories. One for BIOS and one for UEFI.

Technically you could rename the efi directory to something else, but the pxelinux for legacy BIOS systems is hardcoded in some files.

Now you will need to download a couple of files. I recommend using the Fedora 35 version, even if you are going to be installing Redhat or CentOS. They are newer, have more features, bug fixes, and support more hardware.

But you can use the CentOS or Rehat versions if you want to. Shim-x64, grub2-efi-x86, and grub2-efi-x64-modules. We will need to extract these rpms. You can do this in /tmp or somewhere safe.

If it says this is already installed, replace install with reinstall. These are the efi files you will need for efi based systems.

This will create 3 directies in /tmp.

You can delete these directories in /tmp if you like, you are done with them. Make sure you don’t put a leading / and actually delete /usr and /etc.

The next part depends on what iso’s you have downloaded and extracted. But hopefully you will get the idea.I am using Fedora 32, Fedora 35, and Redhat 9 as my examples. You can use whatever directory names you like.

That’s enough for this article, will add next part later.

Closure:

And there you have it, another article and this one is a guest article – just like yesterday and probably just like tomorrow. I’m extremely grateful for the respite and wish I knew more about Kickstart. I think, for future reference, I’m gonna ask that folks register and write the draft here. I think it’d streamline it.

Thanks for reading! If you want to help, or if the site has helped you, you can donate, register to help, write an article, or buy inexpensive hosting to start your own site. If you scroll down, you can sign up for the newsletter, vote for the article, and comment.

Subscribe To Our Newsletter
Get notified when new articles are published! It's free and I won't send you any spam.
Linux Tips
Creative Commons License
This work is licensed under a Creative Commons Attribution 4.0 International License.