Automate Updates In Linux Mint

Today’s article will be a fairly simple one and is limited to Linux Mint users as we learn how to automate updates in Linux Mint. That seems like a good idea to me. Ideally, this will continue working without any intervention, but we’ll see…

So, I’m not sure how long this has been an option. I only noticed it fairly recently. If you’re not already aware, you can automate updates in Linux Mint. It’s a pretty simple task and won’t require much more than a mouse – or maybe a terminal and then a mouse.

This can be a touchy subject. I’m firmly in the camp of immediately installing all updates. I want my system to be as secure as possible, which means applying the updates as soon as they are available. So far, this mostly appears to work.

Updates often come right before public disclosure and proof-of-concept samples. While it’s true that an update can bork your system, that’s easily fixed and such a rare thing that I don’t even consider it as a reasonable reason not to apply updates.

I also consider it my duty, my obligation, to keep my systems secure. An insecure system doesn’t just impact you. An unsecured computer can be used as a proxy, a command center, a spam relay, or a node in a DDoS attack, among other things. As a good netizen, I keep my systems updated.

So, why not automate that stuff when I can? 

Automate Updates In Linux Mint:

In your system tray, down on the right, look to see if you have an icon that looks like a shield. If you do not see the icon, press CTRL + ALT + T and type in mintupdate. Both of those things will open the Update Manager in Linux Mint.

At some point along this path, you’ll be asked to enter your password. Do so.

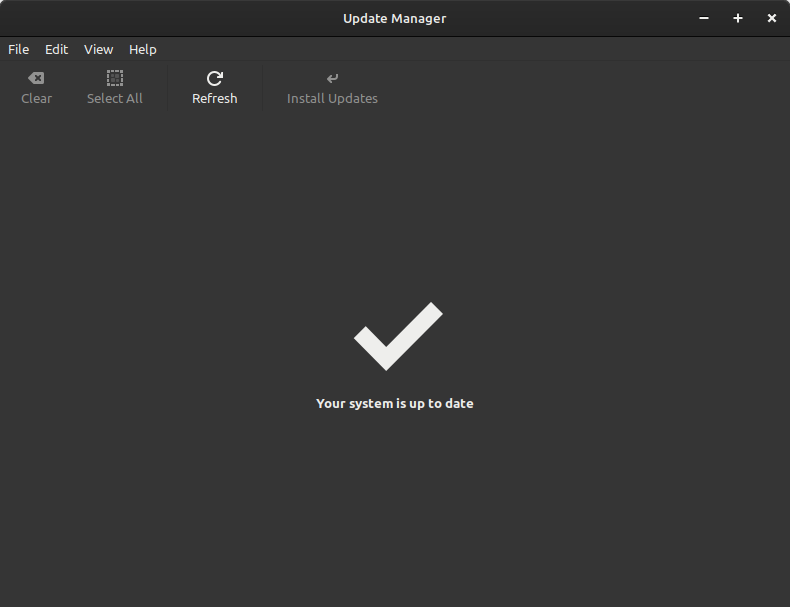
That will open this window:

to automate updates in Linux Mint, start with opening up the update manager
Your theme may mean this has different colors or whatnot, but it should look like this.

Next, you’ll click on ‘Edit’.

You need to click on the Edit button to move to the next step of automating updates in Linus Mint
This is a pretty easy step. Heck, they’re all easy steps! You’ve got this! I’m sure of it!

You next want to open Preferences and click on Automation.

You'll need to edit the preferences to automate Linux Mint Updates.
Just in case you’re confused, I added an arrow for you! (My CDN is going to hate me.)

When you’ve done all of this, you’ll face a new screen.

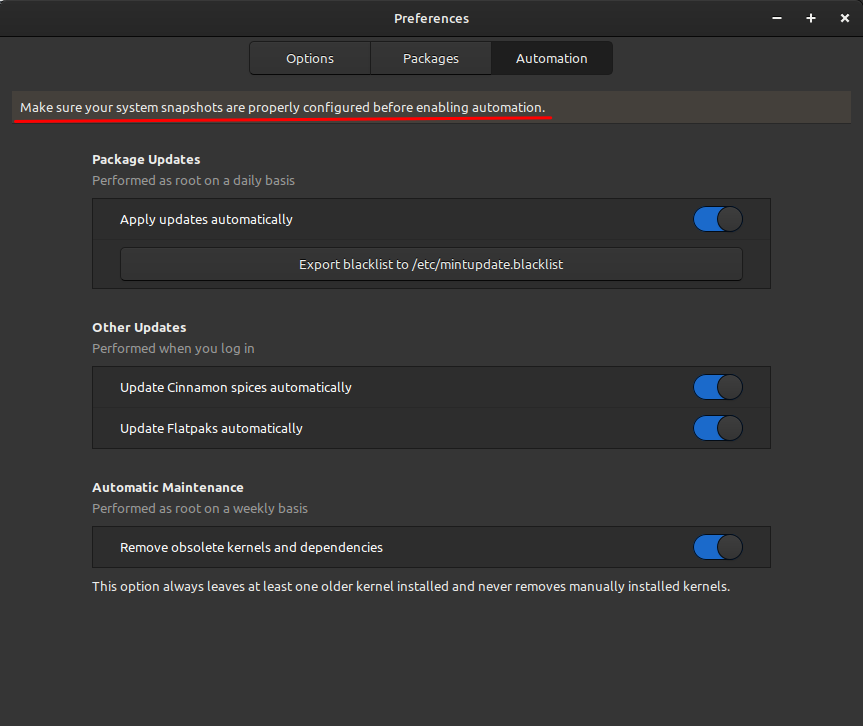
This new screen is where you edit your automation settings. This new screen is where you enable automatic updates in Linux Mint. It looks like this when I’ve configured it to my liking:

Enabling automatic updates in Linux Mint via the Update Manager preferences.
You can configure those however you like, but I enable all of them. You do you, I guess.

Make sure you have a viable backup process.

As you can see, I’ve chosen all the things. I’ve chosen to automate all the updating that I can do. If anything, I wish I could increase the frequency. I suppose I could set up a cron job for this, but a handy GUI is fine for this task. This way will also update Spices and Flatpaks. So, there’s that.

I’ve had this setting enabled for a little while now and I’ve verified that it has been working as expected. If you want to automate updates in Linux Mint, you can do that – and it’s not even difficult.

Update:

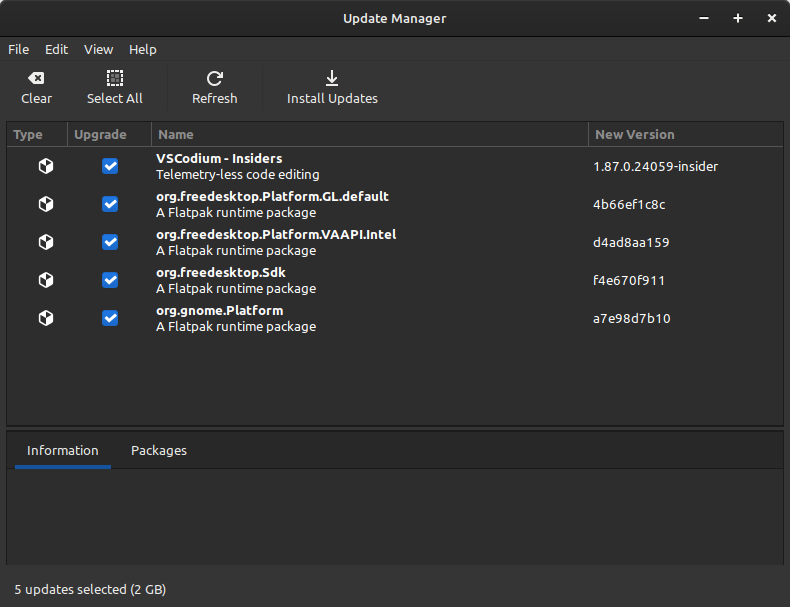
No, it doesn’t appear to update Flatpaks. I’ve given it a few tries and it does not.

flatpaks are not automatically updated
I’ve waited and waited a few times. You have to update Flatpaks manually. So, there’s that…

Closure:

I like automatic updates. I use that sort of feature online with my various websites. Scheduled updates performing themselves is a good thing to me. You may be more cautious, but I throw caution to the wind. I haven’t had an update nuke my system beyond a 2-minute repair job in forever. I haven’t even had a 2-minute repair job in years. That’s good enough for me. You can make your own choices. Regardless of your choices, be sure to backup your system regularly.

Thanks for reading! If you want to help, or if the site has helped you, you can donate, register to help, write an article, or buy inexpensive hosting to start your site. If you scroll down, you can sign up for the newsletter, vote for the article, and comment.
Block A Specific Port In Linux Mint

If you’re using Linux Mint, you’ll find you have ufw already installed which means it’s easy to block a specific port in Linux Mint! I’ll explain how to do that in this article and do what I can to make it easy enough for a new Linux user to follow. If this interests you, read on!

You might want to block a port for all sorts of reasons. If you’re open to the public web via your router, you might find bots hammering at the default ports (such as 22 for SSH) trying to find the login credentials, even if none exist. This is unnecessary traffic and can cause the system to slow down if it’s overwhelmed with connection requests.

Also, Linux uses a lot of ports. There are a bunch that are reserved, for example. You can also designate your ports for many things. I’ve written articles about ports before, so here’s some light reading material:

How To: Check If A Specific Port Is Open
How To: Scan A Remote Host For Open Ports
Find Out What Process Is Listening On A Specific Port
Prevent Brute-Force SSH Attacks With fail2ban

About Ports:

Now, I think I’ll let an AI tell you what a port is in Linux.

A Linux port is a virtual concept that helps access different services within a network. A port is a 16-bit integer ranging from 0 to 65535 with no physical existence.

A port acts as a communication endpoint for identifying a given process or application on the Linux operating system. A port is a 16-bit (o to 65535) number that differentiates a single application from others on various end systems.

As the blurb says, these are virtual ports. They’re not like the physical ports on your router, or anything like that. They’re used for communication and sending traffic to a specific port is asking for traffic on that port. 

If you have nmap installed, you could run nmap localhost to find out which ports are open on your computer. You probably should run that command (you’ll need to install nmap with sudo apt install nmap before you can run this command in Linux Mint). If the port isn’t open, then you don’t need to block that specific port.

UFW:

Linux Mint comes with ‘ufw’ already installed. It is not enabled by default, however. It’s good that it comes installed, which means it’s almost ready for use and you only need to enable ufw for it to be of use. If you don’t know what ufw is, you can check the man page with man ufw to learn more. For simplicity’s sake, you’ll find that ufw is described as:

ufw – program for managing a netfilter firewall

We will be using ufw to block a specific port in Linux Mint. You’ll learn that ufw stands for “Uncomplicated Firewall” and is a frontend for iptables. You can do anything with iptables that you can with ufw, but ufw is much easier for a new Linux Mint user. It doesn’t need to be complicated, as you’ll see in this article.

Use UFW To Block A Specific Port In Linux Mint:

While there is a GUI front-end for ufw, we won’t be using that. Instead, we’ll just use the installed terminal and ufw. As you’re using Linux Mint, you can open your default terminal by pressing CTRL + ALT + T.

With your terminal now open, we first need to enable ufw because ufw is not enabled by default. To enable ufw, run the following command:

That will enable ufw on system startup. That command should output something that looks like this:

You can later disable ufw if you find you no longer wish to use it. That command would look like this:

Now, to block a specific port in Linux Mint with ufw, the syntax would be easy enough to figure out. It just looks like this:

If you want to block the default SSH port (port 22) then you can do that like so:

If you change your mind at a later date, the command to undo this would be:

All you need to do is remember ‘deny’ and ‘allow’ and that ufw commands require elevated permissions which means you need to use sudo. If you can remember that, you can block and unblock specific ports in Linux Mint!

Closure:

Yes, this article is about blocking a specific port in Linux Mint with the ufw command, but it applies to many other distros. I just happened to be using Linux Mint when I wrote the article and didn’t want to test on other systems before smashing the schedule button. So, I wrote it specifically for Linux Mint. This will likely be an accurate tutorial for Ubuntu, the official Ubuntu flavors, other Ubuntu derivatives, and maybe Debian. I’m not sure about Debian.

And now you know…

Thanks for reading! If you want to help, or if the site has helped you, you can donate, register to help, write an article, or buy inexpensive hosting to start your site. If you scroll down, you can sign up for the newsletter, vote for the article, and comment.

Prevent Brute-Force SSH Attacks With fail2ban

Today’s article is one I could have already written and it’s about how to prevent brute-force SSH attacks with fail2ban. The reason I haven’t written it yet is because it either has too much substance or too little substance. I think I can strike a middle-of-the-road here and write an article with just enough substance.

See, and we’ll get to this later in the article, most folks won’t need to do a whole lot more than just install it. You can configure it a great deal, but the defaults are just fine for most people. On top of that, you can even make fail2ban send you email reports but we won’t be covering that in this article. Instead, we’ll largely have directions for installing fail2ban so that you can “prevent” brute-force attacks via SSH. I put the “prevent” in quotes because a diligent attacker could time things, use varied IP addresses, and try brute forcing your login credentials.

I think we need to start at the beginning.

What is SSH:

SSH stands for “Secure Shell” and is a tool to connect to a server remotely. If you check the man page for SSH it is defined as:

ssh — OpenSSH remote login client

This allows you to connect two computers over the terminal. It also comes with SFTP so that you can securely transfer files. You can do a whole lot more with SSH, including forwarding the graphical environment.

Here are a few SSH articles:

Install SSH to Remotely Control Your Linux Computers
Check Your SSH Server Configuration
Show Failed SSH Login Attempts

Then, there are a whole lot more SSH articles. I love SSH, so there have been quite a few articles on the subject. It’s a tool that I use quite often. I encourage familiarity with SSH as it’s sometimes a useful tool to effect a repair on a computer that is otherwise unresponsive to local inputs.

Servers are typically managed with SSH. As you can imagine, servers are a juicy target for malicious people. This means that SSH is a means with which malicious people will use to attack servers. One of the ways they do that is with ‘brute-force’.

What is Brute-Force:

There are many ways that one can try brute-forcing something. The name is as it implies. Rather than knowing the login credentials, they try to brute force them. That means they’ll try one combination of username and password and then keep trying various combinations until they eventually crack the system and figure out the login information.

That is the goal. Their goal is to find the login credentials. Instead of finesse, they use brute force.

This can include a dictionary attack. This can include a progressive attack where they start at the letter a, then try aa, then try aaa, etc. until they find the login credentials. They may also have a list of commonly used usernames and passwords and will systemically work their way through this until they find their way in.

This is one of many attacks and a modern computer can make many attempts in a short amount of time. Add to this modern bandwidth speeds and you can get thousands of attacks in just a short amount of time. It goes even faster if they know one part of the data, such as the username of a privileged account.

Enter fail2ban:

If you’re using a major distro, you have fail2ban available, one way or another. It’s usually easily installed and in your default repositories. When you do install it, you can check the man page. However, fail2ban is described as:

fail2ban – a set of server and client programs to limit brute force authentication attempts.

So, as you can see, fail2ban is the correct tool for the job. After all, and as the headline suggests, we’re trying to prevent brute-force SSH attacks with fail2ban.

Installing fail2ban:

We’ll be using a terminal to install fail2ban. You may also need to remotely connect to the server on which you want to install fail2ban. That too will require a terminal (or some SSH application like PuTTY). Simply press CTRL + ALT and your default terminal should open. If not, you can open a terminal from your application menu.

With your terminal now open, we can install fail2ban.

Debian/Ubuntu/etc:

RHEL/CentOS/etc:

Fedora with dnf:

I believe those are correct. That’s what is in my notes. If they’re not correct, please leave a comment and I’ll update the article. Other distros will have fail2ban available, just search your default repositories and you’ll likely find fail2ban available for installation.

Using fail2ban:

Now that you’ve installed fail2ban, you’re pretty much done. The default configuration is pretty much all you need – but you can customize it. There are a bunch of options available, so you can configure fail2ban in many ways. There are so many ways that we won’t be covering them. They’re reasonably obvious.

Once installed, fail2ban should start automatically. If it doesn’t, run this command to start it:

Next, we’ll make sure to enable fail2ban to start at boot time. That’s this command:

I assume that you’ll want to at least examine the configuration files and I’ll get you started with that. The first thing you want to do is cd to the right directory.

If you run ls you’ll see that there’s a file called jail.conf and you do not want to edit this file itself. Instead, fail2ban will look for configurations in a file called jail.local first. To make that file, you run the following command:

sudo cp jail.conf jail.local 

Next, you might want to make a backup of that jail.local file. 

You can now use Nano to edit your fail2ban configurations:

As you can now see, there are a bunch of options available. They’re far too many to explain here but they’re fairly well described. If any of the options confuse you, you can get help on the man page (man fail2ban ).

After you’ve set fail2ban’s configuration files the way you want them, you’ll need to restart the service for the changes to take effect. That’s done like this:

If you screw up the configuration, just remove the jail.local with this command:

Then restore from your backup like this:

Then, of course, restart the service with this command:

There are a lot of options with this application. You can explore them at your leisure, though I find the defaults to be adequate for most of my needs. As mentioned above, you can install sendmail and have the system send you notification emails. There are many other options as well.

Closure:

Like I said in the beginning, there’s a lot of substance with fail2ban. There’s a lot to it. If I added more to the article, it’d end up quite long. I may write a bit more about this application, but I don’t want to end up with a 2500-word article that will make your eyes gloss over. That doesn’t do me any good and it doesn’t do most people any good. Most folks are going to be fine with the basics before they explore the configuration options on their own.

If you do have a server (or even a personal computer) that’s running SSH, it’s worth your time to install fail2ban. If there’s any chance that someone can try to brute-force your system, they will.

Some bots crawl the ‘net looking for servers that respond on the default SSH ports. They can and will find you. You can also change the port SSH uses for some added obscurity (but remember that obscurity isn’t really security). So, it’s a good idea to prevent brute-force SSH attacks with fail2ban. Yes, it’s a good idea even for us ‘little guys’ who aren’t running servers with valuable information on them.  

Thanks for reading! If you want to help, or if the site has helped you, you can donate, register to help, write an article, or buy inexpensive hosting to start your site. If you scroll down, you can sign up for the newsletter, vote for the article, and comment.
Make Passwords In The Linux Terminal

Today’s article should be fairly simple and is about something we all use because it’s about how to make passwords in the Linux terminal. Assuming my writing chops are up for it, this article should be easy for everyone to follow. I’ll do my best. It might not even be a very long article.

I don’t think I need to explain passwords to any modern computer user. Even mobile users use passwords. The rare people who don’t use this technology will likely still use a PIN for things like their ATMs and credit cards. A PIN is just a numeric password.

I think it’s safe to say that we all know what a password is and why we use one. I’m not sure we all understand how to create good passwords, but we all use them. Perhaps this xkcd comic will amuse you:

xkcd's thoughts on passwords
Hopefully, this works as a hotlink, per xkcd’s request. I also can’t resize it. Ah well…

I have written about passwords in the past. One of the first articles on this site was about generating complex passwords. Here’s a link:

How To: Generate Sufficiently Complex Passwords In The Terminal

There isn’t much to add about passwords. It’s safe to assume we’re on the same page and that we’ve all used many passwords in our lives. I guess it’s then time to move along to the software we’ll be using to generate passwords in the Linux terminal.

Installing makepasswd:

In a previous article, we made complex passwords (with some degree of randomness) in the Linux terminal with a tool known as ‘pwgen’. You’ll find that pwgen is perfectly adequate and does a fine job at creating unique passwords in the terminal.

This time around, as we accomplish the very same task, we’ll be using a tool known as makepasswd. When you install makepasswd you’ll see that it has some small dependencies involving encryption and randomness. That makes some sense when you see how makepasswd is described on the man page.

makepasswd – generate and/or encrypt passwords

We’ll be doing that first bit – that is generating passwords.

You will need an open terminal to follow along in this next section. You can also use your graphical software installer, assuming you have one. To open your terminal, you can usually just press CTRL + ALT + T

With your terminal now open, choose the right command for your distro:

Debian/Ubuntu/etc:

OpenSUSE/SUSE/etc:

Arch/Manjaro/etc:

RHEL/CentOS/etc:

You’ll find that makepasswd is available for other distros, but I’m not sure of the installation commands and don’t want to steer you wrong. As it stands, I’m pulling these from my notes and haven’t tested them to ensure the commands are current. If they’re not current, please leave a comment so that I can update them accordingly.

Now that you have makepasswd installed…

Make Passwords In The Linux Terminal:

If you used a GUI tool to install makepasswd, or if you closed the terminal after installing makepasswd, you’ll need to open a terminal. Fortunately, I told you how to do that in the previous section. If you want to use makepasswd to make passwords in the Linux terminal, you will of course need an open Linux terminal.

With the terminal now open, you can check the man page for more information about the makepasswd application. That’s done like so:

The application is pretty simple, at least for our needs. If you just want to generate a password that’s 12 characters long, you’d run this command:

An example output might be something like this:

If you want to use certain characters, you can use the --string flag. So, if you wanted to generate a 12 character password with just numbers, you’d use a command that looks like this:

An example output might be something like this:

So, I suppose, you could even use this as a tool to generate a pseudorandom PIN for your debit card. 

If you want to generate a list of passwords so that you can pick the one you like from the list, you can do that as well. That command would look a little bit like the following command:

For some reason, it seems to only want to output a maximum number of characters in that command and the maximum number is 10. Do not ask me why, but the option is there and the output of that command might look a bit like this:

You can do quite a bit more with the makepasswd application. As mentioned above, check the man page. You can seed your passwords, you can encrypt them, get the hashed password value, and more. You could even take the above command and output it to a text file called passwords.txt. You’d do that like this:

As you can see in that command, I’ve included the --maxchars flag. You can set both the minimum number of characters and the maximum number of characters with the two flags used in the above two commands.

See? You’ll find makepasswd to be a handy way to make passwords in the Linux terminal. There are all sorts of ways to do this. This is just one more way.

Closure:

I wasn’t sure what I’d write when I sat down to write this article. I started it much earlier in the day than I usually would and flipped through all sorts of text files to find an interesting article to write. The first two articles that piqued my writer’s interest were topics I’d previously covered. I eventually settled on makepasswd. After all, you never know when you will want to make passwords in the Linux terminal. It could happen!

Thanks for reading! If you want to help, or if the site has helped you, you can donate, register to help, write an article, or buy inexpensive hosting to start your site. If you scroll down, you can sign up for the newsletter, vote for the article, and comment.

How To: Kill A User Session

Today’s article won’t be useful for many of my regular readers because it’s about how to kill a user session. This is a skill worth learning, but really only applies to computers that have multiple people logged in at one time. If that’s describing you and your needs, this may be an article worth reading.

Of course, if that’s not something you do, you can still learn from this. It’s not all that complicated and is easy enough to follow. So, feel free to learn something – even if it isn’t something you’re likely to ever need.

There are times when you may have someone logged in and you want to log them out. For example, let’s say you’re getting ready to fire someone. You’re going to want to delete their account, make sure they’re logged out of their account, and then take them to HR where you can file paperwork and escort them (and their property) off the site.

You might also want to do stuff like log people out so that you can perform updates on the server. There are all sorts of reasons why you might want to kill a user session. Your reasons are your own. I’ll simply be showing you the tools.

Kill A User Session:

You’ll need an open terminal and to be connected to the computer you want to control. If you’re doing this, I’ll assume you’re aware of how to do those things. If you’re doing this on your own computer, you can usually press CTRL + ALT + T and your default terminal should open.

Once you’re connected (or have your own terminal) you can find the logged-in users with the following command:

Actually, you can just use this command:

The results are the same. So, either works.

You can now see the output which will show you every logged-in user on that device. Next, you’ll kill a user session with the following command:

If you wanted to use the kill command, you could find the associated processes (the PID) but there’s no reason to do so when you can just kill a user session with the username.

Closure:

There you go. I figured I’d do a nice, short, and easy article. It’s not very complicated and it’s not something many of you will need. However, if you’re managing a system with multiple people logged in, this is a very useful tool to have. You never know when someone’s going to come into your office and ask you to kill a user session. Well, now you know how…

Thanks for reading! If you want to help, or if the site has helped you, you can donate, register to help, write an article, or buy inexpensive hosting to start your site. If you scroll down, you can sign up for the newsletter, vote for the article, and comment.
Linux Tips
Creative Commons License
This work is licensed under a Creative Commons Attribution 4.0 International License.