This is another short article, as I continue exploring the format, and is simply about how to clear Linux Mint notifications. You can do so graphically, or you can do so with a keyboard.
I should be specific. This is for Linux Mint Cinnamon Edition.
When you get an email, when you have a notice from your email client, or have scheduled some system prompt, you might get a notification. These notifications show up in your system tray.
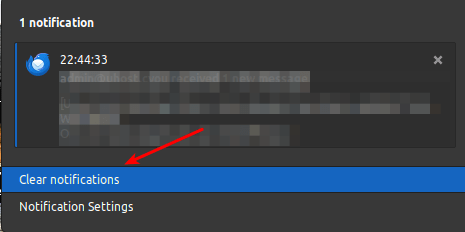
They look like this:
See? I even drew an arrow for you! In this case, there are three!
These notifications show up with regularity if you have a lot of email accounts that get constant notifications. They may show up for other reasons.
If you want to use a GUI, just click the notification icon and clear it. That’d look like this image below, and it’s nice and simple:
This is probably how most of you will clear notifications from Linux Mint.
On the other hand, if you’re pretty sure there are no notifications worth reading, you can always just clear them out with the keyboard.
Clear Linux Mint Notifications With The Keyboard:
If you want to clear Linux Mint notifications with the keyboard, it’s remarkably simple. It isn’t made clear, thus you get this short-form article.
To clear those notifications you simply press the following:
SHIFT + SUPER + C
Now, if you’re unsure, the ‘Super’ key is often labeled to be the ‘Windows Key’. It may say ‘WIN’ on it or it may have the Windows logo emblazoned on it. With your ‘standard’ US keyboard layout, it’s the key on the left between the CTRL and ALT keys.
This could, on Apple keyboards, also be labeled as the CMD key.
But, the ‘super key’ came first. It was an MIT (GO BEAVERS!) thing. If you don’t have anything better to do, read about the Super Key on Wikipedia. The WinKey and CMD key came later in life.
Anyhow, now you can clear Linux Mint Notifications with your keyboard!
Closure:
I’m not sure if I like this short format. I normally have quite a bit to say, even if it’s mundane. There’s a lot to be said about the tools we use. At the same time, there are plenty of meaningful tips that just don’t warrant writing a full article.
So far, exactly one person has opined on the matter and they claimed to like the short articles. A few days later, they also offered the opinion that they liked the longer articles. Given their comments, I’m going to have to assume they also like the regular articles and just like my articles. I’m okay with that, but it’s not exactly information I can act on other than to just keep doing what I’ve been doing.
Thanks for reading! If you want to help, or if the site has helped you, you can donate, register to help, write an article, or buy inexpensive hosting to start your site. If you scroll down, you can sign up for the newsletter, vote for the article, and comment.
Today’s article will be a fairly simple one and is limited to Linux Mint users as we learn how to automate updates in Linux Mint. That seems like a good idea to me. Ideally, this will continue working without any intervention, but we’ll see…
So, I’m not sure how long this has been an option. I only noticed it fairly recently. If you’re not already aware, you can automate updates in Linux Mint. It’s a pretty simple task and won’t require much more than a mouse – or maybe a terminal and then a mouse.
This can be a touchy subject. I’m firmly in the camp of immediately installing all updates. I want my system to be as secure as possible, which means applying the updates as soon as they are available. So far, this mostly appears to work.
Updates often come right before public disclosure and proof-of-concept samples. While it’s true that an update can bork your system, that’s easily fixed and such a rare thing that I don’t even consider it as a reasonable reason not to apply updates.
I also consider it my duty, my obligation, to keep my systems secure. An insecure system doesn’t just impact you. An unsecured computer can be used as a proxy, a command center, a spam relay, or a node in a DDoS attack, among other things. As a good netizen, I keep my systems updated.
So, why not automate that stuff when I can?
Automate Updates In Linux Mint:
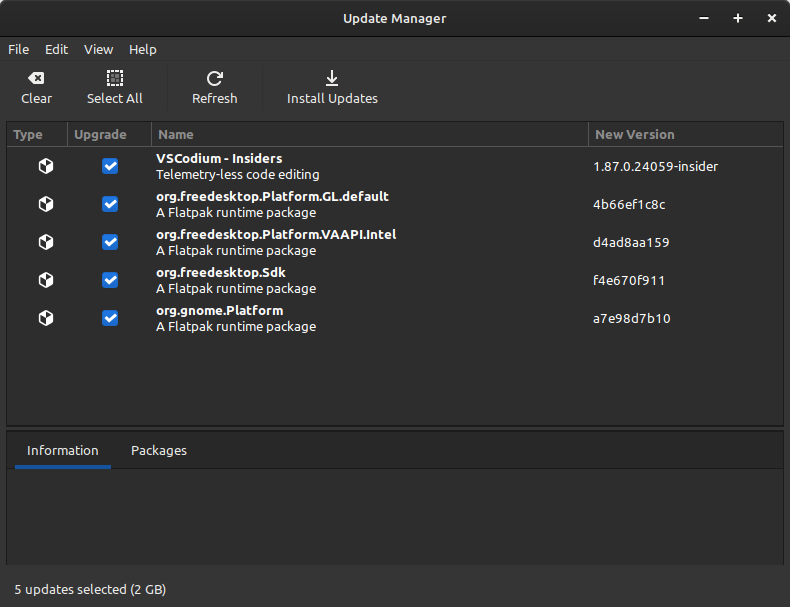
In your system tray, down on the right, look to see if you have an icon that looks like a shield. If you do not see the icon, press CTRL + ALT + T and type in
mintupdate. Both of those things will open the Update Manager in Linux Mint.
At some point along this path, you’ll be asked to enter your password. Do so.
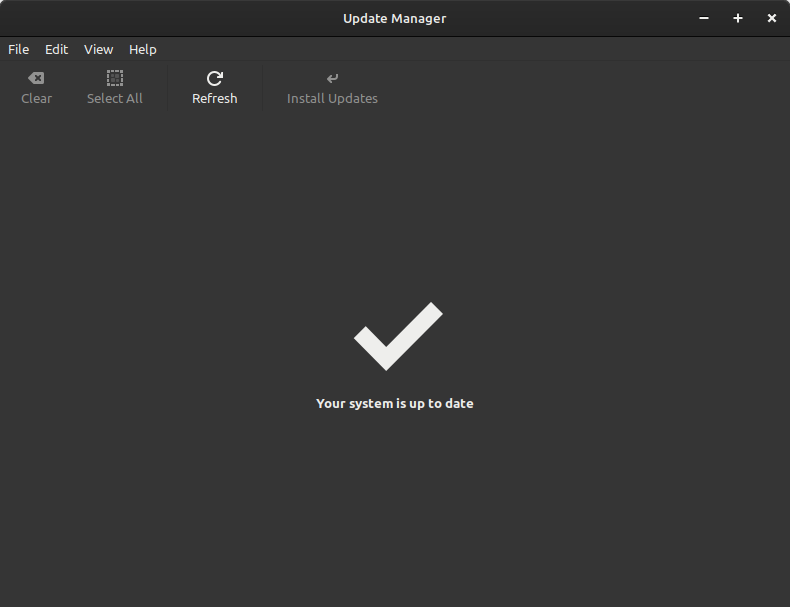
That will open this window:
Your theme may mean this has different colors or whatnot, but it should look like this.
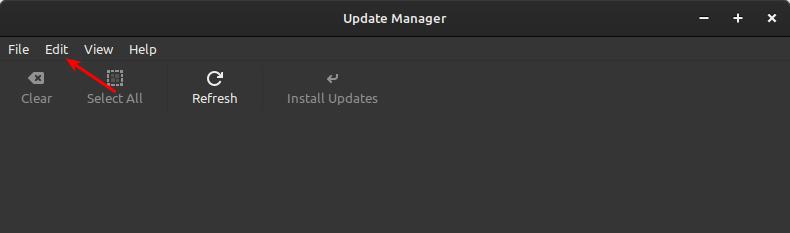
Next, you’ll click on ‘Edit’.
This is a pretty easy step. Heck, they’re all easy steps! You’ve got this! I’m sure of it!
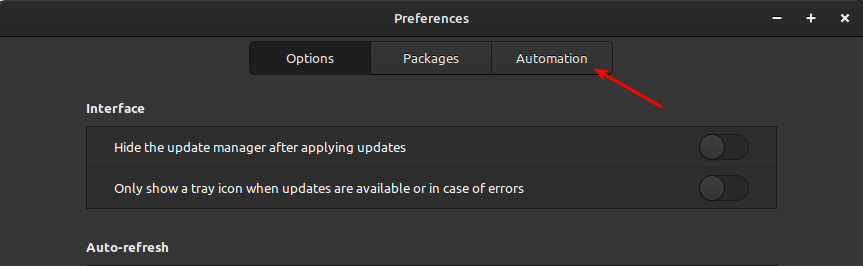
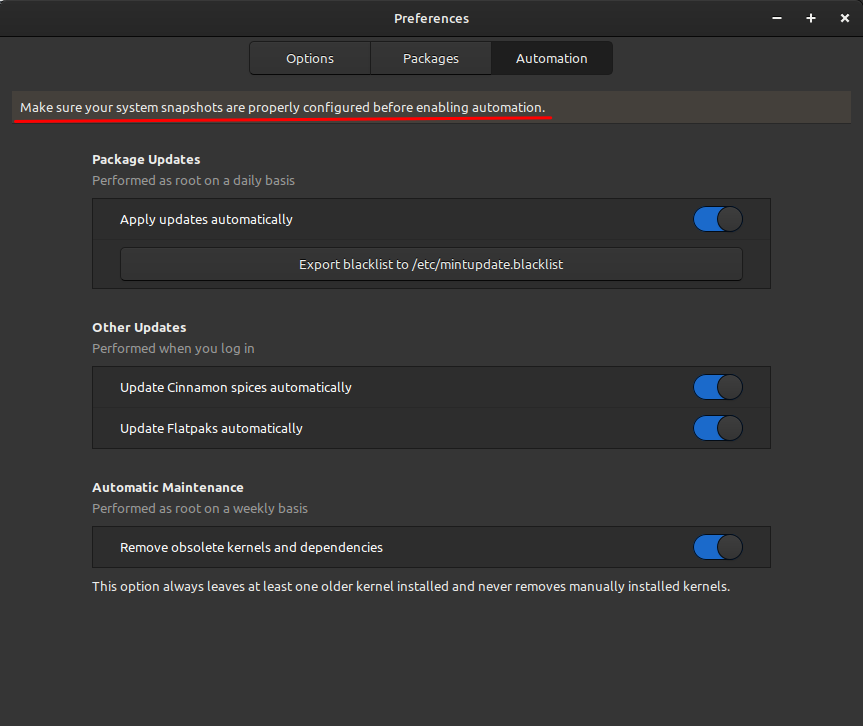
You next want to open Preferences and click on Automation.
Just in case you’re confused, I added an arrow for you! (My CDN is going to hate me.)
When you’ve done all of this, you’ll face a new screen.
This new screen is where you edit your automation settings. This new screen is where you enable automatic updates in Linux Mint. It looks like this when I’ve configured it to my liking:
You can configure those however you like, but I enable all of them. You do you, I guess.
As you can see, I’ve chosen all the things. I’ve chosen to automate all the updating that I can do. If anything, I wish I could increase the frequency. I suppose I could set up a cron job for this, but a handy GUI is fine for this task. This way will also update Spices and Flatpaks. So, there’s that.
I’ve had this setting enabled for a little while now and I’ve verified that it has been working as expected. If you want to automate updates in Linux Mint, you can do that – and it’s not even difficult.
Update:
No, it doesn’t appear to update Flatpaks. I’ve given it a few tries and it does not.
I’ve waited and waited a few times. You have to update Flatpaks manually. So, there’s that…
Closure:
I like automatic updates. I use that sort of feature online with my various websites. Scheduled updates performing themselves is a good thing to me. You may be more cautious, but I throw caution to the wind. I haven’t had an update nuke my system beyond a 2-minute repair job in forever. I haven’t even had a 2-minute repair job in years. That’s good enough for me. You can make your own choices. Regardless of your choices, be sure to backup your system regularly.
Thanks for reading! If you want to help, or if the site has helped you, you can donate, register to help, write an article, or buy inexpensive hosting to start your site. If you scroll down, you can sign up for the newsletter, vote for the article, and comment.
If you have chosen Linux Mint as your distro then you have a handy GUI way to upgrade, but today we’ll upgrade Linux Mint in the terminal. This won’t be entirely pointless, as we’ll be doing things the GUI method of upgrading doesn’t do. By the end of this article, you should be comfortable upgrading your system in the terminal.
Additionally, this is going to work for other related distros. This article will apply to you if you use Debian, Ubuntu, an official Ubuntu flavor, and many other distros. More specifically, if you have access to apt, this will apply to your computer.
There are a few confusing terms here. I’ll do what I can to explain.
We often use ‘update’ and ‘upgrade’ interchangeably. I do that myself. In the sense of this article, an update means you’re refreshing the software available to you and then you’d upgrade to the newest versions of that software. So, in the sense of the commands used, they’re not interchangeable.
We’ll be using apt for this article. APT is short for Advanced Package Manager. This is the most common method of managing packages in the terminal, at least for those distributions that use apt. If you check the man page, you’ll see:
apt – command-line interface
And that’s not too descriptive. If we read on, we’ll see:
apt provides a high-level commandline interface for the package management system.
That’s a bit more promising, as updating and upgrading is indeed managing packages. So, that’s what we’ll be using and you won’t need to install anything if you’re using Linux Mint.
Upgrade Linux Mint In The Terminal:
As you can see, I mentioned that this is to be done in the terminal. That means you need an open terminal. Just press CTRL + ALT + T and your default terminal should open.
With your terminal now open, let’s update the database to see what new software is available for your system. That’s an easy command:
1
sudo apt update
The output will tell you to do so, but you can check the available upgrades with the following command:
1
apt list --upgradable
You could update them manually, one by one, but you can just use this command:
1
sudo apt upgrade -y
That will install all of your available updates without asking you for permission to proceed. If the updates do require manual input, it will stop to ask you for your input.
Now, there’s another tool. We can clean up after ourselves, removing software that doesn’t need to be installed anymore. This happens and happens with some regularity. You can run the following command:
1
sudo apt autoremove
If you’d like, you can combine all these commands into a single command:
You can alias that, or leave it in your Bash history, and run that regularly to keep your system updated with the latest (and most secure, generally speaking) software.
Closure:
Yup… It was still a weekend when I wrote this. I also have guests that will be here for a while. So, it’s a fairly short article – but it’s a useful article for those who are running Linux Mint. After all, it’s not all that challenging to upgrade Linux Mint from the terminal and that’s something all Linux Mint users may wish to learn. If you’re in that group, this article is for you…
Thanks for reading! If you want to help, or if the site has helped you, you can donate, register to help, write an article, or buy inexpensive hosting to start your site. If you scroll down, you can sign up for the newsletter, vote for the article, and comment.
Well, that’s a long headline, but it’s not easy to compress the idea of restoring Google Search to Chromium when installed in Linux Mint! However, this is another article that is just me scratching my own itch. You’ll understand what I mean soon enough, I hope. I mean, I think I can describe it well enough.
Also, I’m using a new keyboard. I wore the last one out. That always slows me down for a little while. Ah well… I digress, and needlessly so…
So, let’s say you’ve done a fresh install of Linux Mint. Let’s also say that you decided you want to use Chromium. Fortunately, Chromium is in the default Linux Mint repositories. Given the ease of this operation, you go ahead and install Chromium in Linux Mint with the following command:
1
sudo apt install chromium
Everything appears well and good – until such a time as you decide you want to search from the search bar. At that point, you’ll notice that Chromium in Linux Mint uses a different search engine. This should be easy to change (and it is) but when you look in the settings you’ll see that Google Search is nowhere to be found.
There’s a resolution for this! We won’t even need the terminal.
I’ll presuppose that you’ve already installed Chromium, so we’ll skip that part. You can figure that out if you haven’t already figured that out and are now curious about adding Google Search.
Restoring Google Search To Chromium:
First, you will want to open Chromium, click the three vertical dots in the upper right, and select ‘Settings’.
From there, you look to the left to find the ‘Search engine’ option and click on that. Chances are good that you already tried this, assuming you’ve wanted to restore Google Search to Chromium.
You next click on ‘Manage search engines and site search’, which is where we want to be to edit search engines in Chromium.
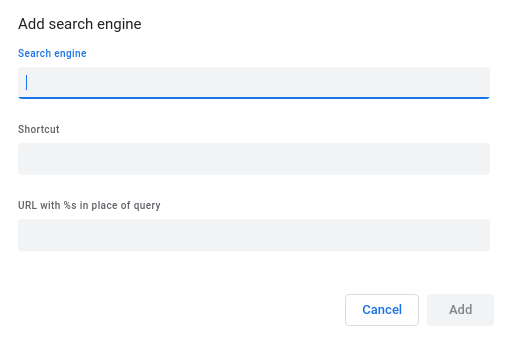
Scroll down to ‘Site Search’ and click on ‘Add’, like so:
See? It’s a pretty basic concept. The rest is also easy. We can restore Google Search!
That’s going to pop up a new window that looks like this:
There aren’t many fields to be filled out – and Google isn’t your only option.
Under ‘Search engine’, add:
Google Under ‘Shortcut’, add:
google Under ‘URL’ add:
https://www.google.com/search?q=%s
Note, that the
%s is where your search terms would go in the website’s URL. If you wanted to add Ecosia, for example, you’d use this in the last section:
1
https://www.ecosia.org/search?method=index&q=%s
Be sure to click the ‘Add’ button when you’re done.
By the way, the ‘Shortcut’ is the text you’d type to manually pick that search engine. You start your address bar query with the shortcut text, add a space, and then add your search terms. That will let you pick among the various search engines manually. In the above example, you’d first type ‘google’ and that’d give you results from Google Search.
Of course, you can just make Google Search the default…
Make The New Search The Default Search:
If you want, you can make the newly added search engine the default search engine. That’s what I did, but it’s entirely up to you. You could always just preface the search with the word/letter you put in the 2nd second and manually select your search engine.
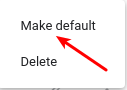
To make the newly added search the default search, simply click the three verticle dots next to the new entry and set it as the default. Like so:
Tada! It’s default!
That’s all there is to it. You’ve now made the newly added search the default search. When you search from the address bar, it will use your default search engine. If you highlight and right-click to search, it will now use your new default search engine.
Notes:
I mentioned Ecosia and gave an example. It’s pretty easy to find the right URL. Go to the search engine (or site search engine) and enter ‘example’ into the search bar.
If you did that here on Linux-Tips, you’d get this:
1
https://linux-tips.us/search/example
To add this site as a search engine, you’d replace ‘example’ with
%s. Like so:
1
https://linux-tips.us/search/%s
If you wanted to add Bing, you’d do the same thing:
So, the result needed to add Bing as a search engine would be:
1
https://www.bing.com/search?form=&q=%s
You can generally do this with any sites you want – so long as they’re reasonably accessed and have the search term included in the address bar. If you wanted to search Linux.org from the search bar, you’d use:
1
https://www.linux.org/search/2278682/?q=%s&o=date
Yes, that will work and it will still properly filter the results according to date. It’s pretty easy. As I mentioned, I’m mostly scratching my own itch with this article. This was a change I needed to make and I thought it’d make a good article. I’ve decided to make it more thorough, showing you that you can do more than just restore Google Search to Chromium.
This will also work with browsers based on Chromium. If you are using Brave, Vivaldi, Edge, Chrome, etc., then you can almost certainly manage your search engines just like this. I tend to have a few search engines configured but I mostly rely on Google Search as it seems to consistently work best for me. You do you, however.
Closure:
Well, there you go. It’s pretty easy to learn about restoring Google Search to Chromium when installed in Linux Mint! (That’s such a long headline…) The concept is easier than trying to make a concise headline out of it. I dare say this is the longest headline I’ve ever had. Search engines are not going to like it. Hopefully, the content makes up for that!
If you’re still reading this far, you might as well know that Google uses a different address in their search settings. It’s a convoluted thing and I hope I get this right…
However, you don’t need all that. You’re fine (as far as I can tell) with the basic option I gave above. But, I figured I’d include this just for the sake of completeness. Good luck restoring Google Search in Chromium when installed in Linux Mint! It’s not that challenging and I’m sure you can figure it out.
Thanks for reading! If you want to help, or if the site has helped you, you can donate, register to help, write an article, or buy inexpensive hosting to start your site. If you scroll down, you can sign up for the newsletter, vote for the article, and comment.