How To: Find A Website’s IP Address

Today’s article should be interesting, as we learn how to find a website’s IP address. There’s more than one way to do this sort of thing, so I’ll just be showing you the one way to do so. I want to keep it relatively short and simple. So, to find out how to find a website’s IP address, read on!

I have a reason to keep this one short and simple. I’m in the midst of a blizzard and am likely to lose my connection at some point this evening. That’s okay, I love the cold and snow. As for me and my house, I’ve got solar and wind. I won’t want for anything. I’ve been out playing in the snow already. I’ll go back out shortly.

So, let’s say you want to know the IP address of your favorite website. That’s easy enough to learn. Though it may surprise you that your favorite website might have multiple IP addresses. That’d often be because many websites have multiple nameservers pointing at them for a bit of redundancy.

We’ll be using the ‘dig’ tool. This is likely installed by default. You shouldn’t need to install anything. The dig command defines itself as:

dig – DNS lookup utility

That’s what we’ll be using to find a website’s IP address, as it’s a fine tool for doing so. With that said, let’s just jump into the article…

Find A Website’s IP Address:

If you’re a regular reader, you know that it’s probably time to open a terminal. Like many articles, this one requires an open terminal, as that’s where you use the dig command. Just press CTRL + ALT + T and your default terminal should open.

With your terminal open, we’ll use Linux Tips as our example:

The output of which should look like this:

using dig to find a website's ip address
You’d be looking for the answer section, as indicated in the graphic. Pretty easy, huh?

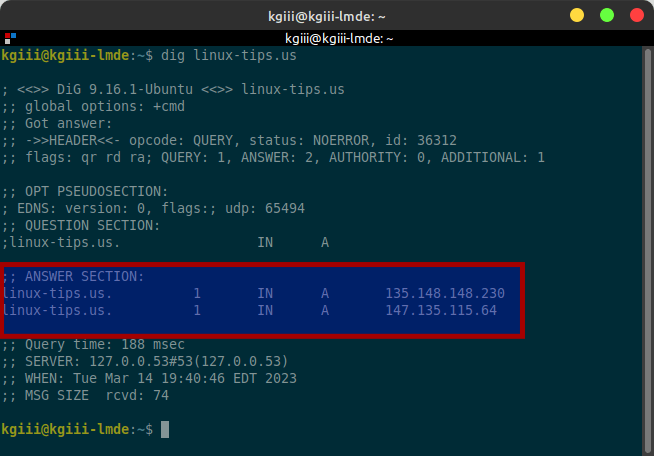
As you can see, the answer section is what you’re looking for. The IP addresses are on the right. As you can see, this site has two IP addresses – both of which belong to my CDN (if you’re curious).

You can save some time and space… Well, some space. I suppose it may take you a second or so longer to type out the extra characters. But, give it a try with the +short flag (placed in a weird spot).

The output from that command is a bit easier and more concise:

using +short is a neater output to find a website's ip address.
That’s a bit easier and contains just the information you’re looking for. You can just use that.

You can use either or both, depending on what you’re after. I suppose it’s technically a bit longer when you type in the last command, but your output is just the information you’ve been looking for.

By the way, dig +short linux-tips.us will work, I just learned it the other way, so that’s how it is situated in my notes. If you’re feeling weird about placing the flag at the end of the command, just place it where flags normally go. Also, don’t forget to check the man page with man dig for more information about the dig command.

Closure:

And there you have it, you have another article! This time we’ve covered how to find a website’s IP address. If the site has a dedicated IP address, you can use that IP address to connect to the site, as opposed to using the domain name. So, there’s that…

Thanks for reading! If you want to help, or if the site has helped you, you can donate, register to help, write an article, or buy inexpensive hosting to start your site. If you scroll down, you can sign up for the newsletter, vote for the article, and comment.

Using The SSH Verbose Mode

That’s right, today’s article is going to be yet another SSH related article, this time it’s about using the SSH verbose mode. It’s handy for debugging SSH connections, plus the information can help you understand more about how SSH works. This is a fine article even for those just starting out with SSH and Linux.

I know, I know… I do a lot of SSH articles. In my defense, they’re fun – and there’s just so much to SSH that many people don’t know. It’s a tool that I use all the time, so it’s only natural that I share articles on the SSH subject. I’m bound to run out of ideas for ’em eventually.

For those that don’t know, SSH stands for “Secure Shell”. It’s a way to remotely control computers within the terminal – though you can actually forward some graphics applications over SSH.

If you’re unfamiliar with SSH, you might try reading some of these articles:

Install SSH to Remotely Control Your Linux Computers
Prevent SSH Root Login
Check Your SSH Server Configuration

Alternatively, you can search for SSH articles and discover quite a few other articles on the subject of SSH. As mentioned in the preamble, and I have gotten pretty formulaic, there are quite a few SSH articles.

There are quite a few SSH articles because there’s a lot to learn. You don’t start off by running, you start by stumbling a few steps and working your way up.

So, with all that in mind, let’s have another SSH-related article…

Using The SSH Verbose Mode:

This article requires an open terminal, like many other articles on this site. If you don’t know how to open the terminal, you can do so with your keyboard – just press CTRL + ALT + T and your default terminal should open.

Of course, you need a computer you can connect to with SSH installed. If you don’t have a remote device, you can enable SSH on your local computer and then just connect to user@localhost and practice all these remote commands.

There are three different modes in SSH verbose mode. They’re indicated with a -v, a -vv, and -vvv. To use them, the command would look similar to the following commanda:

In the first mode, that is -v, you get details about the client-side activities.

In the second mode, that is -vv, you get details about both the client-side activities and the server-side activities.

With the third mode, that is -vvv, you get even more details, more verbosity, about both the client-side and server-side activities. 

For example, this is some of the text output from a -v SSH verbose mode:

ssh verbose mode displayed
And that’s just some of the information you’ll see when you use the SSH verbose mode.

You’ll get even more verbosity as you go up through the levels of SSH verbose mode. This is useful for debugging your SSH connections – but it’s also useful for those who aren’t sure what’s going on behind the scene. When using SSH’s verbose mode, you can see what’s actually going on behind the curtain. That means you can learn more about what’s going on with your SSH connections.

Closure:

So, yeah… It’s another SSH article. I wrote this one ’cause I was thinking about it. I was thinking about it because I’d recently done another SSH-related article. So, I figured I might as well cover SSH verbose mode while thinking about it. Otherwise, I’d have made a note of it in my files and maybe never bothered with the article. Besides, if you want a different article, you’re always welcome to write it yourself and I’ll (quite likely) publish it.

Thanks for reading! If you want to help, or if the site has helped you, you can donate, register to help, write an article, or buy inexpensive hosting to start your own site. If you scroll down, you can sign up for the newsletter, vote for the article, and comment.

How To: Login To SSH To Run One Command

In today’s article, we’re going to learn how to login to SSH to run one command. Yes, it’s another SSH article! However, this one should be relatively short. I’ve covered SSH a great deal already. This is just one more SSH trick.

SSH stands for Secure Shell and is a way to remotely control other computers. As I said in the opening paragraph, I’ve already covered a lot of SSH articles, because SSH is a tool I use regularly and it’s a tool I really like.

SSH lets me manage computers on the other side of the country without even leaving my chair. I also use SSH to manage various computers around my house. If I need to do something on a computer in another room, I can just SSH into it and do what I needed to do. It’s great!

Well, today’s SSH article is a bit different. We’re going to login to SSH to run one command. That’s all we’re going to do. We’ll login, automatically run the command, and then automatically exit the SSH connection. This is useful if you want to run a script, update, etc…

There are some previous SSH articles that you might want to read:

Install SSH to Remotely Control Your Linux Computers
Prevent SSH Root Login
Show Failed SSH Login Attempts

Alternatively, you can click to search for SSH articles. I’ve covered quite a bit of SSH material, so you can learn quite a bit from those links – even if you’re already familiar with SSH.

Well then, let’s just jump into the article… It really shouldn’t take long.

Login To SSH To Run One Command:

Like oh so many articles, and this one involving SSH, you’re going to need to start off with a terminal. You’ll also need a device that has SSH properly setup and ready to run. You can actually set SSH up on the computer you’re using and just SSH into localhost to practice this.

And, of course, if you don’t know how to open your terminal, just press CTRL + ALT + T and your default terminal should open.

With your terminal now open, the format of the command is something like this:

For example, if I wanted to connect via SSH to run one command, and that command was to list the files in the home directory, the command would look like this:

Note: That device doesn’t face the public internet, so I don’t have SSH keys enabled on the device. So, that means I have to enter my password in the image below. With that in mind, the output of that command would look like this:

login to ssh to run one command
See? It logs into the remote device, runs one command, and exits! Pretty neat, huh?

Of course, you can make it your own and there would be one less step if you had set up SSH keys. You can also make it more complicated if you want. You could try any one of the following commands, adjusting it for your needs:

Go ahead and play around with this. If you want to login to SSH to run one command, that’s how you do it. You can make the command as simple or as complicated as you want. So long as you string it together properly, the sky’s the limit!

Like I said above, you can just install SSH on your single device and practice what you read in these SSH articles. It’s not particularly taxing. There are plenty of articles to help you along the way.

Closure:

See? It’s really not all that hard to login to SSH to run one command and then exit automatically after that command has been run. It’s another handy SSH trick that you can add to your SSH toolbox. Also, the article is longer than I anticipated. Ah well…

What comes next? I have no idea. I try to not write too many consecutive articles on the same subject. Mixing them up seems the best way to go about it, as the site’s meant to be searched and not read like a blog. I do have a bunch of SSH content, but I’ve also covered a whole lot of it already.

Thanks for reading! If you want to help, or if the site has helped you, you can donate, register to help, write an article, or buy inexpensive hosting to start your own site. If you scroll down, you can sign up for the newsletter, vote for the article, and comment.

Monitor rsync’s Progress

In this article, we’re going to learn how to monitor rsync’s progress. It’s a pretty trivial article, but it’s something you may want to know – especially if you’re using rsync often. Read on and learn how to monitor the progress of rsync. 

For the curious, I use rsync every day. It’s a part of what I do to beta test Lubuntu. It’s pretty handy for syncing my existing .iso with a fresh daily .iso, saving both Ubuntu and I a bunch of bandwidth.

I also use it locally. If I want to backup something like my home directory, there aren’t many better choices. Rather than mess with various applications, I can just write a simple command and can even automate it by making it a cronjob. 

However, it’s nice to get some feedback. It’s nice to see how far and how fast the syncing is taking place. It’s handy to monitor rsync’s progress. There are a couple of neat ways to do this, so I’ll show you them. 

If you don’t know, rsync is a tool used to sync files. It’s great for copying files from one location to another location. It even has some checks and balances, so it’s pretty great. By the way, the man page defines it like:

rsync – a fast, versatile, remote (and local) file-copying tool

Which I think is an apt and fair description. So, with that in mind, let’s move into the article about how to …

Monitor rsync’s Progress:

This article requires an open terminal, like many other articles on this site. If you don’t know how to open the terminal, you can do so with your keyboard – just press CTRL + ALT + T and your default terminal should open.

For the most part, rsync works like so:

Now, you can just show the progress with the -av flags. The ‘a’ for “archive” and the ‘v’ is for verbose. That is a handy command. You will also need the ‘–info=progress2’ to go along with it. 

To use it, it might look something like this (to backup sync your entire home directory in this example):

See? That’ll output the progress as you go. For local stuff, that’s pretty much my ‘go-to’ command, or close enough.

But wait, there’s more!

That’s right, there’s more to know if you want to monitor rsync’s progress!

First, install ‘progress’. It’s probably not installed by default, so you’ll have to install it manually with your own package manager. For example, with apt in Ubuntu, it’s just:

With that done, it’s a tiny application, open up another terminal window – so that rsync is still happily running in your first terminal instance, and run the following command in the second terminal:

Pretty frickin’ neat, huh? You can monitor your rsync command’s progress quite easily with that command. It gives you a pretty good readout for your rsync’s progress. If nothing else, it’ll keep you amused while your data syncs. 

Closure:

Yay! Today you have another article. I still haven’t missed a day. You’ve had an article every other day for a long time now. Well, today is no different and in this article you learning how to monitor rsync’s progress – a pretty handy tool, especially for the inquisitive. 

Thanks for reading! If you want to help, or if the site has helped you, you can donate, register to help, write an article, or buy inexpensive hosting to start your own site. If you scroll down, you can sign up for the newsletter, vote for the article, and comment.

Let’s Take A Look At Logged In Users

Today is a good day to learn how to take a look at logged in users. The vast majority of my readers are desktop users, so you can mostly skip this article. On the other hand, when you take a look at logged in users, you might find users you didn’t know were logged in and discover a problem like unknown users.

Yeah, most of you – including me at the moment (which makes it difficult to do things like take useful screenshots) are using Linux (mostly) as a single user. You have a user and you login to that user account when you start your system up.

While you do have other system-configured users, you don’t generally login as those users. As such, you probably spend very little time thinking about the users you have. Those system users aren’t generally logged in but are there for permissions purposes, so they’re out of mind for most of us.

Well, for the rest of you, you can use this article to learn how look logged in users – even getting a glimpse at what they’re doing. I mentioned some difficulty in taking screenshots, so I’ll provide you with just one. Cherish it, as it’s the only one you’re getting!

Here it is:

looking at other users
See? I’ll reference some of this below, in the article itself. I might as well…

Have A Look At Logged In Users:

This article requires an open terminal, like many other articles on this site. If you don’t know how to open the terminal, you can do so with your keyboard – just press CTRL + ALT + T and your default terminal should open.

As you can see from the image above you can see all the logged in users with the first command. The following command will list them:

You’ll see the same thing, with a bit more information, when you use the following command:

Now, in the image above, you can see where I used it once and then ran it again. What you don’t see is that, in between those two commands, I opened up another TTY and logged in again as ‘kgiii’. If you want to replicate that, just press CTRL + ALT, then F3 to F6, and login at the prompt with any user(s) you happen to have.

Finally, you can get a look at what they’re doing – like one has a desktop session open and two of those login instances just have bash sessions open in TTY sessions. To do that,  you just use:

That should be easy enough for you to remember! By the way, if you did login as an additional TTY instance, run ‘users‘ again and you’ll see the output for that command has changed accordingly. The command’s output will may also give you a good idea about how long the system has been up and what the system resources are like.

Closure:

There you have it. You have learned how to have a look at logged in users so that you can have an idea of what’s going on with your system. If you spot a user you don’t recognize, that might be indicative of a problem. If you spot a user you don’t recognize, you’ll need to do some more investigating. By the way, if you have ‘finger’ installed you can always run ‘finger <username>‘.

Thanks for reading! If you want to help, or if the site has helped you, you can donate, register to help, write an article, or buy inexpensive hosting to start your own site. If you scroll down, you can sign up for the newsletter, vote for the article, and comment.

Subscribe To Our Newsletter
Get notified when new articles are published! It's free and I won't send you any spam.
Linux Tips
Creative Commons License
This work is licensed under a Creative Commons Attribution 4.0 International License.