I open a lot of URLs in the course of a day, especially during the pandemic when there’s naught to do but while away my time online. Seriously, I open a whole lot of addresses – many of them the same and opened often. I thought it’d be great to have keyboard shortcuts to browser bookmarks.
The answer isn’t to open more tabs, I already have too many tabs open. With 100+ tabs open across three browsers almost all the time, I have too many tabs already.
The address bar is helpful – but not as much as one might think. For example, I have multiple sites with Google Analytics. The URLs in the drop down menu are cryptic and bookmarking them all just extra steps to my workflow. They look like:
“https://analytics.google.com/analytics/web/#/report/visitors-overview/a178003867w269232012p241267937/overview-dimensionSummary.selectedGroup=demographics&overview-dimensionSummary.selectedDimension=analytics.country“
When I start typing in the address bar, my ‘drop-down’ menu has all sorts of URLs that look exactly like that. That’s not too helpful.
Looking for plugins to solve this issue wasted so much time that I’m writing this now, because sleeping is futile. I need to be awake in few hours. No sleep for me…
I searched high and low, hoping to find a browser plugin/extension/add-on that’d let me assign keyboard shortcuts to my bookmarks. None of them met my needs – and I’m pretty sure I tried them all.
By the time I had tried the last of them, I realized that I don’t actually need any help from a plugin or extension. No, my desktop environment takes care of this for me. I just hadn’t thought of it.
Make Keyboard Shortcuts to Browser Bookmarks
Pretty much all the major desktops have resolved this problem. You just have to look at it from the right perspective. So, I write this in hopes of saving someone else the time I spent searching for solutions.
‘Member all those keyboard shortcuts you use for doing things like opening the menu, opening the terminal, showing your desktop, maximizing windows, and things like that?
Well, they work just fine for other commands. Keyboard shortcuts work just fine for opening browser tabs and windows. Your keyboard shortcuts can do more than just turn the volume up or down, and they can do more than enable typing things things like ©, Ø, or ¶. These shortcut things can do more than open menus!
Other people may have thought this obvious. You may think it obvious after the fact. I am unashamed to admit that it took quite a while for me to realize that I already had the tools for this. Again, I hope writing this saves someone else some time. It’d be great if this had been obvious from the start.
For this, we’re going to be using Lubuntu (LXQt) and Google Chrome. For other desktop environments, you’ll have to adjust. You almost certainly have a similar function, just look in your menu.
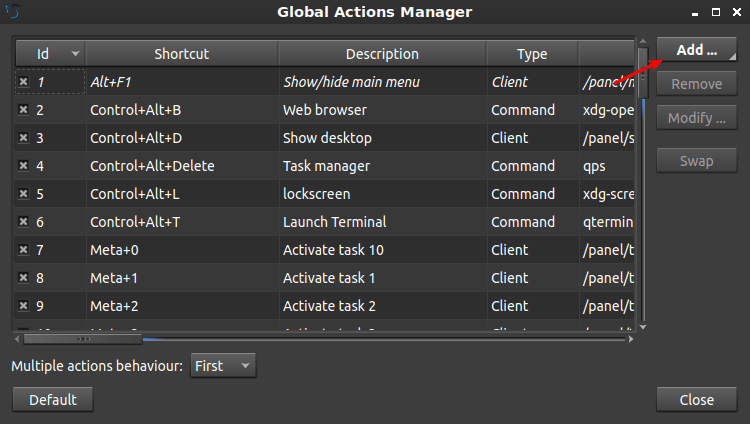
In Lubuntu, you’d be looking for Menu > Preferences > LXQt settings > Shortcut Keys.
Yup, we’re going to use those. We’re going to fix this oversight – by using system shortcuts as keyboard shortcuts to browser bookmarks!
I admit, it’s a bit of a sledgehammer method, but it works!
Making it Work
It will vary for you, but for me it looks like this:
Then it looks like:
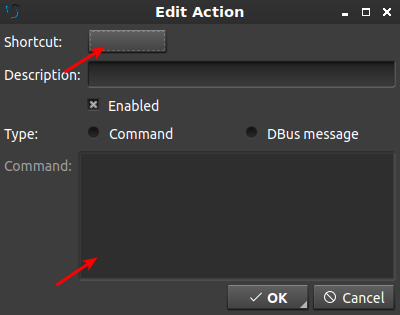
In this case, and you’ll have to change it for your desktop environment. In LXQt you set the shortcut by clicking where the first arrow is and then pressing the keyboard combination before the timer runs out. Me? I used
An example of the command I used, and I needed to tick the circle to make it a command based shortcut, was this:
1 | google-chrome https://analytics.google.com/analytics/web/#/report/visitors-overview/a178003867w269232012p241267937/overview-dimensionSummary.selectedGroup=demographics&overview-dimensionSummary.selectedDimension=analytics.country |
I could/should have used ‘google-chrome-stable’ for the command, but why follow the rules when you’re already breaking them? I’m pretty sure these type of shortcuts are meant to be used as system shortcuts and I’m pretty sure that we’re ‘not supposed to’ turn them into shortcuts for browser bookmarks! For that reason, you’ll see that I picked an unusual set of key combinations for them.
I used the CTRL and SHIFT modifiers because they are not used in tandem for many things. You should probably adjust accordingly for your system. Try to make up key combinations that aren’t likely to be claimed by your system, your desktop environment, and the applications you use. These new shortcuts will almost certainly overwrite any application-specific shortcuts as they’re truly system shortcuts!
If you use a different browser, you’ll also have to adjust accordingly. You can test the commands by trying them in the terminal first. If they work in the terminal, you can probably assign keyboard shortcuts to them.
For example, if you use Firefox, then it is ‘firefox <url>’, just like it is ‘vivaldi <url> for Vivaldi. Your browser may even have additional modifiers to open it in a new tab, in an existing window, or maybe open the URL in an incognito session! Look it up and find out – or use ‘man <browser>’ for more information. Try ‘firefox –new-tab –url https://linux-tips.us’ if you want to see an example.
While this is pretty heavy-handed, and probably not something they suggest doing, it works. Sure, it will take some time to remember which keyboard shortcut is which, but I doubt that’ll take long before it’s muscle memory.
It’s a bit like pounding in thumbtacks with a framing hammer, but it works – and there are many, many possible keyboard combinations that aren’t already in use. Given enough time and effort, you could have a ton of bookmarks that open with a simple set of keyboard presses.
Like always, thanks for reading! This has been a pretty fun project and the goal-reaching feels pretty great on the ego-muscle! It’s not all that easy to come up with article ideas, so feel free to suggest some. Don’t forget that you can unblock ads, sign up for the newsletter, donate, contribute by writing an article, register to participate, help edit, etc…
You can also scroll to the bottom of the page to check the copyright that has been there since Day One. This blog is itself opensource, so you can use these articles as you want.