How To: Search For Files By Name

Today’s article isn’t going to be all that complicated, as we’re just going to cover one way to search for files by name. It is a pretty useful skill to have, and a skill that one should probably learn early on. If you want to learn how to search for files by name, read on!

So many of us will parse the output of the ‘ls’ command, but you really shouldn’t parse the output from ‘ls’. Sure, it’s nice and easy to use something like ls -la | grep <filename>, but that’s a bad idea for reasons better explained by clicking the above link.

One of the options you can use instead of ‘ls’ would be the ‘find’ command. We’ve used it a few times before, but this time we’ll be using it to search for files by name. It’s relatively easy and I’m sure you can figure it out. The find command’s man page defines itself as:

search for files in a directory hierarchy

Which is a good description, because that’s what it does. Which is also good, because that’s what we want it to do! So, let’s get this article started rather than wasting time in the intro…

Search For Files By Name:

This article requires an open terminal, like many other articles on this site. If you don’t know how to open the terminal, you can do so with your keyboard – just press CTRL + ALT + T and your default terminal should open.

With your terminal now open, the command you’re looking for would look a little like this example:

As you can see, you must declare a directory and a file name. If you want some level of leeway, you use ‘-iname‘ which indicates that it isn’t case-sensitive. As a matter of habit, I use ‘-iname‘ instead of ‘-name‘. This works for me and we’ll use ‘-iname‘ from here on out.

Let me give you an example…

Say you wanted to find the ‘firefox.desktop’ file and ensure it’s there. You could use this command:

Of course, if you aren’t sure it’s a desktop file, you can use:

The asterisk means anything, so you’ll get results for firefox.desktop as well as anything else.

If for some reason, you wanted to search your entire system for anything containing firefox, it’d look like this:

That’ll likely throw a whole lot of errors, as you don’t have permission to look in those areas, so you just add sudo to the command:

Which should show you every instance of a file starting with firefox on the entire computer. The ‘find’ command can seem pretty difficult to tackle for a new person, but if you take it in small bites you’ll start to learn that it’s not all that complicated. Be sure to check man find for more details.

Closure:

There you go… It’s yet another article. This time, we’ve covered how to search for files by name, a task that you may do with some frequency. If you know what you’re doing, it’s possibly faster than rooting around in a GUI hoping you find the right directory.

You don’t even need to know the entire file name to at least narrow it down a great deal. So, it’s a great tool to add to your toolbox and is more reliable than parsing the output of the ‘ls’ command.

Thanks for reading! If you want to help, or if the site has helped you, you can donate, register to help, write an article, or buy inexpensive hosting to start your site. If you scroll down, you can sign up for the newsletter, vote for the article, and comment.
Make ‘wget’ Resume From An Interrupted Download

Today’s just going to be a quick article, an article where we learn how to make ‘wget’ resume from an interrupted download. This is a darned useful function you can add to a wget command, especially if you’re in an area with sketchy connectivity. To learn to make wget resume from an interrupted download, read on!

So many of my articles are written because of something I did recently. Many are still based on my copious notes (we’re well over 300 articles here on Linux Tips), but those will run out eventually. I’m often thinking of new ideas for articles and sometimes my day-to-day computing gives me an article idea that’s not from my notes. This is one of those…

Today, we’re going to cover yet another wget feature! We’ve had many wget articles. Here are a few of them:

Limit The Download Speed For ‘wget’
Rename A File Downloaded With ‘wget’
How To: Hide The Output From wget

And we’ve used wget in many articles. Go search for “wget”.

By now, many of my regular readers will be more than familiar with wget. So, what is wget? It’s a terminal-based tool that you use to download files. I use it often. You’re encouraged to check man wget for more information.

I use it outside of the browser, even if I found the download link via a browser. It’s just that handy and the throughput rate seems to be greater with wget (oftentimes). If you check the man page, wget describes itself as:

The non-interactive network downloader.

Which is exactly what it does. Which is nice…

How To: Make ‘wget’ Resume From An Interrupted Download:

You’ll kinda sorta maybe need an open terminal for this article. If you don’t know how to open the terminal, you can do so with your keyboard. Press CTRL + ALT + T and your default terminal should pop open.

With your terminal open, you just need a file to download… I’ll let you pick that. You also need to interrupt your download, so that you can practice this…

Wait, no… That’s just silly. Instead of practicing this, just learn from my usage and call it good. There’s no need to replicate this until you need it. Yeah, that’s the ticket!

So, imagine my surprise when I learned that Gentoo now has a live USB edition. (I was pretty surprised.) I immediately decided to download the file, though I’ve still not tried it. To download the .iso, I used the fantastic wget tool.

My terminal was already open. My present working directory was already the ‘Downloads’ directory. I had nothing to do except enter the wget command. The command I entered was this:

As you may know, my DSL provider made me angry and I’m now using a combination of a mobile hot spot and satellite. My mobile provider likes to disconnect me for 30 minutes at a time and does so at varied intervals.

I normally just switch to the satellite connection for 30 minutes but wget didn’t like that. I’d already downloaded half of the file while tethered to my phone and didn’t want to download it again. Downloading data I’d previously downloaded is just a pain in the butt and slows things down. So, I added the -c flag. The command I then used, once connectivity was restored, was this:

Sure enough, wget resumed from where it left off when the connection dropped out. I didn’t have to download that all over again. Sure, wget will automatically retry a few times (which you can modify) but it’s not going to keep trying for 30 minutes (by default) or longer. So, this is how you make wget resume from an interrupted download.

Closure:

See, it’s easy to make wget resume from an interrupted download. Was it worth writing an entire article for a single flag? I’d say yes. Well, of course, I would say yes. If I didn’t think it was worth an entire article, I wouldn’t have written an entire article about it!

Ah well…

And now you know…

You’re welcome…

Thanks for reading! If you want to help, or if the site has helped you, you can donate, register to help, write an article, or buy inexpensive hosting to start your site. If you scroll down, you can sign up for the newsletter, vote for the article, and comment.

Disable Window Grouping In Lubuntu

Today’s article will only matter if you use Lubuntu and want to disable ‘window grouping’ in Lubuntu. I find window grouping an annoying ‘feature’ and look to turn it off whenever I come across it. If you’re like me and want to disable window grouping in Lubunt, read on ’cause this article is for you!

I’m not sure how well I can format this like a normal article, but let’s start with the basics and see where things end up.

What is ‘window grouping’?

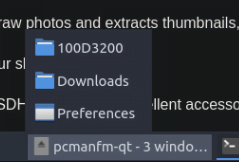
Window grouping is when your desktop groups similar applications together. If you have 3 instances of Firefox open, you’ll only have one instance shown in the panel (taskbar). If you click/highlight that one instance of Firefox, you’re then able to pick which of the Firefox instances you want to bring to the front.

This is an example of window grouping, where I have multiple instances of PCManFM-Qt open:

window grouping
That’s ‘window grouping’. Ugh…

I dislike this feature a great deal. It slows me down. It doesn’t reduce clutter, it adds clutter where I don’t want it. If you like window grouping, by all means, enjoy the feature.

If you are like me and find it to be an annoyance rather than a benefit, I have good news! The good news is that it can be turned off! If you’re using something other than Lubuntu, you can probably also turn it off. If you’re using another distro, a distro that’s using LXQt, you can also follow these directions.

Anyhow…

Disable Window Grouping In Lubuntu:

If memory serves, and it has been a while, if you were using Lubuntu during the LXDE days (no longer supported in any iteration of Lubuntu), you’d disable window grouping through PCManFM. This is not the case with modern Lubuntu. The current Lubuntu, and all supported Lubuntu versions, uses LXQt and it’s a different process to disable window grouping.

You can right-click on the bottom panel and select “Configure Panel” (you may have to mouse around a bit to find an empty place in the panel). From there, you’d click on Widgets (on the left) and then on “Task Manager”.

Alternatively, if you have a nice blank space in the task manager section of your panel (the bit of information at the bottom of the screen), you can skip the above step because you can just pick ‘Configure “Task Manager”‘ from that pop-up.

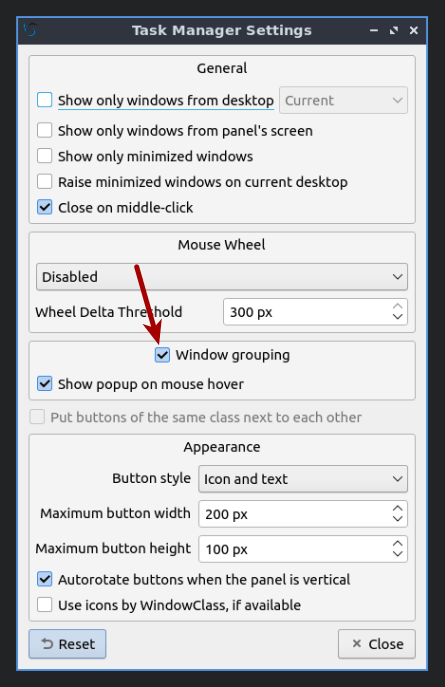
Either way, you end up at the following screen, at which point it should probably become obvious. Find and disable the window grouping option. It will look like so:

there's an option to disable that window grouping feature
Just un-tick the box and you’re on your way! Hit the close button.

When you’ve done that, the changes will take effect immediately and you can just hit the close button, happily going about your day without that silly window grouping feature. Just for completeness, it’d look like this:

the lubuntu task manager without window grouping enbled
I prefer it this way. I am not a fan of window grouping. It’s pretty easily disabled, thankfully…

If you decide you want to keep the window grouping, it’s easily reversed. You can also adjust other features while you’re there, should you want to do so. If you get there via the “Configure Panel” option, you can go through the “Widgets” and customize them as you see fit. You can also add and remove them while you’re there.

Closure:

Hey! There you go. You have another article! This time we’ve not even used the terminal! This time, we’ve just decided to learn how to disable window grouping in Lubuntu. It’s pretty easy once you know how to do it and what the feature is called. It’s one of the defaults that I change soon after I do a fresh installation.

Thanks for reading! If you want to help, or if the site has helped you, you can donate, register to help, write an article, or buy inexpensive hosting to start your site. If you scroll down, you can sign up for the newsletter, vote for the article, and comment.

A Couple More Ways To Find Your Network Interfaces

Today’s article is mostly just for fun, as we examine a couple more ways to find your network interfaces! I’ve shown you a variety of ways at this point, but this is Linux. If you just want to have some fun finding your network interfaces, read on – ’cause this article is meant for those who like to travel a different path!

One of the things that make Linux so awesome is the myriad choices we have. There are so many different ways to accomplish the same goal. In fact, we sometimes get defensive about ‘our way’ of accomplishing things. It can make for some amusing (and sometimes a bit heated) discussions. 

Anyhow, I’ve covered this before. I’ve even covered it recently, which is why this is still fresh in my memory. You can start with this article if you want:

How To: Show Your Network Interfaces

Just to touch on it, a network interface is a device that your computer uses to communicate over the network. In most folks’ cases, you’ll locally use your network interface to connect to the Internet, perhaps first to your router or modem. These networking devices have names.

It’s important to be able to point to a specific networking interface, which is why they have names. If you want to issue commands, you want to send them to the right networking interface. If you want to monitor a connection, you need to know the correct name for the network interface.

So, these network interfaces have names. These names should be unique in your system, meaning you shouldn’t have more than one device per name. The names should not be shared among the devices and each working networking interface should have a name of its own.

If you want to know the network interface names, this article’s for you…

Find Your Network Interfaces Continued:

This article requires an open terminal, like many other articles on this site. If you don’t know how to open the terminal, you can do so with your keyboard – just press CTRL + ALT + T and your default terminal should open.

With your terminal now open, we’re going to show you a couple of new ways to find your network interfaces. It’ll be fun!

For starters, and probably one I should have already covered, we’ll use a command we’ve covered here and here. We’ll use the ‘netstat’ command, and the ‘netstat’ command you need to find your network interfaces is simply:

(If you don’t have ‘netstat’ available, install the ‘net-tools’ package from your distro’s repositories. It’s almost certainly available.) The output is nice and clear and will show you the names of your network interfaces.

The next command we’ll use is one we’ve used many times before. It’s just a two-letter command, so trying to search for it (on this site) is neigh on impossible – but you can be certain that we’ve used it before. (We’ve at least covered sorting and formatting the output from the ‘ls’ command.)

Anyhow, the command we’ll use to list the network interfaces is pretty simple, it’s just this simple command:

That ‘ls’ command should spit out a list of your network interfaces all nice and easy. If there’s going to be one command that’ll work on any system, it might be this one.

Speaking of which, as this is Linux, there are all sorts of ways to accomplish goals. Because of this, that also means they’ll not always work on every system. You may need to try multiple commands to get the output you’re after – but both of today’s commands should result in you getting the names of your network interfaces (even if you have to install ‘net-tools’ to do so).

Closure:

There you have it, another easy article. Ugh… I do wish I was feeling a bit more up to snuff. Meh… At least I’m writing and writing this sort of stuff. In this case, it’s another article that’ll show you how to find your network interfaces. It’s information worth having. They’re tools that will go well in your growing toolkit of Linux tools.

Thanks for reading! If you want to help, or if the site has helped you, you can donate, register to help, write an article, or buy inexpensive hosting to start your own site. If you scroll down, you can sign up for the newsletter, vote for the article, and comment.

How To: Find Linux News

Today’s article will be really easy for anyone to follow, as I share how it is I find Linux news. It’s amazing how many people don’t keep up with any Linux news. Read on, as this is sure to be a fairly short article. 

I might even speculate that most Linux users don’t keep up with Linux news. I’d speculate that it’s an even smaller group that does things like read the release notes for their updates and upgrades. They don’t read the notes about software upgrades and they don’t definitely don’t pay attention to what’s going on at the project(s) level(s).

This is too bad. There’s a lot to learn and gathering information is good.

These are the people who are then surprised by things that were covered in the release notes, just as people are surprised by changes that have been covered by the journalists. (Well, I’m going to call them journalists for the sake of this article, and to avoid unneeded complexity.)

Now, I admit that I’m not always as diligent as I would suggest others be. I can be pretty lazy. I might even move to a new distro point release without actually reading the release notes. So, do as I say, not as I do!

Or not…

Just keep up with what you want to keep up with. For the most part, you’ll be just fine. Anyhow, I am not feeling all that great and I need a quick/easy article. So, you get this article about finding Linux news.

How I Find Linux News:

Below, you’ll find some links to news sites that I use when I want to keep up with Linux news. If you have your own sites, feel free to add them as a comment below. If you want your site added, feel free to ask in a comment below and I’ll take a look.

My first stop is quite often just an aggregator. It’s not complete, but it’s useful. I’ll often visit some of their aggregated URLs in person. If you just visit one site, this is a good choice:

tuxurls.com

My next choice is a site that tends to have plenty of content. I try to catch them daily, but obviously don’t always have time to do so:

linuxtoday.com

This next choice also has a ton of content. In theory, you can comment on the stories, but there’s not a lot of community involvement in those regards. Still, they tend to have a bunch of Linux news:

lxer.com

This next one doesn’t always have the same amount of content as some of the others, but it’s usually pretty good. Plus the site is well-designed and it even looks like a proper news site:

linuxinsider.com

If you want less content, but things like tech data and well-thought-out articles that tend to be a bit more in-depth, then you would do well to consider this site long-lived Linux news site:

phoronix.com

This next site tends to have some good content – and it’s reader-supported. As such, you will find there’s some decent commentary here. If you don’t know what to think about an article, you can head to the comments and someone will tell you what to think! See:

lwn.net

There are more but this is the final one I’ll list. I know, not everyone likes Google. But, their news section is usually pretty good at finding Linux news that might not have been covered elsewhere. I actually tend to check this one fairly frequently. The link should work for you, regardless of where you live:

news.google.com/search?q=Linux

So, those are a few of the places I go to for news. You should also consider finding your distro’s news outlet (often a blog of sorts). There you can keep up with distro-specific things and find stuff like release notes. You should be able to find that on your own.

Closure:

There you have it, you have another article. This time, we’ve seen a few of the places I go to when I want to find Linux news. I try to keep up with a bunch of it, and some subjects interest me more than others. If nothing else, you may want to consider keeping up with the news published by the distro you’re using. You’ll know more and not be surprised when changes happen.

Thanks for reading! If you want to help, or if the site has helped you, you can donate, register to help, write an article, or buy inexpensive hosting to start your own site. If you scroll down, you can sign up for the newsletter, vote for the article, and comment.

Linux Tips
Creative Commons License
This work is licensed under a Creative Commons Attribution 4.0 International License.