How To: Find Large Files Using ‘ncdu’

In this article, we’ll learn how to find large files by using ‘ncdu’. It’s useful for spotting large files that eat up your disk space. We’ve previously had an article about visualizing disk usage. Those were some great GUI ways to find large file, but this will be done inside your terminal – and using ncdu.

You’ll find that ‘ncdu‘ stands for NCurses Disk Usage. As the link says, it refers to the similarity with ‘du’ and that it uses the [n]curses programming language. As far as tools like this go, this one is relatively new (from 2007). Unsurprisingly, ncdu defines itself as:

ncdu – NCurses Disk Usage

There are a ton of options for ncdu and we’re only going to touch on just one of ’em. The goal isn’t to teach you how to use ncdu, it’s to teach you how to use ncdu to find large files. If you want to learn more about the tool, you can always refer to the man page.

Now that we understand the scope of this article (how to find large files using ncdu) we can move on into it…

Find Large Files Using ncdu:

Chances are good that ncdu isn’t installed by default and you’ll need to install it. It’s also a text-based application. So, obviously, you’re going to need a terminal open. You can easily open a terminal by pressing CTRL + ALT + T. That should open your default terminal.

Now, you’re going to need to install ncdu, and one of the following commands should cover the most popular distros:

Fedora:

Debian/Ubuntu: 

Manjaro/Arch: (Note: Should work, threw PGP error in my testing VM.)

openSUSE/SUSE:

RHEL/CentOS: (Note: Needs epel-release.)

Or whatever… It’s available for any distro I could think of to check, and it’s trivial to install it. If you’ve been following this site long enough, you can figure it out. I have the greatest confidence in your ability to get it installed!

That said and done, all I’m going to teach you is how to use it with no flags or anything of the sort. Yup… I wrote all this just to show you a single use type of ncdu.

Basically, for the exercise today, all you need to do is change to the directory you’re curious about and then you’ll just run ncdu in that directory. So, as you just opened your terminal and installed ncdu, you can just run it right there in your /home/<user> directory. It looks like this:

If you want to run it on the root of your drive, just navigate to it and run ncdu all over again. Sure, you can specify the directory or you can just be a lazy bum and navigate to the directory and simply run ncdu without any flags at all.

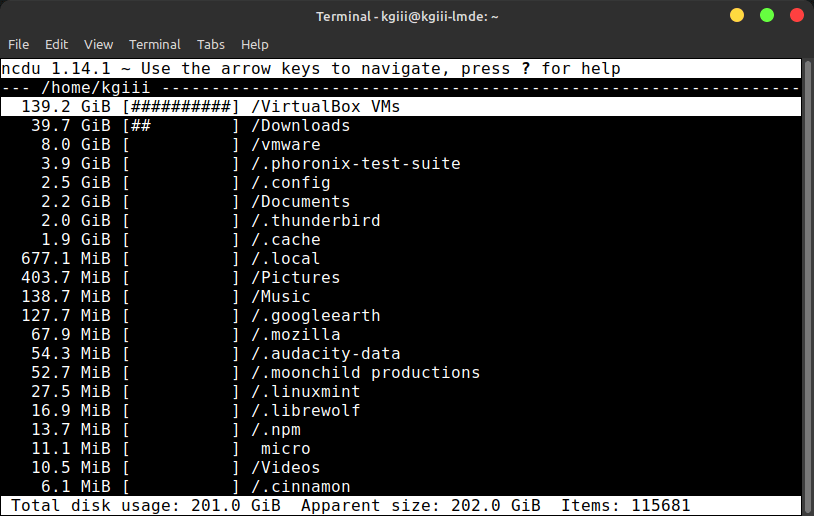
If you run it in your home directory, it’ll just be the files that belong to you. But, you can navigate to any directory and just run the command. In your home folder, it might look a little something like this:

ncdu showing the directories in order of tile size.
See? It should be pretty self explanatory from here on out. Navigation is easy.

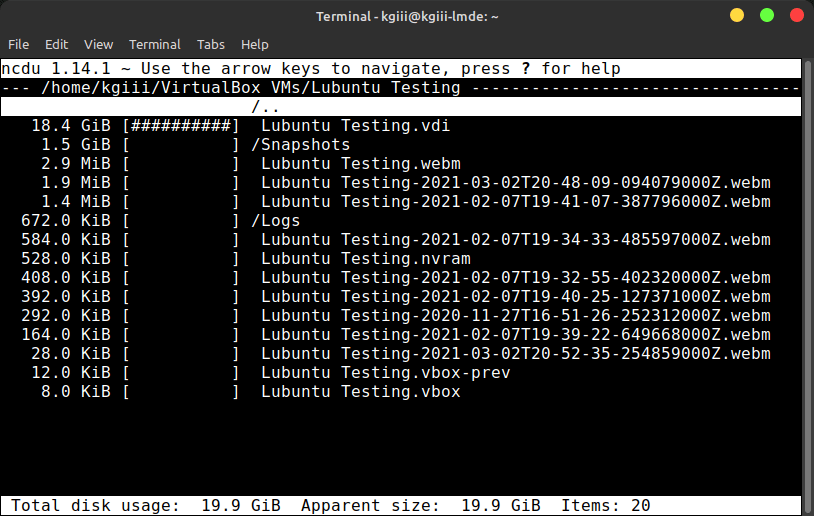
To navigate, you just use your arrow keys. Up and down to pick the directory, forward and backward to enter and exit the directories. For example, when I dig down into my VirtualBox virtual machines directory, I get a screen that’s even more informative. Like this:

ncdu showing the directories in order of tile size.
As you can see, you can dig down quite nicely and find the file sizes.

Anyhow, I’m sure you can figure this out. Use your arrow buttons and explore. Heck, go to the root directory and explore your system until you’re happy and content! Trust me on this one,  you have the capacity to figure this out.

Now, before I go, I’d be remiss in my duties if I didn’t strongly suggest you read the actual man page. There’s a whole lot more to this tool. Using it this way is kinda like using a hammer to bake cookies, or some other horrible analogy. But, it does work. It does give you the information you need. Best of all, it does it without any necessary complexity.

Closure:

And there it is! Yet another article is said and done. This one will show you how to use ncdu in the terminal to find large files. If you’re ever unable to use a GUI, this is an excellent tool to determine file sizes. You never know when you’ll need such a tool.

Thanks for reading! If you want to help, or if the site has helped you, you can donate, register to help, write an article, or buy inexpensive hosting to start your own site. If you scroll down, you can sign up for the newsletter, vote for the article, and comment.

How To: Ask A Good Support Question

This article will teach you how to ask a good support question. After all, if you want good support (and of course you do) then you really need to start with a good question. Good questions lead to good answers. Good questions help us help you.

Let’s be frank about this. Asking a good support question is actually a difficult thing  for some people to do. The folks who really need support are often the least-knowledgeable, which already places them at a pretty solid disadvantage. 

Really, it’s hard to ask good questions. In fact, the possible scope of things that would need to be covered in an article of this nature is so large that I’m really only going to be able to give you some general guidelines. I’ll do what I can to help, and remember that various sites may have different conventions, so you’ll have to take from this what you can.

This article is pretty long because it is not easy to ask a good support question. It’s okay, to be new at it. It’s okay to not know everything. But, if you want support, you’ll have to learn how to ask for it. Also, if you’ve been directed to this page, it just means that you could can use some pointers to help us help you.

With all that said and done… Let’s learn how to ask a good support question!

Ask A Good Support Question:

It should be noted that this article is written in a fairly generic manner. After all, I want to make sure it’s useful to as many people as possible. Because of this, I add: When in doubt, follow the local conventions. The support site you’re using may have their own definitions of normal and good. So, as they say, “When in Rome, do as the Romans did.”

Start with a good headline! 

Your headline should actually be a short description. Generic headlines don’t help and won’t attract people to your question. A good headline will inform and be accurate. A good headline will make people want to open the thread and read your question. A bad headline lessens interest and interaction.

Bad: “My computer doesn’t work.”
Good: “After my last update, my computer stops booting after the GRUB screen with a blinking cursor and a black screen.”

Put some effort into crafting your headline. Don’t make it click-bait; make it an accurate summary of the problem. Make it a simple, well-thought-out description of your problem and brief enough to fit as a headline.

But, before you even begin asking questions…

Use the search feature!

Before you post your question, search! Search, search, search! It’s your computer and your problem, you should be the one doing the most research. On top of that, many questions already have an answer. Every support site out there has a search function. Use it!

Don’t just use the forum’s search – use your favorite search engine. Don’t just do a quick search, keep searching. Make it past the first five or ten search results, and don’t expect your answer to be on the first link you clicked. You might have to do multiple searches, digging deeper into the problem. Not all problems are easily resolved.

Searching can be hard – especially if you don’t know the jargon or lack the information to know the correct keywords. So, find as much information as you can about your problem and use any error logs you can find. Even if your searching doesn’t give you the answer – it might give you enough information to help us help you.

Hint: If you start an application from the terminal, you might learn something from the text it outputs to the terminal.

Hint: If you want a nice GUI way to read your logs, I highly recommend using ksystemlog. It pulls in just a few dependencies and is a very handy tool to have in your toolbox.

Again, search and then search some more. If nothing else, you’ll have more information, which you can help us to help you. You’ll also learn things along the way. What’s not to love?

While you’re searching, make sure you also search the support site to make sure you put your question in the right sub-forum. The “General” category is not a catch-all, it’s where you put your question when there’s no better category. If your question is about the terminal, put it in the command line sub-forum. If your question is specific to Ubuntu, make sure you put it in the “Debian and derivatives” section, or the “Ubuntu” section if they have it. Use commonsense and put your question in the most appropriate section.

Make your post legible!

If you want help, once again, you have to help us help you. This article is written for more than one site in mind, so I need to be generic. The support forum you choose to use has formatting features – use them! Make use of the formatting to better explain your problem and to better identify the information you’re sharing.

Unless otherwise specified, the language is English. It’s not that we’re trying to be jerks, it’s that we don’t speak your language. Use the DeepL translator (or Google Translate if needed) and post your question in English (when you’re on English-speaking sites). More generic, use the language the forum uses. The translation onus is on you, and not on them.

Use code tags. Every single Linux support forum that I know of has the ability to wrap things in code tags. It will look a little like this:

[code]sudo apt update && sudo apt upgrade -y[/code]

Using the code tags where appropriate will properly format the code and make it legible to those who wish to help you. It makes it easier for us to actually see what’s going on. It gives clear line breaks, makes the text distinct, and helps us spot problems. 

Use paragraphs. Giant walls of text aren’t easy to read, nor are they fun to decipher. This is especially true when they’re interspersed with multiple problems and poorly formatted code snippets. Without paragraphs, you might as well be writing gibberish.

For the love of all that’s holy, stop taking screenshots of text! It’s text. Post it as text! When you post your output as text, we can highlight the important bits and search for them. We can edit it and send it back to you. We may know what bit of that text is important and not having to type it out based on a picture is much more efficient.

So, if it is at all possible, do not post text as images. It’s a pain in the butt to get the text during a boot error, so there are obvious exceptions when it’s approached by a reasonable person. But, seriously, try to avoid it. Some of us completely ignore questions that are hard to read or questions that use graphics when text is more appropriate.

Be complete and informative!

There’s almost no such thing as too much information. I mean, sure, you could possibly give us more information than we need, but that’s infinitely better than not enough information.

We not only need to know what distro you’re using, we also need to know what version you’re using. Then, we may also need to know what desktop environment you’re using. We need to know what major changes you’ve made to your system. In some cases, where appropriate, we will also need to know what software version it is you’re talking about. For all but the most basic of questions, we may need to know quite a bit of information.

Believe it or not, we don’t actually know every piece of software that has been written over the years. When necessary, you should provide a link to the software’s home page – so that we can learn about it and help you with it. We’ll maybe even need to know how you installed it, as there are often multiple routes to installation.

If it’s a hardware connection, telling us the model number of your computer isn’t actually enough information. Different models have entirely different configurations while keeping the same model number. We’ll need to know things like what CPU you have, what your GPU model number is, what you have for a sound card, what type of connection to the internet you have, how much RAM you have, and possibly more. A great tool for gathering that information is inxi. We use that tool often on my favorite support site, Linux.org.

Sometimes It’s Not A Problem:

Sometimes, it’s the expected behavior. Yes, your computer will slow down when you have a bunch of browser tabs open and leave them open for days. Yes, your computer will still boot slowly if it’s old and you’re using an OS with a heavy desktop environment while you have everything opening at boot. No, it’s not supposed to show asterisks (some distros do) when you type your password into the terminal.

Be patient and helpful!

Unless you’re paying for support, we’re all volunteers. We owe you nothing. Don’t treat us like paid support and don’t expect us to do the work for you. You’re expected to participate in us helping you. When we ask for follow-up information, provide it in a timely manner. Don’t ask for help unless you have time to follow-up and respond to requests for additional information. Civility and gratitude go a long ways. 

TIP: Limit your questions to one at a time, unless you’re absolutely certain that they’re related. We volunteers tend to specialize in a few areas, so mixing a bunch of questions into one post is just confusing and may lead to your problems remaining unresolved. 

Don’t cross-post.

Pick a forum, one support site, and ask your question there. Chances are good that we’re members of the other forums, so you’re going to get a lot of the same people helping you. Don’t ask the same question at multiple sites, ask at one site – which also makes it easier for the person who’s searching for the same question in the future. Asking at multiple sites is asking folks to duplicate work. It’s just lazy, uninspired, and rude to do so.

Finally!

This is just a general guide. As I told you at the start, asking a good support question isn’t easy. On top of it all, different forums will have different conventions. So, you should probably lurk at a forum before just jumping in. It’s probably a good idea to pick a forum at the same time you pick a distro. That way, they know who you are when you’re asking for their help and you’re already a member of the community before you’re asking for help.

Remember, if your post was resolved, mention it and thank the person that helped you solve it. If you resolve the post on your own, add a comment to let folks know you found the solution – and what the solution was. On the sites that allow it, be sure to edit your title to let folks know the problem has been solved. For example, you can add [Solved] to your original headline and let forum helpers (and people looking for solutions) know that the thread contains a solution.

Closure:

And there it is… I have updated and moved the article that’s meant to help people ask a good support question. Quite a lot of the article has changed, including formatting. In the next day or two, the old link will have a 301 redirect to this link. So, if you’re linking to the older version of this article, it will automatically shunt people over here to view this article about how to ask a good support question.

I’d like to think that this is a ‘living document’. As such, it will change in time. If you can think of worthy additions, please leave a comment below. If this has helped you, please feel free to let us know (in a comment) which section of the article was most helpful to you. Most importantly, I want it to serve as a link folks can use when they want to help folks ask a good support question. The older version of this article was quite beneficial in that way. I hope this one follows suit.

Thanks for reading! If you want to help, or if the site has helped you, you can donate, register to help, write an article, or buy inexpensive hosting to start your own site. If you scroll down, you can sign up for the newsletter, vote for the article, and comment.

Updated:
02/12/2022 (added the [Solved] and Google translate.)
07/07/2022 (fixed a spelling error that has been there the whole time.)
Disable The Caps Lock Key In Linux Mint

Sometimes, like software, an article is about scratching my own itch – and I really wanted to disable the caps lock key in Linux Mint. While I can type at a fairly decent clip, my keyboard is often at an angle and this results in me hitting the caps lock key unintentionally.

It also gets pressed fairly often when I’m inebriated! That can be pretty frustrating and, frankly, I have pretty much no use for the caps lock key to begin with. I suppose I could square up the keyboard and not type while inebriated, but ain’t nobody gonna believe it if I said I’d do those things.

Hmm… This is the point in my introduction where I’d explain the subject matter. This time, the subject is the caps lock key. I’m pretty sure I don’t have to explain that. If I have to explain the caps lock key, this is probably not the site for you. That’ll save a lot of time!

Normally, I’d go about this task by using xmodmap or maybe setxkbmap to accomplish this, but instead I figured I’d look for a nice and easy solution. I figured that I’d look for a handy GUI method. The method I learned may be old-hat to you folks, but I’ve always done this in the terminal and that means it’s new to me.

So then, as there’s nothing more to add to the intro, let’s learn how to disable the caps lock key (and more – and the easy way)!

Disable The Caps Lock Key:

For once, you don’t need to start with an open terminal! Instead, open your application menu and type “keyboard”. Click on the icon that is labeled exactly that.

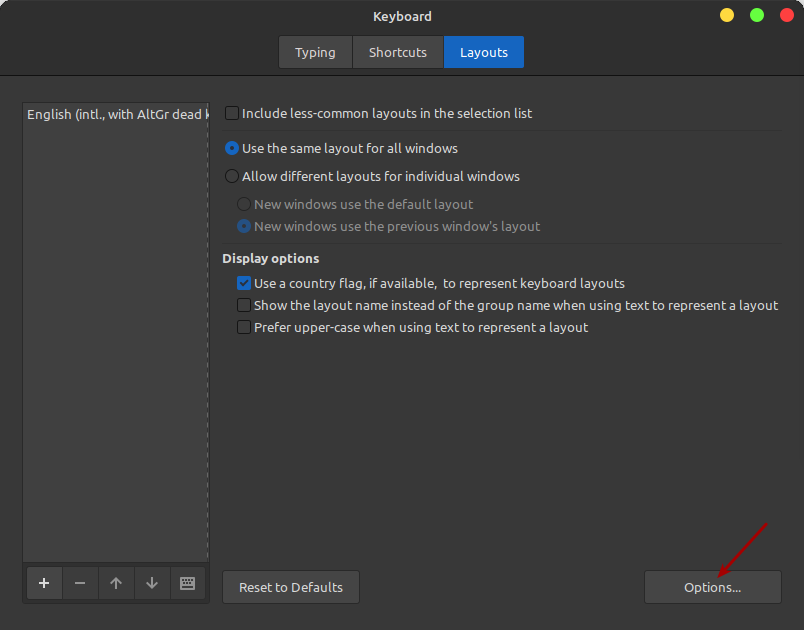
Next, click on the “Layouts” tab and click on “Options”. It should look a little something like this:

setting your keyboard up to disable the caps lock key
This one should be pretty self-explanatory. Just click where the arrow points!

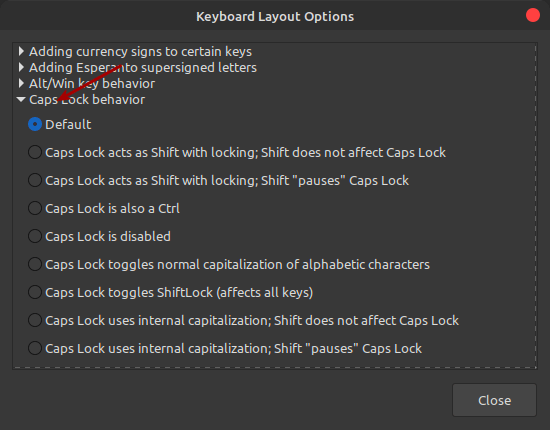
That will open a new screen, where you’ll click on “Caps Lock Behavior”. Once again, it’s going to look a bit like this:

the screen where you disable the caps lock key
You can disable the caps lock key – or you can pick other options.

As you can see, there are a variety of options – including setting the caps lock key to disabled. There are a number of other options that you can pick for the behavior of your caps lock key, but I simply disabled it and called it good. That is what I was after, after all. You do you and decide how you want your caps lock to behave, but this is how you disable caps lock if you really want to.

Closure:

There you have it, another way to disable caps lock key in Linux Mint. I suppose I could probably go ahead and write an article about how to do it in the terminal – which is actually on my list of potential articles to write about. Before delving into the terminal, I decided to see if it could be accomplished graphically and, sure enough, it can.

As you can see, there are all sorts of other options in there. You can change the behavior for quite a few of your keyboard’s keys. This is yet another way you can easily personalize Linux Mint to meet your needs. There’s nothing wrong with that, of course. Worst case scenario? Just hit the ‘Reset to Defaults’ in the Layout tab as indicated in the first graphic on this page.

Thanks for reading! If you want to help, or if the site has helped you, you can donate, register to help, write an article, or buy inexpensive hosting to start your own site. If you scroll down, you can sign up for the newsletter, vote for the article, and comment.

Determine If You’re Using UEFI

Today’s article is going to tell you how to determine if you’re using UEFI or legacy mode. This is particularly useful if you’ve either forgotten. It’s also useful if you’re using a system you don’t know anything about. It’s handy for troubleshooting things like boot issues.

UEFI (Unified Extensible Firmware Interface) is not really a ‘thing’. It’s a set of specifications that determine how the OS interfaces with the operating system. While it does have its advantages, OEMs have been pretty sporadic with the quality of their implementation. UEFI was predated by EFI, which came from a vendor known as IBM. UEFI was predated by BIOS (legacy) and, for now, vendors seem inclined to more or less support both.

Why should you care? Well, it’ll tell you a lot about how you’re booting your system and it says a lot about how your system interacts with the hardware. While tools like boot-repair are able to work with either, you will need to know what type of system you’re working with if you’re doing it manually.

The good news is that it’s easy to figure this out. Even a beginner can figure it out! So, let’s find out if you’re using UEFI.

Are You Using UEFI:

Yup… You need a terminal open. So, let’s do that. All you need to do is press CTRL + ALT + T and your default terminal should open.

Now, the tool we’ll be using is called ‘efibootmgr’. That tool defines itself as:

efibootmgr – manipulate the UEFI Boot Manager

I did some testing and it was installed by default on most of the operating systems I tried it on. If it’s not installed, it’s pretty easy to install. The only time I had to install it manually was with openSUSE Tumbleweed. So, the command for that is:

If it’s not installed on your system, just go ahead and install it. You may need to use apt, dnf, or whatever – but it should be available for your distro. Just install it like you’d install other software from the terminal, suited to your distro’s package manager.

Once it is installed, it’s really, really simple. Just run:

Then, check the output. If you’re not using UEFI, it will say:

If it says anything else, you’re using UEFI. 

See? I told you that it was easy. That’s all you need to know.

Closure:

Yup. Another article said and done. This one is about determining if you’re using UEFI or if you’re not. It’s so simple that even a rank beginner can figure it out. Don’t forget that you can use the comment section to ask questions that’d be suitable for new articles. Sometimes, even with my notes, it’s harder to decide the subject than it is to write the article.

Thanks for reading! If you want to help, or if the site has helped you, you can donate, register to help, write an article, or buy inexpensive hosting to start your own site. If you scroll down, you can sign up for the newsletter, vote for the article, and comment.

Install Brave Browser In Fedora

I keep hearing people talk about the Brave browser, so I decided to spin up a virtual machine and learn how to install Brave browser in Fedora. It’s actually one of the more complicated installs, but it’s not dreadfully difficult. If you’re looking to install Brave browser in Fedora, this article is for you.

If you’re unfamiliar with Fedora, it’s a distro that’s mostly sponsored by Red Hat and it is usually on the front edge of software. So, if you’re looking for a reasonably stable platform that also offers the latest and greatest software, Fedora is probably a good distribution for you.

Read: What is The Best Linux Distro?

So, if you’re a Fedora user, or are considering using Fedora, you might be pleased to know that you can install Brave browser. It’s not even all that difficult. While it’s generally advised that new users stick to the software choices in their default repositories, I’ve generally/mentally always made an exception for the browser. After all, which browser you prefer is such a personal choice. As such, you may need to reach outside the defaults to find the browser that best suits your needs.

Anyhow, today’s article is going to tell you how to install the Brave browser in Fedora. I’m not really a huge fan of Brave, but the growing popularity can’t be denied. So, you might as well know how to install it.

Install Brave Browser In Fedora:

Like so many articles, this one requires an open browser. That’s easily accomplished with the GUI application menu, or you can just go ahead and press CTRL + ALT + T and your default terminal should open.

With your terminal open, let’s prep Fedora to install Brave browser. You’ll need to install dnf-plugins-core if you’ve not already done so. That’s done with this command:

We’ll then want to add the Brave repository, like so:

Note: That may change with newer Brave versions.

Next, you’ll want to make sure the software you get is genuine, using an .asc file – an ASCII version of a .pgp key file, and this requires this command:

That’s pretty much it, actually. All that’s left is to install Brave browser in Fedora – which is done with just this command:

Follow any on-screen prompts and you’re good to go. If you want proof that it works, see this:

freshly installed brave browser in Fedora
That may look a little funny, but it’s Fedora with LXDE – and the Brave browser!

See? It works! It wasn’t even all that hard to install the Brave browser. If that’s the browser you want to use, you can now jump to Fedora and know that the browser works just fine. You’re welcome!

Closure:

There you have it. There’s another article, this one telling you how to install Brave browser. I figured it’d be something folks are interested in, as Brave has increased in popularity and more folks are considering using Brave as their default browser.

Thanks for reading! If you want to help, or if the site has helped you, you can donate, register to help, write an article, or buy inexpensive hosting to start your own site. If you scroll down, you can sign up for the newsletter, vote for the article, and comment.

Linux Tips
Creative Commons License
This work is licensed under a Creative Commons Attribution 4.0 International License.