Today, we’re going to learn how to install Microsoft Edge. That’s the browser made by Microsoft that even has a Linux version. That’s right, it’s from Microsoft but has a Linux version – and a version packaged for pretty much everyone.
We’ll be installing on Linux Mint, just to mix things up a bit. It’s really not that much of a change, it’s still using apt. It just so happens that I’m sitting at a Linux Mint computer when I’m writing this. We might as well use GDebi while we’re at it.
Yes, I’m well aware that many of you hate Microsoft with a passion. That’s fine. If you don’t want to install Microsoft Edge, just move on and don’t bother those of us who are curious about the browser. You’ll have another article in a couple of days, and it quite likely won’t have anything to do with Microsoft.
If you don’t know, Microsoft Edge is based on Chromium – which is the opensource version of Chrome, more or less. Chromium doesn’t have feature parity with Chrome, so it’s not quite the same version. Chrome is mostly based on it.
There are many browsers based on Chromium. Brave, Vivaldi, Opera, etc.? They’re all based on Chromium. There are only so many browser engines out there, and Chromium being opensource means people are going to use it. Microsoft jumped on the bandwagon with their Edge and made it available for Linux users. So, we’re going to…
Install Microsoft Edge:
This article requires an open terminal, but only for a minute. If you don’t know how to open the terminal, you can do so with your keyboard – just press CTRL + ALT + T and your default terminal should open.
To keep things easy, we’re going to install GDebi. As we’re doing this on Mint, the command will work with any apt-using distro, the command to install GDebi is:
1
sudo apt install gdebi
Follow any prompts to ensure you install GDebi properly.
Next, fire up your favorite browser and:
Click to download Microsoft Edge for Linux (make sure to get the right one for your distro). There are a number of choices, so pick the right version of Microsoft Edge for you.
Let it download, say to your Downloads directory. When your download is complete, right click on it and choose to open it with GDebi directly from the right click menu.
That part is easy, just let it do its preliminary checks and then you can click on the install button (upper right) when it’s ready to be installed. Later, if you don’t like it, you can open the .deb with GDebi again and opt to uninstall the package. See? It’s pretty handy.
Closure:
I actually wrote a review of Edge before, but it’s on the old site and not really very good. Even if you can’t stand Microsoft, it’s not a bad browser. It’s not one that I’m going to use in my day-to-day browsing, largely due to lethargy, but it’s still a viable browser.
Thanks for reading! If you want to help, or if the site has helped you, you can donate, register to help, write an article, or buy inexpensive hosting to start your own site. If you scroll down, you can sign up for the newsletter, vote for the article, and comment.
Today’s article will teach you how to install the Snap version of Chromium – the opensource browser from Google. It’s akin to Chrome, but without all the proprietary bits and bobs. This isn’t a difficult article to follow, but may have some information that was easy to miss along the way.
Chromium is also the source for many other browsers, from Brave to Opera, they’re all Chromium underneath – including the Edge browser from Microsoft.
You’ll find things like syncing your passwords and history isn’t really possible with Chromium’s default configuration. Those bits are proprietary, and Google doesn’t want third parties using their resources, so those bits have been disabled for some time now.
However, it’s still very much a usable browser – and I’d know that sorta thing. After all, I’ve made it pretty clear that I’ll try any browser at least once! I’m often checking out the browser market and trying new browsers. With that, I can say that Chromium is generally easy to work with, has the features I use, has great support, and has a ton of available extensions.
Snap Version?
Snap? Yes, this article is about installing the Snap version of Chromium. I actually wrote an article about how to install the non-Snap version. (It was a horrible article written while I was very ill – I need to go back and edit it.)
Snaps are Ubuntu’s (will work on most every distro, with a little effort) ‘new’ package management system. It’s meant to be easier for both you and the developer, as the developer needs to only package one version. As for it being easier for you, it’s meant to avoid needing dependencies and does things like run in a secure container. It has some differences to, and some similarities with, both AppImages and Flatpaks.
Snaps are happening. If you don’t like them, you’re going to have to put some effort into not using them – if you want to use Ubuntu and official Ubuntu flavors. Mint is an exception – currently. We’ll see how long they hold out and which side of history they end up on. Still, if you want to use Ubuntu, you might as well adjust and start using Snaps.
In fact, in Lubuntu 22.04, you’ll find that Firefox defaults to a Snap version. That’ll likely be mentioned in the release notes that nobody ever reads, so, we’ll have to see how folks deal with that change. I wonder how many won’t even notice the change?
Yes, there are complaints about Snap applications – some of them even valid complaints. It doesn’t matter. This is the direction Ubuntu is going and there’s no stopping them. I will link to this page again, just to show you how easy they are to use. You might as well jump on the train, ’cause the destination is set for Ubuntu’s locomotive.
On a personal level, I don’t really mind them. They’re a bit wonky when compared with traditional repositories or PPAs. They do things like save the previous version, so that you still have access to the application if the newer version is buggy. They also take up more space, as one would expect if dependencies are included with each Snap. Indeed, they even take longer to load. Much of that is mitigated by having more modern hardware or being just a little patience – they don’t take all that long to load, after all. They also have some pretty great features.
So, yeah… This article is about a Snap application – specifically Chromium. It’s not terribly complicated – but there’s a second step that many don’t realize and I want to bring attention to that step.
Install The Snap Version of Chromium:
This article requires an open terminal, like many other articles on this site. If you don’t know how to open the terminal, you can do so with your keyboard – just press CTRL + ALT + T and your default terminal should open.
Once you have your default terminal emulator open, you can just install Chromium with the following:
1
sudo snap install chromium
That’s all well and good, but it’s actually just a limited version of Chromium. Perhaps for licensing reasons, I’m not actually sure, you’re probably not done at this point. Well, many people will not be done at this point.
If you, like those many people, want to play things like proprietary media (i.e. DRM encumbered media like Netflix) you actually have to install another package. This step isn’t really all that clear and you’re kinda left blind to figure it out for yourself. Hopefully this makes it a bit more clear for those seeking information about installing the Snap version of Chromium.
Again, it’s not hard. This is not a difficult article to follow. It’s just that it’s not all that clear. You next need to install chromium-ffmpeg. Your regularly installed ffmpeg is not adequate, you need a Chromium specific version. The command is pretty logical, once you know that you need it.
1
sudo snap install chromium-ffmpeg
And, that’s actually all you should need to do. Having done that, you can restart your browser and you should be able to use DRM-protected music and video. Yes, you should be able to use Netflix – but not Peacock, ’cause they’re just jackasses.
Closure:
See? I told you that it wasn’t that difficult to install the Snap version of Chromium. It shouldn’t take you more than a few minutes before you’re watching videos and listening to the music. We can argue the merits of DRM some other time, but this is not the article for that.
Well, I mean, you can offer opinions in the comments and feedback, but no amount of opinion will stop me from telling folks how to do this. If they want to consume DRM-encumbered media, they are free to do so, and this is one way of doing so. No amount of opinions offered will sway Ubuntu from this course.
Thanks for reading! If you want to help, or if the site has helped you, you can donate, register to help, write an article, or buy inexpensive hosting to start your own site. If you scroll down, you can sign up for the newsletter, vote for the article, and comment.
I keep hearing people talk about the Brave browser, so I decided to spin up a virtual machine and learn how to install Brave browser in Fedora. It’s actually one of the more complicated installs, but it’s not dreadfully difficult. If you’re looking to install Brave browser in Fedora, this article is for you.
If you’re unfamiliar with Fedora, it’s a distro that’s mostly sponsored by Red Hat and it is usually on the front edge of software. So, if you’re looking for a reasonably stable platform that also offers the latest and greatest software, Fedora is probably a good distribution for you.
So, if you’re a Fedora user, or are considering using Fedora, you might be pleased to know that you can install Brave browser. It’s not even all that difficult. While it’s generally advised that new users stick to the software choices in their default repositories, I’ve generally/mentally always made an exception for the browser. After all, which browser you prefer is such a personal choice. As such, you may need to reach outside the defaults to find the browser that best suits your needs.
Anyhow, today’s article is going to tell you how to install the Brave browser in Fedora. I’m not really a huge fan of Brave, but the growing popularity can’t be denied. So, you might as well know how to install it.
Install Brave Browser In Fedora:
Like so many articles, this one requires an open browser. That’s easily accomplished with the GUI application menu, or you can just go ahead and press CTRL + ALT + T and your default terminal should open.
With your terminal open, let’s prep Fedora to install Brave browser. You’ll need to install dnf-plugins-core if you’ve not already done so. That’s done with this command:
1
sudo dnf install dnf-plugins-core
We’ll then want to add the Brave repository, like so:
Next, you’ll want to make sure the software you get is genuine, using an .asc file – an ASCII version of a .pgp key file, and this requires this command:
That’s pretty much it, actually. All that’s left is to install Brave browser in Fedora – which is done with just this command:
1
sudo dnf install brave-browser
Follow any on-screen prompts and you’re good to go. If you want proof that it works, see this:
That may look a little funny, but it’s Fedora with LXDE – and the Brave browser!
See? It works! It wasn’t even all that hard to install the Brave browser. If that’s the browser you want to use, you can now jump to Fedora and know that the browser works just fine. You’re welcome!
Closure:
There you have it. There’s another article, this one telling you how to install Brave browser. I figured it’d be something folks are interested in, as Brave has increased in popularity and more folks are considering using Brave as their default browser.
Thanks for reading! If you want to help, or if the site has helped you, you can donate, register to help, write an article, or buy inexpensive hosting to start your own site. If you scroll down, you can sign up for the newsletter, vote for the article, and comment.
Today, I’m going to review the Dooble browser, so that you don’t have to. The Dooble browser is a browser that has no dependencies as long as your system has fits ‘latest Qt is supported’ requirement. It bills itself as:
Dooble is the scientific browser.
Many folks are aware that I’m a sucker for a new browser. I install browsers that interest me, even though I have no plans to use them as my regular browser. I install browsers just to see what’s going on in the browser world. Changing my browser isn’t actually something I plan on doing!
So, I first read about Dooble browser when I was browsing Reddit. It was some video that I didn’t watch, ’cause I don’t tend click many video links. Seeing a browser name that I didn’t recognize sent me immediately to a search engine, where I found what was once their home page. That, sadly, wasn’t the project’s page anymore. It sent me here.
Technically, the link I clicked sent me straight to the release page where I found it packaged as a .deb file. Being who I am, I immediately downloaded it – with some glee, as it had been a little while since I played with a new browser. It said it was a scientific browser and I’m a mathematician, so I was pretty sure that the browser and I would get along famously.
I was wrong. Oh, was I wrong.
Installing Dooble Browser:
As mentioned, from the releases page, I found the .deb packaged for my Lubuntu system. It downloaded well enough, but the first thing I noticed was this:
1
2
3
4
5
6
7
8
9
10
11
12
13
14
15
16
17
18
19
sudo apt install ./Dooble-2021.08.05_amd64.deb
Reading package lists... Done
Building dependency tree
Reading state information... Done
Note, selecting 'dooble' instead of './Dooble-2021.08.05_amd64.deb'
The following NEW packages will be installed:
dooble
0 upgraded, 1 newly installed, 0 to remove and 0 not upgraded.
Need to get 0 B/97.4 MB of archives.
After this operation, 0 B of additional disk space will be used.
(Reading database ... 476858 files and directories currently installed.)
Preparing to unpack .../Dooble-2021.08.05_amd64.deb ...
Unpacking dooble (2021.08.05) ...
Setting up dooble (2021.08.05) ...
Processing triggers for mime-support (3.64ubuntu1) ...
Processing triggers for gnome-menus (3.36.0-1ubuntu1) ...
Processing triggers for desktop-file-utils (0.24-1ubuntu3) ...
Yes, yes that’s verbatim. I just copied and pasted the output. No, I have no idea why it started off with the selection process like that. I also have no idea why it’d go on to ‘getting’ files. The files were already there. The good news is that it did install and that it was immediately available in the application menu under the Internet heading.
Using Dooble Browser:
So, I opened up Dooble browser and was greeted with what looked like a fairly regular browser. I typed in the address for this site and the site opened, complete with ads.
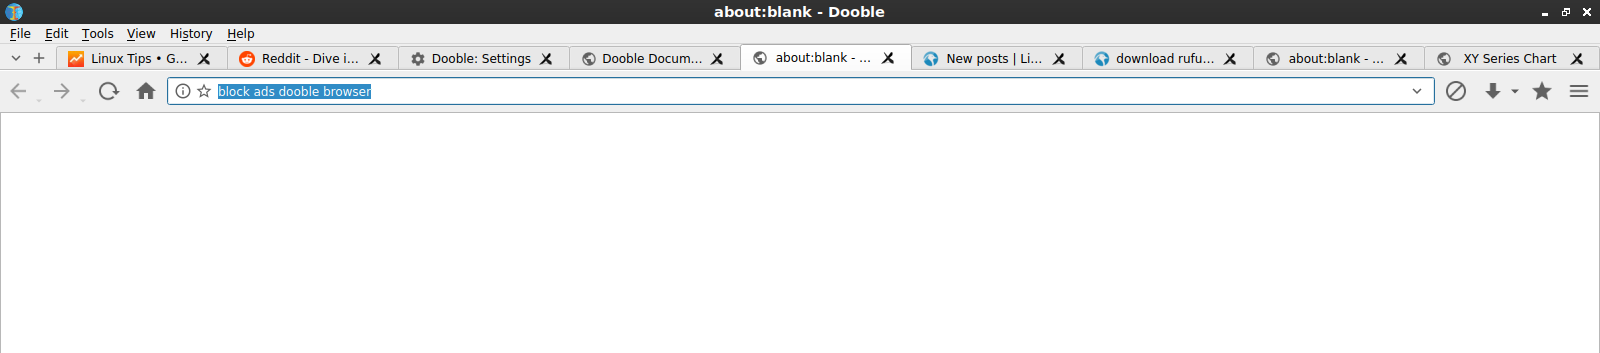
Curious, I looked for a way to add extensions and found none – more on this later. So, I typed ‘Dooble browser ad block’ into the address bar and pressed the enter button.
Nothing happened.
At this point, I opened a few more sites and decided to open the settings menu. There are like 4 first-level tier buttons that will take you to your browser history… In the settings menu, I found search engines. None of them worked for searching from the address bar. Right clicking on text? Nope… There’s no active ‘search’ feature there.
I found an option to enable ‘web plugins’. This did not enable anything noticable.
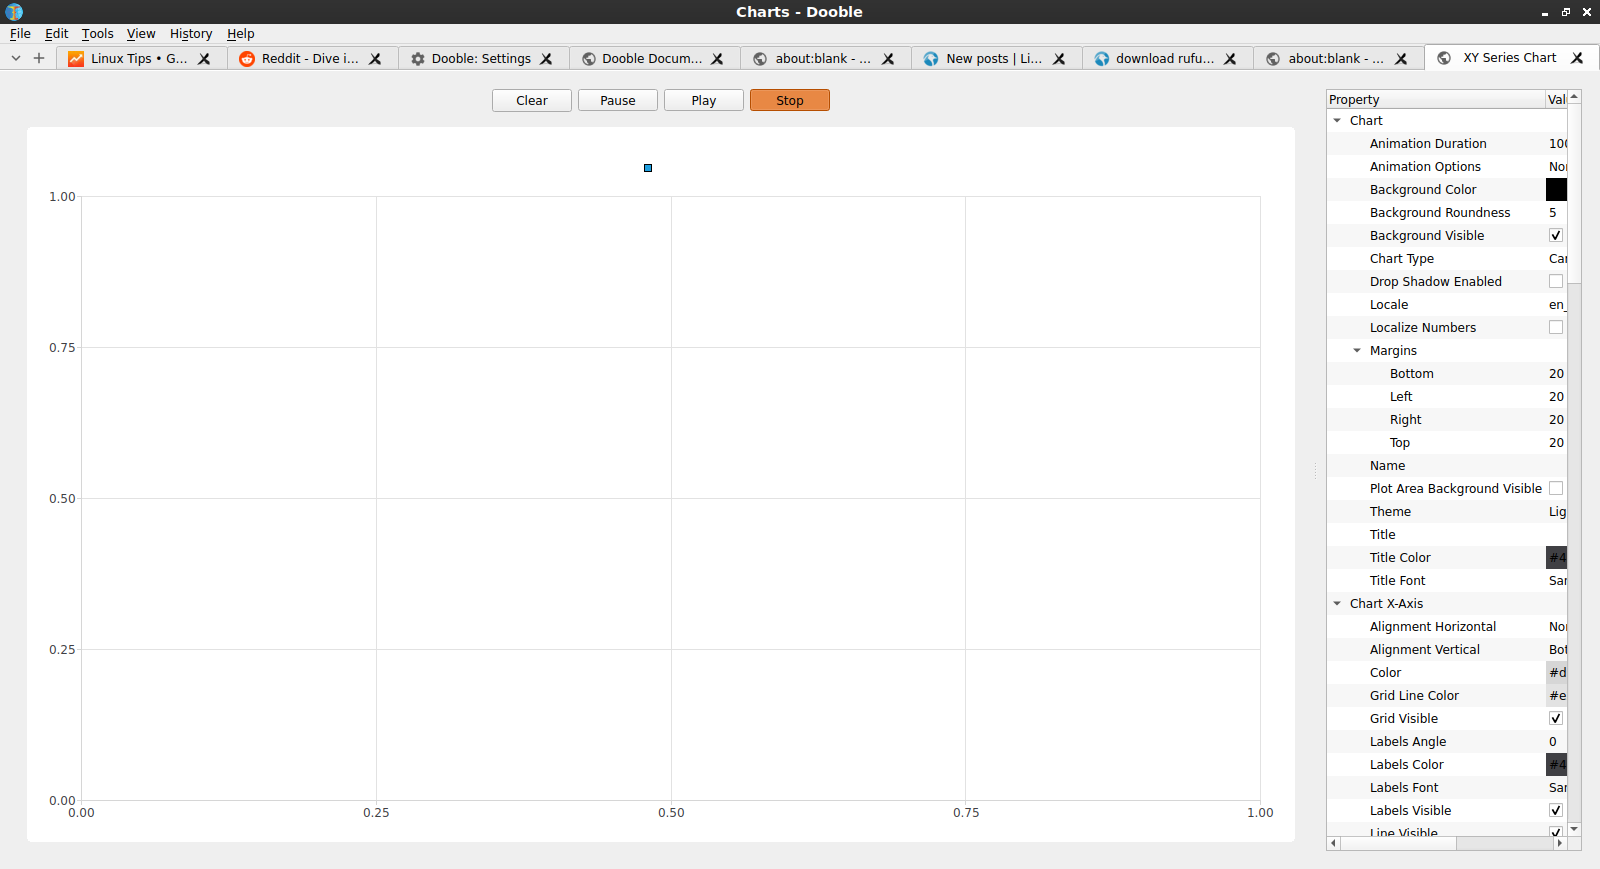
I decided to check out the ‘science’ aspect – which is just some sort of mystery graph. To do this, I clicked on ‘Charts’. It helpfully looks like this:
Yes, I pushed the buttons. No, it didn’t help. It wasn’t even remotely helpful.
I have no idea what they’re plotting on the chart. Pressing the buttons didn’t make it clear. I thought about investing some more time, but I don’t like throwing good time after bad.
In my effort to block ads, or at least to see if you could, I played with a feature that let me accept and block domains. I told it to only accept linux-tips.us, and refreshed. It still happily showed me ads from Google. Speaking of which, it’d be pretty sweet if you’d unblock ads on linux-tips.us!
Reviewing Dooble Browser:
Well, it does have an option for a floating clock and floating history. Oh, wait, there’s a 5th way to access history as a top-level option. They sure want you to be able to view your history.
I have no idea why it has ‘search engines’, because there’s no right click search menu and searching from the browser’s address bar does this:
You can just keep clicking and waiting. Nothing happens… You can keep waiting…
Whatever it’s charting, I can’t tell. Usually an X and Y axis actually have labels. Without those, I can’t really tell what is going on. Is it me that’s making the mistakes? Once more, I can’t even tell!
Does it function as a browser? Well… You can technically browse sites. I browsed a number of them before giving up and noticed not one single rendering problem – which is a plus. I was able to login – but my username and password wasn’t remembered, meaning I couldn’t automatically log back in.
One of the things I noticed was that the ‘cache size’ never increased – regardless of how much browsing was done. On the plus side, I told it to not allow Reddit to send push notifications and it appears to have remembered that.
So, on a scale of 1 to 10, I’m gonna give Dooble browser a solid 3.5. It stayed up and running, with no crashes. It didn’t require any dependencies, and installed cleanly. Technically, it does browse websites. The Gopher support amused me, though I didn’t bother testing it.
I find it laughable in its lack of functionality. That it has search features and then doesn’t let you search is amusing. I just can’t give it less than 3.5. I’m sure tons of hours are going into it, and I’ll assume that it’s going to improve. I’ll keep checking in on it. If you’re a developer and would like to offer some sort of rebuttal, I’m all ears.
Closure:
Well… That’s a review. I don’t think I can recommend the Dooble browser to anyone at this time. They have lofty goals but are failing to meet them. When it becomes a usable browser, I’ll try to let people know. I’ll check in on it from time to time, even if just to get a chuckle from how laughably bad it is.
Thanks for reading! If you want to help, or if the site has helped you, you can donate, register to help, write an article, or buy inexpensive hosting to start your own site. If you scroll down, you can sign up for the newsletter, vote for the article, and comment.
This article was authored while I was sick and pukin’. Well, I’d mostly stopped puking while writing.. Thanks to a fantastic @GGG_246 from Reddit (No thanks to you folks on Linux.org who normally catch this stuff!) the entire intro was meant for Chromium and not Chrome.
This is because I was moving it from the old site to the new one, splitting it into two articles. The old article covered both Chrome and Chromium. Also, I was sicker than I’m gonna describe…
So, here you go… This is how to install Chrome browser on Ubuntu. (I am still not quite back to normal. Ask me about my bowels!)
Install Chrome Browser:
Let’s just jump right into it. You know what Chrome Browser is, or you wouldn’t be here. It’s also not very complicated. Let’s bust open your default terminal emulator by pressing CTRL + ALT + T and enter the following:
That’s it in the terminal. You’re done. When you finish the installation and start Chrome it will let you set it as the default in the terminal or GUI (if you want), among other things. Even better, the installation adds its own repository and will now automatically update the Chrome browser when the rest of the system is updated.
The repository contains the beta version as well, as well as the unstable version. With the repository added, you can install any of them easily. Be aware that beta may have bugs and that unstable is a nightly build that’s also prone to bugs. Using either means you understand the risks – and also kinda comes with the responsibility of reporting bugs.
Just use ‘apt install’ and they’re there for the taking. Install as you wish!
And, that’s about it really. There’s not a whole lot to this article and it’s intentionally short. I’ll do a very similar article about Chromium, so be prepared for that!
Closure:
One more article is in the books. This one is short for a couple of reasons. One of those reasons is that I’m not feeling well. That and power outages make me wonder if I’ll actually manage to do this for the full year. I should get a bunch of articles ahead! I’m eventually going to miss an article or two and I should probably prepare for that.
Thanks for reading! If you want to help, or if the site has helped you, you can donate, register to help, write an article, or buy inexpensive hosting to start your own site. If you scroll down, you can sign up for the newsletter, vote for the article, and comment.