Did You Know You Have A Calendar In The Terminal?

You might not know it, but you actually have a calendar in the terminal. It’s surprisingly handy. Though, to be clear, I pretty much only use it when I’m already in the terminal – such as when I’ve used SSH to connect to a remote server.

So, it’s useful (to me) while I’m already in the terminal. The rest of the time, I’m in a GUI desktop environment and there’s a calendar to be had just by mousing over the time. There’s also Thunderbird’s calendar and I use that a great deal. It cal command is of limited value, which is just fine. 

The tool we’ll be using is called ‘cal‘. The cal command is in wide use today and has been with us for, at the time of this writing, more than fifty years. It’s a pretty straightforward command and its longevity speaks towards its usefulness for a subset of Unix/Linux users. It describes itself like:

cal, ncal — displays a calendar and the date of Easter

And it does (sorta) tell you when Easter is – for both western churches and the Orthodox churches. See? It’s already doing what it says on the tin! It only gets better from here!

We won’t really be covering ncal, which is useful if you’re trying to find things like the number for the day of the year. While that might be useful to some, it’s not useful to most and those folks can easily read the man page to learn more about it.

Anyhow, on to the article about the calendar in the terminal!

Calendar In The Terminal:

As you can see, this has to do with the calendar in the terminal, so you’re going to need an open terminal. If you want, you can just press CTRL + ALT + T and your default terminal should open right up. 

With your terminal now open, you can start with the absolute basic command, which will show you a calendar with today’s date highlighted. It’s really easy, it’s just:

If you want to show the last month, this month, and next month, you can do that too. The command to do that is:

If you want to see a month from time past, or in the future, you can do that. The format for that is <mm> <yyyy> and it’s useful for both months past and months future. It looks something like this:

The previous commands (sans cal -3) will give an output similar to this:
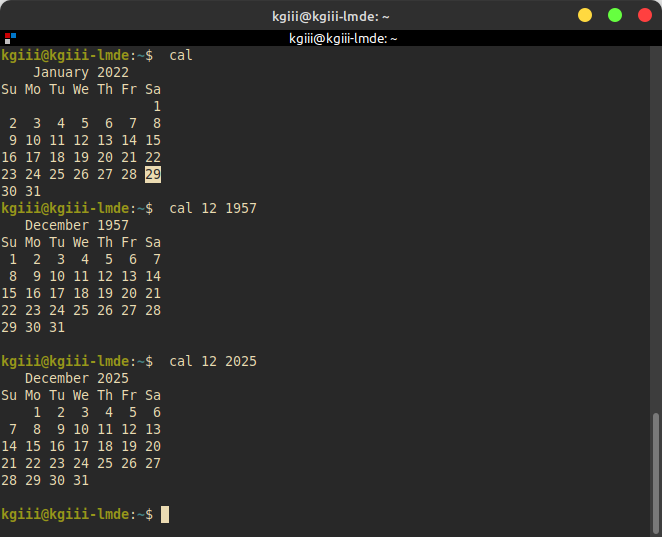
cal in action
Well, you don’t need to be a police detective to tell what day it was when I wrote this.

But wait! There’s more! You can show the entire year in the calendar by just using the -y flag. It looks like this:

That command can be modified. To show a different year, it’d look a little something like:

By default, the calendar in your terminal uses the Gregorian calendar. If you want the calendar in your terminal to use the Julian format then you just use the -J flag.

On top of that, it really will tell you when it’s time to celebrate (assuming you do) Easter. For some reason, I can’t get ‘cal’ to show Easter – but you can still make it work. To show it in Gregorian (western churches) format, it’s just ncal -o or for Julian dates you’ll just use ncal -j.

Closure:

See? I told you that you had a calendar in the terminal! It’s not entirely useless and can be useful when you’re full-screening your SSH sessions, or something of that nature. If you regularly work in the terminal, this is a handy tool to add to your toolbox. Most of the time, you’ll probably only need three letters to have a useful calendar appear in your terminal.

Thanks for reading! If you want to help, or if the site has helped you, you can donate, register to help, write an article, or buy inexpensive hosting to start your own site. If you scroll down, you can sign up for the newsletter, vote for the article, and comment.

How To: Create Custom Welcome Message In Your Terminal

In today’s article, we’ll teach you how to create a custom welcome message in your terminal. This could be useful or playful. What you do with this power is entirely up to you. After all, that’s the whole point of ‘custom’!

It’s not terribly difficult and there’s some fun to be had with this exercise. Basically, we’ll be making it so that you get a custom message (including action) that is output whenever you open up a new terminal.

You can make the terminal do all sorts of things by editing your ~/.bashrc file. That’s how we’ll create a custom welcome message in your terminal. It’s not dreadfully difficult but it will help make your system feel like your own and, to some people, that’s one of the greatest things about Linux.

So, how about I show you how I customized my welcome message in the terminal? You can use my example as a brief template to use yourself, when you create your own custom welcome message. It’s something even a new Linux user can do!

Create Custom Welcome Message

The file we’re going to be using for this is .bashrc, located in your home directory. So, the path to that file will be ~/.bashrc. If you don’t know, dot files (those starting with a period) are considered hidden. Unless you’ve opted to do so, these files will not show up in your file manager. We can still access ’em just fine in the terminal, when we use their path.

The tool we’re going to use is ‘nano‘. It’s an acceptable tool for this, and many other things, but you could just as easily substitute a GUI text editor. In this case (so long as you can see the hidden files) you don’t need to edit in the terminal – and you don’t even need to use ‘sudo’ for anything, because the files you’re editing belong to you in the first place!

Let’s get to editing – as it’s easy and I need to show only a couple of commands in order to demonstrate the feature. We’ll do it in nano, of course. That requires an open terminal, so just press CTRL + ALT + T and your default terminal should open.

With your terminal open, enter the following command:

Once that’s open, add the following lines:

Then you’ll save that with nano – which is done by pressing CTRL + X, then Y, and then ENTER. That’ll save the file – but you still need to tell the system how to use it. You need to tell bash to look for the new source and that’s done with:

That reloads the changed file. Close your terminal and open it again to see the new custom welcome message. In this case, it’d look a bit like this:

custom welcome message
See? You now have a custom welcome message in the terminal! Tada!

Obviously, you can customize those two commands, add more commands, and generally craft the custom welcome message you want to see when you open the terminal.

Just remember… You have to save the changes and then you need to reload the changes with source ~/.bashrc in order to make sure they work. You have to save the changes and reload the source with every change. You’ll see the changes when you next open the terminal. The two commands I chose should be self-explanatory, you can use them as an example for the commands you want to use to make your custom welcome message.

Closure:

There you have it, another article said and done! This one shows you how to make a custom welcome message in your terminal. Is this a useful skill? Well, not necessarily – but it is a way to make Linux a little more your own. It’s an easy way to customize Linux. Enjoy!

Thanks for reading! If you want to help, or if the site has helped you, you can donate, register to help, write an article, or buy inexpensive hosting to start your own site. If you scroll down, you can sign up for the newsletter, vote for the article, and comment.

Use ‘apt-cache’ To Find An Application’s Homepage

It can come in pretty handy to know an application’s homepage. You can find an applications’s homepage with ‘apt-cache’. I’ll show you how. This is a pretty easy article to follow and just another tool to add to your toolbox.

NOTE: This is only valid for systems that use apt. As the title indicates, it requires ‘apt-cache’. Without apt-cache, this page will do you no good. None good! That’s how much it will do you. None!

Why would you want to know the homepage – and, more so, the preferred homepage? For starters, in the days of GitHub and everyone forking, and awkward application names that aren’t easily searched for, it’s hard to know which site is the correct one.

Maybe you want to report a bug? Maybe you want to request a feature? Perhaps you want to make a donation? Maybe you just want to thank the author for writing such awesome software? Maybe you want to know where the homepage is because you need support and you’re not sure where to turn to?

There are all sorts of reasons why you might want to know the homepage of a piece of software. It’s actually something that’s important. It’s also something your system already knows and will happily show you if you know the proper magical incantation.

Find Application’s Homepage: 

Like many other articles, you’re gonna want the terminal for this. Let’s go ahead and get that opened by using your keyboard and pressing CTRL + ALT + T

Got your terminal emulator open? Good! Let’s start with the command.

If you do not have ‘inxi’ installed, feel free to use a different application. Note that you do not need to use sudo for this. Not all apt commands require sudo. You only need sudo when you’re actually doing administrative tasks. See? I saved you some typing!

Anyhow, in the text output from the above command you’ll see a line that starts with “Homepage:”. If you hadn’t already guessed it, that’s the line that tells you the authors homepage. You’ll also sometimes find the URL where they want you to report bugs, but that’s a topic for another day.

So, let’s go ahead and make the command a little more precise. We’ll pipe the output through grep and get rid of the cruft we don’t actually need. In that same terminal, go ahead and enter:

NOTE: The command contains a capitalized letter H because Linux is often case-sensitive and is certainly case-sensitive in this case. If you don’t believe me, try it with a lowercase h!

But wait, there’s more!

Not only is there homepage information in there, there’s sometimes some useful nuggets of information in there. If you have LibreOffice installed, go ahead and check (skip the pipe and grepping) to see what the output is. Inside, it has a ton of additional information, including listing ways that you can extend LibreOffice by installing more software.

Closure:

And there you have it. You can now easily find the application’s homepage for the applications you have installed or want to install. Should you need to contact the author, check for information, or just see if they did anything else, you now know how to do that. It’s a little hidden nugget that most folks don’t seem to know. Well, now they do…

Yay! You made it all the way to the bottom. You deserve a treat. Seeing as you’ve already got the terminal open, and seeing as we’re dealing with apt-cache, let’s just get some pretty neat stats with:

A careful reader would remember that from a previous article, but no matter. Thanks for reading! If you want to help, or if the site has helped you, you can donate, register to help, write an article, or buy inexpensive hosting to start your own site. If you scroll down, you can sign up for the newsletter, vote for the article, and comment.

How To: Show All Environment Variables

Today’s article is going to show you how to show all your environment variables in Linux. There are quite a few and some of them can be quite useful. If you don’t know what an environment variable is, we’ll cover that briefly as well.

So, what is an environment variable? It’s a static name for a dynamic value. In other words the system has information that varies, but using an environment variable will point to the dynamic information as though it was static.

As an example, we can use ‘echo $PWD‘ in the terminal and it will output the present working directory. If you change the directory and run that command again, it will output the new present working directory. You can do things like ‘echo $SHELL’ and it will tell you the shell you’re using, even if you’ve changed from the default shell. Things like that are the point of having environment variables.

These things really shine when used for things like scripting. They’re useful when you’re not certain of the architecture they’ll be used on and still want the script to work predictably wherever it is used. You’ll also see environment variables put to work in programming. They’re pretty handy, as I said!

If you’d like to see an example, read my article about clearing EXIF data for privacy’s sake. Scroll down to find the alias example I included and you’ll see the $PWD environment variable at work. See? It’s pretty easy and effective. So, let’s see a few ways to show all environment variables.

Show All Environment Variables:

Like most articles, you’re gonna need an open terminal. You can do that with your keyboard, by pressing CTRL + ALT + T and your default terminal should open.

Now that you have your terminal open, we’ll start with the first way to show all the environment variables:

You can also use:

You can also use the following command, but I don’t recommend doing so. It’s here for the sake of completeness and the command will output a lot of gibberish that’s really of no value to the average user.

Now that you know how to show them, here are a few handy examples that further demonstrate what an environment variable does.

Show home with:

Find the system language with:

Or find the desktop environment in use with:

Those are just a few of the environment variables available to you as a Linux user. If you make use of these on a regular basis, please leave a comment explaining how you use them.

Closure:

Yup… Another article. Another step closer to the anniversary of this site. I still have some content to move over from the original site, but writing completely new stuff is pretty fun. Seriously, it’s pretty fun. Please feel encouraged to write an article or two, considering I normally take the whole month of January off!

Thanks for reading! If you want to help, or if the site has helped you, you can donate, register to help, write an article, or buy inexpensive hosting to start your own site. If you scroll down, you can sign up for the newsletter, vote for the article, and comment.


How To: Mount An .iso In Linux

Today’s article will teach you how to mount an .iso in Linux, a task undertaken seldom but worth knowing. This isn’t something I use often but it’s something you may want. It promises to be a quick and easy article, so read on!

I’m pretty sure the ‘unmount’ is incorrect English and that it’d be ‘dismount’ if you had mounted something like a horse or gym equipment. But, when I look around the web I see ‘unmount’ used with greater frequency. So, I’ll be saying ‘unmount’, even though that seems wrong.

Why would you want to mount an .iso? Well, there’s software that’s meant to be run from CD/DVD. You could burn your .iso to optical media or you can just mount the .iso and use it from there. Rather than wasting time burning the disk, you might just as well mount it.

You might want to verify that the image works before you burn a copy or upload it to share it. You might want to make edits to an .iso image and mounting the .iso will help with that, as you’d obviously unmount the image between changes.

So, you have a few reasons as to why you might want to mount an .iso. This article will explain how. It might not be a skill you need to day, but it’s one you may want eventually. We might as well get it written down now.

Mount An .iso In Linux:

This article requires an open terminal, like many other articles on this site. If you don’t know how to open the terminal, you can do so with your keyboard – just press CTRL + ALT + T and your default terminal should open.

The first command you need to run is to set up the mount’s directory:

With that done, you can navigate to the directory where your .iso is stored or just use the full path. Your command should look a little something like this:

When you’ve done that, the .iso should be mounted and remain mounted until you unmount it or reboot. This is not a permanent mount, so you’ll not have any permanent changes to your system because of this. For permanency, you’d need fstab.

By the way, just cd /mnt/iso to navigate to your newly mounted iso and that should work just fine. If you want to unmount the .iso on your own, you’d just use this command:

You can verify that you mounted and unmounted it with the lsblk. The output from that command should first show the .iso mounted and then show it when it’s unmounted.

Closure:

That’s about it. There’s not much more to say about how you mount an .iso in Linux. It’s a pretty simple activity and one easy to master. In my case, I just do it so infrequently that I never actually remember all the commands. So, it ended up in my notes – which means it turned into an article.

Thanks for reading! If you want to help, or if the site has helped you, you can donate, register to help, write an article, or buy inexpensive hosting to start your own site. If you scroll down, you can sign up for the newsletter, vote for the article, and comment.

Linux Tips
Creative Commons License
This work is licensed under a Creative Commons Attribution 4.0 International License.