Take, Edit, And Upload Screenshots With Shutter

For such a minimal thing, there are some strong opinions about Shutter. Me? I love Shutter. I love Shutter, warts and all. Some folks have some pretty strong opinions regarding how much they dislike Shutter. And, well, they’re not all wrong. Their complaints can be pretty legitimate.

Man, sometimes Shutter will freeze when you try to take a screenshot limited to just a specific section of the screen. Shutter went a very long time without getting any updates – so long that it has been booted from some of the repositories, as it relied on older libraries.

But, things have changed… Well, no… No, that bug is still there and I’ve been too lazy to report it. But, on a positive note, it’s actively being developed again. It is now ported to GTK3 and is slowly making its way back into the default repositories. The author is now fixing bugs again.

Because of this, I feel comfortable putting it out there. Yeah, once in a while it’ll freeze – and you have to use a TTY to stop the processes manually – but it’s worth it. That doesn’t happen all that often.

I not only use Shutter for screenshots, I use it to do quick edits to pictures I plan on uploading. You can even upload it to a few services from within the program itself – like Imgur and DropBox. The editing is a bit better than basic editing and more than enough to redact important information, crop, add text, add arrows etc…

Screenshots With Shutter:

I usually work with Lubuntu, and in the Ubuntu family. So, I’m just going to cover how to install it with Lubuntu, or any official Ubuntu flavor. For quite some time, you’ve had to add a PPA (repository) but there’s now a new ‘official’ PPA that you can use.

This step requires an open terminal, like many other articles on this site. If you don’t know how to open the terminal, you can do so with your keyboard – just press CTRL + ALT + T.

Once you have the terminal open, you can add the official PPA with the following:

If you’re using a modern release, it should then automatically update the database. If you’re using something older, go with this next:

Once that has finished, you just need to install it. That’s done with:

Let that finish and, once installed, you can open Shutter from the menu and immediately go to work taking screenshots. 

If you want to integrate it into your system the shortcuts would be:

shutter -f for a full screenshot
shutter -a for the active window
shutter -s to manually grab an area

So, swap those to fully integrate it into your system – if you want. 

Give it a shot. You might like it. It actually works these days without installing a bunch of old library packages. If you decide you don’t like it, you can always remove it. To remove it, you’d simple run these commands:

And remove the PPA with:

Tada! It’s all gone. Again, it’ll be a bit different if you’re not using Ubuntu or an official Ubuntu flavor. Any distro that also supports PPAs should handle this by default, so there’s that. There’s a way to install it on most distros, if you want to put the effort in.

Closure:

There you have it, another article – and this one is about Shutter – a tool to take screenshots. I find it easiest to just integrate it into the system and just have the application sitting in the tray. After all, I deal with a lot of images and a whole lot of screenshots. I’m not sure how I got there, but here I am. Man, I take a lot of screenshots.

Like I said, you can use it to edit regular images too. Then, you just click the button to export them and you upload them to sites like Imgur. If you’re curious, it looks a bit like this:
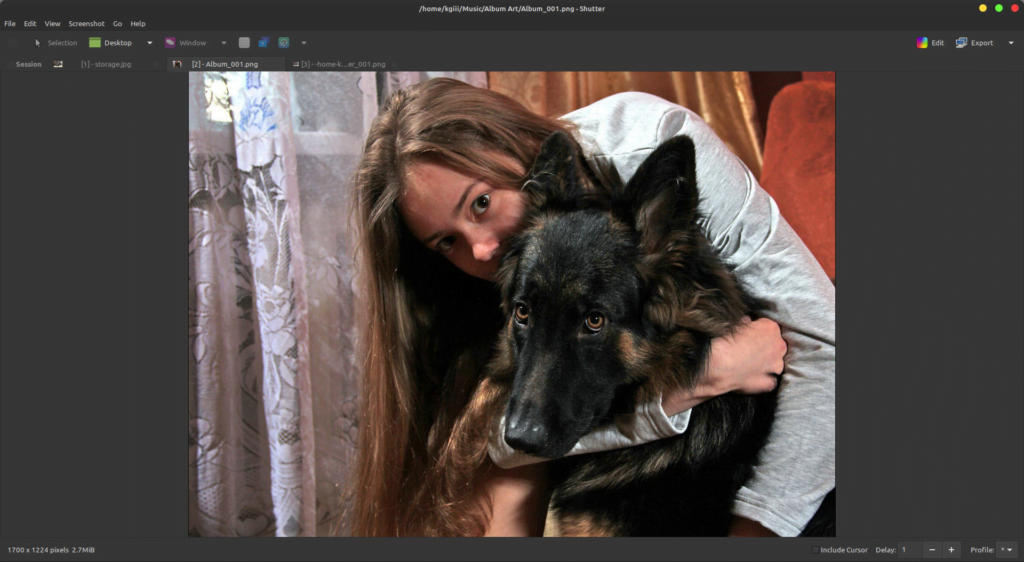
shutter in action
Shutter can be used all sorts of ways – including editing pictures.

Anyhow, it’s worth looking at again. I’ve used it all along, but there are bug fixes and the whole porting to GTK3 thing. If you’ve shunned it, or overlooked it, it’s time to try it again – warts and all. Just try reporting bugs (me too) and we’ll see where it goes.

Thanks for reading! If you want to help, or if the site has helped you, you can donate, register to help, write an article, or buy inexpensive hosting to start your own site. If you scroll down, you can sign up for the newsletter, vote for the article, and comment.
Disable Printing And CUPS.

I don’t print much of anything these days, and haven’t for a long time, and on older hardware I’d disable printing by disabling CUPS. I’ve also found printing enabled on server installs. That doesn’t seem like a good default to me, but I’m definitely not an expert. 

If you don’t need to print, you don’t need the CUPS services running. Today, we’ll discuss disabling it. We could mask the services, like we did in the article about disabling sleep/hibernation. Instead of doing that, we’ll use this as an opportunity to show how to disable a service. That seems like a reasonable choice.

If you don’t know, Linux printing is (usually) controlled by CUPS. CUPS is developed by our friends at Apple. CUPS has actually been around since the late 90s and has pretty much become the default printing system. If you check the man page, it defines itself like:

cups – a standards-based, open source printing system

And the description:

CUPS is the software you use to print from applications like word  processors, email readers, photo editors, and web browsers. It converts the page descriptions produced by your application (put a paragraph here, draw a line there, and so forth) into something your printer can understand and then sends the information to the printer for printing.

If you don’t print from your system, you don’t need the service running. Back when I cared about optimization, this would be something I’d disable. I’m not sure that it ever did much good at making things run faster, but it definitely made me feel like I was doing something!

Disable Printing/CUPS:

Like many other articles on this site, we need an open terminal. You can open a terminal with your keyboard – just press CTRL + ALT + T. That should do it!

Now, with your terminal open, we just need to enter a few commands. Just in case, we should first make sure to stop any of the printing services. To do that, you run the following:

If you did it right, you’ll get no feedback. We also need to stop ‘browsed’ (the daemon that broadcasts/receives broadcasts from remote printers) with:

Again, nothing should show up on your screen. You’re also done stopping any of the printing services and the next step will be to disable those services. It’s pretty easy – you just replace the stop with disable. It looks like this:

And again for the daemon:

That should do it, actually. You should now no longer be able to print from your device. This could even be an additional security setting for times when you don’t want basic users to be able to print sensitive information while still keeping a printer up on the network. If the system can’t print, you don’t have to worry about them acquiring the print credentials. For those who’ve covered the costs of a ‘print room’, you might even see some benefits on the bottom line!

Closure:

See? That was a nice and easy article. It’s not even all that long! Heck, the stuff around the commands is more complicated than the commands themselves! Now that I think about it, that kinda describes a bunch of these articles. I can’t write essays every day! Besides, who would read them?!?

Thanks for reading! If you want to help, or if the site has helped you, you can donate, register to help, write an article, or buy inexpensive hosting to start your own site. If you scroll down, you can sign up for the newsletter, vote for the article, and comment.

Let’s Decompress A File (tar.gz) In The Terminal

Pretty much every Linux user has to look up how to decompress a file in the terminal. Ask them to do it by rote and they’ll balk, but it’s actually pretty easy. Heck, there are entire jokes and comic strips dedicated to it. The thing is, it’s actually pretty easy and this article is going to show you how.

The tool we’ll be using for this is called ‘tar’ and the man page helpfully describes it like this:

tar – an archiving utility

If one is curious, the .gz is for gzip. It’s both a file format and a compression utility. The .tar is a container for multiple files. Its name comes from tape archive, where one would store multiple compressed files in one file. Think of it as a container for .gz files, if that helps.

Today’s article is meant to be REALLY basic, so we’re only going to approach this with the tar command. The only goal of this article is to teach you how to decompress a .tar.gz from the terminal. (There are a dozen GUI ways to do this, but not all systems have a GUI available.)

Decompress A File:

This article requires an open terminal. You can do so with your keyboard – just press CTRL + ALT + T and your default terminal should open.

You’ll also need a .tar.gz, but I’m going to assume you already have. If you don’t have one, you’re bound to reach that eventuality so long as you continue to use Linux. It’s a preferred file distribution format for things like source code. 

Anyhow, it’s really simple. Navigate to the folder where your .tar.gz file exists and run the following command:

You really only need to remember the vzf. In order, those stand for verbose (tells you what’s going on), z (decompress the files inside), and f (means the name of the file you’re working on).

The x flag means extract and we’ll get back to that in a moment.

You can even tell tar to extract the files in a specific directory. That’d look like this:

But, that’s not too terribly important, so long as you clean up after yourself and don’t leave a bunch of clutter. 

Let’s get back to that x flag. See, if you want to go the other way, that is to compress some files, you just change the x to a c.

In this case, we’re only to cover compressing all the files in a specific folder. That’s a little something like this:

So, really, you only need to remember the “vzf” and x for extract or c for compress. That’s the basics of decompressing a file in the terminal. There are a zillion possible combinations and the man page for tar is about a mile long.

In the vast majority of cases, those are the only two ways you’re going to use the command. If you need something more specific, check man tar.

Closure:

And, there you have it. You have the very basics on how to decompress a file from the terminal. There’s a lot more to the tarball but we really don’t need to cover that. If you need more, there’s the manual – but you probably won’t need more than that.

Thanks for reading! If you want to help, or if the site has helped you, you can donate, register to help, write an article, or buy inexpensive hosting to start your own site. If you scroll down, you can sign up for the newsletter, vote for the article, and comment.

Show Date And Time In The Terminal

Today’s article is a nice and easy one, where I show you how to show the date and time in the terminal. It seems like a nice and easy article to write when I’m not feeling well. I’ll try to not let my ailments hamper the article in any way. 

Normally, I’d have a few articles written ahead of time. This time, I only have one article written ahead of time and it’s my ’emergency’ article. I’m not doing that poorly, so I’ll write this one. I’m pretty dedicated to doing an article every other day.

Anyhow, as I said, this article will show you how to get the date and time from the terminal. You can actually get the time just from running uptime, but there’s more to it. Linux actually has a ‘date’ command, which is what we’ll be using for this exercise. The date command’s man page describes it like:

date – print or set the system date and time

We will only be using the date command to print the time in the terminal. There are easier ways to set and maintain the time. With NTP being common, you really shouldn’t have to worry much about keeping the time accurate enough on your system.

Why would you want to know the date and time? Not everyone uses a desktop environment with a GUI and a clock. You may need to know the system time when you’re working on it remotely. There are all sorts of reasons. In fact, I once wrote an entire article about finding your timezone in Linux.

Show Date And Time In The Terminal:

This article requires an open terminal, just like many other articles on this site. Just press CTRL + ALT + T and your default terminal should open.

Now, this is nice and obvious… With your terminal open, just type in:

You’ll get an output similar to this one:

Tada! You’re done!

Just kidding! There’s more to it. If you want to show just the time, you can just use this command:

If you want to show the date and have it formatted like we do in the US, you can use this command:

Want to know the date 3 weeks ago? (You can also use days for this command)? Well then, you can try this command:

How about if you want to know how many days into the year you are? Well, you can do that with:

Those are about the most interesting ways to show the date and time in the terminal, at least the most interesting ways that I can think of at this moment in time. If you use the date command for anything else, let us know by leaving a comment!

Closure:

There you have it, yet another article! This one shows you how to show the date and time in the terminal, just in case you want to do that. It’s a nice and easy exercise and, as far as tools go, is one that’s at least easy to remember. It’s probably not the most important tool you can have in your toolbox, but at least it’s in there. (Please be gentle pointing out any errors, part of this article was written with the help of a heating pad.)

Thanks for reading! If you want to help, or if the site has helped you, you can donate, register to help, write an article, or buy inexpensive hosting to start your own site. If you scroll down, you can sign up for the newsletter, vote for the article, and comment.

Let’s Use ‘ls’ To Sort Files By Time

Today’s article is going to tell you how to sort files by time while using the ‘ls’ command in the terminal. I find sorting by time is often easiest when working with a lot of files that have less-than-helpful filenames. For example, it’s nice to sort by time when I’m dealing with screenshots, knowing that I took a new screenshot that’s helpfully named something like ‘kgiii@kgiii-msi: ~-Downloads_032.png’.

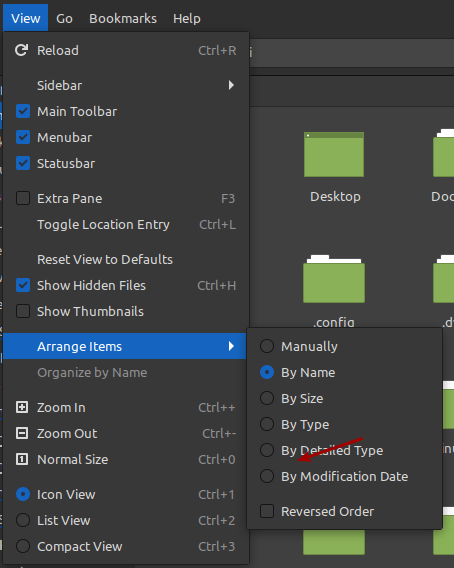
It’s usually easy enough to graphically sort files by time and date. In your file manager, you might need to select list view, add the column, and then select at least one of the time options. Different GUI file managers will have different options, and may not include all possible time values stored in the file’s meta information. Speaking of screenshots, it might look something like this:

sort by modification time
In this case, arranging items by ‘modification time’ is an available option.

The file’s metadata has several time options and we can sort by those with the ‘ls’ command while in the terminal. The output of ‘ls’ is usually sorted alphabetically. It’s not terribly difficult and will help you along your Linux trails. I find it useful when picking among a large number of files.

Parsing the output of the ‘ls’ command is generally considered a bad idea. We won’t really be doing that, but this is a good time to mention it. If you don’t know why, click this link. They explain it better than I can. That’ll save some time!

Today we will learn to use ‘ls’ to sort files by a few time value stored in the file’s meta information. It’s an easy enough process and a handy tool for your growing toolbox of Linux commands.

Sort Files By Time:

Obviously, you’ll need an open terminal. You can do so with your keyboard – just press CTRL + ALT + T and your default terminal should open.

Once you have it open, the /home/user directory is a fine choice. We won’t need to change directories – but you can. If you have a lot of screenshots saved in ~/Pictures, then you may find that directory more informative. Either way, let’s start with the basics:

This first one will show the last time the file was modified – which may be the creation date and time. That command is (the -l used in each command means use the long listing output):

You can sort by access time, sorting by the last time the file was opened. (Yes, this is all part of a file’s metadata.) To do that, you just use:

With that done, we have one more. This one shows the last time the metadata was changed for the files listed. If you were to use touch to change the last modified time, this would show when you did that. Make sense?

And there you have it! If you want to show the output in reverse order, you just use a -r flag and you can still use the -a flag to show hidden files, should you need to do something like that.

Closure:

That’s about it. You can now sort files by time. It’s a pretty handy tool and one you may find yourself using often. As mentioned above, I find it handiest (with my particular uses) when working with all the screenshots I take. I take a whole lot of screenshots. I assume I take more screenshots than most folks.

Thanks for reading! If you want to help, or if the site has helped you, you can donate, register to help, write an article, or buy inexpensive hosting to start your own site. If you scroll down, you can sign up for the newsletter, vote for the article, and comment.

Linux Tips
Creative Commons License
This work is licensed under a Creative Commons Attribution 4.0 International License.