How To: Find The RAM Total In The Terminal

Today’s article will show you how to find the RAM total, because that’s basic information everyone might want to know. If you don’t already know how much RAM you have, this is a good article for you. If you’re like me and need to be reminded from time to time, this is also a good article for you!

You might have a computer that doesn’t run as fast as you want, and having not enough RAM may be a cause. Before you install a distro, you should know that distro’s minimum requirements, of which RAM is often one such prerequisite. Maybe you’re upgrading RAM and really want to make sure you know what you have inside? Dunno, but there are reasons why you might want to find the RAM total.

Not all my articles are long, and that includes this one. This one should be pretty quick and easy, suitable for folks just starting out who want to know how much RAM they have.

Find The RAM Total:

This article requires an open terminal, like many other articles on this site. If you don’t know how to open the terminal, you can do so with your keyboard – just press CTRL + ALT + T and your default terminal should open.

With the terminal open, we’ll just use the free command. It looks like this:

The output is obvious and will look similar to this:

free -m in action
The output should be fairly obvious to all readers. The total RAM is listed in the output.

That’s the output from a fairly standard device. It should be obvious, but the column you’re looking for is under ‘total’ and you’re looking for the big number/top row.

You can also check /proc/meminfo for more information. Run the following command for a bunch of data about your installed RAM:

If you take a look at the output, you’ll be looking for the row starting with “MemTotal” in the results. Of course, you can just use ‘grep’ to pull out just the information you want. Try it with this command:

That should do it. It should give you an output that has just the row you’re looking for. Feel free to change ‘MemTotal’ to another row, but remember that it’s case sensitive – like most of Linux.

Closure:

There are surely other ways to find the RAM total, but those are a couple of easy ways to toss into your growing toolbox. This is also another article in the books. It’s just a short article, but it’s an article nonetheless. 

Thanks for reading! If you want to help, or if the site has helped you, you can donate, register to help, write an article, or buy inexpensive hosting to start your own site. If you scroll down, you can sign up for the newsletter, vote for the article, and comment.
How To: Restart TeamViewer From The Terminal

In a previous article, I wrote about TeamViewer, and this article will teach you how to restart TeamViewer from the terminal. The reality is, I like TeamViewer quite a bit but it has a nasty habit of failing during the authentication step.

The only way to make it work, without visiting the device in person, is to restart it. I actually do this with SSH, but it’ll work in the terminal. So, you’re doing it from the terminal – you’re just doing it remotely and using SSH to do that.

Well, no… I have no idea how you’ll be doing it. After all, you might choose to do it locally – where this will also work. So, is it really from the terminal? Yes. It just depends on which terminal, I suppose!

Anyhow, this is just a short article. If you’re physically at the computer, why are you using TeamViewer?!? If you’re physically at the computer, you can just restart it with the GUI – or you can use the terminal. 

Restart TeamViewer From The Terminal:

So, if you’re at the device, just open the terminal. If you’re not at the device and TeamViewer isn’t authenticating, just connect to it with SSH. We’ll assume you’ve already set up SSH and know how to connect. If you don’t, then go back and read the SSH link in the 2nd paragraph. You need to use the following commands. 

To stop the TeamViewer service, run:

To restart the TeamViewer service, run:

If you want to just run one command, you can do that too! Just run:

The latter command is probably the easiest, and TeamViewer fails often enough for me to have taken the time to alias the restart command. As far as I can tell, there’s no rhyme or reason for it to no longer authenticate, but that’s what happens.

Closure:

As I use it often enough, I figure this is worth sharing with the world. It’s not a very long article, but it is indeed an article. Hopefully this helps someone who’s having similar authentication errors. As near as I can tell, just restarting the service fixes it and I’d say that the authentication fails every other day, sometimes more and sometimes less. Thanks for reading!

Thanks for reading! If you want to help, or if the site has helped you, you can donate, register to help, write an article, or buy inexpensive hosting to start your own site. If you scroll down, you can sign up for the newsletter, vote for the article, and comment.

How To: Change Your Password In The Terminal

It’s considered good form to change your password once in a while. This may not be something important for you, but others may appreciate it. It may be corporate policy or regulations that make you need to change your password, or you could just be more security minded than many others. No matter what, this article tells you how.

The tool we’re using in today’s exercise is called ‘passwd‘, which is a tool to help make and manage passwords. It’s a bit complicated, but it uses something called hashing and stores a hash instead of a plain-text password.

When you login, your password is checked against the hash that was created when the password was created. This prevents people from easily reading your stored password, stored of course because there must be something to check against.

If one remembers way back to the start of this project, my goal is to put my notes online. This article is in my notes, which is why this is such a simple article. Indeed, this article should be pretty straightforward and easy to understand. I’d definitely call it a beginner-friendly article.

Change Your Password:

Like most always, you need to open your terminal. You can do so with your keyboard – just press CTRL + ALT + T and your default terminal should open.

Once you have your terminal open, the command you’re looking for is:

If you already have a password, you’ll need to type your current password and then you’ll type the new password twice. When you logout or next need to use your password, your new password will be required. You don’t need ‘sudo’ for this, as the password you’re changing belongs to you.

Seeing as this is short, I’ll toss in another use of passwd. If you want to change the password for a different user, you just use this command:

Change the obvious to the obvious, specifically the username. This command does require ‘sudo’, because you’re changing a password that doesn’t belong to the current user.

There’s more that can be done with passwd, but those things are beyond the scope of this article. I’d expect to see some more passwd uses covered in the future, but you can get a head start by typing man passwd into your terminal and learning about the other options.

Closure:

That’s it, really. I told you that this one would be short and easy! Sure enough, it’s pretty easy. Many of my notes are regarding people who are new to Linux, but it’s still nice to get more of them online. I dare say we’re coming along nicely.

Thanks for reading! If you want to help, or if the site has helped you, you can donate, register to help, write an article, or buy inexpensive hosting to start your own site. If you scroll down, you can sign up for the newsletter, vote for the article, and comment.

How To: Check CPU Temps With lm_sensors

There are a variety of ways to check your CPU temps, and this one will be covering this with lm_sensors. It’s a handy application and it’s often installed by default. Moreover, it’ll be available for pretty much every distro out there.

This time around, we’ll be using the above-mentioned lm-sensors. Wikipedia describes lm_sensors as thus:

lm_sensors (Linux-monitoring sensors) is a free open-source software-tool for Linux that provides tools and drivers for monitoring temperatures, voltage, humidity, and fans. It can also detect chassis intrusions.

It then says that a citation is needed. Thank you, Wikipedia. That’s helpful.

With so little to go on, we can check the man page. Alas, man lm_sensors has no entry. You’ll actually need to use the less obvious man sensors. That description isn’t much better, but it beats a blank.

sensors is used to show the current readings of all sensor chips. sensors -s is used to set all limits as specified in the configuration file. sensors –bus-list is used to generate bus statements suitable for the configuration file.

This will, of course, also tell you more about using lm_sensors, though there really aren’t a whole lot of options. It outputs what it outputs and you’ll like it. You’ll potentially get more information than just the CPU temps, but this article is about how to check CPU temps.

Check CPU Temps:

This rest of this article should be short and straightforward. Like normal, open up your default terminal emulator by pressing CTRL + ALT + T. Once the terminal is open, you can install lm_sensors easily enough. Try one of the following (note the varied names):

Debian/Ubuntu/etc:

Suse/OpenSUSE:

Fedora/RHEL/Rocky:

Arch/Manjaro/etc:

So far so good, yes? Well, now we need sensors to find our hardware and that’s another command in the terminal. Specifically, it’s this:

That’s going to run and it’s interactive. You will have to type “YES” over and over again. You’ll eventually need to hit the ENTER button. Fortunately, once you’re done, it’s all over and you never have to do it again – unless you add/change hardware that has sensors.

With lm_sensors loaded properly, let’s check CPU temps! It’s a really simple command – and it’s just:

If you are an American that is easily frightened by the metric system, you can just add the -f switch for Fahrenheit, like so:

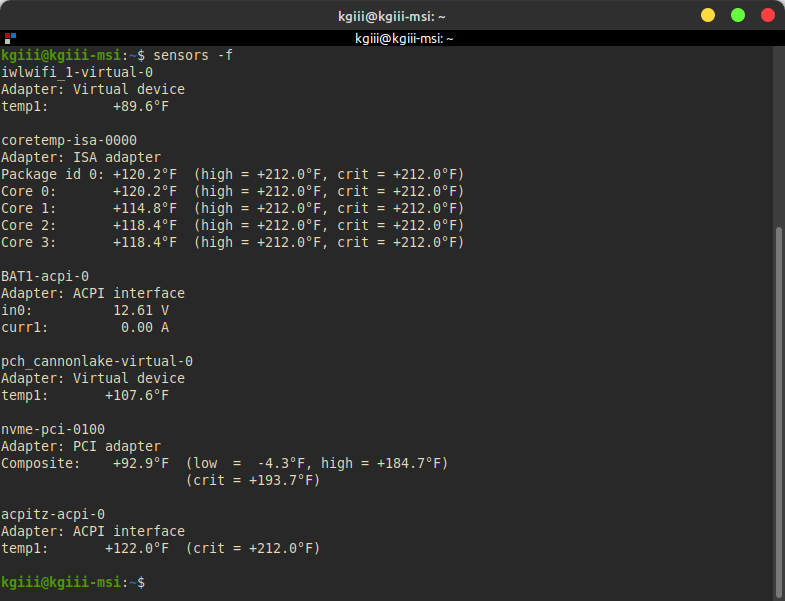
Your output should look something like this:

lm_sensors in action
That’s a pretty standard output. Note the included CPU temps (listed by core, starting at core 0).

It should be noted that there’s more to the output than the CPU temps. This is not always the case. Your hardware may not have sensors that report back the operating conditions – but your CPU will almost always report that data so that the OS can do things like throttle-down for energy saving purposes. Be sure to run man sensors to see the rest of the options.

Closure:

Congratulations! You can now easily tell how hot (or cold) your CPU is running. You should also look up your CPU’s temperature thresholds. This way you’ll be able to tell if your CPU is running hotter than it should be running. Doing this can save your hardware or give it greater longevity.

Thanks for reading! If you want to help, or if the site has helped you, you can donate, register to help, write an article, or buy inexpensive hosting to start your own site. If you scroll down, you can sign up for the newsletter, vote for the article, and comment.

How To: Find Your Uptime In Linux

This article will do a bit more than help you find your uptime. There are a number of other thing that’ll be covered, but they all have to do with your uptime.

So, what is uptime? Uptime is how long your system has been up and available. It’s a useful metric, especially if your system is public facing or providing some sort of service that people depend on. In fact, Wikipedia has a definition!

For example, it’s a metric that matters a great deal in web hosting

That link is a link to my small hosting offering, but scroll down to the bottom at said link and you’ll see a link to check the uptime. In fact, I’ll save you a click and you can just click here.

That link is one way of examining system uptime and availability over the internet over a period of time that’s expressed in a pretty manner. You too can find the uptime of at least the system that you’re using, but we won’t be covering pretty graphs or network availability.

In this article, you’ll find your uptime by using the terminal. We’ll cover a few different ways as well as examine the uptime command.

By the way, you can just type man uptime and see how to use the command. It’s not exactly complicated. Anyhow, uptime defines itself as:

uptime – Tell how long the system has been running.

And that’s a pretty accurate statement. So, let’s examine that first!

Find Your Uptime:

For this exercise, you’ll need an open terminal. To open the terminal, just press CTRL + ALT + T and your default terminal should open.

Once the terminal is open, let’s start with the basics:

That’ll give you a basic output, along with your load averages. If you want a more easily readable output, you can just use the -p flag.

If you want to know when it’s counting from, when your system became available, you can do that. To do so, it’s just the -s flag.

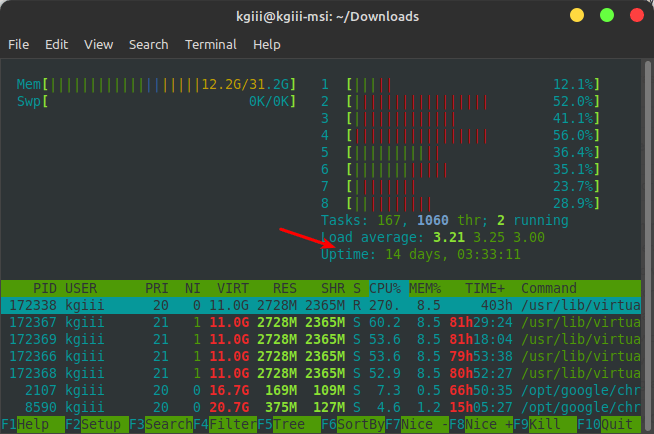
That’s pretty much everything that the uptime command can do. That’s not the only way to find your uptime, however. For example, you can open top or htop and see your uptime. If you use htop, it looks like this:

htop showing the uptime
See? It’s right there! It’s in ‘top’ as well. Now you know!

You can also use just a ‘w’ easily enough. It too will find uptime it looks like this:

You can also use ‘screenfetch‘ or ‘neofetch‘ to get your uptime. If you have one or both installed, the commands would look like one of the below:

Both of those will find your uptime and display them.

As you can see, there are many ways to find your uptime. In fact, I’m sure I missed some ways that you might use. If you use a different method, or know of another method, please feel free to leave a comment below!

Closure:

Well, this is it. It’s another article. I must be approaching the halfway point. The goal is to keep this project going for a year and to reassess at that time. If it’s something that’s popular, beneficial, and I’m not burnt out, I’ll keep going with it. Maybe by then someone else will want to take over or help write some stuff? Who knows? We’ll find out at the end of the year!

Thanks for reading! If you want to help, or if the site has helped you, you can donate, register to help, write an article, or buy inexpensive hosting to start your own site. If you scroll down, you can sign up for the newsletter, vote for the article, and comment.

Linux Tips
Creative Commons License
This work is licensed under a Creative Commons Attribution 4.0 International License.