Use an RPM on a DEB-based System

Once in a while, you’ll come across a piece software that’s only in RPM format. It’s possible to convert RPM to DEB and you may be able to install that software on your DEB-based system.

You’ll find that it’s not unusual to come across software packaged in a format that you can’t use. That’s just the name of the game. Developers and package maintainers are going to concentrate on the stuff they themselves use. It’s not selfishness that prevents them from packaging it in different formats, it’s just a matter of time and priorities. 

It’s times like these when you can use a nifty little tool called ‘alien‘. Alien has been around for a long time and is really useful. It can actually be used in both directions, converting between .deb and .rpm interchangeably. 

Convert With ‘alien’

So, let’s get started. This won’t take very long and will be a valuable tool for your tool-chest. If you don’t need it today, put it aside for a future date. As you progress along your Learning Linux Journey, it may well prove valuable.

As you know, the tool we’ll be using is ‘alien’ and the man-page defines it as this:

alien – Convert or install an alien binary package

You’ll install it with your package manager. As we’re using an apt-based system, we’ll be using apt to install the software. Crack open your terminal with CTRL + ALT + T and enter the following:

That’s going to pull in quite a few dependencies. On a stock Lubuntu installation, it pulls in about 200 MB worth dependencies, so you should be aware of this.

Now that you have it installed, there are a couple of ways you are most likely to use it. The first, given that we’re talking about Debian/Ubuntu/derivatives, would be converting an .rpm to a .deb. That’s pretty easy. Just do this:

That will convert the package to .deb and you can install it in the normal ways. Seeing as you’re right there in the terminal already, you can just use:

You can skip all that and do the conversion and installation all at the same time. To do this, you simply use the -i switch. It looks like this:

NOTE: This won’t always work. The package you converted may not work, usually due to dependencies that can’t be satisfied. If it doesn’t work, you’ll have to look for other solutions.

If you want to go the other direction, you can use this:

There are other ways to use alien, but those are the most common ways that I see it being used – and the ways I’ve historically used it. It has been effective most of the times I’ve tried it, but I am just a single data point and anecdotes aren’t really data.

If you’re interested in other uses (such as tgz or slp), you can consult the man-page or read the online man page. It’s a fairly versatile application and one that all Linux users should know about.

Once again, thanks for reading. Don’t forget that there’s a newsletter and that you can now donate to help cover any hosting costs. If you want to contribute, there are all sorts of ways that you can help – just let me know.
Quickly Reset Ubuntu’s Default Repositories

Is your software not updating? Are you getting repository errors when you try to upgrade? There’s a quick and easy way to reset the Ubuntu repositories to the defaults.

Ubuntu, like all Linux distros, uses repositories for distributing software. This provides a central location for curated, standardized software that’s almost certain to work on your system. These repositories are not just where you install software from, they’re also where you get your software updates.

If you want to see them in action manually, open your terminal and enter the following:

That will show you the system checking the repositories, updating your internal database of software and software versions. There aren’t a whole lot of defaults, so it’s usually a pretty quick process. If you’ve been adding PPAs or other repositories, it could take a while to get through the list.

Of course, if you see errors with that command then this might actually be the article you’re looking for! There are a variety of reasons why one might want to set the system back to the defaults, and it’s actually pretty easy once you know how.

Reset Ubuntu’s Repos

Like many articles and exercises, this one is gonna start with you cracking open your terminal. You should already know how to do that, but you can just use your keyboard and press CTRL + ALT + T.

Once you have that open, just go ahead and run this horribly destructive (I kid, I kid) command.

NOTE: That command could have a horrible outcome if you mess it up. Be sure to double-check it, or use copy/paste. If you screw this up, you can delete files that you really don’t want to delete. You have been warned!

That command will erase all the entries in your ‘sources.list’ file, technically deleting the file itself, which is not necessarily a good thing. Fortunately, it’s a necessary step and only the first step. The next step is also easy – and more or less mandatory.

Just run the following command:

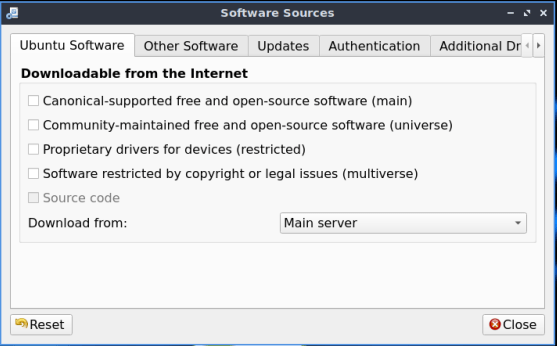
Up should pop a window that looks a whole lot like this:

software properties
Note the lack of any selected repositories. The next step should be obvious.

There you go. You have a blank slate. Select from those four (or five, if you want the source code and have selected at least one other repository) and then click close. When you close it, the system will ask you if you want to update the database and you should agree, of course. You can also change the server from which you download, and most people pick a server that’s geographically close.

That’s it. That’s all it takes to reset your Ubuntu repositories to the defaults. There’s no wizardry involved. You’re simply removing one file and recreating it with the defaults. You could do it all with a file manager if you opened it as root, but the terminal is faster and easier.

Thanks for reading. Feedback is always appreciated. You can sign up for the newsletter and get a notification when new articles are published. A couple of people asked, so I’ve set it up so that you can donate to help fund the site. I’m not going to try to guilt you into donating. The site will remain online and continue to grow even without donations. Still, I had some interest and figured I’d add it as an option. 

Dealing With Duplicates In Your Bash History

Your Bash history can be a valuable tool when you mess up and need to retrace your steps to find out what went wrong. It’s in your best interest to keep it from getting cluttered.

Some of my readers are fairly new to Linux, so you may not know that you have a Bash history. Well, you probably do. It’s helpfully called .bash_history and it’s a hidden file in your home directory. You can open it with a text editor if you want.

See, every time you write a command into the terminal (unless you take steps to avoid it) that command is stored in a hidden file called .bash_history. The period at the start of the file name means that it’s a hidden file and you’ll need to enable hidden file viewing in your file manager. (It’s quite frequently F4 or under the ‘View’ menu.)

If you open your terminal (press CTRL + ALT + T) and push the up arrow on your keyboard, you’ll see the last command you used in your terminal. Well, it’s a bit more complicated than that, but you’ll see the bottom-most entry in your .bash_history.

If you use your terminal a lot, you’ll have duplicates. It’s just a fact of life. Many commands will be run multiple times, such as performing updates. These clutter up your history and just waste space. You don’t have to keep the duplicates, or even allow duplicates.

De-dupe .bash_history

First, let’s disable duplicates and delete them if they do somehow occur. To do this, you’re going to edit your .bashrc file. As you can see by the . at the start of the file name, the file is hidden by default. You can use the GUI file manager and favorite text editor. Enable viewing hidden files, and just add the following line to the very bottom of that file.

Save it, of course.

If you want, you can do it right in the terminal. Open the terminal with the directions above and enter the following command:

Notice how there’s no use of ‘sudo’? That’s because you already own these files and you don’t need elevated permissions to edit them. 

Anyhow, use the down arrow and then paste in the text above, just as though you were editing it in your favorite text editor. Then, go ahead and save it by pressing CTRL + X, then Y, and then ENTER.

There… Now Bash should ignore duplicates and erase any new duplicates that it finds.

All well and good?

Maybe…

I mean, it’s not like you just installed your OS today and have a sparkling clean bash history. No, if you’re like me, you’ve probably got a bunch of clutter in there and all sorts of duplicated content. So, you’re going to want to clear those already existing duplicates out as well.

Seeing as you’re already in the terminal, you can use the following command that I once found online and saved to my notes:

That right there will go ahead and remove any duplicates that it finds in your bash history. You might want to make a backup of the file before trying that command – but I’ve used it so many times that I have complete faith in it. So far, it has only removed duplicates and not broken anything. (Pay most of your attention to the use of awk in the command if you’re wondering how it works.)

And, there you have it. You should have a nice .bash_history that isn’t full of duplicates. I’ve been known to open the file manually and run through it to remove stuff I’m never going to use again, commands that I’ve gotten wrong, or commands that are no longer of any use. 

Addendum

I should also mention that I have been using the (mostly) same history file for a long time. You save it and import it on new computers that will run the same operating system. Personally, I use my bash history fairly often and I like the consistency. I also do the same with my aliases, but that’s a topic for another day.

By the way, if you don’t want to have your command stored in the history, the easiest way to avoid it (on a command-by-command basis) is just to put a space in front of it. The system doesn’t care that there’s a leading space, except to use it as a cue to not store the command in your history. If you’re entering sensitive data into your terminal, you might want to consider that. If it’s just a junk command that you’re never going to see again, you might want to consider that.

Finally, thanks for reading. I appreciate the audience and I enjoy getting my notes online. The new domain is going well and we’ll soon be getting some of the older content transferred. It’s just a bunch of tedious work. I’d ask for help, but there’s not a whole lot anyone can do to help. I’ll just have to find the time to do it. Don’t forget the newsletter! 

Graphically Examine Hardware Info With HardInfo

Sometimes old tools are the best, or at least adequate. In this case, we’re talking about HardInfo – a tool that hasn’t been updated in about 7 years, but still does a great job.

This is Linux. There are a ton of great applications to detect and list your hardware. Most of them are CLI. HardInfo is one application that lets you graphically detect and show your computer’s hardware. It’s rather out of date, but that doesn’t seem to hinder it any.

Welcome to HardInfo!

HardInfo used to be installed by default with Lubuntu. As near as I can tell, the last time it was included by default was in Bionic (18.04) and it has now been left aside as an old relic and with nothing replacing it.

You may remember it, but you may remember it with a different name. In your menu, it showed up as “System Profiler and Benchmark” and may well have been overlooked by many. Not me, I use it every time I get a new computer and want to check out the performance.

Allow me to explain…

See, it doesn’t just list the hardware that it finds, it also (as the menu entry implies) lets you run a bunch of pretty neat benchmarks. If your computer is fairly modern, then it will likely exceed all the default benchmarks listed in the program. It has been a long time since it has been updated, after all. Still, it’s great to see what your computer is capable of.

The great thing about it is that it’s simple and self-explanatory. I don’t really have to tell you how to use it. You can figure it out easily enough on your own. I only need to make you aware of it!

Installing it is easy enough. If you’re using a Debian/Ubuntu distro, or a derivative, you can install it right from your default repositories. This is true for most other distros, I suspect. I confess, I made absolutely no effort to look this up! Still, to install it in Ubuntu, you’d  start by opening your terminal. Use your keyboard to open your default terminal by pressing CTRL + ALT + T.

Then, just run the following command:

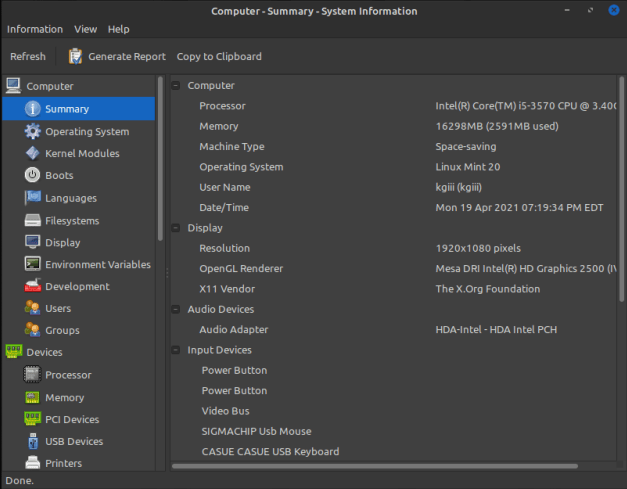
Then, just open it from your menu – somewhere under system tools and by the name mentioned above. It should look a little like this:

hardinfo in action
See? This is nice and easy. Anyone can figure it out!

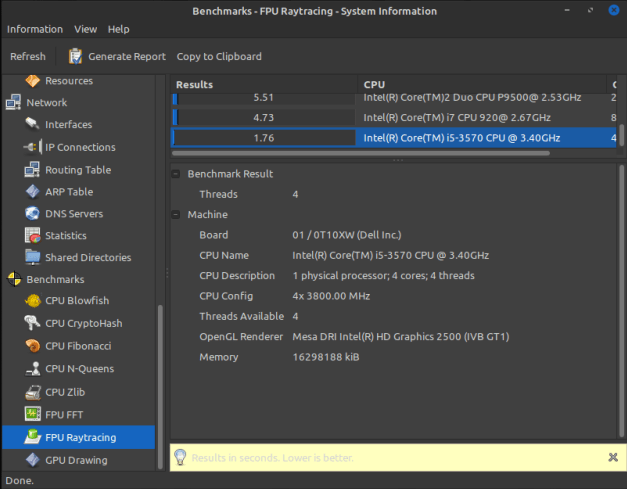
Scroll down and you can run a bunch of different benchmarks! Once again, this is entirely self-explanatory. If you use a more modern device, you’ll shatter the records listed for other computers – which is a nice boost of endorphins – like so!

HardInfo doing a quick benchmark.
See? Even my older computers slaughter the competition!

And, there you have it. HardInfo is still a pretty wonderful tool. I like it for all the benchmarks it offers. They’re a great way to get a rough estimate of performance. It’d be great if that section was updated with more modern devices, but I am not a very good programmer. Maybe one of you will download the source, fork it, update it, and maintain it? It’d be a great asset to the community!

Bonus: CPU-X

If you want something more modern, that gives the same information but has fewer benchmark choices, then you can always take a look at CPU-X. CPU-X is from the folks at X0rg (not to be confused with X.org) and has been updated much more recently. It’s a great GUI way to check your hardware. Once again, you can install it from your default repositories. Once again, that looks like this for Debian/Ubuntu/apt using distros:

It too is fairly self-explanatory. If you need help using it, perhaps Linux is not the best choice for you! Ha! I kid… If you need help using it, just go ahead and ask. I’ll do my best to get you sorted.

If you want a more modern version, you can download it. It’s a little complex, but not very. First stop, visit the CPU-X GitHub page and click on the latest release – on the right.

Once you’re there, you can download the AppImage, which is probably easiest. If you want, you can grab the package for your OS, it’ll be in tar.gz format. Open it with your archive manager.

Inside that archive, you’ll find some .deb files. You know what to do with those. First, extract the CPU-X .deb and then extract the ‘libcpuid’ file – not the one with dev in the title.

Once you have them both extracted, you need to install the appropriate library file before you install the CPU-X .deb. The library is a required dependency and the one in the default repositories is not new enough to work with the newer CPU-X.

You’ll also possibly get a warning that says you have an older version available in the repositories and that you should install that version instead of the newest version. You can skip that warning and install the newer version just fine. It shouldn’t break anything!

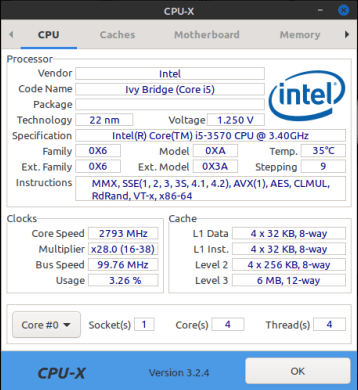
When you start CPU-X, it will ask you to run as root. To get all the information, you will need to run it as root. So, go ahead and either select “Run as Root” in the menu or go ahead and choose to run it as root when prompted. It will, of course, ask you for your password. If you’ve done it correctly, it will look a little like this:

cpu-x up and running
See? It works and it too is easy to understand. Sweet!

If you use the right arrow near the top, you’ll see there are benchmarks available. They’re two simple benchmarks where your computer generates prime numbers. You can select the duration and the number of threads. Other than that, it’s not really all that complicated or informative. It’s there if you want to.

Anyhow, there you have it. You have a couple of ways to graphically check your hardware information. If you don’t want to use something like inxi, this is the next best thing. Thanks for reading and be sure to sign up for the newsletter. 

How To: Generate Sufficiently Complex Passwords In The Terminal

In this article, I will tell you how I use pwgen to generate random passwords. It is a simple command, but comes in surprisingly handy. This being Linux, there are surely other ways to accomplish this task, but this is the method that I use.

I’ve been working on a router for the past few weeks. I’ve been working on getting this site up and running. I’ve also been working on a new computer that’s just meant for testing.

I don’t do a whole lot of password sharing and remembering. That means when I need to login to an account I’ll often just hit the button to recover my password and then use a new password entirely. This means I’ve had to generate quite a few passwords. The tool I use to do this is known as pwgen.

GENERATE COMPLEX PASSWORDS

The tool ‘pwgen’ may well be installed by default. If not, it’s very likely to be in your default repositories. I checked everything from Fedora to Mandriva, and it looks like you shouldn’t have any issues installing it. If you’re using a Debian/Ubuntu/derivative and have access to apt, then you can just install with:

Once installed, you can just run the ‘pwgen’ command from the terminal and you’ll get a bunch of random passwords. They may, or may not, be sufficiently complex and able to satisfy the various password requirements. It tosses out a lot of passwords, so it’s not like you won’t have choices.

Me? I use it a bit differently. In fact, you might even say that I use it ‘wrong’. After all, the man page describes the pwgen application as:

pwgen – generate pronounceable passwords

I don’t actually want pronounceable passwords. I want suitably complex passwords! Fortunately, pwgen can be bashed into shape and can provide all the complex passwords you desire. Here’s the command I use:

So, what’s going on with that? What do those switches do?

     s – random and hard
     n – adds numbers
     y – adds symbols
     c – at least one capital letter
     B – removes ambiguity
     1 – one password per line

The 12 is how many characters each password will have and the 6 is how many passwords it will spit out for you. So, for example, you’ll get an output like this:

In my case, this is already aliased to ‘newpass’ and that means I don’t need to type the entire command when I want a new password. Alas, I’ve not yet covered aliases. It’s on my list of articles to cover, but it’s not done yet.

Anyhow, thanks for reading. As you can see, this is the very first article at our new home. I’ll slowly move the other articles over here, editing them to match the new format and maybe making some of them a bit more thorough. This site should be faster, have the features that were used at the previous site, and a bit easier to maintain. There’s even a published privacy policy.

Don’t forget to sign up for the newsletter. It’ll only send out emails when an article has been published and won’t include any spam. I won’t give your email address out, nor will I sell or trade it. 

Linux Tips
Creative Commons License
This work is licensed under a Creative Commons Attribution 4.0 International License.