If you’re using a modern computer, you might be using an NVMe SSD and you might want to know your NVMe information. The standard and older tools may not be all that helpful, even though NVMe SSDs have been around for a while. This article will help you with that, should you want to get your NVMe SSD information.
Let me see if I can explain this…
You’ll often see “NVMe M.2 SSD”, which is a mouthful.
NVMe stands for Non-Volatile Memory Express which is just a specification.
M.2 is another specification for expansion cards.
The device that is used for NVMe is an SSD – Solid State Drive.
SSD, which has been around for quite a while now, differs from previous generations of storage in that it’s electronic and not magnetic.
We humans have a long history of trying to record things. We’ve used everything from words to pictures, from dots on paper to grooves on wire, from symbols to magnetic, and more…
For computers, a long time was in the magnetic storage age. From spinning drums holding mere bytes of data to complicated spinning platters that hold terabytes of data… We’ve made good use of the magnetic storage mediums over the years.
Solid-state drives don’t use magnets. Data is stored on memory chips that retain their memory (non-volatile) even if the power is disconnected. An SSD is quite common today.
Less common, but growing in popularity, is the NVMe M.2 SSD. This is a much smaller format than the early SSDs (which even came in the 3.5″ format, and surely some obscure formats that I’m overlooking). This is also on a faster bus lane, meaning the read and write speeds far exceed the storage medium before it – including the aforementioned larger SSDs that connect via IDE or (preferably) SATA.
The current consumer options are pretty great and an NVMe SSD is much faster than a regular SSD. The standard SATA SSD is quite common still, while the NVMe M.2 SSD is the latest and greatest.
With me so far?
Well, an NVMe M.2 SSD is a very different architecture and, as such, there are special tools to use. If you want to find the temperature of your NVMe SSD, the normal tools (like hdparm) may not yet work. Instead, there are other tools that you’d want to use.
In this article, we’ll be talking about a tool known as ‘nvme-cli’…
About nvme-cli:
You almost certainly don’t have nvme-cli installed by default. If you did, you’d be able to check the man page. Doing so would show that nvme-cli is described like this:
nvme – the NVMe storage command line interface utility (nvme-cli)
It should be important to know (and we’ll get to the installation step in just a minute) that you’ll be installing the package with one name but referring to, that is using, the application with another name.
For example, it’s man nvme to access the man page.
NOTE: You will want to read the man page. There’s a whole lot of options and we’re just going to cover one basic command. We’ll learn stuff like the operating temperature of your NVMe. We won’t be worried about the various other options, of which there are many.
Find Your NVMe Information:
If you want to find your NVMe information in the terminal, you can do that. You’ll first need to install a tool known as nvme-cli. To do this, you’ll want an open terminal. You can usually open a terminal by just pressing
With your terminal now open, you must first install nvme-cli. You’ll find that packages are available for many distros, as they should be as the format is becoming more and more popular.
Follow one of the basic installation methods below, specifically the one suitable for your distro’s package management system.
Debian/Ubuntu/etc:
1 | sudo apt install nvme-cli |
SUSE/OpenSUSE/etc:
1 | sudo zypper install nvme-cli |
Fedora/Asahi/etc:
1 | sudo dnf install nvme-cli |
RHEL/CentOS/etc (those with yum available still):
1 | sudo yum install nvme-cli |
Arch/Manjaro/etc:
1 | sudo pacman -S nvme-cli |
I’m pretty sure there’s an nvme-cli package available for all the major Linux distros. If not, I linked to the project page above and you can check there for a package or to compile nvme-cli from source.
Find Your NVMe’s Absolute Path:
You’re going to need the absolute path to where your drive is mounted. That’s a part of the command, so you’ll need that. Just to mix things up a little bit, we’ll use the ‘df’ command. You should have df installed automatically on any major distro. The man page will helpfully describe the df application like so:
df – report file system disk space usage
We don’t care about all that. We just care about the absolute path. This usually starts with /dev/ and ends with the device ID. In an NVMe’s case, it will usually include nvme in the title, which is quite helpful.
So, let’s get that information…
1 | df -TH |
You’ll get an output similar to this one:
1 2 3 4 5 6 7 8 | $ df -TH Filesystem Type Size Used Avail Use% Mounted on tmpfs tmpfs 3.4G 1.9M 3.4G 1% /run /dev/nvme0n1p1 ext4 503G 253G 225G 53% / tmpfs tmpfs 17G 0 17G 0% /dev/shm tmpfs tmpfs 5.3M 4.1k 5.3M 1% /run/lock tmpfs tmpfs 17G 127k 17G 1% /tmp tmpfs tmpfs 3.4G 74k 3.4G 1% /run/user/1000 |
It should be obvious that the absolute path for this would be /dev/nvme0n1p1 and that’s the data we’re going to need.
Now, to find your NVMe information, the syntax would be like so:
1 | sudo nvme smart-log <path_to_drive> |
Using the output from above, an example of that would be:
1 | sudo nvme smart-log /dev/nvme0n1p1 |
This will then give you an output like so:
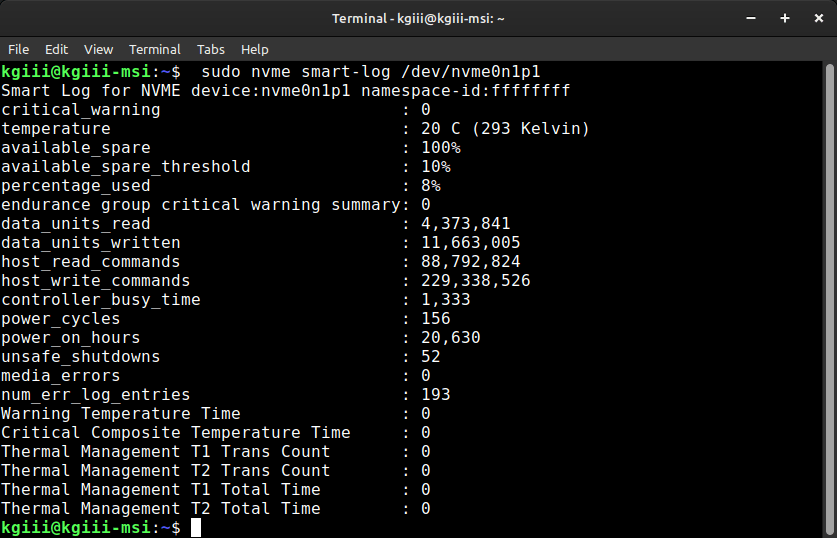
Of course, you can pipe this output to other commands. Let’s say you wanted to know the current temperature of your NVMe SSD. You’d do that with the grep command. An example would be:
1 | sudo nvme smart-log /dev/nvme0n1p1 | grep temperature |
If you want to know the number of times you’ve powered the device on, you can do that by piping the output to grep again. For example:
1 | sudo nvme smart-log /dev/nvme0n1p1 | grep power_cycles |
So, you can use the nvme-cli application (the nvme command) for quite a bit. You can do a whole lot more with it, so be sure to check the man page if you’re interested in doing more than checking the temperature or how many times you’ve cycled the power on that device.
As NVMe SSDs get more common, you’ll likely start seeing this package installed by default. From what I can see right now, no major distro is including this by default. If you’re using an NVMe M.2 SSD, you might just want to install it. If nothing else, it’s yet another tool that might come in handy.
Closure:
Today’s article is a bit longer than some but I think it’s worth reading. If I didn’t think it was worth reading, I wouldn’t have written as much! There’s so much that I could have covered but I didn’t. Articles have to have only so many words before people lose interest.
I’d have loved to cover the history of computer memory (or perhaps even more about how we humans have recorded stuff) but that didn’t seem prudent. I figured I’d limit the number of words to 1,200, but I still managed to exceed that – though not by too many. Seriously, it’s a pretty fascinating bit of history. You should use Google (and/or YouTube) to see learn about all the different ways we’ve stored data, and that’s just scratching the surface!
Fascinating stuff, I tell you! Fascinating!
Thanks for reading! If you want to help, or if the site has helped you, you can donate, register to help, write an article, or buy inexpensive hosting to start your site. If you scroll down, you can sign up for the newsletter, vote for the article, and comment.
Last Updated on January 23, 2024 by KGIII