Better Network Diagnostics With MTR

This article will show you how to get better network diagnostics with MTR, a tool called “My Traceroute” that combines both traceroute and ping into a single tool. MTR is a pretty handy tool that’s likely installed by default and a tool that even regular users should have in their toolbox.

You may remember that I wrote an article about traceroute. If you don’t know what traceroute is, it’d be in your best interest to go read that article, as I will not really be duplicating the work that went into writing that article.

As of yet, I have not yet written an article about ping. Ping is a terminal-based tool, used to time how long it takes for your device to send and receive packets to and from another device. It’ll also tell you if there are packets being dropped along the way. You can use it pretty easily. Here’s a very basic ping command:

(You can use CTRL + C to stop the running process.)

The output from that command is pretty self-explanatory. The numbers you’re probably most interested in are all the way on the right, and denote how long it took for a round-trip message to complete in milliseconds. Online gamers are often interested in their ping times. This is because a higher ping may mean they may lag behind their competitors. In this case, lower is better.

Well, MTR combines the two, traceroute and ping. It’s pretty awesome. You’ll see!

Network Diagnostics With MTR:

So long as you understand both ping and traceroute, there’s not much more this article can teach you. MTR is pretty basic in its output, easily understood by all but the novice users. Anyone with any networking history will immediately grasp the importance of MTR.

MTR isn’t a new tool, having been around since 1997. I won’t be covering how to install it. MTR’s likely already installed. If not, it’ll be easy enough to install it. If anything, this article is largely just an excuse to make people aware of it.

This article requires an open terminal. If you don’t know how to open the terminal, you can do so with your keyboard – just press CTRL + ALT + T and your default terminal should open.

Now, with your terminal open, try:

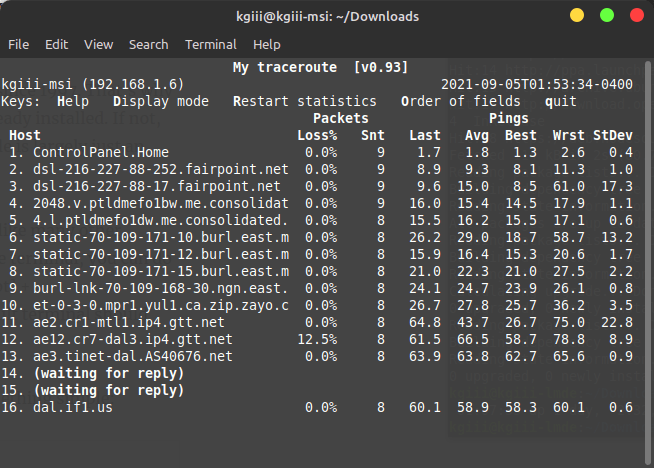
It should look something like this:

mtr in action
I really don’t need to explain the columns, do I? I’m sure you can figure it out!

There’s some options while it is running. The H, D, R, O, and Q keys all have functions, listed right there after “Keys:”! There are a few options when starting MTR, a whole lot of options. You can find those options by running man mrt. I’ll cover a couple of interesting options here.

If you want to limit the number of pings, you use the -c flag and then add the number. In the example below, I have chosen 5.

You can also just show IP addresses, not resolving the hostname. Like so:

If you want to show both IP addresses and resolved hostnames, the flag is -b.

There’s more that you can do with it, but mostly you can use it to find where along the line the traffic stops. If it’s on your end, you get to do something about it. Otherwise, I suppose you’re at the whim of the MITM. So, give the man pages a look and let me know in a comment if you already use this tool and how you use it.

Closure:

And there’s another article. Woohoo! It’s not just another article, but it’s an article about doing network diagnostics with MTR. It’s not as hard as one might think to come up with ideas for articles. Sometimes, I just use a tool and then realize it may make for a good article. That’s what happened in this case.

Thanks for reading! If you want to help, or if the site has helped you, you can donate, register to help, write an article, or buy inexpensive hosting to start your own site. If you scroll down, you can sign up for the newsletter, vote for the article, and comment.

How To: Update Ubuntu From The Terminal

It’s possible, even easy, to update Ubuntu from the terminal. Personally, I almost always update from the terminal, regardless of distro. This article will tell you how to update Ubuntu from the terminal – but it’s equally valid for Debian, official Ubuntu flavors like Lubuntu or Kubuntu, and it’s also valid for distros based on Ubuntu or Debian – such as Mint.

I recently did an article about updating Fedora from the terminal. Boy howdy, I hope that link works! It’s scheduled for publication so it doesn’t show me the real URL that it’ll have when it has been published! So, I hope I typed it properly! Either way, I recently did said article and figured I might as well do one for Ubuntu.

The tool we’ll be using is known as ‘APT‘ and apt has been a staple of Linux since Debian introduced it in the late nineties. It’s known as “Advanced Package Tool” and is used to configure and install applications. Even if you’re doing it graphically, it’s usually apt under the hood when you’re using Debian, Ubuntu, Mint, etc…

There really isn’t a whole lot to this, so it should be a reasonably short article. It’s also an article that may make the terminal more approachable for people who are new to Linux. Once you see how easy it is, you might decide to try it yourself! If it goes well, you might learn more about the terminal and the many ways you can use it. We can find out!

Update Ubuntu From The Terminal:

This article requires an open terminal, like oh so many other articles on this site. If you don’t know how to open the terminal, you can do so with your keyboard – just press CTRL + ALT + T and your default terminal should pop open.

Once you have your terminal open, you’re going to update your database of available software and the version numbers of said software. This database will be checked against the database of software (and versions) that you have already installed. It’s just a simple command:

That’ll let you know if there’s any software that needs to be updated and may take a few seconds to complete. If any software is available it will let you know and you can upgrade to the newest version. The notification will look something like:

You can, as stated, see which applications need to be upgraded to new versions by running that command. This upgrade process may also add or remove system software as needed. But, to upgrade, it’s just as easy:

This will spit out a list of software that will be updated, will be added, or should be removed – and you can enter “Y” to agree to the upgrades before pressing ENTER to continue. That’s it, you’re done.

However, I like to alias (an article still not written should link here) all this to a single command. My actual command looks like this:

That will update the database and make sure it completes successfully. It will then upgrade the software, effectively entering the Y for you. Finally, it will automatically remove software that’s no longer needed. Some folks might consider that command a bit risky to run automatically, but I’ve been doing it for years. Use it at your own risk!

Closure:

That’s it, actually. There’s really not that much more I can tell you about how to update Ubuntu from the terminal. Sure, there are other apt commands, but those aren’t really important for this article. Unlike the Fedora article, there’s no handy way to undo an upgrade with apt.

Thanks for reading! If you want to help, or if the site has helped you, you can donate, register to help, write an article, or buy inexpensive hosting to start your own site. If you scroll down, you can sign up for the newsletter, vote for the article, and comment.

How To: Update From The Terminal In Fedora

It may seem silly to write an article about how to update from the terminal in Fedora, but it’s not! There’s actually a reason for doing this and there’s more to it than just updating! I’ll try to keep the article brief, but we’ll just have to hope for the best.

If you don’t know what Fedora is, it’s a distro primarily sponsored by Red Hat. In 2003, RHL was nixed in favor of RHEL, a paid distro. Fedora is a community maintained distro based on RHEL and even the trademark is owned by Red Hat. 

So, it’s a pretty solid distro with a few versions. There’s a workstation, IoT, and server edition. It’s binary compatible with RHEL and is widely used, with something like 1.2 million users. Support is through the community, which is a distinction between Fedora and RHEL where support is a paid option. Fedora also has some community spins that offer things like different desktop environments.

I should probably note that, since the changes to CentOS’s direction, RHEL is pretty much free for SOHO use. You can download it and use it on your workstation right now. See this link for more information about getting and using RHEL free – it’s a lot nicer an agreement than you may think!

Anyhow, on to Fedora… 

The motivation behind this article is that there’s an ‘undo’ option for DNF that’s pretty neat. However, out of the box it doesn’t do much. There are some extra steps you’re going to want to take and none of the sites that I’ve visited ever seem to put these two together.

This article aims to address that!

Update From The Terminal In Fedora:

Obviously, you’re going to need your terminal open. To do this, you can just use your keyboard and press CTRL + ALT + T. That should open your default terminal.

Once your terminal is open, you can upgrade like so:

That should update your system to the latest and greatest. In fact, you can list your previous DNF history with the following command:

Now, here’s the neat part… When you run the history command above, the first column is an ID column and you can undo a specific update with this command:

Except that pretty much never works. Fedora isn’t in the habit of keeping archived versions in their repositories. So, this is the neat part, you need to add a repo that contains those archives. That’s the missing step!

This isn’t a perfect undo, but it’s a far sight better than it is without that repo being added. For the most part, it works. If it’s not working, it may ask you to use either (or both) the --allow-erasing or --skip-broken flags and, from my testing, that appears to make it work well enough most of the time.

So, if you want to use the undo feature offered by DNF, you should really add that archive. Doing so will make a more robust solution when you attempt to update from the terminal in Fedora.

Closure:

And there you have it. With that, you should be able to update from the terminal in Fedora with some greater confidence. With that little change, you can actually undo (some/many) updates if they go awry or if you need a little more time before you can use the newer versions of your applications. It’s not that hard and my observations tell me that it works with some regularity – if you’ve added the archive repo.

Thanks for reading! If you want to help, or if the site has helped you, you can donate, register to help, write an article, or buy inexpensive hosting to start your own site. If you scroll down, you can sign up for the newsletter, vote for the article, and comment

The Meaning Of “Load Average” On Linux?

You may have come across “Load Average” in your Linux travels. It’s common for it to be misinterpreted but it’s simpler than you might think. In this article, I’ll try to explain it for you.

Knowing the load average may let you know when you need more powerful hardware. It could indicate that there’s a runaway process, or that there has been some sort of hack and you’re now running malware, perhaps mining cryptocurrency in the background. The load average is valuable information, though many folks don’t seem to know what it means.

I also see some load average misconceptions when I travel the ‘net. There are faulty interpretations and faulty implications. For example, it doesn’t necessarily mean that you were hacked or need hardware, it just means you need to start looking into the cause of a high load average. It doesn’t mean definitely anything – it could just be that you had a high load for a while due to a compute-intensive process.

This shouldn’t take very long, or be all that complicated, but we’ll see if I’m able to put it into words. I’ve never tried to put it into words before! Let’s see how that works out.

Linux Load Average:

First, let’s crack open your terminal. Use your keyboard and press CTRL + ALT + T. That should open your default terminal.

With the terminal open, run this simple command:

You should get an output similar to this:

So, let’s explain what’s going on here. 

Those are the average of CPU usage over the last 1 minute, 5 minutes, and 15 minutes. Each 1 is a CPU (or CPU core) that was waiting because it was busy. It was waiting, unable to process data because it was too busy running existing scheduled jobs. So, you can have some pretty high numbers.

Sometimes, you’ll see like a 1.04 as a result and that means that one CPU/core had a high average load over the past minute. The load average isn’t what the score was at 1, 5, or 15 minute intervals. It’s an average of CPU usage over time

If you have an 8 core CPU and they’re all busy over a minute, you’ll end up with a load average of 8.x, and you may still have a functioning (perhaps slowed down) computer. At the same time, if you’re on an old dual-core CPU then you may find that 2.x means your computer is entirely unusable due to the lag.

Obviously, most folks are going to want a lower load average but some folks may want a higher average so that they know they’re getting the most out of their hardware. As a general rule, you want your CPU’s load average lower so that you can move data in and out of it quickly. Having a high CPU load can create a bottleneck and that’s less than optimal.

Closure:

There we go… I think I explained it well enough. If not, just let me know and I’ll try to answer any comments that are questions. If you can think of a better way to describe it, feel free to add that too! Either way, it’s another article for the archives. Pretty soon, the year will be over!

Thanks for reading! If you want to help, or if the site has helped you, you can donate, register to help, write an article, or buy inexpensive hosting to start your own site. If you scroll down, you can sign up for the newsletter, vote for the article, and comment.

Create A New User With SUDO Privileges In Ubuntu

It’s not unusual to want to create a new user with sudo privileges and it’s actually really easy. This will be just a quick article that explains how. It’s not exactly a complex operation.

This article doesn’t cover other distros! It has only been tested in a couple of Ubuntu derivatives and not all distros come with ‘adduser’. It should probably work if you install ‘adduser’ where available, but that’s entirely untested by me. Give it a shot and let me know in a comment if it works out for you.

You may want a multi-user environment, you may want different logs for different users, you may want some customization with one user, you might want to test things with a separate user, etc… There are tons of reasons for wanting a different account and wanting a new user with sudo privileges.

I shouldn’t need to mention this, but sudo stands for ‘superuser do’. Users that belong to the sudo group are pretty much omnipotent. They can access anything, change anything, and do anything they please. You’ll use sudo to do things like install software or edit system files.

Anyhow, I’ll explain how to create a new user with sudo privileges in this article. It’s a pretty easy task and you shouldn’t have much trouble with this one.

Create New User With SUDO Privileges:

This article requires an open terminal, like many other articles on this site. If you don’t know how to open the terminal, you can do so with your keyboard – just press CTRL + ALT + T and your default terminal should open.

The tool we’ll be starting with is called ‘adduser‘, and the name tells you what it does. With your terminal now open, you start by entering the following to add a new user:

Once you’ve done that, you’ll be asked to type the new user’s password twice, and then you can fill in some additional information for that user. Those steps aren’t necessary, but you will want to add a password for the user – and definitely so because it’s an account that has access to sudo.

Now that you have created a new user, you’ll need to modify that user. The newly created user doesn’t come with sudo access by default, you need to grant it. The tool we’ll be using for this is ‘usermod‘ and the command to make the new account a new user with sudo privileges is:

At this point, you should be able to login and use the newly minted user account. Indeed, you should have a new user account and that new account should have sudo privileges.

CLOSURE:

See? I told you that this wouldn’t be a long or difficult article. If you want a new account and you want that account to have sudo privileges, it’s just a couple of easy commands away. This is yet another article in what’s turning out to be quite a long list of articles.

Thanks for reading! If you want to help, or if the site has helped you, you can donate, register to help, write an article, or buy inexpensive hosting to start your own site. If you scroll down, you can sign up for the newsletter, vote for the article, and comment.

Linux Tips
Creative Commons License
This work is licensed under a Creative Commons Attribution 4.0 International License.