Strip Password From A Password-Protected PDF

One company likes to send me a password-protected PDF every month, and it can be a pain typing in the password every time. Fortunately, we don’t have to! To completely remove the password from password-protected PDFs, keep reading!

Now, there are times when removing the password from a password-protected PDF is against corporate policy or may be a violation of regulations. I suppose a good rule might be, “Don’t tamper with the password protection unless the PDF belongs to you.”

That said, it’s actually pretty easy to remove the passwords from password-protected PDFs. It’s easy and I’ll show you how! This won’t even have to be a very long article!

Remove Password From A Password-Protected PDF:

Like oh so many of my articles, this one starts with the terminal open. If you don’t know how to do that, it’s easy. Just use your keyboard and press CTRL + ALT + T and your default terminal emulator will open.

The tool we’ll be using is called ‘qpdf‘ and it describes itself as:

PDF transformation software

Once you have that open, one of the following should help you install qpfd:

Debian/Ubuntu:

Arch/Manjaro:

RHEL/Fedora:

Any of those should get you to the point where qpdf is installed, and there shouldn’t be (m)any dependencies. Using it is just as easy as installing it.

Obviously, you change “PASSWORD” to the password that’s used in the password-protected PDF to the actual password. You also use the name (and path) of the PDF and a new name for the new PDF that has no password. That will, of course, remove the password and you can delete the original after verifying that it worked.

BONUS:

You can actually use qpdf to make a password-protected PDF. It’s also easy and the command would look like this:

In this case, the PASSWORD is your new password and it must be typed twice. The 256 is the key-length used to encrypt the PDF. To get more information like that, just run:

In there, you’ll see that qpdf is really quite a potent application. It can do so much more than just stripping the password from a password-protected PDF. So, give that help file a scan and see what other features it has!

CLOSURE:

See? I told you that this article wouldn’t take all that long. Best part? It’s another in what’s a growing list of articles and it’s something you can actually use when you get a password-protected PDF. Again, if you’re gainfully employed or in a regulated occupation you may not want to remove the password protection.

Thanks for reading! If you want to help, or if the site has helped you, you can donate, register to help, write an article, or buy inexpensive hosting to start your own site. If you scroll down, you can sign up for the newsletter, vote for the article, and comment.

Find Your Network Interface Name

There are all sorts of reasons why you might want to know your network interface name. It comes in handy with things like ‘vnstat‘, for example. In fact, I wrote an article about changing the network interface name. (There’s sometimes a reason why I write articles in the order I write ’em!)

Like I said, you may want to know this information for other purposes. In your general day-to-day computing, the network interface name is entirely unimportant. As you’ve seen from previous articles, it may come to pass that you need to know the name and this article will explain how to find that.

Anyhow, this one is quick and easy. I’m just going to show you some easy ways to find your network interface name. This should be pretty brief and simple enough.

Your Network Interface Name:

Like oh so many articles, this too requires an open terminal. Sure, there are GUI methods to find your network interface name, but we might as well do it in the terminal. So, use your keyboard and press CTRL + ALT + T. With your terminal open, you can start with:

With any luck, this should be enough. You’ll get something that looks like this:

network interface name
See the handy arrow? That’ll help! That’s the network interface that’s up and connected.

As you can see by the arrow, that’ll clue you into which connection is in use at the time. If that doesn’t work, you can also try this command:

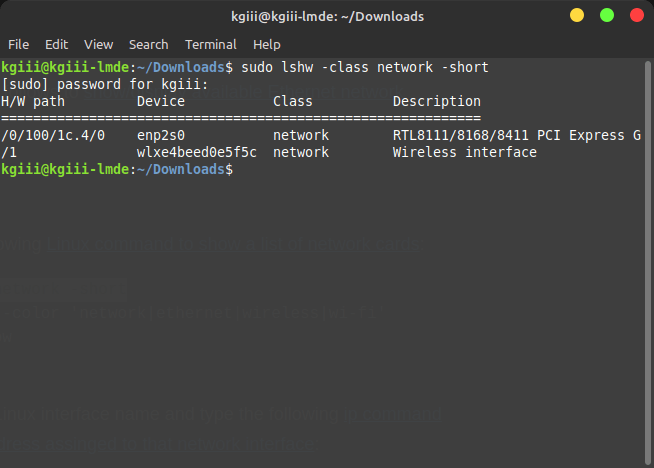
The output from this will look similar to this:

lshw showing network interface names
A keen eye will note that there are multiple devices listed!

As you can see, that’s from a different device with a different operating system. It also relies on ‘lshw’ which you may or may not have access to.

You can also try:

Some of those commands will show the ‘lo’ connection, which is just a loopback connection and immaterial for this purpose. You can safely ignore that.

Anyhow, those will show you your network interface names. If you have more than one, it’ll happily show them all – and give you a clue as to which one is up. If you have both connected, say wireless and wired, then it will say both are up. This information isn’t very useful by itself, but it is useful for other purposes.

There are other ways, so feel free to leave a comment showing how you find your network interface name.

Closure:

See? I told you this one would be quick and easy. There’s not much to it, but it’s a useful bit of information to know and now you know that this is how you find your network interface name. It’s not much of an article, but it’s yet another in what’s hopefully a long list of ’em! They can’t all be huge pieces!

Thanks for reading! If you want to help, or if the site has helped you, you can donate, register to help, write an article, or buy inexpensive hosting to start your own site. If you scroll down, you can sign up for the newsletter, vote for the article, and comment.
Install ShellCheck So That You Can Use It Locally

If you’ve been writing shell scripts, or if you’re new to writing scripts, you may not know of ShellCheck – and you that can install ShellCheck for use locally. This means you don’t need to go online to check  your shell scripts, saving you time and effort – as well as being available offline.

If you don’t already know of ShellCheck, march your ass over there right this minute! It’s one of the greatest tools on the internet. If you’ve already read the whole linked page, you can pretty much skip this entire article! After all, it tells you how to install ShellCheck over there – and I’ll be duplicating a lot of that here.

Why am I duplicating it? Because so few people seem aware of it. So few people know this tool exists, even for online use. Time and time again, I see scripting questions that can be debugged/resolved using this wonderful ShellCheck tool.

So, like many of the articles on this site, it’s here so that we can link to this article and not have to repeat ourselves time and time again. Like much of the site, it’s meant to save time and to avoid duplicating effort!

There are other ways to use ShellCheck, such as directly in your editor. This article will not be covering those other ways, I’m simply going to tell you how to install it and use it from your terminal.

Install ShellCheck For Local Use:

Like so many of these things, you need to start with an open terminal. To do so, use your keyboard – just press CTRL + ALT + T and your default terminal should open. If it doesn’t, just open it from your application menu.

Once you have the terminal open, you can install ShellCheck. It’s available in most default repositories, so you shouldn’t have any issues installing it.

Debian/Ubuntu:

Arch/Manjaro:

Fedora:

OpenSUSE:

One of those ought to work. If not, follow the link in the second paragraph, poke around, and you’ll see that you can likely get ShellCheck installed with little or no difficulty. Worst case, you can grab the binaries and install it manually.

Using ShellCheck is even easier. You just use ‘shellcheck’ and then the path to the script. So, it’d look something like one of the following:

It’s really that easy. ShellCheck isn’t perfect and it doesn’t recognize every error, but it’ll catch a ton of beginner mistakes and typos. It’ll catch syntax issues and punctuation mistakes. It’s pretty handy and is absolutely a great tool for anyone that does any scripting at all.

Closure:

And there’s another article! This one will help you install ShellCheck, a fantastic tool for people who need to check their scripts. It’s right there in the application’s title! Really, more people need to be aware that it exists, and hopefully this article does a little something to help raise awareness.

Thanks for reading! If you want to help, or if the site has helped you, you can donate, register to help, write an article, or buy inexpensive hosting to start your own site. If you scroll down, you can sign up for the newsletter, vote for the article, and comment.

Don’t Let Applications Close When The Terminal Is Closed

You may have started an application from the terminal and noticed that those applications close when the terminal is closed. This article will help you stop that behavior. This should be a pretty basic and speedy article.

Let’s explain what I mean with a demonstration. First, open your terminal by pressing CTRL + ALT + T. Now, enter the following:

Change the ‘pcmanfm-qt’ to the file manager you use, like ‘nemo’, ‘spacefm‘, or whatever it is you use to manage files in a graphical way. Any one will do. 

Now, close the terminal that you used to open your file manager or application. When you do so, you’ll see that applications close when the terminal is closed. Well, it doesn’t have to be that way. 

Enter ‘nohup‘, a lovely tool that will let you open applications in the terminal and then make sure that those applications don’t close when the terminal is closed. The ‘nohup’ application should be installed by default on any major distro and the man page describes it like:

nohup – run a command immune to hangups, with output to a non-tty

If you check the man page, you’ll see that it has pretty much no useful flags other than help and version. So, straight away you’ll see that it’s a pretty easy application to work with.

And, with that ease in mind, I’m just gonna go straight into telling you how to use it.

Applications Close When The Terminal Is Closed:

Seeing as you already opened the terminal, let’s not mess about and just show you some uses of ‘nohup’. Let’s say you use ‘nemo’ as your file manager:

Now close the terminal. See? When you use ‘nohup’ you’ll not have applications close when the terminal is closed.

You may see the command used with an ampersand (“&”) symbol at various tutorial sites. What that does is it runs things in the background. This means it should immediately return to the command prompt after the application has opened. This only works if you’re using bash, by the way. If you use it, it looks something like this:

Anyhow, after you’ve used ‘nohup’ to open an application without the ampersand, you can also just press CTRL + C and disconnect the running application from the terminal while returning you to the command prompt. Later, when you close the terminal, you’ll find see that no longer do those applications close when the terminal is closed.

That’s about it, really. I don’t see any reason to stretch this article out by adding fluff. You’re welcome!

Closure:

There ya have it. Another article. This one will help you change the behavior, if you don’t want to have applications close when the terminal is closed. 

Thanks for reading! If you want to help, or if the site has helped you, you can donate, register to help, write an article, or buy inexpensive hosting to start your own site. If you scroll down, you can sign up for the newsletter, vote for the article, and comment.

Customize Your GNOME Desktop With GNOME-Tweak-Tool In Ubuntu

The GNOME-tweak-tool is a valuable tool to modify and manage your GNOME desktop environment. The application is easily installed, easily used, and generally safe to use. This article will help you get the tweak tool installed and explain why you might want to do so.

If you know about it already, you may know it as ‘Tweaks‘, it’s current name. I’ve chosen to use the older name for search reasons. I want to cover the tool not just for new users, but also for older users who may need a reminder. Doing it this way should cover all the bases, though my SEO “skills” are still in the ‘wing it’ phase. Plus, see the installation command below.

I don’t cover GNOME very often. Truth be told, I’m not a huge fan. However, I’d be overlooking a large number of users if it wasn’t mentioned from time to time. GNOME originally stood for GNU Network Object Model Environment, though that was dropped when the focus of the project changed. It’s one of the more popular desktop environment options out there, and is a default for a number of distros – including Ubuntu. 

With GNOME comes a lot of support resources, as it is so widely used, and even has the ability to use extensions. It’s a weighty desktop with a number of great features that are beyond the scope of this article. People sometimes complain about how GNOME does things, and the lack of easy customization, but when you use GNOME you’re buying into the entire GNOME philosophy. “In for a penny, in for a pound.” 

But, we’re Linux users. If there’s one thing we have (just shy of universally) in common across the board, it is that we like to customize our experience. We like to tinker and to make things our own. Well, GNOME-tweak-tool will help you with that. It’ll help you make the GNOME desktop your own.

Install GNOME-tweak-tool:

The GNOME-tweak-tool should be available for any distro that’s using GNOME as its desktop environment. You don’t want to try using the tweak-tool while using a different desktop environment, even if that desktop environment is based on GNOME.

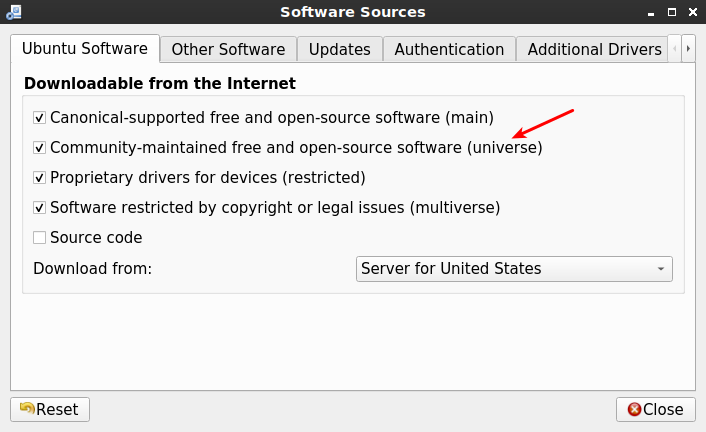
For the sake of this exercise, we’ll assume you’re using Ubuntu. With Ubuntu, you’ll need the Universe repository enabled. You may have that enabled already, but you can check under “Software Sources” easily enough. It’d look like this:

software sources, universe enabled
See? You can just click a button to do this! Nice and easy!

Once you have the correct software source (repository) enabled, you can go ahead and get the GNOME-tweak-tool installed easily enough. Crack open your terminal by pressing CTRL + ALT + T and then enter:

That should install the tool and make it available in your menu. To find it in your application menu, you can search visually or just type “tweak” and it will narrow the results down to show you just the application.

If you’re using a different distro, one not based on Ubuntu, you’ll need to adjust the installation command. If you use dnf or zypper, you’ll need to adjust the command to suit those package managers. While this article specifically covers Ubuntu, it should be easy to do this with other distros as well.

Why The GNOME-tweak-tool:

The GNOME-tweak-tool actually does a bunch of things and is full of options. I’ll go ahead and list some of the options and, seeing as I’m looking at an Ubuntu VM as I write this, I might as well go in order.

  • Change animations and suspend when closing your laptop’s lid.
  • Change application themes, background images, icons, etc.
  • Add/remove desktop items, app indicators, or a dock.
  • Adjust system-wide fonts.
  • Change keyboard and mouse settings, disable touchpad while typing.
  • Add/remove startup applications.
  • Change the top bar, maybe adding/removing battery monitor, etc.
  • Change titlebar actions and buttons.
  • Modify window behavior, including click and focus actions.
  •  Modify workspaces, adding and removing them.

As you can see, there are quite a few tweaks available and they’re all available in a single place. Some of those settings may be in other places, but this puts them all into one place.  The GNOME-tweak-tool is a pretty decent way to customize your GNOME desktop environment, an easy way to make it your own.

If you’re a GNOME user, this may well be just the tool you’re looking for. New users are often exposed to Linux with GNOME as their first desktop. If you’re one of those people, you’ll likely enjoy this chance to customize your experience.

Closure:

There you have it! It’s an article about GNOME-tweak-tools. As y’all know, and as mentioned above, I don’t particularly like GNOME. It’s just not my cup of tea and I don’t fit well in the whole ‘GNOME experience’. And, you know, that’s okay. We don’t all have to agree. If we did, there’d only be a single DE to pick from. We don’t want that.

Thanks for reading! If you want to help, or if the site has helped you, you can donate, register to help, write an article, or buy inexpensive hosting to start your own site. If you scroll down, you can sign up for the newsletter, vote for the article, and comment.

Linux Tips
Creative Commons License
This work is licensed under a Creative Commons Attribution 4.0 International License.