There are times when you want to see what’s going on with your devices and you can monitor your Linux system with nmon. If you’ve never heard of nmon, that’s okay. You’ll find that nmon is a handy application that lets you monitor all sorts of aspects of your system. You’ll also find that nmon is an application that’s used in the terminal, so be prepared for that.
This nmon application is available for most Linux systems and I’ll let you know how to install nmon in this article. You’ll find that nmon stands for ‘Nigel’s Monitor’ and has been around since the early IBM AIX days. It has since been made available for Linux.
You can read about nmon on Wikipedia.
You can also visit the nmon project page.
If you check the man page, you’ll see nmon described as:
nmon – systems administrator, tuner, benchmark tool.
We won’t be doing much of that. We’ll just be using nmon to monitor the system. You can then take that information and use it to administrate, tune, and benchmark the system. We’ll be using nmon to monitor CPU, RAM, your network usage, and things of that nature.
You can also learn more about nmon from the man page because I’ll only be covering how to monitor your Linux system with nmon. There’s almost always so much more! It’s almost a shame that I try to limit many of my articles.
Installing nmon:
You can use your usual GUI tools to find and install nmon. It’ll be available for most distros. It’s also possible to install nmon in the terminal. We’ll cover that, so just press
With your terminal now open, we’re ready to install nmon.
Debian/Ubuntu/etc:
1 | sudo apt install nmon |
Arch/Mandrake:
1 | sudo pacman -S nmon |
RHEL/CentOS:
1 | sudo pacman -S nmon |
SUSE/OpenSUSE:
1 | sudo zypper install nmon |
Gentoo:
1 | sudo emerge -a sys-apps/nmon |
I think that covers the vast majority of distros out there. If you don’t see your distro, or if I got one wrong, please let me know in the comments. I don’t always get this section right. I wasn’t even planning on writing this article today. But… Here we are!
Monitor Your Linux System With NMON:
You should have a terminal open already, from when you were installing nmon. This is going to sound strange, but you’re new to nmon – or you probably wouldn’t be reading this article. Because you’re new, open up a second terminal.
In the first terminal, enter this:
1 | nmon |
In the second terminal, enter this:
1 | nmon |
Now, do you see why I had you open two terminals?
In the first terminal, look at your settings and options. In your second terminal, apply them. See, once you apply them you can no longer trivially refer to the material in the first terminal.
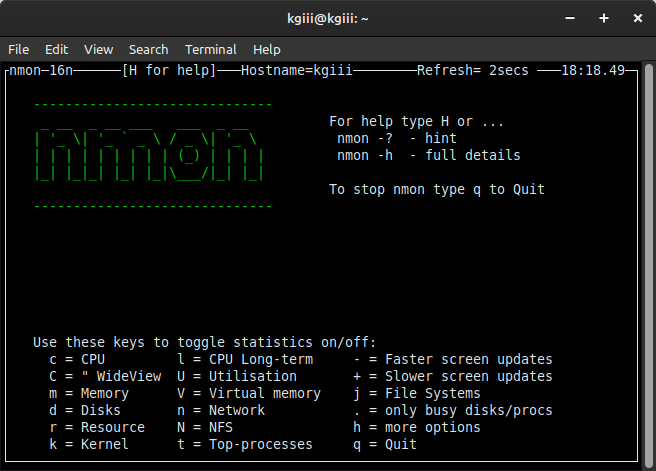
You can apply the monitoring options in any order you’d like and in any combination that you like. The nmon application makes it easy. You press
So, pick what you want to monitor from the first terminal and press the appropriate key in the second terminal. It might look a bit like this:
Then, your monitoring terminal could look a bit like this:
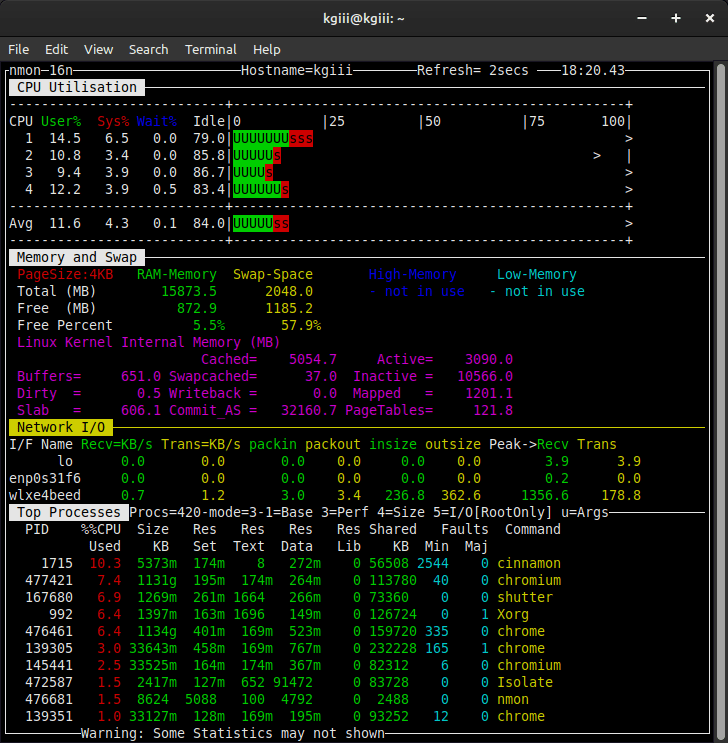
Of course, once you know how nmon works and what you’d like to monitor in your Linux system, you won’t need to have the first terminal open. There are a lot of options, but you’ll find they’re easy to remember. You can also use
I suppose you want to know how to get out of nmon without closing the terminal window and leaving nmon running in the background. Well, that’s easy. Just press
Closure:
I didn’t plan on writing this article today, but I’d cracked open nmon for one reason or another and decided that I’d write about nmon when I was thinking about it. It’s another one of those articles that scratches my own itch, but it’s also something worth sharing.
It’s a pretty easy task to monitor your Linux system with nmon. I figure anyone can do it and I tried to make it easier for new nmon users by suggesting they use two distinct terminal windows. It seems like a reasonable way to get started.
Thanks for reading! If you want to help, or if the site has helped you, you can donate, register to help, write an article, or buy inexpensive hosting to start your site. If you scroll down, you can sign up for the newsletter, vote for the article, and comment.