Let’s Make A Directory Tree

Today we’re going to install a nifty application and then we’re going to make ourselves a directory tree. We’ll learn a couple of other things along the way, as we often do. Linux is great like that, and so we’ll have some fun along the way – including generating an entirely pointless text file that takes up too much space and takes too much time! That sounds fun to me!

So, what is a directory tree? Well, you start in one directory and then make a “tree” of all the directories below it. The directory you start in will be the top of the tree, and the directories below will be the branches. In its simplest form, it might look a little like this:
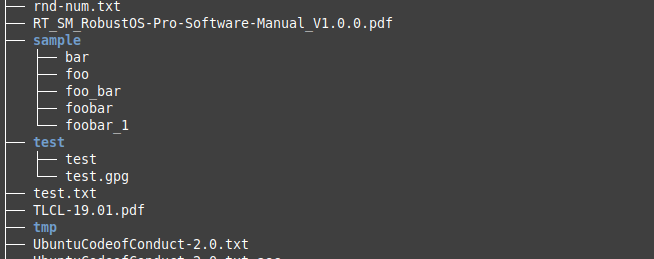
using the tree command to make a directory tree
As you can see, that’s part of the tree – with various directories and sub-directories.

You can’t see the parent directory, but there is one. That’s just a piece of the tree, which should be enough to explain this tree concept.

The tool we’ll be using is known as ‘tree’, of course. The man page describes it as being:

tree – list contents of directories in a tree-like format.

You may not have ‘tree’ installed and you will need to install it. It should probably be a default tool, but it is not. Use your package manager, search for ‘tree’, and install it. In Ubuntu/Debian/Derivatives, you can try:

That should get you started and, with tree now installed, we can…

Make A Directory Tree:

If you had your terminal open to install ‘tree’, you might as well leave it open. You’ll need it for the rest of this article. If your terminal is not open,  you’ll need to open it. Just press CTRL + ALT + T. Tada!

Now, the first thing we’re going to do is right there in your home directory, simply make a directory tree with the following command:

That will make a lovely tree. The -d flag means that it will only show directories in the output. That’s what we wanted, a directory tree. However…

You can make a tree with the files included. Just drop the -d flag and try this:

Now, let’s send that output to a file. If you want a tree (with or without files listed in it) as a saved text file, you can try this command:

Now, for some fun, you can try this (it will take a long time):

You need ‘sudo’ for that command so that it can traverse and list the various directories for which you have no permissions. It will take a long time. I want to say that it took about 30 minutes, but I currently have a bunch of external stuff hooked up to this device.

It will also generate a giant text file. Mine was over 500 MB in size. Opening it is a slow and painful process, but it’s not too bad once it is open. There are other options for the tree command, just type man tree to learn more about the tree command.

Closure:

So, now you know how to create a directory tree. You also know how to make your directory tree include files and how to make a directory tree of your entire computer’s file system. I don’t know why you’d need to know this, but now you do. They do make good text documents for small sections of the tree, especially if you need to quickly see the directory structure for some other task.

Thanks for reading! If you want to help, or if the site has helped you, you can donate, register to help, write an article, or buy inexpensive hosting to start your site. If you scroll down, you can sign up for the newsletter, vote for the article, and comment.

List The Files In A Directory

Today’s article is only going to be useful if you are a new user and don’t yet know how to list files in a directory. This is, of course, something you do in a terminal. I do believe this will be a quick and easy article, so read on if you don’t yet know how to list files in a directory.

If you’ve used Linux for more than a month, you can safely ignore this article.

Yes, this has been covered all over the web. This isn’t anything remotely new, nor is it anything all that complicated. However, this is a holiday weekend and I figure it’s a good article for new users who happen to be just browsing around. I’ve also covered some ‘ls’ commands before.

On the other hand, it should be a short article! So, there’s that!

List The Files In A Directory:

Of course, this article requires an open terminal, like many other articles on this site. Should you not know how to open the terminal, you can do so with your keyboard. Press CTRL + ALT + T and your default terminal should open.

With that terminal now open, let’s try a simple command:

That will list all the files in the directory. If you’d like to see the output in columns, you can always try this command which lists the output in a denser manner.

That command doesn’t list dot (hidden) files. Seeing as you’re in the home directory, you should have some hidden files. If you want to use the ‘ls’ command to show files, you need the -a flag. You can combine it with the above and use this command:

That’s the command I use more often than not. This being Linux, you get to decide which how to use the command. I think I type the ‘ls -la‘ command out of habit.

Closure:

Well, you got an article. Sure, it’s a simple article but someone may find this important information. Of course, they could just use the man page   – but what’s the fun in that?

Thanks for reading! If you want to help, or if the site has helped you, you can donate, register to help, write an article, or buy inexpensive hosting to start your site. If you scroll down, you can sign up for the newsletter, vote for the article, and comment.

How To: Disable The Caps Lock Key

Today’s article is one that I used to scratch my own itch because I really like to disable the caps lock key. Of all the keys on the keyboard, that’s the only one that makes me want to disable it. The rest of the keys are fine, but I have no use for a caps lock key.

NOTE: This is probably not going to work if you use Wayland. I don’t know, I haven’t tested it. If you’re wanting to test it so that you can write paragraphs about how wrong I am, please do. I’m a little curious! I need to learn more about Wayland.

Sure, we could use the destructive (or at least awkward) method and physically rip the key off the keyboard. Some fancy keyboards have easily removed caps, meaning you can just remove them with a little caps-puller tool. Pretty much every time I’ve needed to remove keys, it has been a permanently destructive process, but I know it can be done.

By the way… This is why I’m a wasteful jerk sometimes and I just chuck that keyboard in the trash when I’m done with it. To be fair, I wear the letters off a cheap keyboard.  Where my thumb hits the space bar it wears down the plastic from repeated use. I’m not a ‘hard typer’, I’m a prolific typer. So, here we are…

Those of you with a keen memory may recall this article:

Disable The Caps Lock Key In Linux Mint

That was fine for Mint (Cinnamon)… It’s not a universal thing. I meant to write a more universal thing, so I guess this counts as that…

Disable The Caps Lock Key:

You’re gonna want a terminal window open for this. So, press CTRL + ALT + T and your default terminal should open. Tada!

Now, the tool we’ll be using is called ‘xmodmap’. See that ‘x’ in there? Yeah, that’s what (along with the description) makes me unsure if this is going to work for Wayland users. If you’re using a major distro, especially one using X, you’ve got this tool installed by default.

When xmodmap is not installed, the package name should be ‘x11-xserver-utils’ in Ubuntu and it’s fairly safe for other distros to assume the appropriate package will show up if you search your repositories for it. If you need to install it, say with a distro that uses apt (and you shouldn’t), then the incantation would look like this:

Got it? Is it installed? You can check if it’s installed with this command:

Now that you know you have xmodmap installed, you can just use the following command to disable the caps lock key:

Should you change your mind, which you shouldn’t because caps lock is evil and gets in the way of perfectly good typing technique, then you can undo this. Try this command, it should work:

That right there should get rid of your caps lock key’s functionality. You should be able to press the key and have exactly nothing happen, which is a good thing. 

Closure:

Yes, I know the Internet Wisdom© insists that “caps lock is cruise control for cool” but just don’t… No… Just don’t do that. Really, don’t do that!

Try as I might, I can’t think of a legitimate (for me) reason to use caps lock. I never use it on purpose. If I need a few capital letters, the regular shift key works just fine. I have two hands, after all.

So, if you’re like me and don’t want to be cool (and have fewer hassles) go right ahead and disable that caps lock key. I sometimes press it by accident while typing and not looking. It just makes a mess of things. While I type like a demon on fire, I don’t hold my hands in the correct position and don’t use the right fingers for the right keys. I press that ****ing caps lock key way too often, so disabling it makes my life easier.

Thanks for reading! If you want to help, or if the site has helped you, you can donate, register to help, write an article, or buy inexpensive hosting to start your site. If you scroll down, you can sign up for the newsletter, vote for the article, and comment.

Meta: The State Of Linux-Tips #17

Today you’re just going to get a quick meta article, where I go over the state of Linux-Tips (this site, obviously). It has been a while since I did the last one, so it’s time to do another one. I’m thinking I’ll keep this one brief. I’ve had an adventure today, dealing with some medical stuff, so a low-energy article is a good idea.

I try to do a meta article every month. I haven’t always managed to do so, but it’s a sorta goal. It’ll be fun to share what’s going on. It’s not all that informative, but I try to make it as interesting as this kind of article can be.

So, if you want a day off you can just skip this article. If you’re interested in what’s going on, read on and enjoy the meta article.

The State Of Linux-Tips #17

So, traffic really hasn’t grown or changed much. This month we’re going to do better than last month, but not drastically so. Google appears a little annoyed with the site again, but I don’t worry any more. Frankly, the site gets plenty of traffic as it is. 

Someone did donate recently. I’m grateful for that. The funds went to pay for hosting, though I suppose they more specifically went straight to my CDN provider. Why is it worth the money to pay for a CDN?

The site loads quickly no matter where you are on the planet. On top of that, you’ve never seen a minute of real downtime. You might have seen a temporary screen while updates happened, but the server has pretty much 100% uptime. I decided to add a monitor fairly recently – but in that time the server hosting the site has gone down.

This site did no such thing. The CDN still presented you with static content, which is what this site mostly is. If you attempted to interact with the site during the outage, the CDN (it’s both WordPress and LiteSpeed specific) will cache your request and process it when the site is back online. So, you’ve almost certainly never seen the site go down.

Now that I said that, watch there be some big outage that takes the site offline for a few hours! Ah well… I’ll risk it. If you whois the domain, you’ll see the nameservers which will clue you in as to which CDN I use. They’re very specialized and likely won’t work for many of you. I think it’s worth it, but it’s an annoying monthly fee. (Even if I have to fund it entirely by myself, I will continue doing so. Donations are nice, but the site will survive without them.)

Anyhow, thanks for the donation! (I have to find the motivation to wrap the site up as a PDF to give away to people who donate, something planned for the future, but I’ll make sure it’s available for them. That seems like a good idea. 

Some Stats:

So, like always, the VAST MAJORITY of my traffic comes from Google. I suppose the state of Linux-Tips depends heavily on the traffic.

Well, this might not seem like much, but last month we went through more than 35 GB of bandwidth. I’m having some issues with backups, so the site was also using almost 20 GB of disk space. That disk space consumption has since been reduced significantly!

Some Demographics:

Roughly 92% of my traffic is from Linux users.
Just about 80% of my traffic is from Chrome/Chromium-based browsers.
Roughly 80% of my traffic originates in the United States.

The top 3 articles read in the past month:

Find Out Which Display-Manager You’re Using
How Do I Install Linux (A General Guide)
How To: Disable Sleep And Hibernation on Ubuntu Server

Other Stuff:

The site is attacked about 400 times on an average day.
Most of the attacks appear to come from compromised servers.
Only about 70 people have signed up for the newsletter.
AWStats claims I’ve displayed > 600,000 pages in May.
There are about 50 articles that show up in Google’s top ten listings.
As I learn more, I realize I have no business being a WordPress admin.
This changed! In May people spent an average of 171 seconds on the site.
One visitor was using Symbian OS.
Four visits were from someone using Sun Solaris.
We’re now over 280,000 words on the site.
It’d take you 19+ hours to read all of that.

Closure:

And there you have it… You have another meta article, an article about the state of Linux-Tips. You probably didn’t learn anything important, but now you know what’s going on here and what you can expect in the future. I expect to continue to write these articles for the foreseeable future. Don’t forget that I accept on-topic guest articles. (I get so many requests for stuff that’s not on-topic. I’ve stopped responding to the people too lazy to read the site and understand what’s going on here.)

Thanks for reading! If you want to help, or if the site has helped you, you can donate, register to help, write an article, or buy inexpensive hosting to start your site. If you scroll down, you can sign up for the newsletter, vote for the article, and comment.

A Fun Way To Check If Your Network Devices Are Connected

Today is going to be a fun article, mostly good for lazy people, where we discuss a way to check if your network devices are connected. There are far easier ways to do this, assuming you’re local to the device. If you’re not local to the device, the fact that you’re connecting to it likely means that the network is at least somehow connected!

But, in the spirit of being lazy, let’s head into the world of sheer, unadulterated laziness. I mean, if you want to know if your wireless is connected there’s an icon. Of course, you can see if your ethernet is connected. To check that ethernet connection all you probably have to do is look at the back of the computer and maybe wiggle the cable a little bit.

This, of course, presumes that said network adapters are in working condition. If they’re broken, this tool might give you a bit of debugging information. But, still, this is a command that calls itself a “beat connector”. It’s mostly used to check to see if your network devices are connected – as in physically connected to your computer.

The tool we’ll be using will be ifplugstatus and it defines itself as this:

ifplugstatus – A link beat detection tool

At least as far as I use it and the man page indicates, it checks to see if your network devices are connected. Seeing as that’s what the title suggests, it means we’re probably off to a good start!

Check If Your Network Devices Are Connected:

First things first… You’ll almost certainly find that ifplugstatus is not installed by default. You’ll need to install ifplugstatus if you want to use it. To do that, you’ll need an open terminal – which you’ll need for the rest of the article. To open your terminal, press CTRL + ALT + T and your default terminal should open.

Now, I’ve only ever used this command with Lubuntu and similar. Because of this, I don’t know if it’s the same on other distros. (Feel free to leave a comment.) But, at least in Lubuntu, not only is ifplugstatus not installed by default, that’s not the name of the package you need to install. No, that’s a different name and to install ifplugstatus you will want to run the following command:

You’ll need to adjust that command to match the distro you’re using.

Anyhow, with ifplugstatus installed, you can check if your network devices are connected with just the following command:

But wait! There’s more! You can get a lot more information about your network devices by adding the -v (verbose) flag to the command. That flag automatically assumes the -a (all) flag, so it’s just:

There you have it… Instead of just looking in the status bar section to see if wireless is connected, or even looking around the back to see if the cable is connected, you can just check all that right there in the terminal – without having to move much more than your hands! You’re welcome!

Closure:

Heh… There you have it! You have another article. If you ever want to check for a beat, that is to check if your network devices are connected, you now know how to do so. You can even SSH into another device and check to see which of its network devices are connected (beyond the obvious one you’re connecting with). You don’t even have to leave your seat.

Thanks for reading! If you want to help, or if the site has helped you, you can donate, register to help, write an article, or buy inexpensive hosting to start your site. If you scroll down, you can sign up for the newsletter, vote for the article, and comment.

Linux Tips
Creative Commons License
This work is licensed under a Creative Commons Attribution 4.0 International License.