If you use a wireless connection on your computer, or wi-fi for short, you might want to monitor your wi-fi. This is a simple task in the terminal and won’t take too long to learn. So, if you’ve ever wanted to monitor your wi-fi, this is the article for you!
There’s more to your wireless connection than just the throughput. There are things like link quality and signal strength that might interest you. It doesn’t stop there, there are all sorts of other bits of information you can learn if you decide to monitor your wi-fi in Linux.
I’ve written a few similar articles, each using a different technology. If you’re interested in those articles, click one of the following links:
Visualize Your Network Traffic With ‘darkstat’
‘vnStat’ A Tool For Monitoring Your Bandwidth Usage
Monitor Bandwidth In Real Time
Monitor Bandwidth With nload
Those are all about monitoring bandwidth and your network connection speed. They’re all fit for purpose, but this article covers wavemon, which is quite different and more specifically about monitoring your wi-fi connection as a whole. This isn’t very complicated or anything. You’ve got this!
This will be done in the terminal, so you might as well prepare yourself for that. So many of my articles do indeed require an open terminal.
wavemon:
The tool we’ll be using is known as wavemon. Like most of these articles, it’s another tool that’s fit for purpose. We want to monitor the waves, radio waves that is. This is one of the tools for the job. In fact, you’ll find the man page describes wavemon like so:
wavemon – a wireless network monitor
To install wavemon, we’ll need an open terminal. You can frequently just press
With your terminal now open, we need to install wavemon.
Debian/Ubuntu/etc:
1 | sudo apt install wavemon |
RHEL/CentOS:
1 | sudo yum install epel-release && sudo yum install wavemon |
Arch/Manjaro/etc:
1 | sudo pacman -S wavemon |
Fedora:
1 | sudo dnf install wavemon |
I think I have all of those correct. If not, please leave a comment down below so that I can fix it. If you’d like to add the code to install wavemon on other distros, please leave a comment below. I’m pretty good at getting back to commentators and tend to be quick at fixing articles.
Anyhow, wavemon is the tool you’ll want to use to monitor your wi-fi!
Monitor Your Wi-Fi In Linux:
Leave your terminal open from the installation phase.
This section of the article will be nice and quick. You don’t need to do anything else besides run the command. You don’t even need elevated permissions (such as sudo) for this.
With your terminal open, just enter the following command:
1 | wavemon |
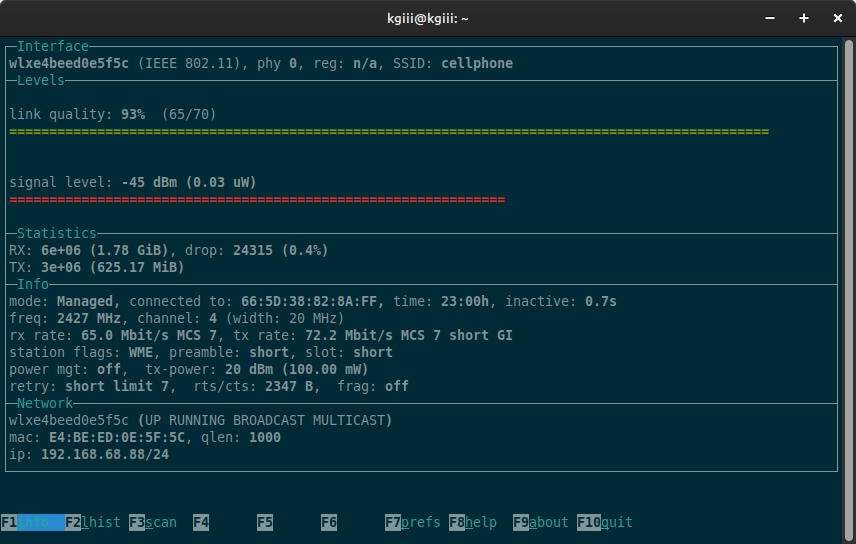
You’ll get a handy output (it may help to resize your terminal for this one) that’s full of information. An example of that output would be this:
I can’t get
If you do start wavemon with sudo, you can scan for wireless networks with the
You can change some settings with
The
If that doesn’t work,
But, you can see how much data you’ve received (during this session) and how much data you’ve sent (during this session). It’s all pretty basic stuff and wavemon is a nice and easy way to monitor your wi-fi in Linux.
Closure:
Well, that’s one way to monitor your wi-fi in Linux. If you use a wireless connection and want more information about that connection, wavemon is an acceptable tool for the job. There are certainly other tools out there and this is just one of them. It’s an easy tool to use and I find it’s familiar enough for anyone to understand with relative ease.
I did say that this would be a fairly easy article. It is indeed a fairly easy article! This is one of those things you can learn in just a few minutes. You never know when this information will come in handy. Then again, you might just be curious and want to know this information. You can customize it a bit but I didn’t need to do so.
Thanks for reading! If you want to help, or if the site has helped you, you can donate, register to help, write an article, or buy inexpensive hosting to start your site. If you scroll down, you can sign up for the newsletter, vote for the article, and comment.