Monitor Wireless Link Quality

If you’ve ever had issues with your wireless connection, and many of us have, you might have wanted to monitor wireless link quality. This is a good task for an article, so let’s learn together one way to monitor wireless link quality. This will be a pretty easy article to follow.

You need a wireless adapter and wireless connection to follow along with this article. It’s not complicated, but you will need those things. Even if you don’t use wireless often, you might want to learn how to monitor the link’s quality – just in case you’re put in a position where you’re using wireless. It’s better to be prepared!

Wireless connectivity issues have plagued many people. Some of those people will jump to it being a hardware problem, like a driver acting up. They’ll try all sorts of things before checking the link quality. I’d suggest checking link quality early on in the troubleshooting process.

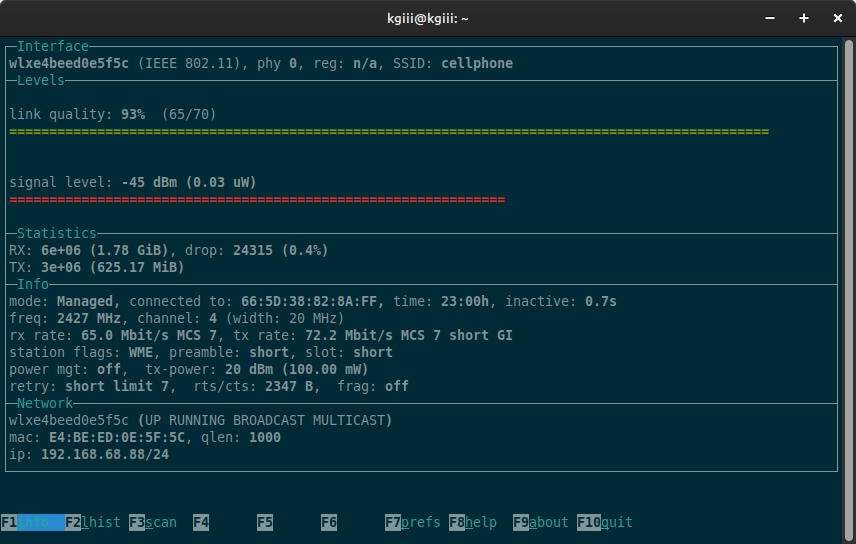
If you don’t know, wireless signal strength is measured in decibel milliwatts (dBm). They’re measured between 0 and -100 dBm. In this case, higher is better. -30 is perfect and -90 is disconnected. In simple terms, -30 is closer to 0. I don’t have a great connection, but it’s adequate. 

We won’t need to install any tools for this exercise. You have everything you need already installed and enabled, or you should. These are fairly basic low-level commands. They’ll be a part of any major distro for regular desktop use.

So, what will we be using?

The watch command:

The watch command is used with other applications, allowing you to monitor the process and to get continually updated information from that command. For example, the following command will watch your memory usage:

If you check the man page (with man watch), you’ll see that this is the correct tool for the job. You’ll also see that it’s not that difficult to learn how to use the watch command.

I’ve not yet written a watch article, but it’s pretty basic. In this case, we’ll introduce the -n flag but that’s just an indicator of frequency. You could simply use the watch command without any flag and it’ll refresh every two seconds. So, there’s that.

If you want to verify that watch is installed before going further, just run this:

The output should match this:

Which is where these sorts of things belong.

By the way, I’ve covered the which command before:

Find A Command’s Binary

You could also use the ‘whereis’ command.

Another Way To Find The Binary For A Specific Command

See? Lots of information is available. 

The cat Command:

We’ll also be using the cat command. The cat command is used to show the text in a file. When used in conjunction with the watch command, you can monitor a file to see if it changes. That’s exactly what we’ll be doing in this article.

Once again, you can check the man page ( man cat) for more information, but doing so will show you that the cat command is described as such:

cat – concatenate files and print on the standard output

The cat command is also useful for linking things together, such as the content from multiple files. We’re just concerned with the standard output (that’s what shows up in your terminal) and printing to said standard output. 

You can verify that cat is installed with:

Of course, the output is:

You can also read:

A Quick Look At The Cat Command

It’s not something you should have to install. Any desktop (or server) is going to include these two commands by default. They’re considered basic building blocks of a POSIX-compliant system. That’s something we all want!

Those are the only two tools you’ll need if you want to …

Monitor Wireless Link Quality:

If the commands mentioned in the intro section weren’t enough of a clue, this is one of those things you do in the terminal. That’s also something your distro came equipped with. Most folks should be able to open their default terminal emulator by pressing CTRL + ALT + T.

With your terminal open, you can check the current status of your wireless connection’s link quality. You simply need to run the following command:

That output is just for a single snapshot in time. If you’re having connectivity issues, you may want to monitor the state of your wireless connection over time. That’s why we use the watch command.

In its basic form, a command to monitor wireless link quality would look like:

That will run the cat /proc/net/wireless command every two seconds and output the results to your terminal (that is standard output). That’s all you need.

Of course, you can change that watch command a bit to change the frequency. You can make it more or less frequent, but the syntax is simple.

A reasonable interval might be every 10 seconds. That looks like this:

Every ten seconds, your system will run the command and output the results to the terminal you used to run said command. It’s quite basic, I’d think. 

While you probably don’t want to do so for this command, you could use decimal values. If you wanted the command to run 5 times every second, your input would be:

Here’s an example of that command. Yes, I made you a video!

The quality of the link is as a percentage. No, I do not know why. If you know why, leave a comment. The noise is measured according to dBm. If you’ve ever heard the expression ‘signal to noise ratio’ this is a good example of this. You want more signal and less noise, so you want a higher signal-to-noise ratio – which is something people often get backward when used conversationally.

This just shows you something you can do with just two basic Linux commands. That’s just two commands that you have installed already and you can use them to monitor wireless link quality. There’s nothing fancy here. There’s nothing advanced here. You can perform this sort of troubleshooting without any additional applications being installed – and you probably should do so if you’re having wireless connectivity issues.

Oh, before I forget, you can exit the watch command by pressing CTRL + C. That’s about all you’ll really need to know.

Closure:

One of the reasons why I wrote this article was because I wanted to show something that looks advanced but isn’t. This isn’t something that requires much. You only need the tools you have installed already. These tools are going to be available on any Linux desktop (and server) you are likely to touch. 

It also seems like a good idea to share how you can monitor wireless link quality in the Linux terminal. It’s something everyone can do and it’s something you can remember easily enough. If you’re having wireless issues, check to ensure that you have a good signal. It’s as basic as checking to make sure the power cord is plugged in and the device is turned on.

Don’t forget that you can sponsor an article. LOL You can do this even without something to promote. It’d pretty much be a donation, but you’d get a cool message and a link to almost anything you want. (If it’s just a donation and a personal thing, you can do so for much cheaper than the listed price.) I’m hoping to turn this sponsorship thing into a thing, meaning no more of the ads folks are used to and block.

Thanks for reading! If you want to help, or if the site has helped you, you can donate, register to help, write an article, or buy inexpensive hosting to start your site. If you scroll down, you can sign up for the newsletter, vote for the article, and comment.

Learn About Your Wireless Connection

Many of us rely on a wireless connection for our connectivity and this is for those who want to learn about your wireless connection. It should be a relatively simple article. Though, if you do not use wireless internet this won’t be very interesting.

Today’s article about your wireless connection will show you how to learn things like the quality of your connection, the transmission power, the frequency you’re using, and other sundry wireless bits. It’s a bit technical, and we will learn about your wireless connection in the terminal, but it’s all good information and not very complicated.

The tools we’ll be using should be installed in all current major distros. For example, we won’t use ifconfig because it is deprecated. We’ll be using the ip command instead. We’ll also be using iwconfig in this article. You shouldn’t need to install anything for this article. All the tools you need should be installed by default.

Side note: The site sure does load fast without ads! I’ll be finding a new ad provider soon enough, I just haven’t done so yet. I may appeal to Google. We shall see, but the site sure is fast! Alas, it generates no income to offset my expenses. So, we will have ads again. It’s going to happen.

As for the tools we’ll be using…

The IP Command:

The first tool we’ll use will be the ip command. As I mentioned above, the ifconfig tool has been deprecated. It is no longer supported and we’ve moved on to bigger and better things. Most major distros will have made this change. For a bit of completeness sake, I’ll include details for the old way.

You can verify that the ip command is available with this command:

If you check the man page, with man ip command, you’ll see that this is the correct tool for the job. The job is what was indicated in the article’s title. Anyhow, the ip command is described like this:

ip – show / manipulate routing, network devices, interfaces and tunnels

We’ll be using the command to identify the name of your wireless connection. It’s easy enough and you can easily follow along.

The IWCONFIG Command:

The iwconfig command is how we’ll be gathering information about your wireless connection. You should find that you don’t have to install anything for this. If you’re using a major distro that’s modern, you’ll almost certainly have iwconfig available. You can confirm that iwconfig is available with this command:

Just like we did above, you can run the man iwconfig command to see that this is the tool for the job. The output should include the following:

In our case, we won’t be doing any configuration – but we will be using this command to learn about the wireless connection. It’s a handy tool, but we’ll just be using it to gather data.

So, let’s get into the actual article itself…

Learn About Your Wireless Connection:

I mentioned above that this is something you do in the terminal. You probably know how to open your terminal by now. If not, you can usually press CTRL + ALT + T to open up your default terminal.

With your terminal now open, you can check your network connections. The purpose of this command is to learn which of your connection names is the correct one for your wireless connection.

If you’re using an older system, and some modern systems still contain the command, you can use the deprecated ifconfig like so:

Scroll through that data to find your wireless connection. It’ll begin with a W. It used to have a nice simple name by default, but times have changed. In my case, it looks like this:

In this case, you can see that the name of my wireless device is wlxe4beed0e5f5c. Unless you’ve renamed them, your wireless connection should start with a W and should be the only connection that starts with a W.

With that information in hand, you’ll next want to learn about your wireless connection with the iwconfig command. The syntax is quite simple:

So, in my case, the command would look like this:

The output would look like this (in my case):

From there, you can see the access point you’re connected to. You can find out the bit rate, frequency, and power management status of the device, and much more. See? Pretty easy.

HINT: If you don’t want all that information, you can always pipe it through grep. That’s pretty simple:

An example output would be:

This is a quick and easy way to learn about your wireless connection. It’s something that’s not too difficult and something everyone can practice to get a little bit more comfortable working in the Linux terminal.

Closure:

Someone asked if I was running out of ideas for articles. I do not believe I am. There’s just so much to write about and so many things that are worth covering. Today we’re learning about your wireless connection. Tomorrow we’ll be on to something else. And that’s okay… 

Thanks for reading! If you want to help, or if the site has helped you, you can donate, register to help, write an article, or buy inexpensive hosting to start your site. If you scroll down, you can sign up for the newsletter, vote for the article, and comment.

Monitor Your Wi-Fi In Linux

If you use a wireless connection on your computer, or wi-fi for short, you might want to monitor your wi-fi. This is a simple task in the terminal and won’t take too long to learn. So, if you’ve ever wanted to monitor your wi-fi, this is the article for you!

There’s more to your wireless connection than just the throughput. There are things like link quality and signal strength that might interest you. It doesn’t stop there, there are all sorts of other bits of information you can learn if you decide to monitor your wi-fi in Linux.

I’ve written a few similar articles, each using a different technology. If you’re interested in those articles, click one of the following links:

Visualize Your Network Traffic With ‘darkstat’
‘vnStat’ A Tool For Monitoring Your Bandwidth Usage
Monitor Bandwidth In Real Time
Monitor Bandwidth With nload

Those are all about monitoring bandwidth and your network connection speed. They’re all fit for purpose, but this article covers wavemon, which is quite different and more specifically about monitoring your wi-fi connection as a whole. This isn’t very complicated or anything. You’ve got this!

This will be done in the terminal, so you might as well prepare yourself for that. So many of my articles do indeed require an open terminal.

wavemon:

The tool we’ll be using is known as wavemon. Like most of these articles, it’s another tool that’s fit for purpose. We want to monitor the waves, radio waves that is. This is one of the tools for the job. In fact, you’ll find the man page describes wavemon like so:

wavemon – a wireless network monitor

To install wavemon, we’ll need an open terminal. You can frequently just press CTRL + ALT + T to open your default terminal emulator. Give that a go. If it doesn’t work you can find the shortcut in your application menu.

With your terminal now open, we need to install wavemon.

Debian/Ubuntu/etc:

RHEL/CentOS:

Arch/Manjaro/etc:

Fedora:

I think I have all of those correct. If not, please leave a comment down below so that I can fix it. If you’d like to add the code to install wavemon on other distros, please leave a comment below. I’m pretty good at getting back to commentators and tend to be quick at fixing articles.

Anyhow, wavemon is the tool you’ll want to use to monitor your wi-fi!

Monitor Your Wi-Fi In Linux:

Leave your terminal open from the installation phase.

This section of the article will be nice and quick. You don’t need to do anything else besides run the command. You don’t even need elevated permissions (such as sudo) for this.

With your terminal open, just enter the following command:

You’ll get a handy output (it may help to resize your terminal for this one) that’s full of information. An example of that output would be this:

using wavemon to monitor wi-fi in the Linux terminal.
It’s fairly easy to understand the output from the wavemon command.

I can’t get F1 to do anything, but F2shows a histograph.

If you do start wavemon with sudo, you can scan for wireless networks with the F3 button.

You can change some settings with F7 if you want.

The F10 button should quit the program. 

If that doesn’t work, CTRL + C will exit wavemon.

But, you can see how much data you’ve received (during this session) and how much data you’ve sent (during this session). It’s all pretty basic stuff and wavemon is a nice and easy way to monitor your wi-fi in Linux.

Closure:

Well, that’s one way to monitor your wi-fi in Linux. If you use a wireless connection and want more information about that connection, wavemon is an acceptable tool for the job. There are certainly other tools out there and this is just one of them. It’s an easy tool to use and I find it’s familiar enough for anyone to understand with relative ease.

I did say that this would be a fairly easy article. It is indeed a fairly easy article! This is one of those things you can learn in just a few minutes. You never know when this information will come in handy. Then again, you might just be curious and want to know this information. You can customize it a bit but I didn’t need to do so.

Thanks for reading! If you want to help, or if the site has helped you, you can donate, register to help, write an article, or buy inexpensive hosting to start your site. If you scroll down, you can sign up for the newsletter, vote for the article, and comment.

Control Your WiFi With ‘rfkill’ And More

In today’s article, we’re going to learn how to control your WiFi with ‘rfkill’ and we’ll be learning a bit more than that. I think you’ll find ‘rfkill’ to be a nifty and useful terminal-based command to learn. Is this article appropriate for a beginner? Maybe? Maybe not? I’ll do my best to make it approachable for anyone at any level.

By the way, I’ve decided to intersperse the articles about simple commands like ‘lsusb’. I don’t want to bore my more advanced readers – and I don’t want to bore myself. I’ve decided to make the time necessary, even though I’m pretty busy. I’ll be busy for a little more than a week. (Ask me in private, if you want.)

Anyhow, you should learn about ‘rfkill’, as it’s a pretty handy tool for controlling your wireless. If you look at the name, there should be some indication that it’s actually more than just WiFi. You can use ‘rfkill’ to manage Bluetooth, for example. Bluetooth is also wireless communication. As such, you can use ‘rfkill’ to manage that as well.

So, what is ‘rfkill’? Let’s see how the man page defines it:

rfkill – tool for enabling and disabling wireless devices

See? It says what you’d expect, assuming you read the previous paragraph. The title only mentions WiFi, but that’s really due to space and convenience. You can use ‘rfkill’ to manage both WiFi and Bluetooth. Pretty handy, huh?

Well then, let’s just get the party started…

Control Your WiFi with ‘rfkill’:

Sure enough, you use ‘rfkill’ in the terminal. On Linux-Tips.us, we do a whole lot of stuff in the terminal. So, open your terminal now. If you don’t know how to open your terminal, just press CTRL + ALT + T and your terminal should just pop open.

With your terminal now open, let’s first gather some information:

The output should look a little bit like this, or a lot like this:

gathering information with rfkill
The output should be fairly easy to understand for my delightful readers! I have faith in you!

The information you’re after “ID,TYPE-DESC,SOFT,HARD” is easy to understand. 

The first column is the ID number and the second column is a description of the device. The third column is if there’s a ‘soft block’ on the device, and the fourth column is if there’s a ‘hard block’ on the device.

If you see a ‘soft block’, that’s when there’s some software that disabled the device. A ‘hard block’ is when there’s a hardware block on the device. If it is soft blocked, you’ll need a software solution to turn it on – like ‘rfkill’.

Additionally, when you see a ‘hard block’, it means there’s probably a physical switch (often an Fn + F* key combination, perhaps labeled something like ‘Airplane Mode’) that is keeping the device powered off. You need to physically enable the device to make it work.

Importantly, the ‘rfkill’ application can do nothing about a hard block. But, it can do something about a soft block. If you want to unblock WiFi, try this:

Using my computer’s output, to unblock the WiFi the command would be:

You can also unblock with the description. To unblock the WiFi with the description looks like:

Of course,  you can also do the opposite. Instead of ‘unblock’ you would use ‘block’. That means the opposite of the above command would be:

If you want, you can also just ‘toggle’ the devices. When you toggle it, it turns off if it was on – and it turns on if it was off. You do that with the ID. If I wanted to toggle the wireless, the command would look like:

That will turn my WiFi off (if it was on) or it will turn my WiFi on (if it was currently turned off). See? It’s pretty simple!

Well, I hope I’ve made it simple. If it’s not simple, I hope it’s at least approachable. Like always, feel free to drop a question as a comment. If I don’t have an answer, I’ll try to direct you to someone who does.

Also, don’t be afraid of the man page. There’s a lot more to ‘rfkill’ than I’ve covered in this article. We’ve mostly just scratched the surface. To check the man page:

That’ll give you all the information you want. Plus, I’m sure others have authored pages that will go into more depth. We tend to not do too much of that here. I just want you to be up and running, not Linux gurus. If you want to be a Linux guru, you’ll need a whole lot more than just this site!

Closure:

Well, I’m glad you made it through today’s article. I tried to keep it nice and simple, simply showing you a way to control your WiFi with ‘rfkill’. But, there’s more to it, including Bluetooth. I like to think I’ve made this approachable for even a new user, but maybe not…

Again, feel free to comment about this. Is it easy enough for a new person? How about a new person coming from a Google search? Is it easy enough for a novice, someone completely new to computers? (Probably not, but let me know what you think. Thanks!)

Thanks for reading! If you want to help, or if the site has helped you, you can donate, register to help, write an article, or buy inexpensive hosting to start your own site. If you scroll down, you can sign up for the newsletter, vote for the article, and comment.

Turn Your Ubuntu Into A Wireless Hotspot

Have you ever wanted to use your Linux computer as a wireless hotspot? It’s actually pretty easy. Today’s article will get you started and it really isn’t all that difficult. We will actually be cribbing a bit of this article from the software’s homepage, but while some more, rather important, information added.

For many years, I used my own router that I had configured on my own hardware. It was built on Linux. The preceding version actually ran on BSD, but that’s not important for a site called Linux-Tips. Today, you can get a NUC or Pi for dirt cheap and so making a new router is back on my list of things to do. In other words, it’s a fun project that won’t take a lot of money to get into.

All of the varied software and hardware components are already there to make your own router, but I want to enable wireless connectivity. a wireless hotspot, and that’s what we’re going to look at today. The tool we’re going to use is called ‘linux-wifi-hotspot‘ That’s is a great tool, complete with GUI if wanted, written by lakinduakash. It has only been around for a few years, but it’s spoken of very highly – and it just works and works well.

At least it worked the last time I used it. This article is from the old site and I’m just moving it to this site. I actually haven’t bothered much with my own router for the past year or so. So, this information is a bit dated.

Turn Your Ubuntu Into A Wireless Hotspot:

This article requires an open terminal, like many other articles on this site. If you don’t know how to open the terminal, you can do so with your keyboard – just press CTRL + ALT + T and your default terminal should open.

The software is easy enough to install. If you’re using Debian/Ubuntu, just add the PPA and install the software. To add the PPA, you just run:

On a modern Ubuntu, you shouldn’t need to do this, but you might want to go ahead and run a quick update with:

Then you can install the software, starting to get your system into a workable wireless hotspot. To do that, it’s just:

If you want, you can visit the link above (in the preamble), click on releases, and download the .deb file for the current release and just install it with gdebi. In this case, I’d suggest installing with the PPA – just to make sure

Then, you can go ahead and start it. You can also go ahead and make it start at boot, which would be prudent if you intended to use this to make your own router. It’s really self-explanatory and without specific questions for using it, I’m just going to refer you to the man page and the information at the project page.

Caveats:

But, before you can even do all of this, you need to know that your wireless adapter actually supports doing this. To find out, you need to know if your wireless adapter supports “AP” mode. AP obviously meaning ‘Access Point’.

To check this, you need to run the following command:

The project page is noticeably silent with this, but it’s a necessary step. See, you need to know if your hardware actually supports it before you even bother trying. Come to think of it, I probably should have put this closer to the top of the page! Ah well…

Anyhow, the output should contain one or both of the following lines:

Device supports AP scan.

And/Or:

Driver supports full state transitions for AP/GO clients.

So long as you see one or both of those, you should be all set to proceed. If you don’t see either of them, there’s no software solution and you’ll need to get hardware that supports AP mode. In many cases, that’ll mean doing a bunch of research and may even mean contacting the vendor or OEM.

Nobody appears to have compiled a list of hardware that supports AP mode and I don’t think I’ve ever bought wireless adapters that explicitly stated they do on the box. As near as I can tell, more modern adapters support it just fine, so you’ll probably be alright. Online specs are more thorough than what’s printed on the outside of the box, so maybe searching is okay.

Closure:

Alright, there’s your article for the day. I have no idea if you want to make a wireless hotspot for your Linux box, but now you know how. It’s pretty self-explanatory, and you shouldn’t have any questions. If you do, you know where to find me – or to find others who can help you – at Linux.org.

Thanks for reading! If you want to help, or if the site has helped you, you can donate, register to help, write an article, or buy inexpensive hosting to start your own site. If you scroll down, you can sign up for the newsletter, vote for the article, and comment.

Subscribe To Our Newsletter
Get notified when new articles are published! It's free and I won't send you any spam.
Linux Tips
Creative Commons License
This work is licensed under a Creative Commons Attribution 4.0 International License.