Count Word Frequency In A Text File

Have you ever wanted to count the word frequency in a text file? Have you ever wanted to know how many times you used a word in a document? Well, with just two simple commands (grep and wc) we’re going to learn how to do just that.

As a writer, I try to avoid using the same words over and over again. It’s not just bad form, using the same words repeatedly actually makes the document more difficult to comprehend. The brain needs variety (and key concept repetition) or else it just kinda checks out and doesn’t pay much attention.

There are other times when you may want to count the number of words used in a document, perhaps as a reference. “Your honor, the document in question contained my client’s name 245 times – and none of the uses were factual!” I’m sure you can concoct a scenario where you may want this information. You can probably come up with one that doesn’t even involve a judge!

You can also use it a little more broadly, and we’ll cover that. For now, let’s make sure we’re all working on the same page. Press CTRL + ALT + T and open up your terminal, and then enter the following commands:

There. Now that we’re on the same page (you have the text file in your downloads folder) we can all work with the same list of random numbers – instead of random words. (All we care about is that there are characters.)

Count Word Frequency:

Well, you already have the terminal open and you’ve already downloaded my random numbers file. We’ll substitute numbers for words – as words are just a string of characters. So, seeing as you’re prepared…

Trust me, it won’t make a difference that we’re using numbers. By the time I’m done explaining this, you’ll understand and apply it to words (or other characters) all on your own. It’s pretty straightforward and easy to understand.

Let’s say we wanted to count the instances of 62829. The command would look like this:

If you run that command, you’ll see that that string of characters occurs just once. That’s expected and correct.

You can also do things like finding all the instances of 1 (or any single character) in the list with this command:

You can be even more complicated and find all the times a 7 immediately follows a 2. That command would look like this:

(There are three instances of 27.)

So, what’s going on? Well, you are using grep (to search) the contents of the file. You are then piping the output to wc where the number of lines (instances) are being counted.

You can probably be pretty fancy with this, but I just wanted to give a quick overview. Mostly, I figured it’s a good excuse to dig out grep and wc – and who doesn’t like panning for nuggets in text?

Closure:

Yup… This one isn’t a very long (or complicated) article. That’s okay. I like articles of all shapes and sizes. This article will help you count word frequency, something we all may need at one point or another. Sure enough, Linux makes this a pretty simple task.

Thanks for reading! If you want to help, or if the site has helped you, you can donate, register to help, write an article, or buy inexpensive hosting to start your own site. If you scroll down, you can sign up for the newsletter, vote for the article, and comment.
Let’s Install Nano (With Some Bonus Information)

This site mentions Nano quite a few times but never tells you how to install Nano. Today, this changes! Today, we make sure you have Nano available! Not all distros have Nano installed by default, but in pretty much all distros Nano would be a useful tool to have.

The Nano text editor (GNU nano) has been around since 1991, 21 years at the time of writing. I’ve written about it a few times, but nothing major. I think the most I’ve written about it was in an article about My Three Favorite Text Editors. If it’s not obvious from all of this, Nano is one of my favorite editors.

Rather than gush, I think I’ll just explain why I like Nano. It’s simple. When making quick edits to text from the terminal, I don’t need to know things like :q! just to exit the program, I can see how to exit the program because it’s written at the bottom. Nano has plenty of features, even a viable, albeit not great, find-and-replace function.

In Nano, you can do the obvious text manipulation tasks – like cut and paste, of course. You can jump to line numbers and all that stuff. At the end of the day, it’s a great terminal text editor that just works and is simple to use. If you’re new to Linux and think Nano looks daunting, you should introduce yourself to Vim or Emacs!

I like simplicity and effectiveness. For the things I do in that situation, quick file creation or editing, it works just fine. I don’t need anything more robust – or more complex.

Install Nano:

Sadly, Nano doesn’t come installed by default on all distros. It’s a tiny application that just works, so I’d be happy to see it as the default (or available by default) on more distros. Until that time, we’re stuck installing it ourselves.

Fortunately, there’s not much trouble installing Nano in the major distros. You just need to start with an open terminal. You can open one with your keyboard. Just pressing CTRL + ALT + T should open up your default terminal. Pick the appropriate command below and it should install nano for you.

Arch/derivatives:

RHEL/Fedora/derivatives:

OpenSUSE/derivatives:

Debian/Ubuntu/derivatives:

For everyone else, hunt around or download and compile it from source

Once you have Nano installed, you’ll need to know how to use it. Fortunately, for most users and most uses, there are a few shortcuts to learn and that’s it. For most people, you don’t need to know a whole lot for basic functionality. As you’re making basic edits, that works. It’s pretty easy.

My usual blurb (that I cut and paste) to tell people how to save a file in Nano is just this little snippet:

(Which, when formatted properly, comes out looking like “press CTRL + X, then Y, and then ENTER“.)

And, that’s it. That’s pretty much all you need to know when making quick text edits in Nano. However, there’s so much more to Nano than you might be expecting.

Bonus Nano Info:

While Nano is simple, it is deceptively simple. If you type nano into the terminal, you’ll see just a few options on the bottom. And, like I said, that too is a bit deceptive. With your terminal still open, type the following:

As you can see, there are a whole lot more options. There are far too many options for me to even begin to touch on them, and you won’t need any/most of them for the basic text editing for which we usually rely on Nano.

You can open a file with Nano like this:

You can also just open an instance of Nano and name the file when you’re closing it. If you want to create the title when you’re starting, you can just use:

That’ll auto-populate the name field when you’re saving the file. So, you can use Nano to create a new text file easily enough.

While you’re in there, you can use CTRL + W to search. If you then use ALT + W to go to the next instance of the text you searched for. Searching is even kind enough to support regex, case-sensitive searches, and can even be used to replace text.

At the bottom of the output, you’ll see directions that tell you how to use Nano. The ^ means you use the CTRL as the modifier. The M (such as M-A to undo) means you use the ALT as the modifier. So, to cut, you’d use CTRL + K and to undo something you’d use the previously mentioned ALT + M.

You’ll get used to it, I promise. You’ll learn it much faster than you’ll learn Vim or Emacs – but those too have their place. I wouldn’t want to spend hours in Nano, but it’s great for a few minutes when you need to make a quick edit.

Like I said, this is just touching on the surface. Look at the man page ( man nano) for more information. There’s a lot to this little editor and the advanced features are there if you need them. For example, I often open files with the -l flag so that it will show line numbers.

Closure:

Yup… There’s another article. This one tells you how to install Nano and has some bonus information about how to use Nano. I didn’t have time (and this isn’t that kind of site) to tell you about all the other nano options. Those options are just a man nano command away, should you want to use them.

Thanks for reading! If you want to help, or if the site has helped you, you can donate, register to help, write an article, or buy inexpensive hosting to start your site. If you scroll down, you can sign up for the newsletter, vote for the article, and comment.

Time A Command To See How Long It Takes To Run

Have you ever wanted to time a command? Well, you can! Linux includes the ability to time a command, so that you can know how long it took for a command to be processed. 

Today, we’ll be using the ‘time‘ command. Time is simply (and accurately) described in the man page as:

time – run programs and summarize system resource usage

The time command is a pretty nifty tool and the output will tell you the real time that it took, as well as the system time, to run the command you’re timing. There’s really not a whole lot more to say about the time command. It does what it says on the tin. It times stuff!

This is going to just be a quick article and should be easy to follow. There’s not a whole lot to explain and it’s pretty straightforward. If you’re looking to get your feet wet playing in the terminal, this is probably a good article to start with.

Time A Command:

Just like oh so many of these articles, you’ll need an open terminal. So, let’s crack open your default terminal by pressing CTRL + ALT + T on your keyboard.

Now, let’s take the simple command to list everything in a directory:

To find out how long it took to list all the files and folders in a directory, you could use:

The output of that command tells you how long it took to list all the items in a directory beneath the results. It should not have taken long. If you want to try something bigger, something that lasts longer, you can take a look at this command:

That should take a just a little more time to run in your terminal, but how much longer? Well, you can can actually see how long it really took by adding ‘time’ in front of it. Obviously, it’d look something like this:

The output at the end is something like this:

real 0m0.566s
user 0m0.423s
sys 0m0.143s

The ‘real‘ is how much time it really took. The ‘user‘ is how much time it took for the user. The ‘sys‘ is how much time it took for the system – the amount of time that the kernel actually devoted to running that command.

You can time all sorts of stuff. Like, here’s an example output from me updating my system with time sudo apt update (not all of us have big, fat pipes from the ISP):

When I purged Krita (from a previous article), the output from time sudo apt purge krita looks like:

Have fun with it, if you want. Find out how long those tasks actually are, so that you can get a reasonable estimate of where you’re spending your time in the terminal. You can even use it like time nano <file_name> and see how long it took you to edit a file in the terminal!

Like I said, have fun with it. You might find some of those tasks that seem to go slow really don’t take all that much time. Maybe you’ll find out that the reverse is true? One thing is pretty certain, however. If you didn’t have it before, you now have ‘time’ as a new tool in your Linux toolbox.

Closure:

Well, there’s another article. This one has taught you how to time a command in the Linux terminal. It’s a little tool, probably not all that useful, but it’s one that’s there. If you happen to use the time command on a regular basis, please leave a comment letting us know why. I’m sure there’s some real-world uses, but other than looking for bottlenecks or real-time optimizations I can’t really think of any.

Thanks for reading! If you want to help, or if the site has helped you, you can donate, register to help, write an article, or buy inexpensive hosting to start your own site. If you scroll down, you can sign up for the newsletter, vote for the article, and comment.

How To Install Krita In Ubuntu

Krita is an image authoring application. Some people compare Krita with GIMP. While the two programs have overlaps, the two programs are not the same and really shouldn’t be compared. Where GIMP is meant for image manipulation, Krita is more aimed at people who want to create images from scratch.

GIMP and Krita probably shouldn’t even be compared with each other. In fact, to save some time, you can read an article from the good folks at GIMP Tutorials for a good description of the benefits from either as well as why the two applications, GIMP and Krita, should not be compared with each other.

If you want to create digital art, Krita may be the software you’re looking for. When you’ve got a pointing device and plan on using the software like you’re painting, then Krita is the kind of software you’re looking for. Should you plan on creating from the ground up, not modifying memes or photoshopping dicks on pictures of previous politicians, you probably want Krita.

As luck would have it, this article will teach you how to install Krita on your Ubuntu-based system. It should also work for Debian, the official Ubuntu flavors, and Ubuntu derivatives like Mint or ElementaryOS. However, I tested in exactly none of those other systems. If you it doesn’t work, don’t say I didn’t tell you.

This process will have you installing it through your package manager. If you don’t want to do so, then there are an AppImage and Snap package that you can grab by going here. The way we will be installing Krita is a bit more ‘traditional’, so to speak.

Install Krita:

This article requires an open terminal. If you don’t know how to open the terminal, you can do so with your keyboard. Press CTRL + ALT + T and your default terminal should open up like magic.

The first thing we need to do is add the PPA. That’s a Personal Package Archive that adds itself to your regular repositories. A PPA is meant for software that’s not in the default repos. It’s meant for personal use – but we’ve bastardized the use to make it a way to easily install 3rd party software. That’s not important right now. What is important is that you then use this command:

When asked, you can finish adding the repository by pressing ENTER. That should then trigger apt, making it check for new software. If it doesn’t, you can run:

After that finishes, you can go right ahead and just install Krita from the terminal. (It’d also appear in your software manager, but we’re in the terminal so we might as well just finish in the terminal.)

Krita is a pretty large and complicated bit of software, so it’s a sizable download. Once downloaded and installed, you can bring out your inner Leonardo da Vinci! It’s really as simple as that, and nothing more.

Installing Krita this way will keep Krita up to date as the repository is updates. You do have a Flatpak and an AppImage available if either of those is your preference. If not, you can go right ahead and install it the old fashioned way.

Closure:

DING! There’s another article done and done. This one just was a passing fancy, pulled more or less randomly from my notes. It’s a great way to install Krita, for those looking to do so. It’s pretty painless and it’s a solid piece of software.

Thanks for reading! If you want to help, or if the site has helped you, you can donate, register to help, write an article, or buy inexpensive hosting to start your own site. If you scroll down, you can sign up for the newsletter, vote for the article, and comment.

Let’s Install ‘gedit’ With All The Fixin’s In Ubuntu

This article is going to tell you how to install gedit along with a bunch of plugins. There are many text editors out there, but gedit is a popular choice. Many plugins exist to extend gedit, and this is an easy way to install a bunch at once.

Notes: This will only install the plugins in the default repositories. This article covers just Ubuntu, but will likely work with derivatives and even Debian.

gedit, the default editor for the Gnome desktop environment, is a part of the GNOME Core Applications and is available in almost every distro, at least every major distro. The gedit text editor doesn’t need a lot of additional dependencies, which helps make it useful on almost any desktop environment.

You can use gedit for anything – from programming, to writing markup for your website. You can use it just like you would any other plain text editor. There are many ways to extend it, to add functionality not included by default, and that is with plugins.

There are plugins to highlight syntax, to auto-complete words, to auto-close brackets, etc. You can make gedit do all sorts of things you’d not expect from a plain text editor. 

Disk space is absurdly cheap these days, so I don’t see any reason to not install as many plugins as I can, and no reason to not do it all at once. I may not use them all, but I’ll use many of them and I can just not enable those that I don’t want to use. I may have a reason to use them later on. You never know!

Well, this article will help you install gedit and all the plugins your system can find!

Install gedit With Plugins:

Like always, you need an open terminal and you can do that with your keyboard by pressing CTRL + ALT + T and enter the following:

What’s going on with that command? You can string together requests with apt, and this is installing gedit first, then a pack of common plugins, and then every other plugin that uses the ‘gedit-plugin-*’ format. It checks for all software with that naming pattern and installs them if they’re not already installed and have satisfied dependencies.

By the way, the asterisk is known as a wildcard. A wildcard basically means, “any character.” So, foo* is anything from fool to foolish, and foob* is anything from foobar to foob-gibberish or whatever. 

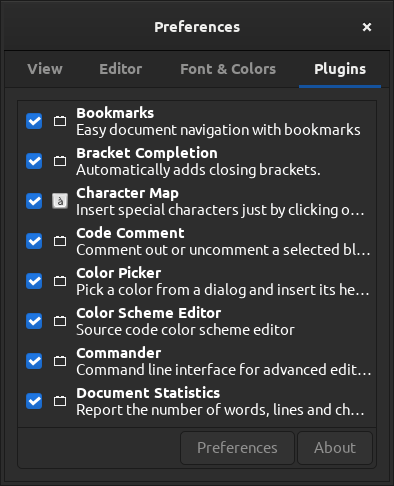
It should be noted that this only installs the plugins. You still can’t use them until after you enable them. To enable them, you need to open ‘gedit’ (which will almost certainly be called “Text Editor” in your menu) and click on preferences, where you can navigate to the right-most tab and enable them as needed. It looks like this:

gedit preferences
Select plugins ’til you’re satisfied!

Anyhow, if you did this properly,  you will now have a bunch of plugins enabled. Is this a bit of overkill? Perhaps, but disk space is cheap and the entire thing takes up less than 19 additional MB on my system. You might as well do it all at once. 

Closure:

And there you have it. You now have gedit installed along with a bunch of gedit plugins. It’s really not all that difficult and there’s no real huge hit on performance or resources. Heck, it doesn’t even take all that long!

Thanks for reading! If you want to help, or if the site has helped you, you can donate, register to help, write an article, or buy inexpensive hosting to start your own site. If you scroll down, you can sign up for the newsletter, vote for the article, and comment.

Linux Tips
Creative Commons License
This work is licensed under a Creative Commons Attribution 4.0 International License.