Is your software not updating? Are you getting repository errors when you try to upgrade? There’s a quick and easy way to reset the Ubuntu repositories to the defaults.
Ubuntu, like all Linux distros, uses repositories for distributing software. This provides a central location for curated, standardized software that’s almost certain to work on your system. These repositories are not just where you install software from, they’re also where you get your software updates.
If you want to see them in action manually, open your terminal and enter the following:
1 | sudo apt update |
That will show you the system checking the repositories, updating your internal database of software and software versions. There aren’t a whole lot of defaults, so it’s usually a pretty quick process. If you’ve been adding PPAs or other repositories, it could take a while to get through the list.
Of course, if you see errors with that command then this might actually be the article you’re looking for! There are a variety of reasons why one might want to set the system back to the defaults, and it’s actually pretty easy once you know how.
Reset Ubuntu’s Repos
Like many articles and exercises, this one is gonna start with you cracking open your terminal. You should already know how to do that, but you can just use your keyboard and press
Once you have that open, just go ahead and run this horribly destructive (I kid, I kid) command.
1 | sudo rm /etc/apt/sources.list |
NOTE: That command could have a horrible outcome if you mess it up. Be sure to double-check it, or use copy/paste. If you screw this up, you can delete files that you really don’t want to delete. You have been warned!
That command will erase all the entries in your ‘sources.list’ file, technically deleting the file itself, which is not necessarily a good thing. Fortunately, it’s a necessary step and only the first step. The next step is also easy – and more or less mandatory.
Just run the following command:
1 | sudo software-properties-gtk |
Up should pop a window that looks a whole lot like this:
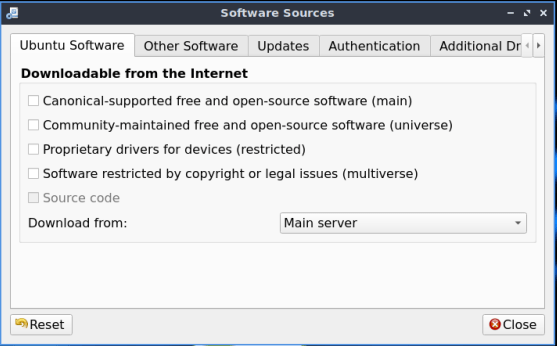
There you go. You have a blank slate. Select from those four (or five, if you want the source code and have selected at least one other repository) and then click close. When you close it, the system will ask you if you want to update the database and you should agree, of course. You can also change the server from which you download, and most people pick a server that’s geographically close.
That’s it. That’s all it takes to reset your Ubuntu repositories to the defaults. There’s no wizardry involved. You’re simply removing one file and recreating it with the defaults. You could do it all with a file manager if you opened it as root, but the terminal is faster and easier.
Thanks for reading. Feedback is always appreciated. You can sign up for the newsletter and get a notification when new articles are published. A couple of people asked, so I’ve set it up so that you can donate to help fund the site. I’m not going to try to guilt you into donating. The site will remain online and continue to grow even without donations. Still, I had some interest and figured I’d add it as an option.