Linux Tips: A Comprehensive Guide for Optimizing Your System

Welcome to Linux Tips, your ultimate resource for unlocking the full potential of your Linux system. Whether you are a seasoned Linux user or a beginner exploring the world of open-source operating systems, this comprehensive guide will provide you with valuable insights and tips to optimize your Linux experience. From boosting performance to enhancing security, we’ve got you covered. Let’s dive in!

Just for fun, this article was written by an AI with the prompt being:

“Write an article for Linux-Tips.us that is optimized for Google’s search engine results.”

Enhance Performance:

Optimize Startup: Speed up your system boot time by disabling unnecessary services and applications that launch at startup. Use tools like systemd-analyze to identify bottlenecks and systemd commands to manage services effectively.

Monitor System Resources: Keep track of your system’s resource usage with tools like htop and top. Identify resource-intensive processes and consider optimizing or terminating them to free up valuable resources.

Utilize Swap Space: Configure and optimize your swap space to prevent system slowdowns. Tune the swappiness parameter to strike a balance between using RAM and swap effectively.

Improve Security:

Keep Software Up to Date: Regularly update your Linux distribution, applications, and packages to ensure you have the latest security patches and bug fixes. Utilize package managers like apt or dnf to simplify the update process.

Enable the Firewall: Activate the built-in firewall (e.g., iptables or nftables) to safeguard your system against unauthorized access. Configure firewall rules to allow only necessary incoming and outgoing connections.

Utilize SSH Key Authentication: Strengthen the security of your SSH connections by using key-based authentication instead of passwords. Generate SSH keys and disable password-based authentication to prevent brute-force attacks.

Boost Productivity:

Master the Command Line: Linux’s command-line interface is a powerful tool for executing tasks efficiently. Familiarize yourself with essential commands like ls, cd, grep, and find to navigate the file system, search for files, and perform various operations.

Utilize Shell Scripting: Automate repetitive tasks by writing shell scripts. Bash, the default Linux shell, allows you to create powerful scripts to streamline your workflow and save time.

Take Advantage of Package Managers: Leverage package managers like apt, dnf, or yum to install, update, and remove software effortlessly. Explore repositories and learn package management commands to manage your software ecosystem effectively.

Customize Your Environment:

Choose the Right Desktop Environment: Linux offers a variety of desktop environments, each with its own look and feel. Experiment with different options like GNOME, KDE, or Xfce to find the one that suits your preferences and maximizes your productivity.

Tweak Your Window Manager: Customize your window manager settings to enhance your workflow. Configure keyboard shortcuts, window behavior, and appearance options to create a personalized Linux experience.

Explore Themes and Icons: Customize the visual aesthetics of your Linux system by applying themes and icon packs. Tools like GNOME Tweaks or KDE System Settings allow you to easily switch between different themes and icons.

Conclusion:

By implementing the Linux tips outlined in this comprehensive guide, you can optimize your system’s performance, enhance security, and boost productivity. Remember to keep your system up to date, monitor resource usage, and leverage the power of the command line. With Linux’s flexibility and customization options, you can create an environment that truly suits your needs. Embrace the open-source philosophy and unlock the full potential of your Linux-based machine today!

The Real Closure:

So, I just wanted to share this with you. We worry about AI, but do you think this is an appropriate article for this site? Better still, do you think this is optimized for Google? It’s none of those things. You can tell by the wording that it wasn’t written by a human. Even better, you can tell right away that it wasn’t written by me.

But, let’s see how well this article does in Google’s search results. I’ll report the results (if they’re worth reporting) and I suspect this article won’t rank all that well – if at all. I doubt it shows up in the top ten results for any keywords. If it does, I’ll let you know. I pay attention to that sort of stuff.

Of course, you could say that it’s contaminated by the actual real closure, but the whole article is failing the formula I’ve been using since my earliest articles. It is what it is and I’ll say that it’s ‘close enough for government work’ and we’ll see how well it ends up doing in Google’s search results. It barely qualifies as an article for this site. My articles are very different – and, well, I’d say they’re much better.

Thanks for reading! If you want to help, or if the site has helped you, you can donate, register to help, write an article, or buy inexpensive hosting to start your site. If you scroll down, you can sign up for the newsletter, vote for the article, and comment.
How To: Quickly Restart The Cinnamon Desktop Environment

Today’s article is going to be a pretty quick and easy article, where you learn how to quickly restart the Cinnamon desktop environment. It shouldn’t be a very long article, and I’d say it’s easy enough for a beginner to process. So, if you’re interested in restarting the Cinnamon DE, read on!

Obviously, this will only apply to those folks who are using the Cinnamon desktop environment. Well, no… I do believe it also works in the GNOME desktop environment. As I understand that it’s a holdover from GNOME, which is what Cinnamon is based on. Alas, I don’t have anything running GNOME right here in front of me, so I’m not going to test that.

On the off-chance that you don’t know what desktop environment you’re using, that’s easy enough to learn. You can just read this article:

How To: Determine Your Desktop Environment

If you want to skip reading that, just open the terminal and run the following command:

The output of that command will tell you what desktop environment you’re using. If the result is ‘cinnamon’, then this article applies to you! 

Anyhow, if you leave your computer on for a long time, you might find that Cinnamon is eating up a bunch of RAM and CPU. You can clear that out by logging out or rebooting, but there’s a much easier way to restart the Cinnamon desktop environment. This article will show you how.

Restart The Cinnamon Desktop Environment:

This time around, you don’t even need to open a terminal!

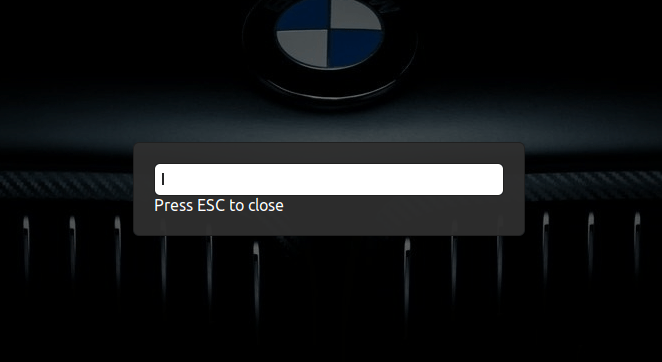
With your keyboard, press ALT + F2 and you should have a new window open up on your screen. It looks like this:

alt + f2 popup allowing you to run commands
If you’ve never pressed this key combination before, this may be new to you. Neat!

Now, all you need to do to restart the Cinnamon desktop environment is press the letter R and then press the ENTER key.

That alone, that little shortcut, will restart your Cinnamon desktop environment, meaning it may free up some RAM and lower the amount of CPU that the desktop environment is using.

Bonus:

You can actually run other commands from there. I don’t know all of them, or at least I don’t know if I know all of them. I’ve been unable to find an exhaustive list and I only know of a few shortcuts you can use in this run screen.

There’s a shortcut, like ‘rt’ that will reload your theme (useful for theme creators). It just reloads the theme, and doesn’t actually restart Cinnamon, though it may kinda look similar.

This won’t apply to too many of my users, as my readers are generally beginners, but you can also enter ‘lg’ into the shortcut window.

If you were using GNOME instead of Cinnamon, it’ll open up “looking glass”, the GNOME debugger.

If you’re using Cinnamon, it opens up Melange – the Cinnamon debugger. Debuggers can be useful if you need it and know what you’re doing with it.

The goodness doesn’t stop there!

If you want, you can put ‘firefox’, ‘gedit’, ‘leafpad’ or other applications in there. So long as those applications exist in /usr/bin, they should load just fine from this run screen. You can use this shortcut to open pretty much any application that has been installed via the normal means. 

If you want to load something that’s not installed from this screen, you can do that too. You just need to enter the path to the application you want to open. Something like, ~/Downloads/LibreWolf.AppImage will work, according to my testing.

Closure:

There you have it! You’ve learned how to use a hidden run menu to restart the Cinnamon desktop environment. On top of that, you’ve learned that it can be useful for all sorts of other tasks. It’s a pretty handy shortcut, one you can open without taking your hands off the keyboard to use a mouse. That right there is quite a bonus in and of itself!

Thanks for reading! If you want to help, or if the site has helped you, you can donate, register to help, write an article, or buy inexpensive hosting to start your own site. If you scroll down, you can sign up for the newsletter, vote for the article, and comment.

How To: Change Ubuntu Into Lubuntu

Today’s article is going to teach you how to change Ubuntu into Lubuntu. Why? Because you can! Because you might want to try a different desktop environment, or because you’d like to have them both on one computer. It’s remarkably easy to change Ubuntu into Lubuntu – and, of course, would work with other official Ubuntu flavors with just slight modifications

As you know, Ubuntu is a distro. Lubuntu is also Ubuntu, but it is an official flavor of Ubuntu. They are not actually different distros. Lubuntu is Ubuntu, with different Ubuntu software installed to provide a different experience.

Ubuntu is Canonical’s flagship operating system. It ships with a suite of useful software and uses the GNOME desktop environment. If you say Ubuntu, that’s the distro you’re talking about. Lubuntu is a separate project under the same umbrella, based on Ubuntu. Lubuntu, once known for being lightweight, is now using the LXQt desktop environment where it once used LXDE. The latter dropped for the former for a whole host of reasons, including maintenance improvements. Comparatively speaking, it’s still fairly lightweight.

Full Disclosure: I’m an “Official Lubuntu Member” and, by extension, also an Official Ubuntu Member. I’m quite biased with regards to Lubuntu, but my biases are open and I still strive to be objective (or at least not objectionable!).

So, if you have Ubuntu installed and you’d like to experience Lubuntu, then this is the article for you, as it will teach you how to …

Change Ubuntu Into Lubuntu:

Like oh so many articles, if you want to change Ubuntu into Lubuntu, you’re going to want to start off with an open terminal. You can use your menu to open a terminal, or you can just press CTRL + ALT + T and your default terminal should open.

Once you have your terminal open, you need to enter just one command, really. The command you’ll enter is:

That will run its course and then pause on a screen where you can read about your display manager. There are no real options on that page, so you can just press the enter button after reading it.

This won’t actually take all that long. When you’re done, you can logout and then login to Lubuntu or, more effectively, just reboot and you’ll boot into the Lubuntu environment. 

When you reach your new login menu, you can pick which desktop session you want to login with by using the dropdown menu in the upper left, with Lubuntu being the new default. Of course, you can login to the regular Ubuntu session still (as well as Ubuntu on Wayland). Most things will still work in when you’re logged into an Ubuntu session, except for blanking the screen. That fails because you’re no longer using GNOME-display-manager (GDM3). (You’re now using SDDM.)

That was it. That’s all you have to do. However, if you don’t like it and want to change it back, it’s slightly more complicated – but not terribly so – to reverse this change. To reverse it, you need to …

Change Lubuntu Into Ubuntu:

Once again, open your terminal. It’s not hard, as described in the 2nd section of this article. Heck, it’s described in almost every article.

You can start with just this command:

And that’ll get you almost all the way back to normal. You’ll still have the splash screen and boot logos that belong to Lubuntu. You could leave those and learn to accept them, or you can fully restore the original setup.

Assuming you want things back the way they were, we need to get your display manager reconfigured – restored to what it was. That’s a very easy command. It looks like:

You’ll get another one of those warning screens and, once again, there are no options. The only thing you can do is press the enter button. Fortunately, that’s exactly the button you want to press!

Finally, you need to change the boot screens. It’s a pretty easy command, but it is interactive. Just run this to get it started:

That will ask you which theme you want to use. In this case, you’ll pick 1 and press the enter key. Basically, you want the option that isn’t “Lubuntu” and this will fix the final visual issue.

When you next reboot, you’ll have the default Ubuntu logo and theme during the whole boot process (assuming everything went as expected). Your login theme will have been restored to Ubuntu’s default, as will have the Ubuntu splash screen while the system boots.

Of course, you could always opt to keep Lubuntu installed alongside Ubuntu, that is LXQt alongside Gnome, if you’d prefer. Then again, if you like your Lubuntu installation, maybe you’ll just want to use it. It’s easy enough to remove GNOME or to even just clean install Lubuntu.

Closure:

And there it is! It’s an article that teaches you how to change Ubuntu into Lubuntu. It’s not a very complicated affair and you can restore it easily enough, should you not like it. You can more or less do this with any other official flavor. Swapping back to just the old Ubuntu will potentially use different commands, but it’ll otherwise be quite similar.

Thanks for reading! If you want to help, or if the site has helped you, you can donate, register to help, write an article, or buy inexpensive hosting to start your own site. If you scroll down, you can sign up for the newsletter, vote for the article, and comment.

How To: Determine Your Desktop Environment

Today’s article will help you determine your desktop environment. Often abbreviated as “DE”, your desktop can be any number of choices – including none at all. This should be a relatively short and easy article. If you don’t know, the desktop environment is a bunch of software that provides the GUI system you use to navigate, load files, and manage your computer.

Once in a while, an article should get back to the basics. This is one of those articles. When someone poses a question and you need to know their desktop environment, you can just tell them that you need that information and link to an article like this one.

As such, it’s not exhaustive nor is it expected to be all that deep. There are a number of ways to get your desktop information. For a more universal approach, these ways will all be through the terminal. In most other situations, you can use the GUI and figure it out. For example, you might use HardInfo and get the data that way. Not everyone will have that installed, so we can just do it though the terminal.

Determine Your Desktop Environment:

This article requires an open terminal, like many other articles on this site. If you don’t know how to open the terminal, you can do so with your keyboard – just press CTRL + ALT + T and your default terminal should open.

Now that you have your terminal open, you can try either ‘neofetch‘ or ‘screenfetch‘. Both of them will happily spit out the information you need. The screenfetch may be better here, as it also gives the version of your desktop environment – from what I can tell. Both are easy to install and may already be installed.

Here’s an example of the relevant output from running screenfetch in the terminal:

screenfetch displaying desktop environment information
See? It’s right there! Easy enough!

You can also do the same thing with running neofetch in your terminal. Once again, it looks something like this:

neofetch showing desktop environment
Once again, it’s nice and easy! Tada!

Now, there’s some chance you just want to determine your desktop environment and don’t need or want any additional information. You can do that. It’s not hard, it’s not hard at all. In fact, both are environment variables that you can easily get to echo as stdout.

You can also use:

Both of those will tell you the desktop environment that you’re using. See:

using echo to view the desktop environment
See? You can use either one effectively and efficiently.

As suggested by @wizardfromoz, of Linux.org fame, I completely forgot to include my beloved inxi. The inxi system information tool is increasingly installed by default, but the link will show you how to install it. It’s a great tool, providing a ton of information, that’s used frequently for support questions.

To use inxi to determine your desktop environment, you can just run:

That’s an uppercase S and it’ll look something like this:

inxi showing the desktop environment
See? It’s even included in the inxi output! inxi does it all!

And there you have it, a few different ways to determine your desktop environment from the terminal. You should probably just know this information, but newer users may not know and may need help in finding this information. 

Closure:

So, there’s another one… Yet another article, said and done. This one is pretty easy and aimed at rank beginners, but it’s not without use. It may even save some time as people might actually search before asking questions! Well, they could… 

Thanks for reading! If you want to help, or if the site has helped you, you can donate, register to help, write an article, or buy inexpensive hosting to start your own site. If you scroll down, you can sign up for the newsletter, vote for the article, and comment.

Linux Tips
Creative Commons License
This work is licensed under a Creative Commons Attribution 4.0 International License.