Show Your Filesystem In The Linux Terminal

Today is going to be a good day if you have decided that you want to show your filesystem in the Linux terminal. If that’s not what you want to do, this might not be the article for you! If it is what you want to do, read on!

I’m going to try to keep this fairly short. There are two commands that I have available to help you show your filesystem in the Linux terminal. There are surely other ways to do so, but I’ll just cover two different ways.

Both of them will be quite simple…

These two commands should be fairly standard. They should work in your distro, regardless of which distro you’ve chosen. There’s nothing special about them.

What do I mean when I say ‘show your filesystem in the Linux terminal’? I mean you can see, and identify, your various drives and their partitions. You can also learn a bit more information about them, but the general idea is that you can see and learn about them in the terminal.

Like I said, this won’t be fairly complicated. It will involve the terminal.

Show Your Filesystem In The Linux Terminal:

Yes, I said the terminal. You will need an open terminal. If you want to open your default terminal, you can usually just press CTRL + ALT + T. That will open your default terminal more often than not. Otherwise, open it from your terminal.

Now, to get to the point… I’m going to show you a couple of commands that you can use to show your filesystem in the Linux terminal. 

Ready?

lsblk:

The first tool we’ll use is lsblk. This is installed by default on any major distro and you won’t need to install anything. If you check the man page, you’ll see that lsblk is described like this:

lsblk – list block devices

That command sounds useful. Block devices are disks, drives, partitions, and the like. So, you can just run that command in the terminal. It looks like this:

The output is easy enough to understand. It might look something like this:

That’s with a bunch of junk still plugged in from a previous article. You can see that the output is easy enough to understand.

df:

The next command we’re going to use is the ‘df’ command. Again, you shouldn’t need to install anything to use the df command. This is something that should already be installed and if you want to use it to show your filesystem type in the Linux terminal, it’s quite easy.

First, you should check the man page. If you do, you’ll see that df is described as:

df – report file system disk space usage

Once again, that sounds like a fine tool for learning about your filesystem. You’ll want two flags. The first flag is -T and will show you the file system type. The second flag is -h and that means it’ll spit the output in human-readable form. An example of that command would look like:

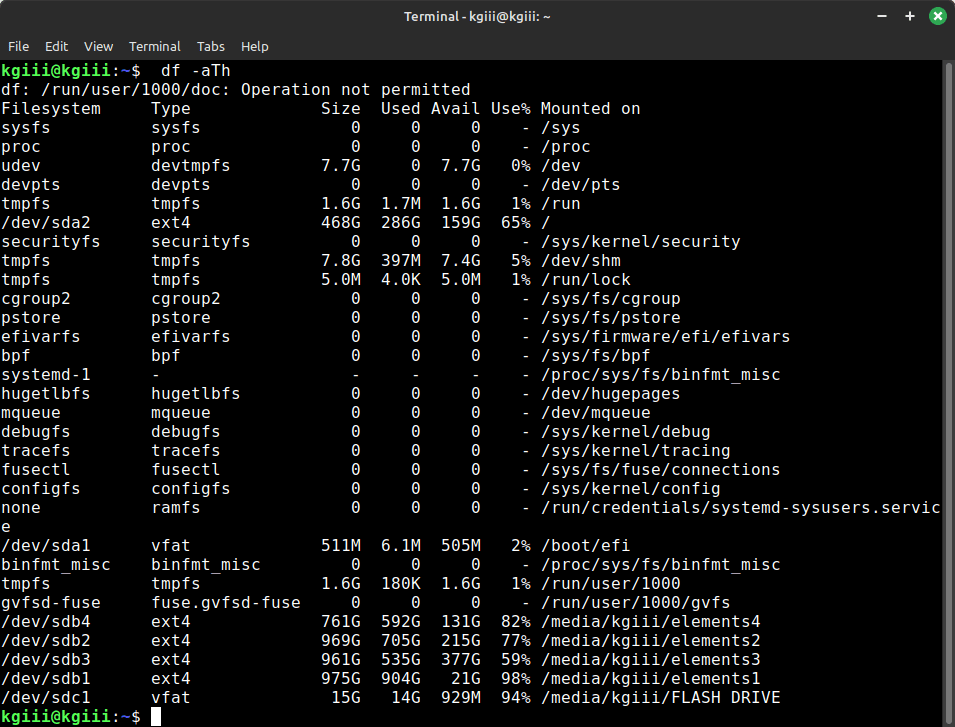
An example output would look like this:

Again, that’s nice and easy to understand. If you want to show your filesystem information, these commands are easily memorized.

You’ll notice that both output is quite similar, as it should be. There are only so many filesystems available in the distro I used to write this. This information can be quite a bit more complicated if you’re running it against a NAS with lots of different storage options, but it’s generally easy enough to understand.

Closure:

There you go… This isn’t even a very long article – because it doesn’t need to be. I wanted to show you how to show your filesystem information in the Linux terminal. None of these commands are all that difficult to use and remember. You can also get some useful information from the mount | grep "^/dev" command, so keep that in mind along with the commands shown in this article.

Thanks for reading! If you want to help, or if the site has helped you, you can donate, register to help, write an article, or buy inexpensive hosting to start your site. If you scroll down, you can sign up for the newsletter, vote for the article, and comment.

Show Mounted Partitions

Today we’ll have a fairly easy article, one that won’t be too long, as we discuss a couple of ways to show mounted partitions. This isn’t anything complicated. A new user should be able to follow along, so long as they’re not too afraid of the terminal.

Even if a new user was afraid of the terminal, none of these commands perform actions other than providing information. If you are careful, even using copy and paste, you won’t risk harming anything. Then again, this is pretty basic stuff. You can handle it just fine! (I have faith!)

Did you notice how I said “a couple of ways”? Well, I said that because there are all sorts of ways to show mounted partitions. 

If you don’t know what a partition is, it’s pretty easy to understand. You have a storage drive. By itself, it’s pretty useless. You have to decide on a filesystem and add at least one partition for that storage drive to be useful. There are also virtual partitions that are created by, and used by, the operating system.

Additionally, that partition must be mounted to be accessible for normal read and write operations. Sometimes, you may need to unmount a drive to perform certain operations. For example, you can’t change the size of the partitions on a mounted drive.

All we will be doing in this article is showing the mounted partitions. I haven’t just picked two commands, I’ve picked the two commands that I think have the most easily processed output.

Show Mounted Partitions:

The very first paragraph mentioned the terminal. That’s because we’ll be using the terminal for these exercises. So, go ahead and press CTRL + ALT + T. Hopefully, that will open your terminal.

We shouldn’t need to install any new software for the tasks covered in this article. We will be using two different applications, but those are going to be installed by default more often than not. I told you that this one will be easy!

Show Mounted Partitions With The ‘df’ Command:

With your terminal open, you can start by verifying that the df command is installed on your system. You’d do that with this command:

With that information, you’ll not only get the version you’ll see why it’s probably installed by default. The df command is a part of ‘GNU coreutils’, which is a set of GNU-provided applications that should be installed by default.

When you check the man page, you can also that df is described as being:

df – report file system disk space usage

So, that’s probably a pretty good tool for showing your mounted partitions. The df command we’re going to use is quite simple. It looks like this:

You can check the man page to see what those flags are doing:

The command output is nice and easy to understand, but very thorough. The next command we’ll use only shows a subset of the above-mentioned virtual partitions. 

Anyhow, that command may look a bit like this:

using the df command to show mounted partitions
Yes, a lot of that is information you don’t really need to know – but now you do.

As you can see, the output from this df command is very thorough. You almost certainly won’t need that much information. Fortunately, the next command is more concise and will net you about all the information you might need in your day-to-day computing.

Show Mounted Partitions With The ‘findmnt’ Command:

This too is done in the terminal and is another way to do much of what you did in the previous section. You probably don’t have to install anything. The findmnt application is a part of ‘util-linux’ and will also be installed by default.

You can find out if the findmnt command is available with this command:

As you’ll see, is indeed part of the util-linux applications. You might as well check the man page, seeing as we’re already here. To check the findmnt man page, you’d use this command:

While you’re checking the man page, check to see how findmnt describes itself. It’s described like:

findmnt – find a filesystem

If you recall the introduction, I mentioned how you’d need a filesystem to make a partition useful. Findmnt appears to be a pretty good application for those who want to show mounted partitions.

You can run the command and get a cascade of data, much like the df command. Run this command:

But, you can run this command with a -D flag and get a subset of that partition information and this subset of information is probably all you’re going to need regularly. That command looks like this:

The more concise output from that command looks something like this:

showing mounted partitions with the findmnt command
Realistically, this is all the information you’ll likely need when you show mounted partitions.

(It was kind of broken for a while, but I fixed it so that you can click on the images and have them enlarge properly. The bug was a devious bugger, but I think I’ve nailed it.)

The output from that findmnt command is easy to read and doesn’t contain nearly as many of the virtually mounted partitions. It still contains some and I’m not sure why or what the difference is. You can see that both commands spit out slightly different bits of information – but the essential bits are there and, thankfully, they match one another.

See? I told you that it’d be easy!

Closure:

Well, at some point you may want to show mounted partitions. It’s handy information to have when you want to perform some disk operations. It can also be handy to ensure a drive is mounted properly.

There are all sorts of reasons why you might want this information. Then again, there are also a zillion ways to get this information (such as running the sudo fdisk -l command). I’ve just picked a couple of ways, though I had a preference for outputs that are easiest to read. 

Thanks for reading! If you want to help, or if the site has helped you, you can donate, register to help, write an article, or buy inexpensive hosting to start your site. If you scroll down, you can sign up for the newsletter, vote for the article, and comment.

How To: List Mounted Partitions

Today we’ll have a nice and simple article, simply because we can, about how to list mounted partitions in Linux. Like so many of these articles, we’re going to need an open terminal. On the other hand, we’ll just be exploring a couple of tools to help us along the way.

Your disk drives, be they solid state or hard disk drives, will be separated into partitions. It can get confusing until you realize that the outputs from these commands won’t always just represent what I’ll call physical partitions. Sometimes, there are virtual partitions – sometimes with their fun file systems.

You may have everything from mounted temporary partitions to software designed to run in its own mounted partition space. When you run these bellow commands, you’ll learn that there are all sorts of mounted partitions. This is completely normal. It’s also pretty easy to weed out the physical partitions.

Why would you want to do this? Well, I’m having a goofy error when I boot one of my computers and I need to narrow it down to which disk it is that’s giving me the error. Once I take the time to do that, I can move on to troubleshooting the problem and finding a solution for the problem.

The tools we’ll be using are ‘findmnt’ and ‘df’. They’re described as the following:

finding:

findmnt – find a filesystem

df:

df – report file system disk space usage

As you can see from the description, both of those have something to do with getting information about a file system. That makes them good tools for the job.

NOTE: There are multiple ways to list mounted partitions. You have GUI and CLI-based tools available to you. One of the goals surrounding this whole project is not just to make people more familiar with Linux but also to help them get comfortable working within the terminal. You’ll be just fine!

List Mounted Partitions:

As I mentioned above, we’ll be using a terminal for this. I do not mind which terminal you’re using but you can usually open the default terminal by pressing CTRL + ALT + T. That works most of the time.

With your terminal now open, you can try the following command:

The output from that command will list your mounted partitions. It’s a lot of text, but most folks are probably only interested in the start of the line. The output of the findmnt command may look a little something like this:

The next command you’re going to want to try will be the ‘df’ command. We’ll be using a few flags. It’s not very complicated, though it may look like it. The command is a simple ‘df’ command and looks like this:

We use the -a flag for ‘all’. Then we use the -T flag because that means type. Finally, we use the -h flag because that means the output will be “human readable” (or more easily read by us mortals.) The output of which looks something like this:

No matter which of those commands you use, it will make your terminal list mounted partitions. If you need to know which partitions are mounted, these are the tools you can start with. They’re easy enough to work with.

Closure:

Well, it’s a bit late in the evening. I almost forgot that there was an article due tomorrow. This happens when I get a lot of responses (elsewhere) on the wrong day. My brain just doesn’t click. I should probably set an automated notification to let me know which days require articles, but I haven’t failed yet. In fact, you get an interesting article about how you can list mounted partitions.

Thanks for reading! If you want to help, or if the site has helped you, you can donate, register to help, write an article, or buy inexpensive hosting to start your site. If you scroll down, you can sign up for the newsletter, vote for the article, and comment.

How To: Check Disk Usage With ‘df’

In today’s article, we’re going to do exactly what the title suggests; we’re going to check disk usage with ‘df’. This means we’ll be checking disk usage in the terminal. Seeing as ‘df’ is included with every distro on the planet (I’m pretty sure) it means this won’t be all that complicated.

I am still a bit under the weather, but the show must go on! I’ve gone this long without missing a publication date, so I might just as well keep the  streak up. 

As the title suggests, we’ll be using ‘df’ to check disk usage. This will already be installed as one of the default tools, so you won’t need to install it. That’ll save some time! If you’re curious, the ‘df’ tool describes itself as:

df – report file system disk space usage

If you want to get a head start, you can check the help page. To do that, you’ll want to run:

If you’re like to check the version, the command is:

So, with that in mind, let’s just jump into the article.

Check Disk Usage With ‘df’:

Obviously, this is yet another article where we’re learning about doing things in the terminal. That means you’ll need an open terminal. If you don’t know how to open the terminal, you can do so with your keyboard – just press CTRL + ALT + T and your default terminal should open.

With your terminal now open, you can just run the command by itself:

In some cases, it will throw an error and not be able to read everything. That’s usually easily resolved. Just run the command as a privileged user. So that would look like:

Now, you can use that output to do a bunch of math, or just pay attention to the percentages. Or, if you’re wanting, you can use the -h flag and get the output in human-readable format. That looks like:

The output of which might look a little something like this:

the output of sudo df -h
See? No errors and it is nice and readable! You can’t go wrong with that!

As you can see in the picture, I’m only using less than half of my available disk space. I don’t need to worry about running out of space any time soon, but if it gets low I can always check disk usage with ‘df’. Also, it doesn’t matter what directory you’re in when you run the command. As you can see, it runs just fine while in the Downloads directory.

I also wrote an article about using GUI methods to visualize disk space usage. You might prefer one of those methods, but you can always just use the terminal to check disk space.

Closure:

It seemed like a good idea to do a quick article tonight. I’m watching IMSA’s last race of the season and feeling poorly, so hopefully I get some sleep at a reasonable hour. Still, as I mentioned, the show must go on. The site has had a new article every other day for quite a while. I might as well keep up the schedule.

Thanks for reading! If you want to help, or if the site has helped you, you can donate, register to help, write an article, or buy inexpensive hosting to start your own site. If you scroll down, you can sign up for the newsletter, vote for the article, and comment.

Subscribe To Our Newsletter
Get notified when new articles are published! It's free and I won't send you any spam.