How To: Change DNS Servers

Today’s article shouldn’t be all that difficult for even our newest users but is limited to those who want to change DNS servers to something other than the default. This is easy enough to do, but obscure enough to warrant an article of its own. 

First, let’s have some fun. I’m going to ask ChatGPT to tell you about DNS in just two paragraphs. So, let’s see what the AI has to say:

First, what is DNS?

DNS, or the Domain Name System, is a fundamental protocol used in computer networks to translate human-readable domain names into machine-readable IP addresses. It serves as a decentralized directory system that enables users to access websites, send emails, and perform various network activities using familiar domain names instead of numerical IP addresses. When a user enters a domain name in their web browser, the DNS resolver (typically provided by the Internet Service Provider or ISP) initiates a series of queries to locate the corresponding IP address. The resolver communicates with DNS servers, starting from the root servers, then the top-level domain servers, and finally the authoritative name servers associated with the requested domain. Through this hierarchical process, DNS ensures efficient and accurate resolution of domain names, facilitating seamless internet connectivity.

DNS operates through a distributed database system known as the DNS namespace. This namespace is organized hierarchically, with the root domain at the top, followed by top-level domains (TLDs) like .com, .org, or country-specific domains such as .us or .uk. Beneath the TLDs, there are second-level domains, and further subdivisions like subdomains. Each domain has authoritative name servers that store the IP addresses associated with the domain names they manage. DNS resolution occurs through recursive queries, where the resolver traverses the DNS hierarchy to find the authoritative name servers responsible for the domain. Once the IP address is obtained, the resolver caches it for future use, reducing the need for repetitive queries. DNS plays a crucial role in the functioning of the internet by providing a scalable and efficient method for translating domain names to IP addresses, enabling seamless communication and accessibility across the network.

Wow! That’s pretty accurate. I’d have just resorted to describing DNS as the telephone book of the internet. You look up the name you want to reach and DNS tells you the number. In this case, the number is the IP address.

All in all, I’d say ChatGPT did a pretty fine job.

Change DNS Servers:

There are a variety of reasons why someone would want to change DNS servers to something else. They may get updated more quickly, weed out junk domains, or even remove ads and things like that. Maybe you want to weed out inappropriate material because you have children. Perhaps you have some custom configurations needed to traverse your complex local network. There are all sorts of reasons why you might want to change DNS servers.

See, as alluded to above, it’s perfectly possible to run your own DNS server (see Pi-hole for one such example). You can also use DNS servers provided by various third parties. For example, CloudFlare and Google offer their own DNS servers that are free for you to use. There are other choices, but this isn’t an encyclopedia writ large, so I’m going to just include those two. You can use your favorite search engine to find more.

So, let’s say you don’t like using a DNS server provided by your ISP. Perhaps you do this because of privacy issues, though you can look into DNS over HTTPS if you’d like. Perhaps you just don’t find them updated quickly enough or you’ve found they contain errors. (They do sometimes have issues and have even been known to be exploited in the past.)

NOTE: We’ll be using ‘nano‘ for this exercise. We’ll also default to Google’s public DNS servers, but you can substitute with whatever you find available.

Well, the first step you’re going to take is opening your terminal. You can do that by just pressing CTRL + ALT + T. In most distros, that will open the default terminal emulator. If your distro doesn’t do so, start mucking about with the keybindings until it does!

The file we’ll be editing doesn’t actually exist on most distros. That’s not a problem, because we’ll be making that file with nano. With your terminal open, enter the following command:

That should be a perfectly blank file and you’ll want to enter the following (again, using Google’s public DNS servers) to change DNS servers:

Then, you’ll save the file with Nano. That’s pretty easy. To save this new resolv.conf file with nano, you just press CTRL + X, then Y, and then ENTER.

Next, you’ll need to reboot. I know this will pain some of you, but I’ve yet to have a sure way to effect these changes other than rebooting. So, you’ve gotta do that. Try this command:

Now that you’ve managed to change DNS servers, you should be able to browse around much as you normally would. Remember, the people in charge of the DNS servers are the ones that decide where you go when you enter an address into the address bar and smash that enter button.

Be sure to use a company you trust to provide those services and be sure to verify your internet is still working properly. If it’s not working, you can remove the file and reboot or you can edit it again and try rebooting again. It shouldn’t be a problem in reality, this isn’t anything all that complicated.

Closure:

So, there you have it. It’s yet another article. This time around we discussed how to change DNS servers – along with some reasons as to why you might want to. If you have a spare bit of hardware kicking about, you can make your own DNS server and point to that with the internal addresses you’d be using. It’s nothing too painful and I think even beginning Linux users can follow along easily enough.

Thanks for reading! If you want to help, or if the site has helped you, you can donate, register to help, write an article, or buy inexpensive hosting to start your site. If you scroll down, you can sign up for the newsletter, vote for the article, and comment.

Let’s Find A Site’s MX Records

Today’s article is going to be rather specific and brief, as we learn how to find a site’s MX records. This isn’t something everyone is going to need to know, but it’s useful for debugging an email issue when you’re hosting websites. So, some folks are going to find it useful – and will then know how to find a site’s MX records. Read on!

I suppose most of my readers will not know what an MX record is…

In short, an MX (Mail Exchange) record is another DNS (Domain Name System) record. In this case, it is used to route emails to the correct server (via the IP address, basically). From there, your server will route the emails to individual email inboxes.

Basically, you want to know this information when things go pear-shaped with your emails or maybe when you’re using a 3rd party email service provider. There are reasons why people will want this information, they will want to find a site’s MX records.

Additionally, I figured I’d do this article now while ‘dig’ is still fresh in our memory. After all, I’ve used dig in the previous two articles and this is the final dig-related topic that I can think of. Here are the previous two articles, if you’re not reading these articles in order and are unfamiliar with the dig command:

How To: Find A Website’s IP Address
How To: Find A Site’s Nameservers

So, with all that in mind, let’s learn how to find a site’s MX records!

How To Find A Site’s MX Records:

Yes, dig is run in the terminal. Yes, you’ll need an open terminal to follow along. If you don’t know how to open the terminal, you can do so with your keyboard – just press CTRL + ALT + T and your default terminal should open.

With your terminal now open, the syntax for this specific dig command is:

For example, you’d find this site’s MX records with:

If you want, as the other dig commands used recently, you can use the +short flag with this, like so:

The output should look like this:

using the dig command to find a site's MX records
There, you can see this site’s MX records. This is public information. So, gawk away!

You can have more than one MX record, should you want failover but the mail protocol already includes some efforts to resend mail when there’s an outage. That’s irrelevant here, but information that I might as well share.

Also, like the other dig commands covered, you can put the flags at the end, like so:

So, that’s an option. I’m not sure why it’s an option. If anyone has a clue as to why it’s an option, do feel free to share. Heck, even if it’s a wild guess, I’ll take it. But, if you want more information about the dig command, run man dig in your terminal.

Closure:

There you have it, it’s another article. I think this is the last dig article, but who knows? This time around, we’ve learned how to find a domain’s MX records. For those that need to know, this will be handy.

For everyone else, you’ll likely forget this by tomorrow – and that’s okay. You don’t have to carry all the tools in your toolbox. If you tried, you’d need a very big toolbox and it’d be hard to carry it!

Thanks for reading! If you want to help, or if the site has helped you, you can donate, register to help, write an article, or buy inexpensive hosting to start your site. If you scroll down, you can sign up for the newsletter, vote for the article, and comment.
Change Your DNS Servers To Google’s In Lubuntu

This article will show you how to change your DNS servers from your default servers to the DNS servers run by Google, specifically while you’re using Lubuntu. If  you’re not using Lubuntu, the process is likely fairly similar. Either way, it should be a nice and fun article, and we’ll even do it in the GUI instead of the terminal.

So, what is DNS? DNS stands for ‘Domain Name System’. As you know by now, machines are identified by their IP address. It’d suck to have to remember numbers instead of names. It’s also possible to route multiple domain names to the same IP address. So, we have domain names and use those domain names to resolve to IP addresses.

If you’re like most people, right now the DNS servers you’re using have come from your ISP – the folks who provide your internet service. This means that they can see which sites you visit, based on the requests you make to the DNS service.

Some folks don’t like this and prefer to find another DNS provider. (There’s also Secure DNS which this article will not be touching on.) One of those companies that provides free DNS servers is Google. Like them or not, their DNS servers are robust and consistently updated, often making domain propagation quicker for you.

This article is for Lubuntu, as stated above, but you may very well be able to follow the same exact steps with your distro of choice. And, now that you have a general idea of what’s going on, let’s learn how to…

Change Your DNS Servers:

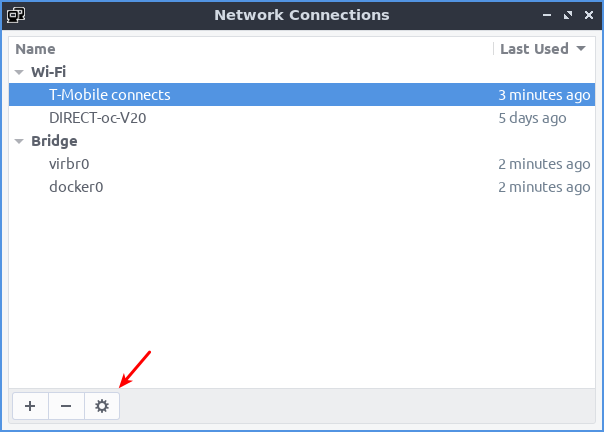
To get started with changing your DNS servers, you need to find your networking icon in your system tray. It’ll be down on the right, not far from the clock. Once you have found it, right click on it so that it brings up the menu to let you “Edit Connections”. It will look something like this:

change network settings
Of course, your version won’t have the nifty arrow.

You’ll want to click the gear icon. That’s why I put the arrow there! 

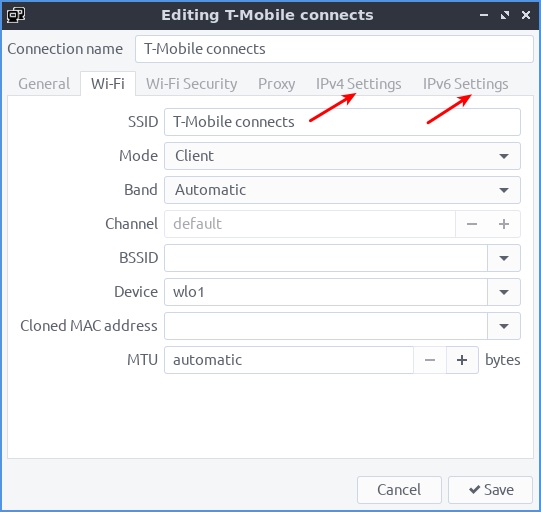
That will open another window. This window will have tabs  you need to worry about – or a tab you need to know about. You probably shouldn’t need both. The tabs you’re interested in will look like this:

changing the network connections
You should need one of those, probably not both of those…

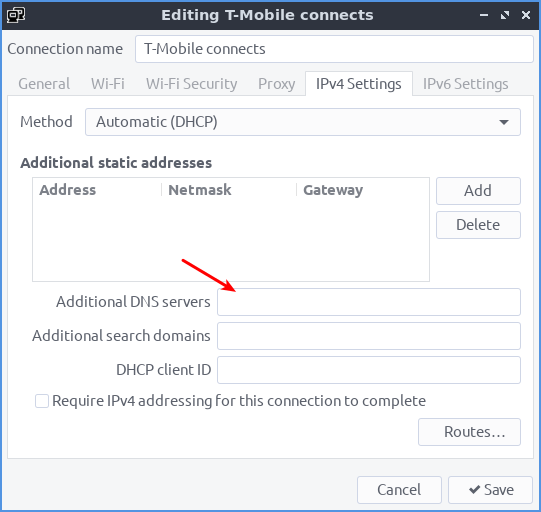
Now,  you should only need to edit one of those. If you’re still using IPv4 then you use that tab. If you’re using IPv6 then you’ll obviously want to use the appropriate tab. For example, the IPv4 would look like this:

screen to edit dns servers
This would be the tab you’re looking for, pretty much…

Now, where that arrow is is where you want to enter the new DNS server information. You separate them with a comma, though you can use a comma and a space – there will need to be a comma.

For Google’s IPv4 addresses, your choices for 8.8.8.8 and 8.8.4.4.

For Google’s IPv6 addresses, your choices are 2001:4860:4860::8888 and 2001:4860:4860::8844.

Note: The ifconfig or ip addr will help you tell if you have IPv4 or IPv6.

When you’re done, be sure to click the save button to ensure your new settings take effect. Remember the screen and changes, should things go pear shaped. You can undo this easily enough.

This will, of course, work with any set of DNS servers out there. You can use it with other servers if you aren’t a fan of Google. This can serve as a general guideline for other servers, should you wish.

Closure:

Yup… There it is. You have another article. This time, it tells you how to change your DNS servers if you use Lubuntu. Again, it’ll work for other distros, but I’m only including pictures/vouching for it with Lubuntu.

Thanks for reading! If you want to help, or if the site has helped you, you can donate, register to help, write an article, or buy inexpensive hosting to start your own site. If you scroll down, you can sign up for the newsletter, vote for the article, and comment.
Subscribe To Our Newsletter
Get notified when new articles are published! It's free and I won't send you any spam.
Linux Tips
Creative Commons License
This work is licensed under a Creative Commons Attribution 4.0 International License.