How To: Make Google Chrome Use Less RAM (UPDATED)

Today’s article is going to be a brief article about a previous article, where I gave you one way to make Google Chrome use less RAM. Consider this an updated article. So, if you’re trying to make Google Chrome use less RAM (and power, I guess) read on!

As tech goes, the situation has changed. As the tech changes, so too must we change our reactions to said changes. The thing with tech is that it never stands still, something that I (for one) appreciate.

The article in question is about making Google Chrome use less RAM. This applies to other browsers, but I concentrated on Chrome. Here is that article:

How To: Make Google Chrome Use Less RAM (And Other Browsers)

In that article, I recommended folks use the “Auto Tab Discard“ plugin. That recommendation has not changed. It’s a great add-on that will discard unused tabs, saving you both RAM and some power (which is useful for mobile devices).

Now, Google (along with other browsers) have enabled a new(ish) feature. Basically, to save power, the browser does what Auto Tab Discard does – it puts unused tabs to sleep. So, when you open those tabs that were sleeping you will need to wait a moment for them to reload.

That’s not a problem. The problem is, Google does this indiscriminately by default. Chrome does seem to make an exception for tabs that are playing audio or video, but all other tabs are fair game and will be put to sleep.

I repeat, all other tabs are fair game. They can and will be put to sleep. That’s downright annoying when you distinctly want to keep some tabs from going to sleep.

Fortunately, you have options.

You can disable this feature in your settings and continue using an extension like “Auto Tab Discard”. That’s a fine choice. That was my choice. It’s probably the wrong choice, but it is a choice.

Your other choice is to manually add sites to the whitelist, telling Google to keep those tabs open. So, you won’t need the extension if you choose to do it this way. This is probably the best choice. This is the choice I did not make.

I’ll show you how to make that choice, and kinda format this like a ‘regular article’…

Make Google Chrome Use Less RAM:

For once, you don’t need to open a terminal!

Instead, open Google Chrome. Then, click on the vertical three-dot menu in the upper right, and then you need to click on “Settings”. When that tab opens, click on “Performance” (on the left) and the rest should be fairly obvious.

If you’re like me, you can just disable the feature. That looks like this:

disable the power saving feature for Google Chrome
At this stage you can modify your settings as you see fit. I’ve turned the feature off. Go me!

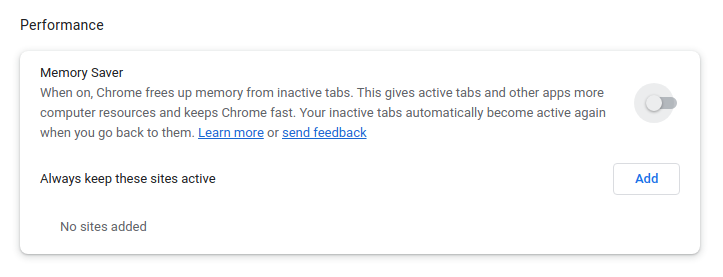
If you want, you can keep the feature enabled (it was enabled by default at my house) and just add your favorite sites to the list of sites that always remain active. I don’t feel like messing around with it, so I’ve simply disabled the feature and opted to keep the extension.

I suppose that might mean I use a little extra RAM, I haven’t tested but it’d be a very trivial amount and I quite like the GUI offered by the installed extension. When I next do a clean install, I’ll probably just let the browser deal with it instead of using the extension.

Other browsers may use similar tactics to save power (and free up RAM, the two are related). As of the time of this publication, this was not yet a feature that’s in Google’s opensource counterpart Chromium. Right now, this appears to just be a function in the proprietary version, but tech changes and that too may change.

Closure:

And, well, now you can see why this is an article all of its own. It was more than I could reasonably add as an update to the existing article and was enough information to make a new article. After publication, I’ll update the previous article to link to this article. I hope… Hopefully, I remember to do that.

Hmm… I think I forgot to do a ‘meta’ article in February. February is a pretty short month, plus I’ve been otherwise distracted. But, I’ve not been too distracted to skip a publication date! We’re rapidly approaching the two-year mark. It has been a pretty good ride!

Thanks for reading! If you want to help, or if the site has helped you, you can donate, register to help, write an article, or buy inexpensive hosting to start your own site. If you scroll down, you can sign up for the newsletter, vote for the article, and comment.

Change Your DNS Servers To Google’s In Lubuntu

This article will show you how to change your DNS servers from your default servers to the DNS servers run by Google, specifically while you’re using Lubuntu. If  you’re not using Lubuntu, the process is likely fairly similar. Either way, it should be a nice and fun article, and we’ll even do it in the GUI instead of the terminal.

So, what is DNS? DNS stands for ‘Domain Name System’. As you know by now, machines are identified by their IP address. It’d suck to have to remember numbers instead of names. It’s also possible to route multiple domain names to the same IP address. So, we have domain names and use those domain names to resolve to IP addresses.

If you’re like most people, right now the DNS servers you’re using have come from your ISP – the folks who provide your internet service. This means that they can see which sites you visit, based on the requests you make to the DNS service.

Some folks don’t like this and prefer to find another DNS provider. (There’s also Secure DNS which this article will not be touching on.) One of those companies that provides free DNS servers is Google. Like them or not, their DNS servers are robust and consistently updated, often making domain propagation quicker for you.

This article is for Lubuntu, as stated above, but you may very well be able to follow the same exact steps with your distro of choice. And, now that you have a general idea of what’s going on, let’s learn how to…

Change Your DNS Servers:

To get started with changing your DNS servers, you need to find your networking icon in your system tray. It’ll be down on the right, not far from the clock. Once you have found it, right click on it so that it brings up the menu to let you “Edit Connections”. It will look something like this:

change network settings
Of course, your version won’t have the nifty arrow.

You’ll want to click the gear icon. That’s why I put the arrow there! 

That will open another window. This window will have tabs  you need to worry about – or a tab you need to know about. You probably shouldn’t need both. The tabs you’re interested in will look like this:

changing the network connections
You should need one of those, probably not both of those…

Now,  you should only need to edit one of those. If you’re still using IPv4 then you use that tab. If you’re using IPv6 then you’ll obviously want to use the appropriate tab. For example, the IPv4 would look like this:

screen to edit dns servers
This would be the tab you’re looking for, pretty much…

Now, where that arrow is is where you want to enter the new DNS server information. You separate them with a comma, though you can use a comma and a space – there will need to be a comma.

For Google’s IPv4 addresses, your choices for 8.8.8.8 and 8.8.4.4.

For Google’s IPv6 addresses, your choices are 2001:4860:4860::8888 and 2001:4860:4860::8844.

Note: The ifconfig or ip addr will help you tell if you have IPv4 or IPv6.

When you’re done, be sure to click the save button to ensure your new settings take effect. Remember the screen and changes, should things go pear shaped. You can undo this easily enough.

This will, of course, work with any set of DNS servers out there. You can use it with other servers if you aren’t a fan of Google. This can serve as a general guideline for other servers, should you wish.

Closure:

Yup… There it is. You have another article. This time, it tells you how to change your DNS servers if you use Lubuntu. Again, it’ll work for other distros, but I’m only including pictures/vouching for it with Lubuntu.

Thanks for reading! If you want to help, or if the site has helped you, you can donate, register to help, write an article, or buy inexpensive hosting to start your own site. If you scroll down, you can sign up for the newsletter, vote for the article, and comment.

Subscribe To Our Newsletter
Get notified when new articles are published! It's free and I won't send you any spam.
Linux Tips
Creative Commons License
This work is licensed under a Creative Commons Attribution 4.0 International License.