Who is, Simply whois

Today, we’re going to learn about whois. There’s not much to it, so it won’t be a very long article. Think of this article as some of the others, where it’s not so much about the tool (the tool is simple to use) it’s about making folks aware of the tool and the capability.

Have you ever wondered about a domain name? Maybe you want to see if it’s registered? Perhaps you want to see who has registered it? Maybe you’ve noticed they have great uptime and want to see the name servers so that you can deduce the hosting company? Perhaps you want to file an abuse report, or you just want to know who the owner is so that you can send them an email. Maybe you’re a stalker and just need to narrow it down a little! (I kid, please don’t stalk anyone.)

Well, you can do that and more with whois! Want to know when the domain name expires so that you can swoop in and steal it? Well, you might be able to do that with help from the handy whois command! You can at least see the expiration date. I tend to keep things registered well in advance, ’cause I’m forgetful and don’t want to lose a domain name.

Unfortunately, quite a bit of information in whois databases is intentionally wrong. Sometimes, the information is quite useless. Certain domains, like this one, have requirements – so I have to use my real name in the registration information (though they never actually check). Other domain names aren’t so particular and you can lie, use email forwarders for abuse complaints and contact info, and generally hide that sort of stuff from whois databases. Ah well…

So, who is whois?

whois:

You might just as well crack open a terminal. If you don’t know how to open the terminal, you can do so with your keyboard – just press CTRL + ALT + T and something useful should happen.

With your terminal open, go ahead and install whois. It’s surely in your default repositories, so just install it like you’d install any other software. As is the tradition, I’ll show you how to do it in Ubuntu or any apt-using distro:

Now, all you need to know is:

You don’t need the http, nor the www, just use the domain name. For example, you can:

I should point out that that’s not really my phone number. You probably shouldn’t call it. If you somehow need my phone number, just ask in private and I’ll share it with you – assuming there’s justification for doing so. Also, please don’t stalk me.

Anyhow, you can see when the domain expires, tell that I use a CDN and which one I use, see when the domain was registered, find out who the registrar is, etc… You can learn quite a bit of information from just that one command. Combined with something like traceroute and you can learn a lot.

Closure:

Anyhow, now you know about ‘whois’ and a bit about what you can do with it. If you want to go digging around, you can learn quite a bit – even if the domain’s behind a privacy fence. There are other tools, like MTR and dig (which we haven’t covered).

Thanks for reading! If you want to help, or if the site has helped you, you can donate, register to help, write an article, or buy inexpensive hosting to start your own site. If you scroll down, you can sign up for the newsletter, vote for the article, and comment.
Change Your Hostname In Linux

This article will tell you how to change your hostname in Linux. It’ll give you a couple of options to use. Both methods are pretty easy, and both are approachable by your Linux newbie. Read on for more information!

If you don’t know what your hostname is, or why you have one, you can take a look at this article. Basically, it’s a handy computer name that you use when you’re using things like SSH or FTP. (The first of those three links would be the best page to learn more about your hostname, but it’s basically just a name for your computer.)

Your hostname is probably something you set during the installation process and seldom thought about again. Unless you’re working with your devices remotely, perhaps with the terminal, it’s not really something that you think about all that often. Well, this article is how about you can change your hostname to something else. 

Why would you want to change it?

Well, you could have duplicated it on another device it by mistake. You may have added more devices and need a new device-naming convention. You may have picked something silly and now want to make it more serious. Your device may be moved to a new network where the name isn’t allowed or already belongs to an existing device. There are any number of reasons why you might want to change your hostname. The key point here being that you can change your hostname.

Onto the article!

Change Your Hostname:

This article, like many, requires an open terminal. You can open the terminal with your keyboard – just press CTRL + ALT + T and your default terminal should open. I’ll start with the easiest of the two ways (that I know) to change your hostname.

Method #1:

The first tool we’ll use to change the hostname is the aptly named ‘hostnamectl’ and to use it, you’d use a command like this:

After that, you’ll need to reboot the system for the changes to take effect. Seeing as you’re already in the terminal, you can actually just reboot the system with this command:

This is the very easy way, and it’s the way I’m going to recommend – even if you’re an advanced user. Alas… There’s another way, albeit a bit more messy, to accomplish this.

Method #2

You can edit ‘/etc/hosts’ and ‘/etc/hostname’, changing the hostname manually. This is also handy if you don’t have hostnamectl as an option. Like above, you’ll need to have a terminal open.

Your first command will be editing the hosts file, and we’ll use ‘nano’ for this. Simply enter the following:

There, you’ll see your hostname (which may also be your username, and often is your username). Just delete that and replace it with your desired new hostname.

When you’re done editing, and seeing as we’re using nano, you can save and exit the editor. Just press CTRL + X, then Y, and then ENTER. (It’s seemingly a little complicated, but not too bad.)

Next, you need to edit the hostname file. The command is similar to the one above, just with a different filename. Enter this:

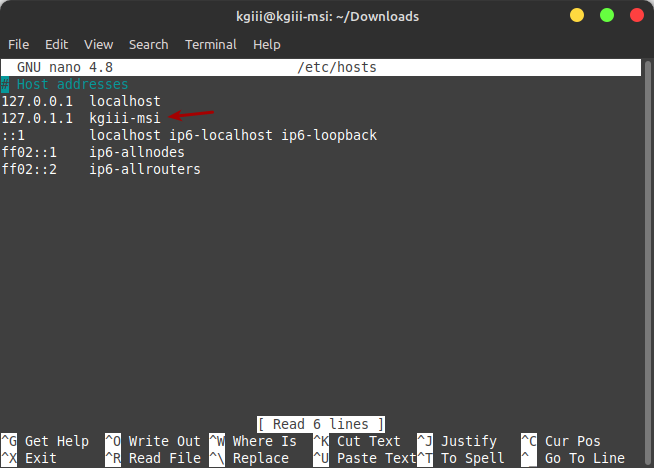
Find the line that begins with ‘127.0.0.1’ and ends with your current hostname. Erase just the hostname and change it to your desired hostname. To make it more clear, here’s a picture:

change the hostname
Just erase the existing hostname and make it your new hostname. Pretty easy, huh?

Once you’re done with that, just like before, you need to save it. Again, you just press CTRL + X, then Y, and then just hit ENTER. That should save your new hosts file and you’re pretty much done changing your username.

There’s one final step. These changes won’t take effect until after you reboot the system. To change your hostname, you will need to reboot the system after changing these files. That’s usually a painless process and you should be able to use the new hostname after the system is rebooted.

Closure:

Well, it’s another article. If I’m paying enough attention (and if you’re curious about milestones), this marks the 100th article posted on this site. This time, the article tells you how to change your hostname. It’s not something you should have to do often, but these are a couple of ways to change it.

Thanks for reading! If you want to help, or if the site has helped you, you can donate, register to help, write an article, or buy inexpensive hosting to start your own site. If you scroll down, you can sign up for the newsletter, vote for the article, and comment.

Linux Tips
Creative Commons License
This work is licensed under a Creative Commons Attribution 4.0 International License.