Monitor System Resources With “Resources”

Today is one of those days when I’d like to introduce you to new software as we learn to monitor system resources with “Resources”. That may not make much sense, but it will! The Resources application is a great option if you want a great way to monitor system resources.

I may do a few articles about monitoring system resources. That’ll be fun.

It’s probably important to mention that many of you will not have this in your default repositories. For those who do, it won’t be in the typical repositories but will exist because your distro ships with Flatpaks enabled.

That’s right. To use this article, you should read a previous article:

Installing Flatpaks In Linux

Once you get Flatpak installed and the FlatHub repository added, you can use a great application known as Resources.

Of course, your desktop distro shipped with a GUI resource monitor and it’s usually fit for purpose. However, this Resources application has a bunch of great features and it is easy to live with. 

Another great thing is that this shouldn’t be a very long article…

Monitor System Resources:

Once Flatpak is installed, you might want to keep your terminal open. Yes, Flatpaks are large – but they have great features, including running in isolation and shipping with all their dependencies.

Most of you can open a terminal by pressing CTRL + ALT + T. If that doesn’t work for you, you’ll have a terminal option in your application menu. It might be under the Administration sub-section.

With your terminal open, you can install Resources quite easily:

That should add Resources to your application menu. It will fall under the Administration sub-section. I’ve seen some distros not show newly added Flatpaks in the menu until after a reboot. If that’s the case, you can manually run Resources with this command:

Once you open the application, all will be revealed. Here’s an image:
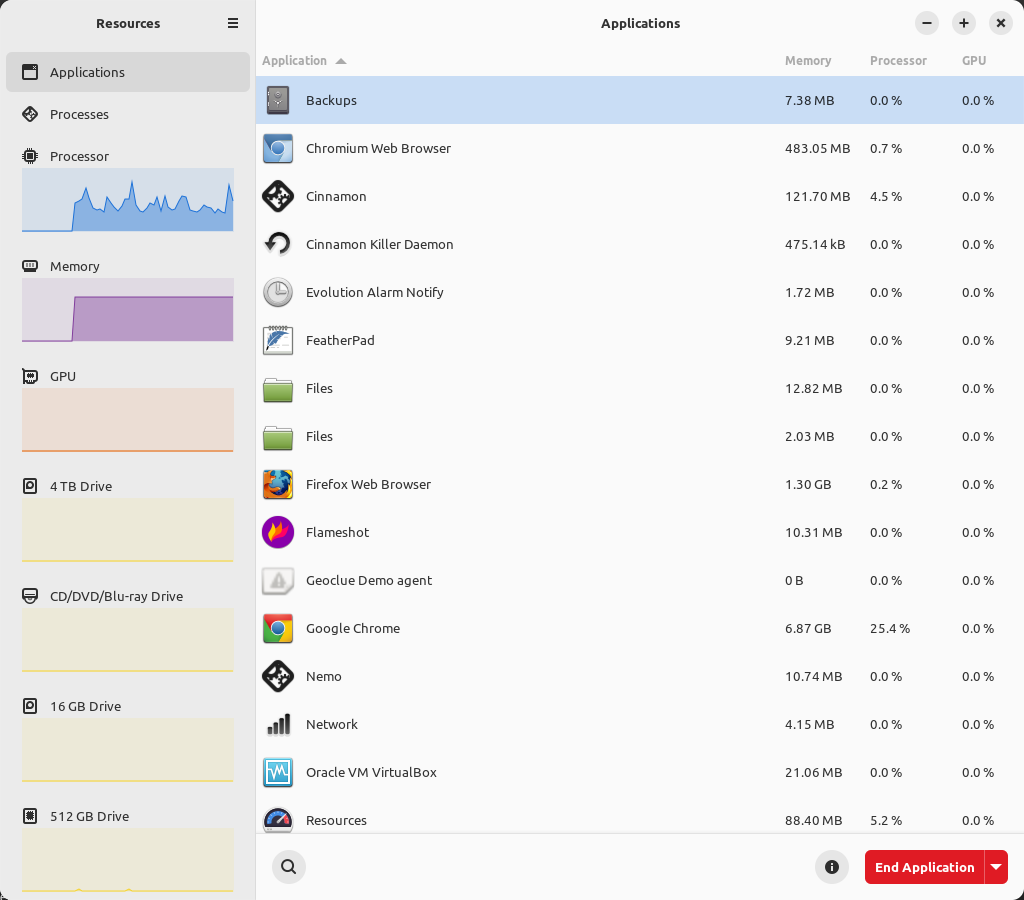
Resources default screen.
This should be self-explanatory if you’ve monitored resources before.

One of the great things is that you can monitor applications that might have multiple processes – such as Google Chrome. You can also monitor processes individually, including closing those applications and processes.

Additionally, you can monitor CPU use, memory use, GPU use, and your various storage devices – including optical media. If you want to know read and write speeds on the fly, that information is available in an easily understood graphical tool.

That’s right… I’m covering a graphical tool today! Let it be said that a GUI is sometimes a good tool for the job and that the Resources application is one of those tools.

If you click on the hamburger menu near the top, you can also adjust your preferences. You can choose to display more information than the default and adjust how you’d like to read things like temperature values. It’s a pretty handy application.

Yes, you already have a GUI tool to monitor system resources but you can opt to use this one instead. It’s a pretty large file (or multiple files) but that’s to be expected with Flatpaks. So, get a coffee going while you wait for the application to install.

Closure:

So, there’s a GUI tool you can use to monitor system resources. It’s worth investigating. Some of you may like it well enough to switch to it entirely. Others may find they reach for it when they need more information than they usually have available on one screen. Either way, it’s a handy application and one worth knowing about.

Thanks for reading! If you want to help, or if the site has helped you, you can donate, register to help, write an article, or buy inexpensive hosting to start your site. If you scroll down, you can sign up for the newsletter, vote for the article, and comment.
Installing Flatpaks In Linux

Today we’re going to have a pretty easy article where you’ll learn about installing Flatpaks in Linux. I’m writing this article because I want to write another article. Once I write this article, I can write that article!

I did write a previous article about installing Flatpaks in Lubuntu. I want this to cover more distros than that, so that’s one of the reasons for this article.

So, I asked AI to tell us about Flatpaks… Let’s see how it did.

“ChatGPT, explain Flatpaks in Linux please.”

Flatpak is a modern packaging format for Linux that aims to simplify the distribution and installation of software applications across different Linux distributions. Here’s a breakdown of Flatpaks in under 600 words:

What is Flatpak?

Flatpak is a technology developed for Linux-based operating systems that allows developers to package applications and their dependencies into a single, portable format. These packages, called Flatpaks, are designed to run on any Linux distribution, regardless of its specific package management system.

How does it work?

Flatpak packages contain everything an application needs to run, including libraries, dependencies, and runtime environments. This eliminates compatibility issues with different distributions and ensures that applications run consistently across different Linux systems.

Key Components:

  • Flatpak Runtime: A standardized environment that provides essential libraries and services needed for applications to run. Runtimes are shared among multiple applications, reducing duplication and ensuring consistency.

  • Flatpak Builder: A set of tools that developers use to create Flatpak packages. Builder automates the process of bundling applications and their dependencies, making it easier to package and distribute software.

  • Flatpak Repository: A centralized location where Flatpak packages are hosted and made available for download. Users can add repositories to their system to access a wide range of Flatpak applications.

Benefits:

  1. Cross-Distribution Compatibility: Flatpaks are designed to work on any Linux distribution, simplifying software distribution and installation for developers and users alike.

  2. Isolation: Each Flatpak application runs in its isolated environment, with its own set of dependencies. This improves security and stability by preventing conflicts between different applications and system libraries.

  3. Sandboxing: Flatpak applications can be sandboxed using various security mechanisms, such as containerization and permission controls. This reduces the risk of malicious software compromising the system.

  4. Upstream Compatibility: Flatpak packages are often built directly from upstream sources, ensuring that users get the latest versions of software with minimal delay.

How to use Flatpak:

  1. Installation: Most Linux distributions provide tools for installing Flatpak support. Once installed, users can add Flatpak repositories to their system to access a wide range of applications.

  2. Searching and Installing Apps: Users can search for Flatpak applications using the command-line interface or graphical software centers. Installing a Flatpak is as simple as running a single command or clicking a button in the software center.

  3. Running Flatpak Apps: Once installed, Flatpak applications appear alongside native applications in the system menu. Users can launch them like any other application, and they will run within their isolated environment.

Drawbacks:

  1. Storage Overhead: Flatpak applications include their dependencies, which can lead to increased storage usage compared to traditional package management systems.

  2. Performance Overhead: Running applications in a sandboxed environment can introduce some performance overhead compared to native installations, although this is usually minimal.

Final AI Thoughts:

Flatpak is a promising technology that addresses many of the challenges associated with distributing and installing software on Linux. Its cross-distribution compatibility, isolation, and security features make it an attractive option for both developers and users looking for a more streamlined and secure software ecosystem on Linux.

So, that explains Flatpaks according to ChatGPT. I think it did a great job in this role, but that’s all I wanted ChatGPT to do for me.

Installing Flatpaks In Linux:

This is going to require a terminal. Some distros will have Flatpak installed and be able to install Flatpaks from the GUI. So, open up a terminal before proceeding. You can usually open a terminal by pressing CTRL + ALT + T but some of you will have to open a terminal via your application manager.

Some distros will come with Flatpaks already enabled. If you have Flatpaks already enabled, you can skip this article. To find out if you have Flatpaks already enabled, run this command:

If that returns a version number, you already have Flatpaks installed.

By the way, if you have Flatpaks enabled but not the centralized repository (FlatHub) then you may still need to run the following command:

Anyhow, now on to the installation instructions:

Debian/Ubuntu:

Linux Mint:

Already Installed.

Fedora/CentOS:

Already Installed.

RHEL:

Rocky Linux:

SUSE/OpenSUSE:

Arch:

Manjaro: 

Already Installed.

There you go. Those are the distros I usually cover. One of those commands is going to work for most of you. If those commands do not cover you, you can likely install Flatpak from your repositories. It should be fairly easy.

As you can see, more and more distros are starting to ship with Flatpaks enabled by default. I’ve seen more of this since Ubuntu started shipping Snaps by default, so maybe those distros are trying to provide something similar while not relying on Ubuntu.

Anyhow, once you’ve done this, you can visit FlatHub to start installing software:

FlatHub

Then, I shared the command earlier, if you find the repo isn’t working properly, you can run the following command to try to fix it:

That should do it. You can now use Flatpaks and I can write that future article!

Closure:

If you’ve ever needed to know about installing Flatpaks in Linux, this is a start. This is the preparation and, once done, you should be able to install software from the repositories easily enough. There are a ton of great applications that you can use after installing Flatpaks in Linux, or at least enabling Flatpaks in Linux.

Also, this seemed like a bit ‘over-the-top’ as far as ChatGPT responses go. It was more verbose than it usually is. I did decide to include all of the output as it does make for a more interesting article. That’s far more than I’d have written about the subject. 

Thanks for reading! If you want to help, or if the site has helped you, you can donate, register to help, write an article, or buy inexpensive hosting to start your site. If you scroll down, you can sign up for the newsletter, vote for the article, and comment.

Set Individual Flatpaks Permissions With Flatseal

This will be an article about Flatpaks permissions and how you can set said Flatpaks permissions with Flatseal. There’s a good chance that this will be a relatively short article, which is nice.

BEFORE YOU BEGIN:

I covered what a Flatpak is and some other bits of information. Read this:

Install Flatpaks In Lubuntu

That will give you an overview and enough information to get started. The only thing that will change is how you enable Flatpak and the Flathub repository. The method you use to do that will be different unless you’re using a distro that relies on the apt package manager.

What Is Flatpak:

I wrote this information out already, but some of you will not bother clicking immediately so I’ll mention that a Flatpak is an application that runs with its own dependencies and is sandboxed from the rest of the system.

The important part of this is that the developers who packaged the Flatpak set the permissions for that application. For example, their application may need access to the network. Their application may need access to storage media. The Flatpak may need to be able to access the sound manager so that you can hear things output by the application.

Well, you can adjust those permissions. If you want to grant additional access, you can do that. If you don’t need certain features, you can deny access to those resources. It’s up to you.

The developer shipped the Flatpak with a set of permissions. There are also default permissions that you can edit. If you want to do something like disallow all Flatpak access to the network,  you could do that. You can also adjust these permissions on a per-application basis.

Which leads us to this…

Set Flatpaks permissions with Flatseal:

If you want to manage Flatpaks permissions with Flatseal, you can start (and pretty much close this page) with the following link:

Flatseal on Flathub

The installation instructions will be available on that page. Alternatively, if you’ve already enabled Flatpaks (see the earlier link in this article) you can just press CTRL + ALT + T to open your terminal and enter the following command:

After you enter that into your terminal, you’ll press the Y button on your keyboard a couple of times to confirm that you wish to install.

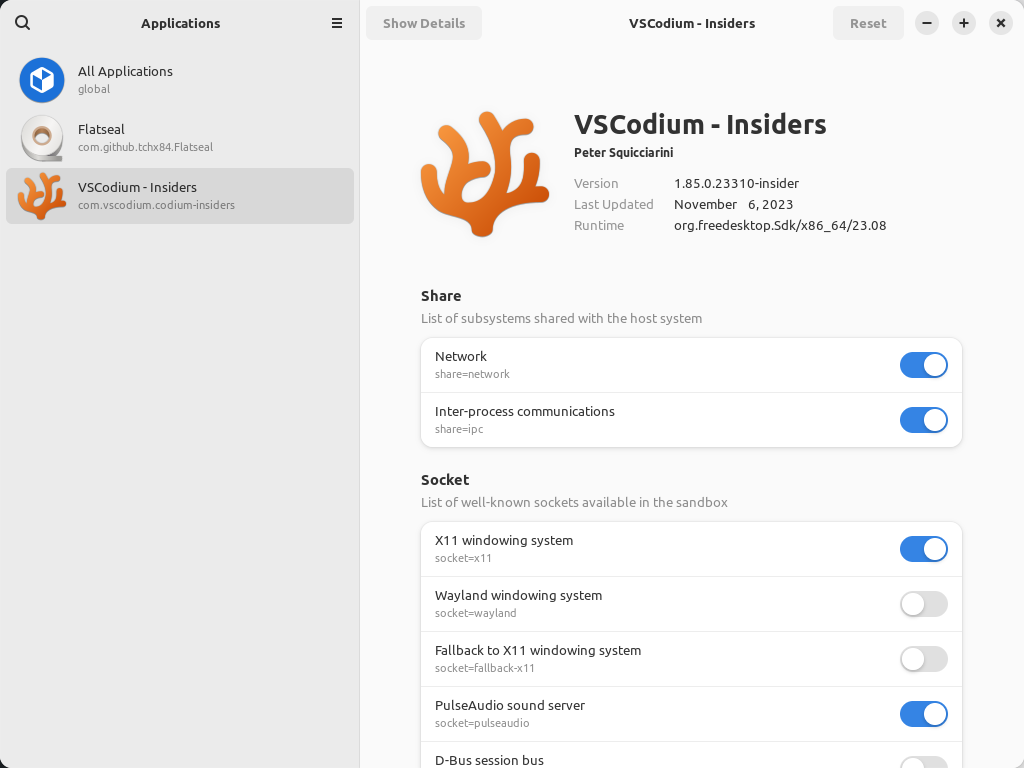
With that said and done, you can then open your application menu, find Flatseal, and open the application. I’ll give you a screenshot, but there’s just so much more to this application that I can’t cover it. It’s fairly self-explanatory and you should be able to figure it out – but there are many options. 

Flatseal is used to adjust the permissions of a Flatpak.
That’s just the tip of the iceberg. Scroll down and there are maybe 50 options. Good luck!

There are just too many options for me to cover. The best way for you to learn how to use Flatseal is to simply install Flatseal and examine the options. If you have any questions about those options, reach out and I may be able to help. Otherwise, you can figure this out on your own.

I have faith in you. You can figure this one out!

Closure:

Well, you can now adjust Flatpaks permissions with Flatseal. I’m never quite sure how to pluralize or make it possessive, but I did my best. We’ll have to see how the final article does.

Anyhow, I told you this should be a fairly short article. It’s not designated as a short article because it’s a bit long for that and you have to read a bunch of other stuff if you want to use this as your starting point. If I could assume you had Flatpaks already enabled, this could have been a short article. I’ll make no such assumptions.

Thanks for reading! If you want to help, or if the site has helped you, you can donate, register to help, write an article, or buy inexpensive hosting to start your site. If you scroll down, you can sign up for the newsletter, vote for the article, and comment.

Install Flatpaks In Lubuntu

This shouldn’t be a very long article and will apply to other distros, but this is how you install Flatpaks in Lubuntu. This seems like a good article to write as it’s something tucked into my notes and something I’ve not written about before.

This article applies to Lubuntu. It may apply to other distros, especially those in the Lubuntu family. In some cases, such as Linux Mint, recent versions come with Flatpak support. In those cases, you don’t need to do anything special, you can start using Flatpaks as soon as you’d like.

What Are Flatpaks:

Flatpak is a utility for software deployment. It was once known as xdg-app but has used the Flatpak name for going on a decade. This is not something new, even though it has recently grown in popularity. They’re pretty handy.

The thing that makes Flatpaks special is that they run in a sandbox. That means they don’t interact with other software on your system, they run in their own isolated memory space. This is good for security.

They’re also good for easy installation. Not only do they run in an isolated environment, they are self-contained. With Flatpak being what it is, you don’t have to worry about dependencies.

If a Flatpak does need to integrate with the system, this will be set by the developer. The advanced user can change those permissions, though that may cause breakage should you restrict the access levels.

There’s also a central repository that you can use. While you can get a Flatpak from anywhere, and you can add your own repositories, the most common use will be from a central repository which does things like providing updates to the packaged software. 

This is good for developers who want to distribute their software while not having to do so for the various package managers. Rather than a .deb or .rpm version, they can upload and update a Flatpak that’s stored in a centralized repository.

Pretty neat!

Install Flatpaks In Lubuntu:

For the sake of this article, Flatpak is the software type and the delivery mechanism, while Flatpaks are the applications installed via Flatpak. Make sense? I hope so because that’s what I’ve got.

I should probably have mentioned that earlier in the article…

Anyhow, to install Flatpak you’ll need an open terminal. As you’re using Lubuntu, you can open your default terminal by pressing CTRL + ALT + T on your keyboard.

With your terminal now open, let’s install Flatpak so that you can install all the Flatpaks your heart desires. To do that, run this command to install Flatpak:

That will install Flatpak, but you will then want to enable the Flatpak repository. That’s another easy command that you can cut and paste:

Next, you’ll need to reboot. Yes, this one should have a reboot to work properly. Run this command in the terminal:

That’s all you need to do.

Installing Flatpaks:

Now you have enabled Flatpak and you’ve added the default Flatpak repository. You can head to the centralized repository and start browsing for interesting software. You do that here:

Flathub, the Flatpak Repository

I’ll give you an example, to make it easier…

Let’s say you want to install ONLYOFFICE as a Flatpak.

Well, you browse/search for it and end up at the ONLYOFFICE repo page.

Once you’re there, you’ll see an “Install” option in the upper right section of the page. There’s a down-arrow next to it, which is the easiest method. Click that and run the command prompt in your terminal.

In this case, that command prompt would be:

You can then run the application with this command:

No, you shouldn’t need to run the program through the terminal. Because you rebooted, added Flatpaks should appear in your application menu in the appropriate category section. 

Also, it’s a bit more of an interactive process when you’re installing Flatpaks through the terminal. You’ll be given a few options along the way, though I just accept the defaults (by pressing the Y key) and call it good.

You’ll also notice that the applications are much larger. If you have slower internet, you’ll notice this. This is because the Flatpaks are isolated and come with the required dependencies. Because of this, the packages are quite a bit larger.

Once in a while, I’ve noticed that the application won’t appear until a reboot happens. If you run the terminal command once, that seems to help it, and then appears in the application menu. It’s not perfect, at least not here, but it’s definitely ‘good enough’ and it’s a great way to get sandboxed software that doesn’t require hunting around for dependencies.

Closure:

So, that’s how you install Flatpaks in Lubuntu. It’s also probably how you install Flatpaks in ElementaryOS, Kubuntu, Xubuntu, etc… However, if you’re installing Flatpaks in Ubuntu there’s an extra step you can take that lets you integrate Flatpaks better with the GNOME desktop environment.

If you’re using Ubuntu, you can add this command before the reboot step:

I believe that will add Flatpaks to your regular software store, that is the GUI one where you’d go to add software. I’m not sure because I don’t use Ubuntu, but that’s what the command looks like it will do. I’d normally not share any code I haven’t used myself, but I took the command from Flatpak’s site, which makes me think it’s correct.

Anyhow, Flatpaks are easy to install and run more securely. If your OS changes underneath, this won’t matter. The software comes with the appropriate dependencies. Once you’re more familiar with the software, you can change the permissions if you want. I’ve yet to find a single reason why I’d want to modify the permissions – but it’s possible.

Thanks for reading! If you want to help, or if the site has helped you, you can donate, register to help, write an article, or buy inexpensive hosting to start your site. If you scroll down, you can sign up for the newsletter, vote for the article, and comment.

Update Flatpaks From The Terminal

Today’s article is just going to be nice and quick. It is just going to be about how you can update flatpaks from the terminal. This might be something you’re interested in learning. So, if you want to know how to update flatpaks from the terminal, this is the article for you!

Trust me, this shouldn’t take too long. That’s good because I’m not sure how long I have! I’m having some desktop computer issues. I have laptops, yes plural, available, but I hate typing on them. I could just hook up an external monitor and keyboard, but that’s a lot like work. If I was interested in doing work, I’d investigate why my desktop PCs keep dying.

What Is A Flatpak:

A flatpak is an application package format. To enable flatpaks, you’ll have to install some software first. That seems like a good article that hasn’t been written yet.

Anyhow, a flatpak comes with all the dependencies it needs to run. It is also run in a sandbox, meaning it is more secure as it runs independently of the operating system and other applications. As they run independently, they’re able to be installed (in theory) on any distro. You don’t need to make a flatpak for each distro’s package manager, you can just make the one flatpak and it should work everywhere.

If you have something like the Gnome Software Manager and you’ve installed the initial flatpak software (software that enables you to use these packages in the first place) then you’ll see that it integrates flatpaks into the system. In that case, flatpaks will update with the rest of the system and you don’t need to worry about updating flatpaks in the terminal.

On the other hand, this may not be true for you and you may not realize that you can update flatpaks from the terminal. Which means this is for you…

Update Flatpaks From The Terminal:

Of course, this means you need an open terminal. Just press CTRL + ALT + T and your default terminal should open. You may need to open the terminal from your application menu, but the above key bindings are fairly universal.

The command is really simple if you want to update flatpaks from the terminal. To do so, you simply run this command:

Notice that you do not need sudo or any elevated permissions. Many folks list this command as a sudo prefaced command and that’s not necessary. The flatpaks installed are installed in a way that the files belong to the user. As such, there’s no need to use elevated permissions.

While you’re there, there’s a lot that one might not know about the flatpak application. I highly suggest you check out the man page to learn more – as there’s quite a bit that you can do with the application.

Yeah, that should show you all the options you have. There are far too many options to cover in this short article about updating flatpaks from the terminal.

Closure:

So, yeah… I told you that this would be a nice and short article. There’s a way to update flatpaks from the terminal and this is how you do it. You might as well know how to do so. It’s not complicated and might come in handy someday, especially if you’re expected to update them manually.

Thanks for reading! If you want to help, or if the site has helped you, you can donate, register to help, write an article, or buy inexpensive hosting to start your site. If you scroll down, you can sign up for the newsletter, vote for the article, and comment.

Linux Tips
Creative Commons License
This work is licensed under a Creative Commons Attribution 4.0 International License.