How To: Use An Older Version Of A Google Chrome Extension

Today we’ll cover a not-so-serious topic about how to use an older version of a Google Chrome extension. There’s a subset of my readers who may eventually want to know this information. It might not be today, it might not be tomorrow, but someday you may need this information. 

Fortunately, that information will be right here in an article about how you go about using an older version of a Chrome extension. This is one of those things you don’t need – until you need it. It’s kinda like how I answer kids who ask if I have any good life advice; “But a plunger before you need a plunger.” It’s pretty solid advice.

The gist of the story is that I live in a very remote area. I also live where weather events are (and this is not in jest) sometimes fatal. If you’re unprepared for the cold, it can kill you. Of course, it’s unseasonably warm right now – but that doesn’t change the point.

So, I take the weather a bit seriously. One of the tools I use for cursory weather examination is a browser extension called “Forecastfox.” The extension relies on AccuWeather and folks have determined that it’s an API change that broke the extension. Also, to make it a bit more interesting, the author of the extension is in Ukraine.

It could be a while before it is fixed and operating properly. Fortunately, and for whatever reason, the previous version was known to still work. Unfortunately, it is a bit of a hit-and-miss, but it’s sometimes possible to get an older version of a Chrome extension. It’s then easy enough to install it, which is what this article is all about.

Use An Older Version Of A Google Chrome Extension:

When you find a Google Chrome extension (and this applies to Chromium, Opera, Brave, Edge, and all the other Chromium-based browsers out there) that doesn’t work anymore, you have some options. You can try a previous version, an older version, to see if that still works as expected.

Unless it’s a security extension, or unless the extension had a security-related flaw, it’s reasonable to try an older version of the extension to see if it works. In my case, I did a bit of research before choosing this route – and I’d advise you to do the same. Make sure the update was just bug fixes and feature additions and that you’re not reverting to an extension with known security issues.

Once you’ve looked around and determined that using an older version of the extension is a good idea, you can get to work on using an older extension version. You’ll want your browser open for this. In this instance, we’ll be using Chrome.

Your first real step is to click the three-dot menu in the upper right. Then, open “More Tools” and click on “Extensions”. In the upper right, enable “Developer mode”. It looks like this:

Enable developer mode in Google Chrome.
Have you ever wondered what this switch was for?

With that enabled, your next step is to find and download an older version of the extension. Be sure to remove the existing version before going any further. Additionally, leave that extension page open because you’re going to need it again.

Now to find an older version of your extension. Start by searching here:

https://www.crx4chrome.com/

That site has a whole lot of extension versions backed up. Odds are very good that you’ll find an older version of your extension there. If you don’t find one, you can try going to the extension’s home page or checking code repositories like GitHub. For example, if it’s on GitHub, just look to the right sidebar to find the releases link and look in there.

Once you have that file (it should be a string of letters and numbers that end in .crx) just drag it to your Google extension page. There’s nothing fancy, just left-click on the .crx file and drag it to Chrome’s open extensions page.

That’s it. It’s that simple.

As you manually loaded the extension you shouldn’t need to worry about it updating automatically. It shouldn’t automatically update until you’ve installed the current version from the store again. So, you’re good to wait for a version or two with your working extension. Then, once you’ve determined the current version works, just remove the extension you manually added and install the version from the store.

See? You’re done!

For Our Firefox-Using Friends:

If you use Firefox add-ons, I did look up how to do the same thing with Firefox. It’s much easier to do this with Firefox. I don’t use Firefox all that often anymore, but I figured I’d learn how to load an older add-on and share that information with you. 

If you’re a Firefox user, you’ve got it easier – mostly…

Your first step is to click the three-line menu, where you’ll select “Add-ons and themes”. Open up the add-on’s settings so that you can remove the extension. After you remove the add-on, leave that tab open because you’re going to need it again.

Once you have the add-on removed, find the add-on’s home page on the Mozilla Add-On site. Look on the left and scroll down. You’re looking for “More information” which should have a “See all versions” link. Click on that and download an earlier version. It’d look something like this:
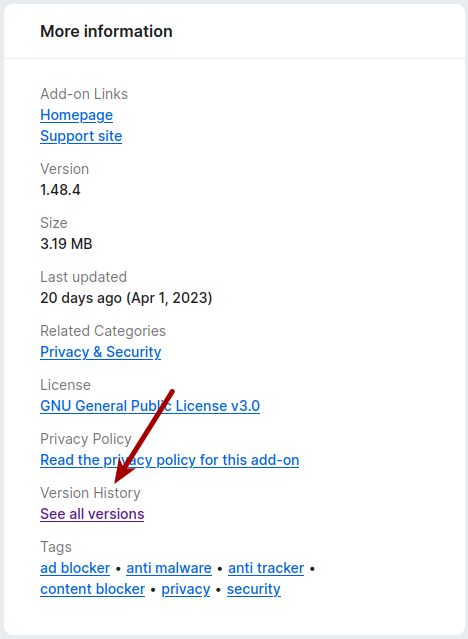
click that link to download older versions of firefox add-ons
It’s not too hard to find. Click it. You’re almost all the way there!

On the next page, scroll down to find the add-on’s older version, the version you believe will still work. It’s a bit uninformative, but just click the older version’s download link on the right and it will download it and ask if you want to install it. Of course, you’ll pick yes to install it.

Now, go back to the tab that you were using to show your add-ons. Find the extension you just added and open up its properties (it’s ‘Manage’ under the three horizontal dot menu). Scroll down to find “Allow automatic updates”. Click on “Off” to disable automatic updates so that it doesn’t automatically update your add-on to the newest version.

When you are reasonably sure that the current version of the add-on will work with your system, you can just enable automatic updates. That should do the trick but will take time as it’ll just update when it next checks. You can simply remove the add-on and add the current one after that, should you be in any sort of hurry.

And, for you Firefox users, that’s it! That’s all you should have to do if you want to use an older version of a Firefox add-on. It’s not too taxing, now is it?

Closure:

Alright, so it’s another long article – and another one that doesn’t require an open terminal. This time around, we’ve talked about how to use an older version of a Google Chrome extension. I also covered how to do so with Firefox. Ordinarily, I’d have considered making these two separate articles, but I figured you could handle another long piece. 

Thanks for reading! If you want to help, or if the site has helped you, you can donate, register to help, write an article, or buy inexpensive hosting to start your site. If you scroll down, you can sign up for the newsletter, vote for the article, and comment.
How To: Make Google Chrome Use Less RAM (UPDATED)

Today’s article is going to be a brief article about a previous article, where I gave you one way to make Google Chrome use less RAM. Consider this an updated article. So, if you’re trying to make Google Chrome use less RAM (and power, I guess) read on!

As tech goes, the situation has changed. As the tech changes, so too must we change our reactions to said changes. The thing with tech is that it never stands still, something that I (for one) appreciate.

The article in question is about making Google Chrome use less RAM. This applies to other browsers, but I concentrated on Chrome. Here is that article:

How To: Make Google Chrome Use Less RAM (And Other Browsers)

In that article, I recommended folks use the “Auto Tab Discard“ plugin. That recommendation has not changed. It’s a great add-on that will discard unused tabs, saving you both RAM and some power (which is useful for mobile devices).

Now, Google (along with other browsers) have enabled a new(ish) feature. Basically, to save power, the browser does what Auto Tab Discard does – it puts unused tabs to sleep. So, when you open those tabs that were sleeping you will need to wait a moment for them to reload.

That’s not a problem. The problem is, Google does this indiscriminately by default. Chrome does seem to make an exception for tabs that are playing audio or video, but all other tabs are fair game and will be put to sleep.

I repeat, all other tabs are fair game. They can and will be put to sleep. That’s downright annoying when you distinctly want to keep some tabs from going to sleep.

Fortunately, you have options.

You can disable this feature in your settings and continue using an extension like “Auto Tab Discard”. That’s a fine choice. That was my choice. It’s probably the wrong choice, but it is a choice.

Your other choice is to manually add sites to the whitelist, telling Google to keep those tabs open. So, you won’t need the extension if you choose to do it this way. This is probably the best choice. This is the choice I did not make.

I’ll show you how to make that choice, and kinda format this like a ‘regular article’…

Make Google Chrome Use Less RAM:

For once, you don’t need to open a terminal!

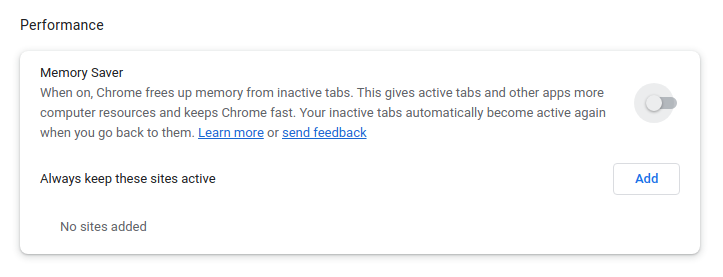
Instead, open Google Chrome. Then, click on the vertical three-dot menu in the upper right, and then you need to click on “Settings”. When that tab opens, click on “Performance” (on the left) and the rest should be fairly obvious.

If you’re like me, you can just disable the feature. That looks like this:

disable the power saving feature for Google Chrome
At this stage you can modify your settings as you see fit. I’ve turned the feature off. Go me!

If you want, you can keep the feature enabled (it was enabled by default at my house) and just add your favorite sites to the list of sites that always remain active. I don’t feel like messing around with it, so I’ve simply disabled the feature and opted to keep the extension.

I suppose that might mean I use a little extra RAM, I haven’t tested but it’d be a very trivial amount and I quite like the GUI offered by the installed extension. When I next do a clean install, I’ll probably just let the browser deal with it instead of using the extension.

Other browsers may use similar tactics to save power (and free up RAM, the two are related). As of the time of this publication, this was not yet a feature that’s in Google’s opensource counterpart Chromium. Right now, this appears to just be a function in the proprietary version, but tech changes and that too may change.

Closure:

And, well, now you can see why this is an article all of its own. It was more than I could reasonably add as an update to the existing article and was enough information to make a new article. After publication, I’ll update the previous article to link to this article. I hope… Hopefully, I remember to do that.

Hmm… I think I forgot to do a ‘meta’ article in February. February is a pretty short month, plus I’ve been otherwise distracted. But, I’ve not been too distracted to skip a publication date! We’re rapidly approaching the two-year mark. It has been a pretty good ride!

Thanks for reading! If you want to help, or if the site has helped you, you can donate, register to help, write an article, or buy inexpensive hosting to start your own site. If you scroll down, you can sign up for the newsletter, vote for the article, and comment.

How To: Install The Regular “non-Snap” Version of Chrome Browser In Ubuntu

Install Chrome browser on Ubuntu…

This article was authored while I was sick and pukin’. Well, I’d mostly stopped puking while writing.. Thanks to a fantastic @GGG_246 from Reddit (No thanks to you folks on Linux.org who normally catch this stuff!) the entire intro was meant for Chromium and not Chrome.

This is because I was moving it from the old site to the new one, splitting it into two articles. The old article covered both Chrome and Chromium. Also, I was sicker than I’m gonna describe…

So, here you go… This is how to install Chrome browser on Ubuntu. (I am still not quite back to normal. Ask me about my bowels!)

Install Chrome Browser:

Let’s just jump right into it. You know what Chrome Browser is, or you wouldn’t be here. It’s also not very complicated. Let’s bust open your default terminal emulator by pressing CTRL + ALT + T and enter the following:

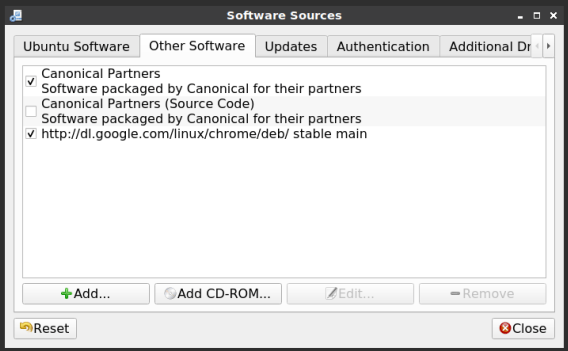
That’s it in the terminal. You’re done. When you finish the installation and start Chrome it will let you set it as the default in the terminal or GUI (if you want), among other things. Even better, the installation adds its own repository and will now automatically update the Chrome browser when the rest of the system is updated.

chrome repository

The repository contains the beta version as well, as well as the unstable version. With the repository added, you can install any of them easily. Be aware that beta may have bugs and that unstable is a nightly build that’s also prone to bugs. Using either means you understand the risks – and also kinda comes with the responsibility of reporting bugs.

google chrome other versions
Just use ‘apt install’ and they’re there for the taking. Install as you wish!

And, that’s about it really. There’s not a whole lot to this article and it’s intentionally short. I’ll do a very similar article about Chromium, so be prepared for that!

Closure:

One more article is in the books. This one is short for a couple of reasons. One of those reasons is that I’m not feeling well. That and power outages make me wonder if I’ll actually manage to do this for the full year. I should get a bunch of articles ahead! I’m eventually going to miss an article or two and I should probably prepare for that.

Thanks for reading! If you want to help, or if the site has helped you, you can donate, register to help, write an article, or buy inexpensive hosting to start your own site. If you scroll down, you can sign up for the newsletter, vote for the article, and comment.

Linux Tips
Creative Commons License
This work is licensed under a Creative Commons Attribution 4.0 International License.