Find Out If A Package Is Installed In Debian

Today we’ll have a quick and easy article where we find out if a package is installed in Debian. There are times when you’re unsure of which packages are already installed. Today’s article looks to help with that, letting you know how to find out if a package is already installed.

Depending on where you live, yesterday was a holiday. A nice and easy article seems like a good idea. It’s actually a holiday as I write this, but that’s okay. I’d probably have written it ahead of time but Mother Nature was having her way with me and my neighbors. So, this is being written on Christmas Day. That’s another good reason to keep this short.

If you’re unaware, Debian is a Linux distro. Debian is one of the elders among distros, having just turned 30 not long before writing this article. It’s a very popular distro that has stood the test of time.

Debian also has a whole lot of derivatives. Then, there are derivatives of Debian derivatives. For example, there’s Ubuntu (and all the flavors) which has many derivatives, such as Linux Mint. While less common, there are probably derivatives of derivatives. By now someone has probably at least made a derivative of Linux Mint! (I did not look.)

That means that today’s article will apply to almost all of them. There’s bound to be an outlier, but anything still using apt or dpkg is good to go and will be able to use the information in this article. You won’t need to install anything, but you will need an open terminal.

Find Out If A Package Is Installed In Debian

Today’s article will involve the terminal. You can easily use a GUI for this. Just open your software manager to search for the package name. In this case, we’ll use a terminal and you can usually open your terminal by pressing CTRL + ALT + T.

You won’t need to install anything to determine if a package is installed in Debian. Everything you need, all the tools you’ll need, should be preinstalled. The tools you’ll be using:

dpkg:

You can use dpkg as one tool for this job. Given my preferences, this is the tool I’ll use for this job, simply because I like the output better. If you check the man page, you’ll see dpkg is described like so:

dpkg – package manager for Debian

That’s a pretty good-sounding description for the task. After all, we want to find out if a package is installed in Debian.

The syntax to do this with dpkg is quite simple:

For example (in Mint):

As you can see, Firefox is indeed installed. You should also remember that this operation is case-sensitive. This generally means you want lowercase letters.

apt:

You can also use apt to find out if a package is installed in Debian. If you don’t already know, apt is one of the tools you can use to manage packages in Debian. Think of apt (and apt-get, the stable cousin) as a front-end for Debian’s dpkg. The man page isn’t all that descriptive at first:

apt – command-line interface

But, if you look a little further, you’ll see:

apt provides a high-level commandline interface for the package management system.

So, apt is another fine tool to use for finding out if a package is installed in Debian. It too has a rather simple syntax and it looks like this:

For example (in Mint):

In this case, you can safely ignore the warning. Again, this is case-sensitive and you’ll almost certainly want lowercase letters in your command.

Closure:

See? A nice and easy article for you. It’s not all that difficult to find out if a package is installed in Debian. This is something you can do quite quickly with an open terminal emulator. It’s something easy enough to remember, as well.

Today’s article was nothing too taxing and is something that can come in handy because, if you’re like me, you can’t possibly remember all the packages you’ve installed. Then, when you do install packages, you’re often installing dependencies.

Keeping track of all of those packages manually would be a tedious process! Just a little bit of terminal knowledge makes quick work of this and the commands are easy enough to memorize. Try them a few times and you might just remember them by rote.

Thanks for reading! If you want to help, or if the site has helped you, you can donate, register to help, write an article, or buy inexpensive hosting to start your site. If you scroll down, you can sign up for the newsletter, vote for the article, and comment.
How To: Add Ubuntu’s Default Repositories

The headline is correct that, in today’s article, I’ll explain how to add Ubuntu’s default repositories – in the terminal. Seeing as I’m doing so, I’ll tell you about each repository as we go along. They exist for different reasons, so we might as well know how and why.

This article is probably only interesting to new Ubuntu users who want to learn to do things in the terminal. That’s a lofty goal, though I’ve already explained how to reset Ubuntu’s default repositories – but that’s graphical. It’s also likely quicker to do this in a GUI. Still, we might as well cover this. 

I see no reason to make the intro section very long. The article will be plenty long. So, onto the article!

Add Ubuntu’s Default Repositories:

Yup. You guessed it. You’re going  to need an open terminal. Many of my articles do. If you don’t know how to open the terminal, you can do so with your keyboard – just press CTRL + ALT + T and your default terminal should open.

You’re also going to need Ubuntu, or an official Ubuntu flavor. I can’t recommend trying this will all Ubuntu derivatives, as I have not ever tested this in all Ubuntu derivative. So, only do this if you are using Ubuntu or an official flavor of Ubuntu – or it may mess up your system. You  have been warned.

About Repositories:

If we’re going to be writing about repositories, allow me to explain what those are. They’re central points from which you download software and software upgrades. They are there to provide the software you need, though not all software is included.

There’s generally a lot of software in them and some folks will only install software included in their default repositories. (Some folks will refuse even some software in the available repos, as the repositories may vary based on the licenses used by the software within.)

Ubuntu’s Main Repository:

Inside this repository, you’ll come across all the software the system needs to have a running system and a bunch of applications. All the software in this repository is FOSS (Free Open Source Software).

You already have this repository enabled, but stuff happens. If you’ve somehow disabled it (don’t do that) you can add it back with:

Ubuntu’s Universe Repository:

This repository contains software that is also FOSS – but Ubuntu can’t vouch for the update state or software inside the Universe repository. They are packages managed by the community, not by Ubuntu themselves.

It’s software you can install and doesn’t really come with all that many risks as the above may sound. Stuff tends to get updated pretty well. There are a lot of diligent people who tend to this sort of stuff. Upgrades are usually fairly rapid. To enable Ubuntu’s Universe repository, you’d run this command:

Ubuntu’s Multiverse Repository:

 In Ubuntu’s Multiverse repository, you’ll find software that is not FOSS. Due to licensing reasons, the folks behind Ubuntu can not maintain any of this software.

The software gets updated, but nothing in this archive is going to have Ubuntu doing so. Ubuntu also can’t ship this repository as enabled by default. To enable the Multiverse Repository, use this command:

Ubuntu’s Restricted Repository:

In Ubuntu’s Restricted repository, you’ll also have software that is not FOSS. The Multiverse repository contains things like drivers for hardware that doesn’t have FOSS drivers available. Well, the Restricted repository is where drivers exist.

A number of people are sticklers for FOSS-only operating systems. plus there’s the licenses to worry about, mean that these end up in a repository all there own. If you’re using hardware that doesn’t have FOSS drivers, you might need the Multiverse repository. To enable the Multiverse repository, you’ll want to use this:

Ubuntu’s Partner Repository:

In Ubuntu’s Partner repository, it’s still software that doesn’t have a FOSS license. It’s Ubuntu adding the software for partners of Ubuntu. It’s useless and will be axed at some point. (It has been empty in recent Ubuntu iterations.)

So, you can forget about this one. I will explain how to enable the Partner repository, as it’s both obvious and I’m pretty sure it’s still a thing on older versions of Ubuntu, and the LTS variants are going to be around for a while longer. It’s easy to enable Ubuntu’s Partner repository, the command is simply:

Closure:

Well, there you have it. You have another article and this one tells you to add Ubuntu’s default repositories. There’s a GUI way to do so, but this one takes place in the terminal. Besides, I already showed you how to do it graphically. This article almost got missed. I was at a funeral and that took a bunch of time and energy. But, I just couldn’t resist keeping up the same publication schedule.

Thanks for reading! If you want to help, or if the site has helped you, you can donate, register to help, write an article, or buy inexpensive hosting to start your own site. If you scroll down, you can sign up for the newsletter, vote for the article, and comment.

Let’s Install ‘gedit’ With All The Fixin’s In Ubuntu

This article is going to tell you how to install gedit along with a bunch of plugins. There are many text editors out there, but gedit is a popular choice. Many plugins exist to extend gedit, and this is an easy way to install a bunch at once.

Notes: This will only install the plugins in the default repositories. This article covers just Ubuntu, but will likely work with derivatives and even Debian.

gedit, the default editor for the Gnome desktop environment, is a part of the GNOME Core Applications and is available in almost every distro, at least every major distro. The gedit text editor doesn’t need a lot of additional dependencies, which helps make it useful on almost any desktop environment.

You can use gedit for anything – from programming, to writing markup for your website. You can use it just like you would any other plain text editor. There are many ways to extend it, to add functionality not included by default, and that is with plugins.

There are plugins to highlight syntax, to auto-complete words, to auto-close brackets, etc. You can make gedit do all sorts of things you’d not expect from a plain text editor. 

Disk space is absurdly cheap these days, so I don’t see any reason to not install as many plugins as I can, and no reason to not do it all at once. I may not use them all, but I’ll use many of them and I can just not enable those that I don’t want to use. I may have a reason to use them later on. You never know!

Well, this article will help you install gedit and all the plugins your system can find!

Install gedit With Plugins:

Like always, you need an open terminal and you can do that with your keyboard by pressing CTRL + ALT + T and enter the following:

What’s going on with that command? You can string together requests with apt, and this is installing gedit first, then a pack of common plugins, and then every other plugin that uses the ‘gedit-plugin-*’ format. It checks for all software with that naming pattern and installs them if they’re not already installed and have satisfied dependencies.

By the way, the asterisk is known as a wildcard. A wildcard basically means, “any character.” So, foo* is anything from fool to foolish, and foob* is anything from foobar to foob-gibberish or whatever. 

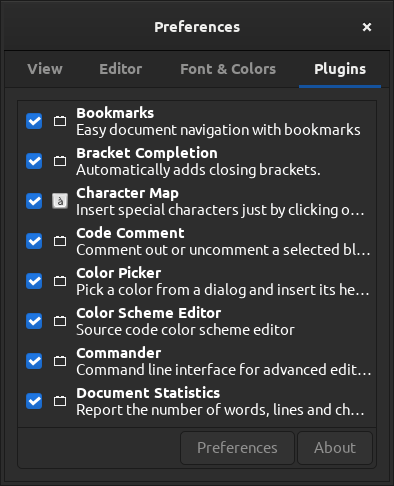
It should be noted that this only installs the plugins. You still can’t use them until after you enable them. To enable them, you need to open ‘gedit’ (which will almost certainly be called “Text Editor” in your menu) and click on preferences, where you can navigate to the right-most tab and enable them as needed. It looks like this:

gedit preferences
Select plugins ’til you’re satisfied!

Anyhow, if you did this properly,  you will now have a bunch of plugins enabled. Is this a bit of overkill? Perhaps, but disk space is cheap and the entire thing takes up less than 19 additional MB on my system. You might as well do it all at once. 

Closure:

And there you have it. You now have gedit installed along with a bunch of gedit plugins. It’s really not all that difficult and there’s no real huge hit on performance or resources. Heck, it doesn’t even take all that long!

Thanks for reading! If you want to help, or if the site has helped you, you can donate, register to help, write an article, or buy inexpensive hosting to start your own site. If you scroll down, you can sign up for the newsletter, vote for the article, and comment.

Linux Tips
Creative Commons License
This work is licensed under a Creative Commons Attribution 4.0 International License.