Let’s Mount An .iso In Lubuntu

Today we’re going to discuss something you won’t need to do often, as we learn about how to mount an .iso in Lubuntu. That seems like a fun article to write and it’s something I just had to do. So, that seemed like a good idea to me.

This shouldn’t be a very long article. I’ll try to keep it simple and straight forward. I figure if you can follow simple directions, you’ve got this licked. It’s not exactly a challenging task. Anyone willing to try hard enough can manage to follow along with this article.

I suppose we should start at the beginning…

What Is An .iso file?

An .iso file is a standard that’s used for images of optical disks. If you’ve used CD/DVD burning applications, it’s what you’re doing when you ‘burn an image’, for example. It’s a single file, meant to be written as an image, and is a file that’s meant to be an optical disk.

You’ll run into .iso files in Linux often. Pretty much every single distro out there is released in .iso format. We don’t always use them for optical disks. You’ll find that a lot of hardware doesn’t even have an optical disk drive. As such, we use the image formats for other things – like USB drives.

We burn these .iso files to a USB so that we can install Linux in the first place. When you’re faced with installing Linux and want (or need) to do it with a USB thumb drive, you’ll want to use tools like balenaEtcher.

So, with Linux at least, you’re likely to run into .iso files. They’re a useful way of sharing a disk image. You’d originally write that disk image to a disk (like optical media) as a single file and then that disk would work. If you try to write an .iso to media as just a file, it’s not going to work as something you can boot from.

You can learn more about the .iso format at Wikipedia. There are other formats for disk images, just so you’re aware. Read the Wikipedia article for more information.

The Mount Command:

We’ll be using the terminal for this command and we’ll be using the mount command for this exercise. As we’re only addressing Lubuntu (though this will certainly work in other distros) we know that the command is already installed and there’s no work for you to do there.

If you check the man page, you’ll see that the mount command is exactly what we need. The man page describes it like this:

mount – mount a filesystem

See? Exactly what we need to mount an .iso in Lubuntu! It’s perfect for the purpose.

You probably mount things all the time. If a disk is usable in Linux, it has been mounted. (You may run checks against an unmounted disk, of course.) If you plug in a USB drive, Lubuntu will happily (assuming your settings are the default settings) mount the drive for you. It’s a handy thing, to have the system smart enough to mount devices when plugged in. It beats the old way of having to mount them yourself manually.

So, the mount application is already installed and you needn’t install anything, but we will be doing this in the terminal. Yes, you can probably manage to do this with some GUI trickery, but you might as well learn how to mount that .iso file in the terminal. It’ll be good for you!

Mount An .iso In Lubuntu:

As mentioned above, we’ll be doing this in the terminal, the way it has historically been done. This isn’t going to be all that challenging, but you first need to open the terminal. To open your terminal, just press CTRL + ALT + T. That should open your terminal.

With your terminal now open, you need a .iso file for this so feel free to download a distro (such as Lubuntu) to your Downloads directory – or wherever you want it to be. You start the mounting procedure by first setting a location for the file to be mounted. Like so:

In theory, you can probably make the directory anywhere, but we will be dealing with convention. If you’re using Lubuntu, things should be mounted as media, and so they go in that directory.

The next step is the actual mounting of the file. This isn’t difficult, you just need to know the path of the .iso and where you just made the directory. That command would look similar to this:

At this point, your .iso file is mounted. You can use the file manager (PCManFM-Qt) to navigate to the files included in the .iso file. You can also list the contents of that file with this command:

With the .iso mounted, you can browse, copy, and extract files from the .iso file. You could theoretically add files to the image, but that’s not always a wise decision. 

When you’re done with the mounted .iso, you can just unmount it with the following terminal command:

This is all you really need to know to mount an .iso in Lubuntu. Try it for yourself, you can’t really break anything.

Closure:

Well, if you ever need to mount an .iso in Lubuntu, you now know how to do so. As I told you near the start, it’s not that complicated. If you just think it through and follow directions, you’ll be all set. It’s not all that often that you need to mount an .iso, but the situation does happen. This is especially true if you’ve done a backup that was a disk image and you need to recover files from it because you’ve had something break.

Thanks for reading! If you want to help, or if the site has helped you, you can donate, register to help, write an article, or buy inexpensive hosting to start your site. If you scroll down, you can sign up for the newsletter, vote for the article, and comment.
Disable Window Grouping In Lubuntu

Today’s article will only matter if you use Lubuntu and want to disable ‘window grouping’ in Lubuntu. I find window grouping an annoying ‘feature’ and look to turn it off whenever I come across it. If you’re like me and want to disable window grouping in Lubunt, read on ’cause this article is for you!

I’m not sure how well I can format this like a normal article, but let’s start with the basics and see where things end up.

What is ‘window grouping’?

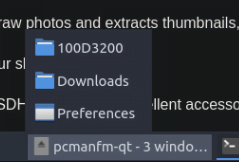
Window grouping is when your desktop groups similar applications together. If you have 3 instances of Firefox open, you’ll only have one instance shown in the panel (taskbar). If you click/highlight that one instance of Firefox, you’re then able to pick which of the Firefox instances you want to bring to the front.

This is an example of window grouping, where I have multiple instances of PCManFM-Qt open:

window grouping
That’s ‘window grouping’. Ugh…

I dislike this feature a great deal. It slows me down. It doesn’t reduce clutter, it adds clutter where I don’t want it. If you like window grouping, by all means, enjoy the feature.

If you are like me and find it to be an annoyance rather than a benefit, I have good news! The good news is that it can be turned off! If you’re using something other than Lubuntu, you can probably also turn it off. If you’re using another distro, a distro that’s using LXQt, you can also follow these directions.

Anyhow…

Disable Window Grouping In Lubuntu:

If memory serves, and it has been a while, if you were using Lubuntu during the LXDE days (no longer supported in any iteration of Lubuntu), you’d disable window grouping through PCManFM. This is not the case with modern Lubuntu. The current Lubuntu, and all supported Lubuntu versions, uses LXQt and it’s a different process to disable window grouping.

You can right-click on the bottom panel and select “Configure Panel” (you may have to mouse around a bit to find an empty place in the panel). From there, you’d click on Widgets (on the left) and then on “Task Manager”.

Alternatively, if you have a nice blank space in the task manager section of your panel (the bit of information at the bottom of the screen), you can skip the above step because you can just pick ‘Configure “Task Manager”‘ from that pop-up.

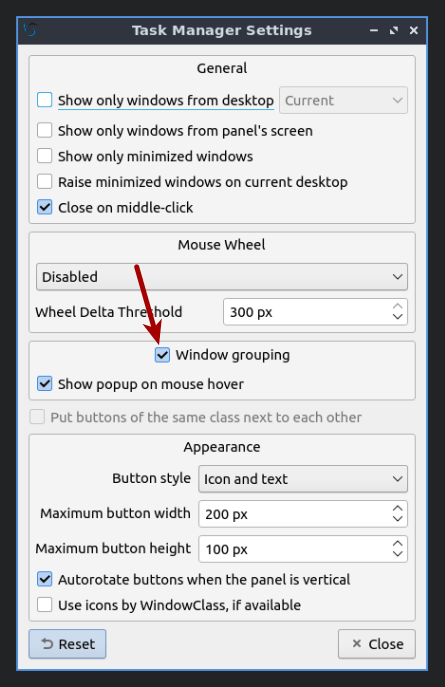
Either way, you end up at the following screen, at which point it should probably become obvious. Find and disable the window grouping option. It will look like so:

there's an option to disable that window grouping feature
Just un-tick the box and you’re on your way! Hit the close button.

When you’ve done that, the changes will take effect immediately and you can just hit the close button, happily going about your day without that silly window grouping feature. Just for completeness, it’d look like this:

the lubuntu task manager without window grouping enbled
I prefer it this way. I am not a fan of window grouping. It’s pretty easily disabled, thankfully…

If you decide you want to keep the window grouping, it’s easily reversed. You can also adjust other features while you’re there, should you want to do so. If you get there via the “Configure Panel” option, you can go through the “Widgets” and customize them as you see fit. You can also add and remove them while you’re there.

Closure:

Hey! There you go. You have another article! This time we’ve not even used the terminal! This time, we’ve just decided to learn how to disable window grouping in Lubuntu. It’s pretty easy once you know how to do it and what the feature is called. It’s one of the defaults that I change soon after I do a fresh installation.

Thanks for reading! If you want to help, or if the site has helped you, you can donate, register to help, write an article, or buy inexpensive hosting to start your site. If you scroll down, you can sign up for the newsletter, vote for the article, and comment.

Today’s Article Is Just A Lubuntu (And Ubuntu) Membership Update

Today’s article is just going to be a short article about my Lubuntu (and by extension Ubuntu) membership status. It’s only a news/meta article and you can safely skip it. Or you can read on… I don’t mind… It’s just some news.

For starters, you can see when I first joined the Lubuntu team originally:

Meta: I’m Now An Official Lubuntu (And Ubuntu) Member!

What I do, more often than not, is do the live testing for the daily .iso. It’s tedious work, but I enjoy the challenge and have the time. You might want to read:

What it’s Like To Beta-test Linux, Specifically Lubuntu

Now, I do my testing with Lubuntu. I’m also an Ubuntu Member. This is because I have to be an Ubuntu Member to be a Lubuntu Member. If you’re an official member of some of the more recent flavors, that’s no longer true. You can be an official member without official Ubuntu membership.

Membership lasts a a year. My year was up and I submitted a renewal application. I was once again accepted as an official member. 

So, I’m an official Lubuntu (and Ubuntu) Member for another year. Yay!

I’d like to take a moment to invite others to join in helping out their favorite distro. You don’t have to dedicate all your time to it. You don’t  have to be a programmer. If you want, you can get involved – and make an appreciable difference.

So, thus ends this article. I need an easy day once in a while, and now you know my membership status has been renewed. Enjoy the easy day!

How To: Change Ubuntu Into Lubuntu

Today’s article is going to teach you how to change Ubuntu into Lubuntu. Why? Because you can! Because you might want to try a different desktop environment, or because you’d like to have them both on one computer. It’s remarkably easy to change Ubuntu into Lubuntu – and, of course, would work with other official Ubuntu flavors with just slight modifications

As you know, Ubuntu is a distro. Lubuntu is also Ubuntu, but it is an official flavor of Ubuntu. They are not actually different distros. Lubuntu is Ubuntu, with different Ubuntu software installed to provide a different experience.

Ubuntu is Canonical’s flagship operating system. It ships with a suite of useful software and uses the GNOME desktop environment. If you say Ubuntu, that’s the distro you’re talking about. Lubuntu is a separate project under the same umbrella, based on Ubuntu. Lubuntu, once known for being lightweight, is now using the LXQt desktop environment where it once used LXDE. The latter dropped for the former for a whole host of reasons, including maintenance improvements. Comparatively speaking, it’s still fairly lightweight.

Full Disclosure: I’m an “Official Lubuntu Member” and, by extension, also an Official Ubuntu Member. I’m quite biased with regards to Lubuntu, but my biases are open and I still strive to be objective (or at least not objectionable!).

So, if you have Ubuntu installed and you’d like to experience Lubuntu, then this is the article for you, as it will teach you how to …

Change Ubuntu Into Lubuntu:

Like oh so many articles, if you want to change Ubuntu into Lubuntu, you’re going to want to start off with an open terminal. You can use your menu to open a terminal, or you can just press CTRL + ALT + T and your default terminal should open.

Once you have your terminal open, you need to enter just one command, really. The command you’ll enter is:

That will run its course and then pause on a screen where you can read about your display manager. There are no real options on that page, so you can just press the enter button after reading it.

This won’t actually take all that long. When you’re done, you can logout and then login to Lubuntu or, more effectively, just reboot and you’ll boot into the Lubuntu environment. 

When you reach your new login menu, you can pick which desktop session you want to login with by using the dropdown menu in the upper left, with Lubuntu being the new default. Of course, you can login to the regular Ubuntu session still (as well as Ubuntu on Wayland). Most things will still work in when you’re logged into an Ubuntu session, except for blanking the screen. That fails because you’re no longer using GNOME-display-manager (GDM3). (You’re now using SDDM.)

That was it. That’s all you have to do. However, if you don’t like it and want to change it back, it’s slightly more complicated – but not terribly so – to reverse this change. To reverse it, you need to …

Change Lubuntu Into Ubuntu:

Once again, open your terminal. It’s not hard, as described in the 2nd section of this article. Heck, it’s described in almost every article.

You can start with just this command:

And that’ll get you almost all the way back to normal. You’ll still have the splash screen and boot logos that belong to Lubuntu. You could leave those and learn to accept them, or you can fully restore the original setup.

Assuming you want things back the way they were, we need to get your display manager reconfigured – restored to what it was. That’s a very easy command. It looks like:

You’ll get another one of those warning screens and, once again, there are no options. The only thing you can do is press the enter button. Fortunately, that’s exactly the button you want to press!

Finally, you need to change the boot screens. It’s a pretty easy command, but it is interactive. Just run this to get it started:

That will ask you which theme you want to use. In this case, you’ll pick 1 and press the enter key. Basically, you want the option that isn’t “Lubuntu” and this will fix the final visual issue.

When you next reboot, you’ll have the default Ubuntu logo and theme during the whole boot process (assuming everything went as expected). Your login theme will have been restored to Ubuntu’s default, as will have the Ubuntu splash screen while the system boots.

Of course, you could always opt to keep Lubuntu installed alongside Ubuntu, that is LXQt alongside Gnome, if you’d prefer. Then again, if you like your Lubuntu installation, maybe you’ll just want to use it. It’s easy enough to remove GNOME or to even just clean install Lubuntu.

Closure:

And there it is! It’s an article that teaches you how to change Ubuntu into Lubuntu. It’s not a very complicated affair and you can restore it easily enough, should you not like it. You can more or less do this with any other official flavor. Swapping back to just the old Ubuntu will potentially use different commands, but it’ll otherwise be quite similar.

Thanks for reading! If you want to help, or if the site has helped you, you can donate, register to help, write an article, or buy inexpensive hosting to start your own site. If you scroll down, you can sign up for the newsletter, vote for the article, and comment.

Why I Use Linux

Today’s article will be short and simple, about why I use Linux. I’ve wanted to write it for a while, and it may end up being another one of those articles that gets updates over time. (Note: This article is from the defunct site, due to a death in the family.)

I tend to use Lubuntu and that’s my preferred desktop system – even after the change to LXQt. It’s visually simple and familiar. It’s light on resources, even though I have plenty.

I don’t use Linux because I hate Microsoft. You’ll never see me call them a derogatory name. I don’t have any major anger towards Microsoft or their products.

I don’t even care if the product I’m using is opensource. Being closed-source doesn’t bother me. I care that the application works and lets me do the things for which I installed it.

I am using a closed-source browser as I type this. Like Linux, it just works for me. It gets out of my way and lets me accomplish my computing goals.

That’s what I really like about Lubuntu. It just gets out of my way. Once it is configured, I don’t have to keep tinkering with it. I don’t have to continually pay attention to the operating system – it just keeps working and I just keep updating it.

I love the simplicity and efficacy of the terminal. When I boot my computer, a terminal emulator is one of the first things I open. I often have two or three of them open at once.

I never have any hardware issues that I can’t resolve. Sure, it may be a bit difficult to find your wireless driver – but once you do then you needn’t worry about it again. In the mean time, tether your phone and connect that way. Then again, I always have an adapter that works well enough for me to get the drivers for any built-in hardware.

I don’t see the process as any different than Windows. You have to put some effort in to make it work. But, once it’s installed, all of my updates are done at the same time and with just a single command. The concept of a package manager is fantastic and you get a wide variety to choose from.

I like both the sense of community and the actual community. If I really want to put the effort in, I can find the person what wrote the driver for my wireless adapter. I don’t suppose that’s really true with any other operating system. With Linux, I can find the person(s) who put my OS together – and, in fact, I do. I try talk with them at least once a week at the online team meeting. I recognize many of the names I see across the ‘net and I’ve known some of them for many years.

I suppose that I do like having access to the source code. I don’t tend to make (m)any changes, as my programming skills aren’t that great these days. Still, I do sometimes make a quick change, apply my own patch, and compile applications on my own.

I like that I have the freedom to have as much, or as little, operating system as I want. I can have a distro with everything installed or I can have a distro that barely has a terminal installed – and you’ve gotta compile that yourself. There are so many choices. There’s a Linux for everyone and, if you’re willing to learn, there are seemingly infinite combinations. I like being able to pick my desktop environment, favorite terminal emulator, favorite window manager, etc…

I like that it’s always changing. I legitimately like systemd, for example. I like learning Netplan. I like learning the new features. I like understanding what’s going on under the hood – or having access to people that can actually explain it. I also like that no matter how hard I try, I will never truly understand everything. There’s always something new to learn. There’s always something new to ‘geek out’ with.

I guess, with the above, you could say that I like the constant innovation. Sure, sometimes Linux is trying to ‘keep up’ with the other mainstream operating systems – and sometimes it goes out on the edge and the community does things you simply can’t find elsewhere.

Linux isn’t perfect. There are bugs aplenty and flaws we’d maybe not tolerate in an operating system we paid for. Sure, we overlook the warts and call it our own – but we really can call it our own. We can meaningfully contribute to a project, to a distro, to an organization, and to the community. There are so many ways that we can give back, and that is awesome.

Anyhow, I don’t want to make this too long. Feel free to write a sentence or two below, letting me know why you like Linux. If you’d like, instead of responding where you’d normally find me, respond here so that folks can see this in the future and see your contributions to the subject.

Thanks for reading! If you want to help, or if the site has helped you, you can donate, register to help, write an article, or buy inexpensive hosting to start your own site. If you scroll down, you can sign up for the newsletter, vote for the article, and comment.

Linux Tips
Creative Commons License
This work is licensed under a Creative Commons Attribution 4.0 International License.