How To: Prevent A File From Being Deleted*

Today, we have another simple article, where we discuss how to prevent a file from being deleted. It’s not quite true and I’ll explain in a moment, but for the most part, it makes it so you can’t remove a file by accident or the like.  So, if you want to prevent a file from being deleted* read on.

Now, let me be more clear. I’m a bit sorry for the cheesy headline, but there’s a reasonable character limit. I included an asterisk just to make sure. A user with root permissions (eg a user with sudo privileges) can still delete the file – but it takes an extra step to do so. They have to know and work at it to delete the file.

The tool we’re going to use is called chattr. While it looks like ‘chatter’ and I want to type ‘chatter’ every time I use it, it is a tool that you use to change a file’s attributes. It’s a handy tool but we’ll only be examining one specific use for chatter. If you’re curious, the man page defines chatter as:

chattr – change file attributes on a Linux file system

If you’re using a mainstream distro, you shouldn’t need to install chattr. You should find it already installed. Some of the more lightweight distros may not include it by default, but you can verify that it’s installed by running the following in your terminal:

If you do find that chattr isn’t installed, go ahead and install it. It’s in your default repos. I’m sure of it!

Prevent A File From Being Deleted:

You guessed it. You’ll need an open terminal for this one. That’s easy, just press CTRL + ALT + T and your default terminal should open. See? Pretty easy!

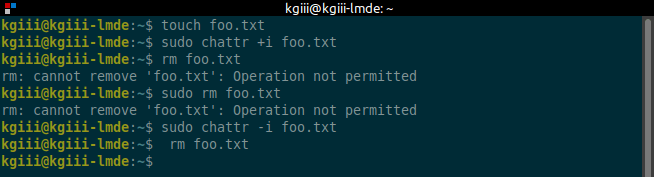
Now, I’m going to show you how to use chattr to set an immutable bit. It’s not difficult and just uses the +i flag. Let’s start with creating a file:

With the file created, let’s set the immutable bit with chattr:

Now, let’s try to remove it with the rm command:

No luck? Well, let’s grab a hammer. We’ll try to remove the file with sudo:

Surprise! You still can’t delete it, even with sudo or logging in as root. To delete the file, you have to first remove the immutable bit, like so:

After that, you can happily (and trivially) remove the file with:

In case that’s not very clear, I’ve made you an image. That should help!

prevent a file from being deleted
See? If the words aren’t useful, perhaps the picture will explain it better.

That should explain it well enough. The file can still be deleted, it just requires sudo and removing the immutable bit from the file’s attributes. Pretty neat, huh?

Closure:

Of course, there’s always a way for a root user to be able to remove a file. However, you can make it difficult should you want to prevent a file from being deleted. A skilled user will check the file’s attributes and know how to delete the file, so it’s more about protecting a file from being deleted unless you want to.

Thanks for reading! If you want to help, or if the site has helped you, you can donate, register to help, write an article, or buy inexpensive hosting to start your site. If you scroll down, you can sign up for the newsletter, vote for the article, and comment.

Review: Ubuntu Cleaner

In today’s article, we’re going to review a piece of software known as ‘Ubuntu Cleaner’. It won’t be a very long article, as there’s not much to cover – as it’s fairly self-explanatory. If you’re interested in learning about ‘Ubuntu Cleaner’ then this is the article for you.

As the name implies, this software is designed to work with Ubuntu. You may find that it works fine with Ubuntu derivatives. It may also work with the various official Ubuntu flavors – in part or in whole. But, the key here is ‘Ubuntu’. It’s software designed for Ubuntu. If you don’t use Ubuntu, this may not be the software for you.

I guess this isn’t a review so much as it is making folks aware of Ubuntu Cleaner. It’s reasonably easy and safe, so it seemed like a good idea to share this with Linux-Tip’s Ubuntu users.

About ‘Ubuntu Cleaner’:

You’ll find that ‘Ubuntu Cleaner‘ does more or less what you’d expect it to do. In many ways, it’s similar to BleachBit. Though, you’ll sometimes read stories of people using BleachBit and hosing their systems. That’s extremely unlikely to happen with ‘Ubuntu Cleaner’.

In short, you’ll see that this application cleans your system. It deletes files you don’t need, reducing the amount of disk space used. It cleans the following things at the push of a button:

  • Clear browser cache
  • Clear APT cache
  • Clear thumbnail cache
  • Remove unneeded packages
  • Remove old kernels
  • Remove old installers

So, ‘Ubuntu Cleaner’ is a system cleaner. If you’re curious about the browser cache, it appears to work with Firefox and the major Chrome/Chromium-based browsers. It did not seem to recognize the Snap version of Firefox, but that could be a problem at my end or something they’re working on.

You can see that it clears other things, like running the APT commands you’d consider running manually. If you have extra kernels installed, it’ll remove them – leaving one kernel version as a backup. 

But, it does what it says it does on the label, it cleans Ubuntu.

Installing/Using ‘Ubuntu Cleaner’:

It’s easy enough to install ‘Ubuntu Cleaner’ in Ubuntu. You will need an open terminal. If you don’t know how to open the terminal, you can do so with your keyboard – just press CTRL + ALT + T and your default terminal should open.

With your terminal now open, simply follow the directions to install ‘Ubuntu Cleaner’ on their project page. I’ll copy them here, but be aware that things change and these installation directions may change:

Then, open ‘Ubuntu Cleaner’ from your applications list and the rest is pretty obvious. On the left side of the screen, select the category of items you want to clean. On the right side, select the specifics you wish to have cleaned with ‘Ubuntu Cleaner’. When you’re done picking, push the button to clean your Ubuntu system. It’s not complicated, and looks like this:

Ubuntu Cleaner in action.
It’s pretty easy to understand how to use Ubuntu Cleaner.

See? It’s not all that complicated and it does what you’d expect it to do. It cleans Ubuntu’s system files – including your browser cache.

Thoughts and Closure:

These are all things you could manually clean yourself, including being able to run commands to remove your APT cache and the likes. But, if you’re one of those people who likes to stay on top of removing unused system files, this might be an application you’d like to use – assuming you’re an Ubuntu user.

On a scale of 1 to 10, I suppose I can rate it a 9. The application could do more, but it doesn’t need to. It does what it says on the tin and there’s little risk of it harming your system. Ubuntu Cleaner is a safe and effective way for Ubuntu users to remove system files.

If you’re an Ubuntu user, go ahead and install it. If you use an official Ubuntu flavor or a derivative, you can also try installing it – but it may not do things like remove the thumbnail cache. You can give it a shot. It’s unlikely to break anything.

Thanks for reading! If you want to help, or if the site has helped you, you can donate, register to help, write an article, or buy inexpensive hosting to start your own site. If you scroll down, you can sign up for the newsletter, vote for the article, and comment.

Subscribe To Our Newsletter
Get notified when new articles are published! It's free and I won't send you any spam.
Linux Tips
Creative Commons License
This work is licensed under a Creative Commons Attribution 4.0 International License.