Avoid Storing Commonly Used Commands In Your Bash History

This article won’t need to be all that long but it might be complicated as we discuss how to avoid storing commonly used commands in your Bash history. Yes, it’s a long title. 

This is also a bit contrary. It is one of those things that is easier done than said. It’s a very wordy thing, after all. I’ll do my best to describe what’s going on and why you might want to do this.

In this case, Bash stands for Bourne Again Shell. This article only applies to those who are using Bash. Bash is not the only shell available and people may opt to use other shells. If you’re one of those people, I don’t think this is going to work for you.

When you’re using the terminal, you’re using Bash. The commands you enter into the terminal are stored in ~/.bash_history, a hidden file in your home directory. We’ve discussed some of this before.

How To: Have Infinite Bash History
Playing With Your Bash History
How To: Not Save A Command To Bash History
How To: Reload Your .bash_profile

Well, you may type common commands, such as uptime. You may not want to store that command in your Bash history. Do you want to store every time you’ve typed the ls command?

You don’t have to. You have options!

What can you do? Well, you can tell Bash not to store certain commands in the ~/.bash_history file. This is actually a simple operation. To avoid storing commonly used commands in your Bash history, you need only to edit your ~/.bashrc file. I’ll show you how!

Man, this is going to impact the layout…

How To Avoid Storing Commonly Used Commands In Your Bash History:

Yeah, no amount of formatting is going to make that look good.

Anyhow, if this isn’t obvious, you’re going to learn how to do this in the terminal. You could edit your ~/.bashrc file with your favorite GUI editor but we’ll be doing this entire thing in the terminal.

As such, you should have an open terminal. More often than not, you can open your terminal by pressing CTRL + ALT + T. If that doesn’t work, you can find a shortcut to your terminal in your application menu. Should that not work, you’re probably already in the terminal!

So, first, we need to use Nano to edit the ~/.bashrc file. That’s an easy command:

Use your arrow button to navigate to the bottom of that file. Go to the absolute bottom and press enter to start a new line. You can press that button twice to provide some separation and to make it easier to read.

Now, let’s say we don’t want to store the ls, uptime, or touch commands in your Bash history file. We’ll use those as our examples. You should also probably leave a comment in your ~/.bashrc file so that you can easily identify what the code does and remember why you added it. That’s also useful if there are other users.

So, add the following lines:

Next, save that file. As we’re using Nano, you save the file by pressing CTRL + X, then Y, and then ENTER on your keyboard.

Next, you reload your ~/.bashrc file much like you reloaded your Bash profile (which was a link in the intro, should you wish to read it). You reload the ~/.bashrc file with this command:

That should reload the file. If it doesn’t, you can close all your terminal instances and open a new one. If that doesn’t work, you can log out and log back in again.

Anyhow…

Commands starting with :<command>: entries you used will not be stored in the ~/.bash_history file. If you type a command starting with those entries, it will be ignored, meaning they won’t clutter up your ~/.bash_history file with commands you’re already familiar with or commands that don’t need to be stored for things like auditing or security reasons.

It’s pretty simple to do, though it’s a bit of a pain in the butt to explain. This is how you avoid storing commonly used commands in your Bash history – something nobody is going to search for. (If you did find your way here via a search engine, be sure to leave a comment. I want to know who you are!)

Closure:

I realize that this is an awkward article and I’m okay with that. This isn’t something everyone is going to bother with, especially those people who don’t do much in the terminal. Still, it’s possible to avoid storing commonly used commands in your Bash history and now you know how.

Then, someday, someone’s going to search for this exact string of characters and, hopefully, they’ll find this article. I hope this satisfies their curiosity and helps them reach their Linux goals! If you did read this and find it valuable, you can always leave a comment.

Thanks for reading! If you want to help, or if the site has helped you, you can donate, register to help, write an article, or buy inexpensive hosting to start your site. If you scroll down, you can sign up for the newsletter, vote for the article, and comment.
Monitor Your Linux System With NMON

There are times when you want to see what’s going on with your devices and you can monitor your Linux system with nmon. If you’ve never heard of nmon, that’s okay. You’ll find that nmon is a handy application that lets you monitor all sorts of aspects of your system. You’ll also find that nmon is an application that’s used in the terminal, so be prepared for that.

This nmon application is available for most Linux systems and I’ll let you know how to install nmon in this article. You’ll find that nmon stands for ‘Nigel’s Monitor’ and has been around since the early IBM AIX days. It has since been made available for Linux.

You can read about nmon on Wikipedia.
You can also visit the nmon project page.

If you check the man page, you’ll see nmon described as:

nmon – systems administrator, tuner, benchmark tool.

We won’t be doing much of that. We’ll just be using nmon to monitor the system. You can then take that information and use it to administrate, tune, and benchmark the system. We’ll be using nmon to monitor CPU, RAM, your network usage, and things of that nature.

You can also learn more about nmon from the man page because I’ll only be covering how to monitor your Linux system with nmon. There’s almost always so much more! It’s almost a shame that I try to limit many of my articles.

Installing nmon:

You can use your usual GUI tools to find and install nmon. It’ll be available for most distros. It’s also possible to install nmon in the terminal. We’ll cover that, so just press CTRL + ALT + T to open up your terminal.

With your terminal now open, we’re ready to install nmon.

Debian/Ubuntu/etc:

Arch/Mandrake:

RHEL/CentOS:

SUSE/OpenSUSE:

Gentoo:

I think that covers the vast majority of distros out there. If you don’t see your distro, or if I got one wrong, please let me know in the comments. I don’t always get this section right. I wasn’t even planning on writing this article today. But… Here we are!

Monitor Your Linux System With NMON:

You should have a terminal open already, from when you were installing nmon. This is going to sound strange, but you’re new to nmon – or you probably wouldn’t be reading this article. Because you’re new, open up a second terminal.

In the first terminal, enter this:

In the second terminal, enter this:

Now, do you see why I had you open two terminals?

In the first terminal, look at your settings and options. In your second terminal, apply them. See, once you apply them you can no longer trivially refer to the material in the first terminal.

You can apply the monitoring options in any order you’d like and in any combination that you like. The nmon application makes it easy. You press c to monitor the CPU, m to monitor memory, n to monitor the network, and things like that.

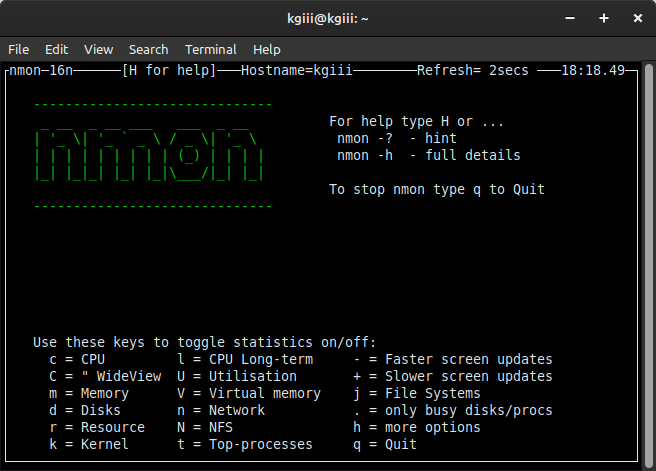
So, pick what you want to monitor from the first terminal and press the appropriate key in the second terminal. It might look a bit like this:

nmon monitoring options
There are quite a few options to pick from and it’s straightforward.

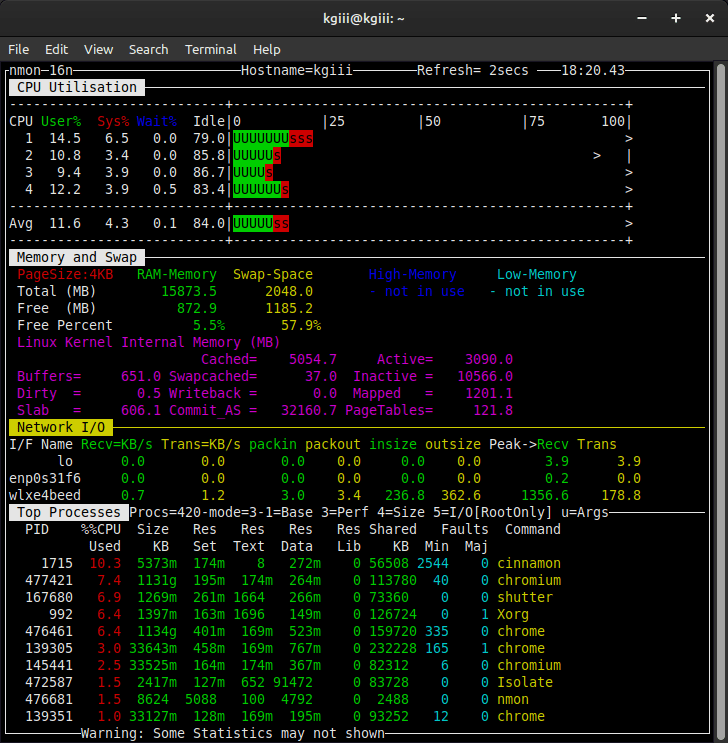
Then, your monitoring terminal could look a bit like this:

monitoring system processes with nmon
See? That’s monitoring CPU, memory, the network, and top processes – all in one screen.

Of course, once you know how nmon works and what you’d like to monitor in your Linux system, you won’t need to have the first terminal open. There are a lot of options, but you’ll find they’re easy to remember. You can also use ? instead of a separate terminal window. I find the two-terminal method to be easier for me because I don’t run nmon often enough to recollect the myriad options.

I suppose you want to know how to get out of nmon without closing the terminal window and leaving nmon running in the background. Well, that’s easy. Just press CTRL + C to quit nmon and return to your regular terminal prompt.

Closure: 

I didn’t plan on writing this article today, but I’d cracked open nmon for one reason or another and decided that I’d write about nmon when I was thinking about it. It’s another one of those articles that scratches my own itch, but it’s also something worth sharing.

It’s a pretty easy task to monitor your Linux system with nmon. I figure anyone can do it and I tried to make it easier for new nmon users by suggesting they use two distinct terminal windows. It seems like a reasonable way to get started.

Thanks for reading! If you want to help, or if the site has helped you, you can donate, register to help, write an article, or buy inexpensive hosting to start your site. If you scroll down, you can sign up for the newsletter, vote for the article, and comment.

Reboot From The Terminal

The weather has had a bit of an impact on my internet connection, so this is just going to be a quick article about how you reboot from the terminal. I want to schedule this as soon as possible, so it’ll be a fairly low-effort article. This should not take long!

There are times when you may want to know how to reboot from the terminal. Then, there are times when you can’t access a GUI, and using the terminal is the cleanest method of rebooting your computer. Knowing how to reboot from the terminal might be a skill worth having. I’ll show you a couple of quick and easy ways to do this.

As the title says, this is going to take place in the terminal. You can usually just press CTRL + ALT + T to open your default terminal. You could otherwise reboot with REISUB.

So, with your terminal open…

Reboot With systemd:

The first command we’ll use to reboot your computer. We’ll be using systemd. This will only work if you’re using a distro with systemd.

Reboot With shutdown:

It should be fairly obvious that the shutdown command can be used to reboot your computer. This is one of the generic utilities, so you won’t need to install anything.

(Check the man page because there are a lot of options available.)

Reboot With reboot:

Finally, we’ll use the reboot command to reboot your computer. This might be the easiest to remember and you shouldn’t need to install anything new. You need the following command:

In some distros, you can drop the ‘now’ and the command will still reboot your computer immediately. 

Closure:

So, there you have it. You have a new article and it should even be published on time. It’s not a long article. The subject is easy enough. You’ll never know when you need to reboot from the terminal, and now you do.

Ah well…

Thanks for reading! If you want to help, or if the site has helped you, you can donate, register to help, write an article, or buy inexpensive hosting to start your site. If you scroll down, you can sign up for the newsletter, vote for the article, and comment.


Locate Your Home Directory

Today’s article will not be long, nor will it be a complicated article, as we learn how to locate your home directory. This is something you probably already know, but you may encounter a strange system where things are a little different. It can happen.

More importantly, this article is going to try something new. Rather than a very long article, it’s going to be a short article. Well, shorter than most – assuming I stop puffing it up with text such as this. Why? Well, I want to see the reception and the statistics.

So, basically, every user account you’re likely to use should have a home directory. This is where the user’s files, customizations, and settings reside. Not every user has a home directory, but the accounts you’d normally use (that is log into and operate) will likely have such a directory. However, you don’t have to have a home directory – though you can expect some weirdness without one.

How To: Create a New User Without a /home Directory

The usual home directory will be in /home/<user> and that’s pretty much the standard we’ve come to know and love. You really shouldn’t need to locate your home directory, but there comes a time when you just might want to.

So, that’s what this article covers. It covers how to…

Locate Your Home Directory:

So, we’ll be doing this in the terminal. That’s a nice place to do things. Press CTRL + ALT + T and your default terminal should open. If it doesn’t open, pick a better distro!

Nah, just open it from your application menu and love the distro you’ve chosen.

We’ll just be covering a couple of quick ways to locate your home directory. That’s all this article is and there’s no reason to turn it into a longer article. We’ll do them both with the echo command. See man echo for more details.

First, you can try this command:

As you should know by now, the tilde (~) is a shortcut for your home directory and it works just fine in this use case.

There’s another echo command you can memorize, but slightly longer:

That command uses both the echo command and an environment variable, specifically $HOME (obviously). This will happily echo the results, sending them to your standard output. This can be quite useful if you’re into scripting or the like.

See also:

How To: Show All Environment Variables

I told you that this wouldn’t be long or complicated. You can now locate your home directory from the Linux terminal.

Closure:

As I said, I figured I’d try the opposite of what I’ve been trying lately. My most recent articles have been quite long and quite detailed. I like them. I enjoy writing them. This time around, it seemed like a good idea to try something different with a subject that benefits from brevity.

Thanks for reading! If you want to help, or if the site has helped you, you can donate, register to help, write an article, or buy inexpensive hosting to start your site. If you scroll down, you can sign up for the newsletter, vote for the article, and comment.

Set A Timeout Value In cURL

Today we’re going to discuss a topic you probably won’t ever need but is worth knowing, we’re going to set a timeout value in cURL. We’re telling the cURL application to quit trying if it takes too long. I suppose it is something worth knowing, so we might as well learn it.

How often do you need this? Well, that depends on you and your workflow. Me? Well, let’s just say that it’s in my notes. I’m not sure that I’ve ever actually used it productively, but it is in my notes. Now? Well, now it’s in your notes! Or, at least it’s here and searchable should you ever actually need to set a timeout value in cURL.

So, what is cURL? I’ve written about it before (some links to follow) but it’s a tool to transfer a URL. That’s exactly what the man page says. Specifically, it says:

If you want to see what the HTML looks like for this site, you can run this:

(That’s not particularly helpful, but you can do it.)

I mentioned that I’d written about cURL before and it may be of some benefit to read these articles (or at least skim them) if you’re unfamiliar with the cURL application.

Let’s Have a Limited Look at Linux’s cURL Application
How To: Make ‘curl’ Ignore Certificate Errors
How To: Add A New Line With CURL

You can see a couple of useful applications of cURL:

Weather In The Terminal? We can do that!
How To: Find Your IP Address Through Your Terminal

See? So, cURL has some use – even for a regular desktop user. If any of those things take too long, you can set a timeout value for cURL, which is what this article is all about.

Set A Timeout Value In cURL:

cURL is a terminal-based tool. Sure, some GUI applications use it in the background, but it’s a terminal tool. As such, you are going to need a terminal available. You should be able to press CTRL + ALT + T to access a terminal. If not, open one from your application menu.

With your terminal open, the syntax for setting one of the timeout values in cURL is pretty basic and easy to understand. Try this:

The time_limit value is in seconds. If you wanted to load the content of this site’s home page and set a timeout value of 10 seconds, you’d run this command:

(Again, not very useful.)

But, that timeout value is just for time-to-first-byte. So, the server will need to respond within 10 seconds else the cURL process will shut down.

There’s another timeout value for cURL. You can set the overall time limit, that is the entire process (including transferring of data) must be completed within that timeframe. If it isn’t, the cURL process will shut itself down. The syntax for that time of timeout value would be like so:

So, if you wanted to make sure the entire transfer of data was done in under 60 seconds, your command would look like this:

(Again, not very useful – but it should certainly take less than 60 seconds!)

I suppose you might find some of this useful if you’re cURLing files more weighty than a web page. You can cURL actual files and write that data to your terminal’s standard output. That’s what cURL does, after all. So, you might find a use for this command.

Closure:

Well, this wasn’t a very long article. It doesn’t cover a great deal and probably won’t be useful to 99 out of 100 people. That’s okay. Not all of my articles are meant for the 99% and sometimes you just gotta write what you feel like writing. This is what I felt like writing. It probably won’t do well for search engine results and that’s okay. Someday, somebody will want this information, type it into Google, and find this site. Or another one just like it, I suppose…

Thanks for reading! If you want to help, or if the site has helped you, you can donate, register to help, write an article, or buy inexpensive hosting to start your site. If you scroll down, you can sign up for the newsletter, vote for the article, and comment.

Linux Tips
Creative Commons License
This work is licensed under a Creative Commons Attribution 4.0 International License.