Let’s Learn How To Change The Default Terminal

There are many reasons why you may want to change your default terminal emulator. It’s actually nice easy to change the default terminal. This article explains how and anyone should be able to do it, even a beginner!

First, it’s often called a terminal emulator because it allows you to emulate the terminal in a graphical environment. There are other ways to refer to it, but just calling it the terminal is usually enough for all but the most pedantic. We’ll mostly just call it the terminal from here on out.

The people who put your distro together also picked the default terminal. It’s usually a basic terminal, and often just a terminal that has been around for a long time. That’s not a bad thing, but there may be better terminals than the default. There are terminals with all sorts of features, from multi-window terminals to terminals that support drag-and-drop!

Perhaps you might like XFCE-terminal, or you may prefer Terminator? Maybe you’d like Guake or TildeThe choices for new terminals are vast, and Wikipedia has a ton of them listed.

You can find even more by using your favorite search engine and searching for Linux terminals. Someone is always writing a new terminal and you can pick a new one to be your default terminal any time you want. There’s bound to be one out there ticks all your boxes.

If you want to open your default terminal, you can usually use your keyboard. Just press CTRL + ALT + T and it should open your terminal. If you don’t like the default, you can make any other terminal your default.

Change the Default Terminal:

For the purpose of this exercise, we’ll start with assuming you’re using Ubuntu and that you want to install Terminator and then set Terminator as the new default. However, aside from the initial installation command, it should work for other distros just fine. In fact, the installation command will work for most any distro that uses the apt package manager.

So, seeing as you opened the terminal up above, we’ll just skip right ahead to installing our example, Terminator:

Go ahead and let it finish the installation after you enter your password and agree to install it. Terminator should be in your default repositories and easily installed. This is true even if you’re not using Ubuntu or an Ubuntu derivative.

Once you’ve done that, you will need to set Terminator as the new default. To do that, run this command:

That should bring up some information that looks a little like this:

change default terminal emulator

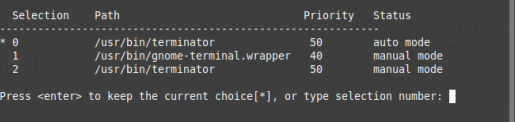
From there you just pick the number of the terminal emulator you’d like to be the new default and press enter. That’s it. That’s all you should need to do.

You can test this by simply using your keyboard to open the default terminal like you did in the first section of this article. Once you’ve made the change, it should take effect immediately and the new default terminal should open up when you next open the terminal with the keyboard. You’ll still have the old links to the original default, but you can move those around at your leisure.

Closure:

And there you have it. That’s how you change your default terminal emulator. It’s not terribly difficult but it’s a quick and easy step you can take to make your Linux a little more customized, a little more something of your own. If you have any ideas for articles, feel free to leave a comment suggesting them. We’ll see what we can do!

Thanks for reading! It’s truly appreciated and there have been a lot of readers lately. If you want to help, or if the site has helped you, you can donate, register to help, write an article, or buy inexpensive hosting to start your own site. If you scroll down, you can sign up for the newsletter, vote for the article, and comment.

Screenfetch vs. Neofetch, You Decide!

Should you use screenFetch or Neofetch? That’s up to you to decide. This article will share some info about both of them. This should be a pretty short article.

I also confess that there’s not much of a “vs.” here. The screenFetch app hasn’t been updated in a long time and Neofetch is the clear winner for most folks. But, well, it seems like people have forgotten that screenfetch exists and that it existed well before neofetch was conceived. That’s why I’ve picked ‘History’ as one of the categories.

See, the thing is, screenfetch (I’m tired of capitalizing the F, and the N, just to be right!) still exists and still works just fine. In some cases, you might get the wrong information from it, especially with newer distros, so why use it? Well, you use it because it shouldn’t be forgotten – and ’cause it still works most of the time.

So, you decide… Screenfetch or neofetch? Or maybe both?

Screenfetch:

The screenfetch application was was created to gather system information so that it could be presented in a screenshot format. In fact, their GitHub page clearly states the purpose as:

Fetches system/theme information in terminal for Linux desktop screenshots.

Though it’s old, it’ll almost certainly be available in your default repositories. Just because it’s old doesn’t mean it isn’t still useful! (Perhaps I’m having some sort of crisis, ’cause I too am old and part of the purpose of this site is to be useful!)

Assuming you’re using a distro with apt, it’s a mere install command away:

Then, well, you use it. You could just run it with ‘screenfetch’, but you can also actually use the -s switch and create a screenshot of your full screen, making it easy to take and share a picture of your desktop to show others in forums and social media sites.

This is an edited down screenshot, ’cause the rest of my desktop isn’t all that interesting right now.

screenfetch
See? Screenfetch in action. I like the ASCII art better, actually. That’s a matter of taste.

As you can see, that was with the -s switch. It happily generates a screenshot of the entire screen, but I edited it down to just the terminal. There’s nothing interesting on my screen right now. Just a bunch of open windows, largely with text in them.

Screenfetch still works, and I like the ASCII art better. I suppose I could probably customize neofetch to make it do the same thing, but I’m way too lazy for that. Either way, it works – and it works just fine. It still does the task it was designed to do, even without any recent updates.

Neofetch:

Neofetch is newer and probably better in every single way. (Though I do have some issues with it on some systems, as it won’t create its own screenshot! That’s a ‘me’ thing, I suspect.) It’s also familiar to many people, and indeed has been mentioned on this site multiple times.

It gets regular updates and has a ton of options. It’s also able to be highly customized. In pretty much every single way, it’s the superior solution. It’s described by the authors like so:

The overall purpose of Neofetch is to be used in screen-shots of your system. Neofetch shows the information other people want to see. There are other tools available for proper system statistic/diagnostics.

It’s a much newer application. Screenfetch last had a release in 2019, while neofetch had a release just last August (at the time of writing). It should be noted that there have been some commits at the screenfetch repository, but they’ve not yet been released. The project isn’t dead. It just isn’t as active as neofetch.

Again, it’s easy to install. It’s in the default repositories for most any distro out there, at least the major ones. There are some distros that include it by default, including Lubuntu! Again, assuming you’re using a distro with the apt package manager, it’s installed just like screenfetch:

And, like screenfetch, you can just run it as ‘neofetch’. However, check the man page for it and you’ll see there are a ton of other options. It’s seriously highly configurable. It looks like this:

neofetch in action
This looks a lot like screenfetch, doesn’t it? The art is different. The output is also different!

For whatever reason, on that system the neofetch doesn’t seem to want to take a screenshot. I’m probably missing scrot or something like that. I’m too lazy to figure it out, but it’ll likely work just fine on your system. It’s a great way to gather a bunch of presentable information about your system, with the end goal being to show it to other people.

So, is neofetch the one for you? Is it really any better?

Screenfetch or Neofetch:

Sure, there hasn’t been a screenfetch release in a long time – but there’s sure to be one eventually. There’s activity in the repository at GitHub. That’s usually an indicator that there’s still more to come. I wouldn’t count it out and it’s pretty much feature complete.

Neofetch? Well, it’s much newer and has more consistent releases lately. It’s also highly configurable. You’ll be able to customize it all you want. You’re encouraged to edit ~/.config/neofetch/config all you want, making neofetch your own. It’s also a mature application, with a large install base and likely also feature complete.

Either one works. They do spit out different information. If you examine both screenshots above, you’ll see the data output is different. Not gonna lie, I ain’t gotta clue why they’re different. The areas where they’re different are trivial and I’ve made no effort to find out which is correct. 

What? It’s a blog. I have finite time for these things, you know! 😊

You can decide between screenfetch or neofetch – or you can use both. They’re both very similar and neither should be used for anything all that serious. They spit out some system information in a form that’s convenient for screenshots so that you can show off your system to your forum friends.

Closure:

Here’s another article in the books. It’s not really about a ‘vs’ anything, but the title seemed appropriate. It’s a good time to expose some of the newer Linux users to the venerable screenfetch tool, as choice is always a good thing.

Thanks for reading! If you want to help, or if the site has helped you, you can donate, register to help, write an article, or buy inexpensive hosting to start your own site. If you scroll down, you can sign up for the newsletter, vote for the article, and comment.

Get Some Prettified CPU Information in Your Terminal With ‘CPUFETCH’

This brief article will help you get ‘cpufetch‘ installed and running. cpufetch is like neofetch, except it’s for your CPU. It’s probably not the greatest information-gathering tool, but it is kind of neat and worth playing with for a little while.

Basically, it’s like neofetch but for your CPU. All-in-all, it’s not the most useful tool. What it is, is interesting – or at least I think so. I saw it on a Reddit post a few days ago and decided to play around with it. I liked it well enough to write this article. 

When I check the cpufetch man page, cpufetch describes itself as this:

Simple yet fancy CPU architecture fetching tool

That seems to be an accurate description and that’s good enough for me! You’re not going to be doing a whole lot with it, but it is fun to play with. It simply outputs CPU data formatted to look a lot like neofetch and that’s all it does. In fact, it outputs data that looks like this:

cpufetch in action
And, yeah, that’s all it does. Neat, huh? No? Well, I think it’s neat! Sheesh!

So, yeah, that’s all it does. As you can see, I used the -s switch with retro to change the styling. You probably won’t be too interested in anything beyond that, which is fine. After all, this article is really about just having fun.

Using cpufetch:

Well, first you’re gonna need cpufetch if you want to use it. So, you should probably do that first! There’s a chance that it’s already packaged for you, and you can check that at this link. If there’s a package for you, go ahead and install it like you normally would. Otherwise, you’re going to need to build it.

Building it isn’t too hard and I had no issues doing so a couple of times on different systems. The directions are right there on the GitHub page, but I’ll recreate them here:

You can, of course, copy the built ‘cpufetch’ file anywhere you want. You can use the following command to make it so that you can use the program from anywhere you want.

Having crammed it into /usr/bin means it’s accessible even when you’re in a different directory. You can just run ‘cpufetch’ and it’ll work.

Speaking of which, that’s all you need to do to run it. You just use:

However, you can go one step further and install it. This isn’t listed on the GitHub page, but you can actually install it to have a man page entry for it and the likes. To do that, instead of moving the cpufetch binary like above, you just tell make to install it. It looks like this:

With that command, it’ll be fully installed and run just like any other application that runs in the terminal. And, as mentioned, it even adds the man page so you can use that. That’s probably a better option than just stopping at the ‘make’ directions from GitHub.

The way the output is formatted takes up quite a bit of space, so it’s prettier if you make your terminal large enough to fit the formatted output. You can also check the man page to learn the few other options. From the few other options, I’ve decided that I prefer the retro style. To do that, it’s simply:

I found the formatting much nicer with the retro logo applied. You do you and decide which one you like best as you play with your new toy. It’s merely a matter of taste.

Closure:

And that’s it for today. You’re probably not going to need cpufetch in your day-to-day operations. In fact, there are better tools than cpufetch – and they’ll give you far more information about your CPU. In this case, I don’t think that matters. It’s just a fun way to see some of the information about your CPU in the terminal. It’s perfectly okay to just have fun!

As always, thanks for reading! Thanks for the feedback! The traffic has slowed down, which is fine by me. If you’re interested in helping, you can donate, write an article, buy cheap hosting, register to help, scroll down and vote or sign up for the newsletter down there, or you can leave feedback in the comments! Any/all of those are truly appreciated and either help keep me motivated, show me what you like, or help the site stay up and running. Until next time…

EDIT:

I found an ancient AMD box to try it on, just so I could generate the AMD graphics. It took a bit to remember I had that old computer, but it looks like this:

cpufetch with an old AMD CPU
You can click on these to make them larger and easier to read.

Dealing With Duplicates In Your Bash History

Your Bash history can be a valuable tool when you mess up and need to retrace your steps to find out what went wrong. It’s in your best interest to keep it from getting cluttered.

Some of my readers are fairly new to Linux, so you may not know that you have a Bash history. Well, you probably do. It’s helpfully called .bash_history and it’s a hidden file in your home directory. You can open it with a text editor if you want.

See, every time you write a command into the terminal (unless you take steps to avoid it) that command is stored in a hidden file called .bash_history. The period at the start of the file name means that it’s a hidden file and you’ll need to enable hidden file viewing in your file manager. (It’s quite frequently F4 or under the ‘View’ menu.)

If you open your terminal (press CTRL + ALT + T) and push the up arrow on your keyboard, you’ll see the last command you used in your terminal. Well, it’s a bit more complicated than that, but you’ll see the bottom-most entry in your .bash_history.

If you use your terminal a lot, you’ll have duplicates. It’s just a fact of life. Many commands will be run multiple times, such as performing updates. These clutter up your history and just waste space. You don’t have to keep the duplicates, or even allow duplicates.

De-dupe .bash_history

First, let’s disable duplicates and delete them if they do somehow occur. To do this, you’re going to edit your .bashrc file. As you can see by the . at the start of the file name, the file is hidden by default. You can use the GUI file manager and favorite text editor. Enable viewing hidden files, and just add the following line to the very bottom of that file.

Save it, of course.

If you want, you can do it right in the terminal. Open the terminal with the directions above and enter the following command:

Notice how there’s no use of ‘sudo’? That’s because you already own these files and you don’t need elevated permissions to edit them. 

Anyhow, use the down arrow and then paste in the text above, just as though you were editing it in your favorite text editor. Then, go ahead and save it by pressing CTRL + X, then Y, and then ENTER.

There… Now Bash should ignore duplicates and erase any new duplicates that it finds.

All well and good?

Maybe…

I mean, it’s not like you just installed your OS today and have a sparkling clean bash history. No, if you’re like me, you’ve probably got a bunch of clutter in there and all sorts of duplicated content. So, you’re going to want to clear those already existing duplicates out as well.

Seeing as you’re already in the terminal, you can use the following command that I once found online and saved to my notes:

That right there will go ahead and remove any duplicates that it finds in your bash history. You might want to make a backup of the file before trying that command – but I’ve used it so many times that I have complete faith in it. So far, it has only removed duplicates and not broken anything. (Pay most of your attention to the use of awk in the command if you’re wondering how it works.)

And, there you have it. You should have a nice .bash_history that isn’t full of duplicates. I’ve been known to open the file manually and run through it to remove stuff I’m never going to use again, commands that I’ve gotten wrong, or commands that are no longer of any use. 

Addendum

I should also mention that I have been using the (mostly) same history file for a long time. You save it and import it on new computers that will run the same operating system. Personally, I use my bash history fairly often and I like the consistency. I also do the same with my aliases, but that’s a topic for another day.

By the way, if you don’t want to have your command stored in the history, the easiest way to avoid it (on a command-by-command basis) is just to put a space in front of it. The system doesn’t care that there’s a leading space, except to use it as a cue to not store the command in your history. If you’re entering sensitive data into your terminal, you might want to consider that. If it’s just a junk command that you’re never going to see again, you might want to consider that.

Finally, thanks for reading. I appreciate the audience and I enjoy getting my notes online. The new domain is going well and we’ll soon be getting some of the older content transferred. It’s just a bunch of tedious work. I’d ask for help, but there’s not a whole lot anyone can do to help. I’ll just have to find the time to do it. Don’t forget the newsletter! 

How To: Generate Sufficiently Complex Passwords In The Terminal

In this article, I will tell you how I use pwgen to generate random passwords. It is a simple command, but comes in surprisingly handy. This being Linux, there are surely other ways to accomplish this task, but this is the method that I use.

I’ve been working on a router for the past few weeks. I’ve been working on getting this site up and running. I’ve also been working on a new computer that’s just meant for testing.

I don’t do a whole lot of password sharing and remembering. That means when I need to login to an account I’ll often just hit the button to recover my password and then use a new password entirely. This means I’ve had to generate quite a few passwords. The tool I use to do this is known as pwgen.

GENERATE COMPLEX PASSWORDS

The tool ‘pwgen’ may well be installed by default. If not, it’s very likely to be in your default repositories. I checked everything from Fedora to Mandriva, and it looks like you shouldn’t have any issues installing it. If you’re using a Debian/Ubuntu/derivative and have access to apt, then you can just install with:

Once installed, you can just run the ‘pwgen’ command from the terminal and you’ll get a bunch of random passwords. They may, or may not, be sufficiently complex and able to satisfy the various password requirements. It tosses out a lot of passwords, so it’s not like you won’t have choices.

Me? I use it a bit differently. In fact, you might even say that I use it ‘wrong’. After all, the man page describes the pwgen application as:

pwgen – generate pronounceable passwords

I don’t actually want pronounceable passwords. I want suitably complex passwords! Fortunately, pwgen can be bashed into shape and can provide all the complex passwords you desire. Here’s the command I use:

So, what’s going on with that? What do those switches do?

     s – random and hard
     n – adds numbers
     y – adds symbols
     c – at least one capital letter
     B – removes ambiguity
     1 – one password per line

The 12 is how many characters each password will have and the 6 is how many passwords it will spit out for you. So, for example, you’ll get an output like this:

In my case, this is already aliased to ‘newpass’ and that means I don’t need to type the entire command when I want a new password. Alas, I’ve not yet covered aliases. It’s on my list of articles to cover, but it’s not done yet.

Anyhow, thanks for reading. As you can see, this is the very first article at our new home. I’ll slowly move the other articles over here, editing them to match the new format and maybe making some of them a bit more thorough. This site should be faster, have the features that were used at the previous site, and a bit easier to maintain. There’s even a published privacy policy.

Don’t forget to sign up for the newsletter. It’ll only send out emails when an article has been published and won’t include any spam. I won’t give your email address out, nor will I sell or trade it. 

Subscribe To Our Newsletter
Get notified when new articles are published! It's free and I won't send you any spam.
Linux Tips
Creative Commons License
This work is licensed under a Creative Commons Attribution 4.0 International License.