Let’s Have Some Fun With Cowsay And Fortune

Today, we’ll be having fun with ‘cowsay’ and doing so while getting your fortune in your terminal. Why not? Linux doesn’t always have to be about work. Today’s article will be not even remotely useful for work and none of what you learn will greatly increase your Linux skills. We are doing this for fun, mostly.

Sometimes, it’s okay to be a little silly and to have some fun.

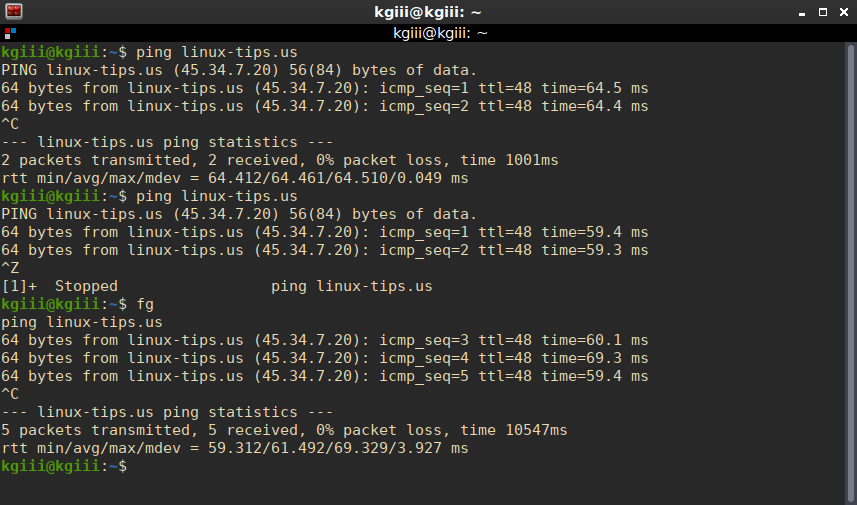
Besides, you’ll get to use the | (pipe) and that’s always fun! Seriously, the pipe is one of the best tools Linux has. It lets you take the output from one command and use it in another one. The man page helpfully describes it like this:

pipe – Postfix delivery to external command

We’ll just be scratching the surface with pipe, so be sure to run man pipe if you’re unfamiliar with it. Pipe hails from Unix and has been with us, in one form or another, since 1973. I dare say that the longevity is good evidence of the value.

I’m just going to give the directions for Debian/Ubuntu/derivatives. I haven’t checked across all the systems, so I’m not sure what distros this will work on. Probably all of the major distros, but it should work on anything with Debian in its lineage. If you’re not doing so, you should still be able to follow along and just adapt it to your package management systems. 

So, that being said and done, let’s look into this matter of a mad world with cows and fortunes.

Fun With Cowsay:

The first thing we have to do is open a terminal. Press CTRL + ALT + T on your keyboard and the default terminal emulator should open up. Once open, run the following command:

That should install both ‘cowsay‘ and ‘fortune‘, along with any dependencies that need to be satisfied. Those are the only two tools you need to install for this exercise, or at least they should be.

Fortune:

Fortune is a tool that outputs fortunes from a database. A normal use would be:

That should happily output a fortune for you.

Cowsay:

The cowsay application prints a graphic that looks vaguely cow-like and any text you tell it to print. The command would look a bit like this:

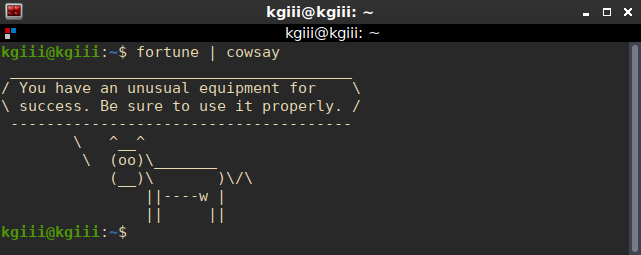
All of which is all well and good – but the magic is when you put them together. So, let’s try that. Let’s pipe fortune output to the cowsay application:

Which will have an output similar to this:

cowsay in action
See? You’ve got a cow spouting wisdom in the terminal! Just what you always wanted!

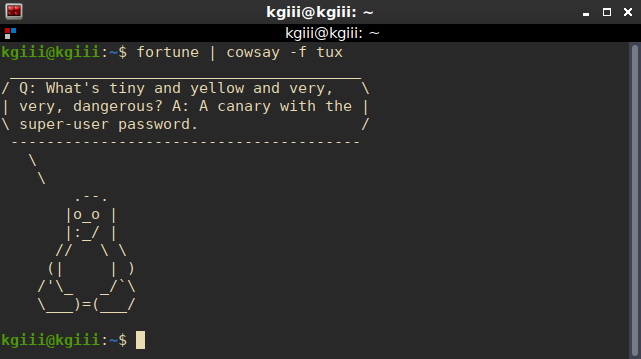
That’s not it! No, dear reader, that is not it! That’s not all you can do! See, you can change the cow to Tux, the Linux penguin mascot.

What the penguin has to do with a cow, I know not. But, I do know that you can use the command and output a penguin. 

The output from that command should look pretty similar to this:

cowsay goes tux
See? It’s Tux! I wouldn’t make this sort of stuff up. It’s too important!

And there you have it. You’ve successfully piped the output from fortune to cowsay and, as a bonus, morphed the cow into tux. Another productive day at the office, while having fun with cowsay!

Closure:

I’ve got a couple of articles ahead, which is nice. This one tells you how to have fun with cowsay, which is also nice. It’s pretty important business!

Now to write some that are scheduled years in the future (so that I don’t mistakenly post them and they’re out of the way) and not fret too much when Mother Nature comes to claim my internet… I’m not giving up on my publishing schedule yet!

Thanks for reading! If you want to help, or if the site has helped you, you can donate, register to help, write an article, or buy inexpensive hosting to start your own site. If you scroll down, you can sign up for the newsletter, vote for the article, and comment.

How To: List All Users In Linux

If you want to list all users in Linux, this is the article for you. It should be a fairly short article, but it should tell you how to list all users. So, there’s that. By that, I mean it’ll probably do what it says on the tin, namely telling you how to list all your users.

You may want to check the list of users from time to time. Applications may add users, you may have added users, malicious software or people may have added users, etc… There are other reasons to list all users, but you get the idea.

This is a beginner-level exercise, so you shouldn’t have any difficulty with it. It should also be reasonably short, which is nice! If you find any mistakes or have any questions, scroll down and leave a comment. You can also ask on the lovely Linux.org forums.

Without further ado…

List All Users:

Once again, we start with opening the terminal. To do this, you just press CTRL + ALT + T and the terminal should open. That’s true on most distros that I’ve encountered. If not, you will still need an open terminal.

Got it open? Good, ’cause it’s a pretty easy operation. The file you’re looking for is ‘/etc/passwd’, which is a plain text file that’s in conjunction with the /etc/shadow file. Like most text files, it’s easy enough to work with them in the terminal.

You probably shouldn’t edit /etc/passwd by hand, but we’re just going to be viewing it.

So, to show the content of the file (and see the list of users):

If you want to show fewer results at a time, you can just use:

If you want, you can ‘grep’ a specific user. Just pipe the output to grep and you’re good to go. It looks like this:

If you want to use that format AND have numbered lines, one way of finding out how many users there are, then just use:

Though you could just as easily have used this to get the number:

If you want to list just the users, you can use ‘awk’ and pick the first column like this:

And that’s about it, really. You’ve now listed all the users – and counted ’em!

Closure:

That’s it! That’s all there is to it, and you’ve learned a little bit more – this time how to list users in Linux. I told you that it’d be pretty painless and easy. Plus, this is another article for the books – and this one authored early enough to give me some time to keep scheduling them ahead of time.

Thanks for reading! If you want to help, or if the site has helped you, you can donate, register to help, write an article, or buy inexpensive hosting to start your own site. If you scroll down, you can sign up for the newsletter, vote for the article, and comment.

Weather In The Terminal? We can do that!

Weather in the terminal? There are people who pretty much live in the terminal! They do everything there, including checking the weather! This article will show you how to get your local forecast in your terminal, because why not?

Where I live, they have a saying, “If you don’t like the weather, wait a minute.” The weather is constantly changing and is responsible for killing quite a few people every year. We have some pretty extreme weather. Because of this, I pay fairly close attention to it – but, really, I don’t tend to check it in the terminal. I use a more robust solution. This article is for those folks who want to. You’re welcome!

First, a little poem:

Whether the weather be fine, or whether the weather be not,
Whether the weather be cold, or whether the weather be hot,
We’ll weather the weather, whatever the weather,
Whether we like it or not.  — anonymous

See? Who says we’re uncultured here?

Anyhow, this is just going to be a pretty brief article. It’s pretty simple to check and it requires just your terminal and a tool called ‘cURL‘ (which has been covered already, so click that link to save some time). If it turns out to be something you like, you can always alias it for regular use or just commit the short commands to memory.

Weather In The Terminal:

Seeing as this is ‘weather in the terminal’ we should probably start with opening the terminal! That’s easy enough, just press CTRL + ALT + T and your default terminal will open.

Once you have it open, you’ll be using a website known as WTTR.IN. You can actually just click that link and get the weather in your browser. It should be your local-ish weather, unless you’re using a VPN. The site is using IP Address Geolocation to show your local weather and a VPN presents a different IP address, meaning it may not actually be your local weather. The same is obviously true in the terminal.

Start with just a basic example, try:

That should be ‘close enough’, depending on where you live and how accurate the geolocation is. If it’s not, you can add some information – such as town and state (or province, or whatever your country uses). It’d look something like:

The output from that command would look a little something like this:

weather forecast in the terminal
See? It even knows I’m in the USA, so it uses the correct units. Neat, huh?

You can even use some landmarks and it will try to figure it out. For instance, you can check the output from this command:

If you’re in the US, then it will show you the results in our goofy units – even if metric is used at the location. Well, it will try to – within the limitations of geolocation. If you want to change it up, you use a ‘u’ or an ‘m’. To force the above with metric units, you enter:

Anyhow, there’s so much more that you can do. Frankly, the above are all I really use it for – and I seldom bother with that. Living where I do, I get my weather in a browser and with a browser extension. So, be sure to use the following to learn more:

You can also just visit https://wttr.in/:help to get that same information in your browser. It’s up to you, but you’re already in the terminal so you might as well keep using it!

Additional info: GitHub repo is located here.

Closure:

And there you have it. Another article is in the books, this one showing you how to use your terminal to check the forecast and current conditions. There are a ton of options that I didn’t bother covering, but options that you may find useful. Be sure to check the help page and keep up with the project on GitHub.

Thanks for reading! If you want to help, or if the site has helped you, you can donate, register to help, write an article, or buy inexpensive hosting to start your own site. If you scroll down, you can sign up for the newsletter, vote for the article, and comment.

Let’s Have a Limited Look at Linux’s cURL Application

This article is going to be a limited look at cURL, a Linux application used in the terminal to transfer data. cURL is a very extensive program and we’ll just be scratching the surface. You’ll see why we’re just scratching the surface soon enough. It’s a very comprehensive application.

So, what is cURL? It’s an application that you use in your terminal to transfer data. However, as said, it’s an insanely complicated program. We’re just barely going to scratch the surface. Let’s start with the definition.

First, ‘man curl’ defines itself nice and easily:

curl – transfer a URL

However, if you keep reading to find the description, you’ll find this gem:

curl is a tool to transfer data from or to a server, using one of the supported protocols (DICT, FILE, FTP, FTPS, GOPHER, HTTP, HTTPS, IMAP, IMAPS, LDAP, LDAPS, POP3, POP3S, RTMP, RTSP, SCP, SFTP, SMB, SMBS, SMTP, SMTPS, TELNET and TFTP). The command is designed to work without user interaction.

curl offers a busload of useful tricks like proxy support, user authentication, FTP upload, HTTP post, SSL connections, cookies, file transfer resume, Metalink, and more. As you will see below, the number of features will make your head spin!

Yeah… 

In fact, while we’re here, why don’t you have a look at the man page for cURL. Really, click that link! I think that may be one of the longest man pages out there. cURL was originally released in 1997 and appears to have picked up everything along the way.

We’ll just be going over installing it and a couple of ways you can get started using it. To learn more, read the man page!

Using cURL:

There’s some chance that it didn’t come installed with your distro’s basic installation, so let’s first cover some ways of installing it. It’s sure to be in your default repositories for any major distro, and will almost certainly be trivial to install.

Open your terminal by pressing CTRL + ALT + T and use the correct following command to install it:

Debian/Ubuntu/Derivatives:

OpenSUSE/Derivatives:

RHEL/Fedora/Derivatives:

Arch/Derivatives:

If your distro isn’t listed above, read the documentation for your distro’s package manager. If it’s not available, you can always build it from source. The project’s homepage can be found here.

With cURL now installed, and your terminal still open, you can test it easily enough. First, try this command:

That should give you a nice message. It’ll appear in your terminal and that’s it. When you close the terminal window, the message will be gone. So, what if you want to download it? For that, you use the -O switch. Let’s try something:

That will make ‘sample.txt’ download to that directory. It’s not entirely unlike wget in those regards. If you want to change the name of the fetched file, you use the -o switch and the new name. So, the above code would look like this:

That will save sample.txt as example.txt and both of those commands will show you the transfer’s progress. This specific file isn’t large enough for that to really matter, but it’s noteworthy that it does so for future transfers.

Those are just a couple of ways to use cURL, and that’s it. It’s seriously powerful and flexible. You can read the man page and learn more about it, as it is a tool we should all have in our toolboxes. It’s useful in many situations and is worth spending some time to learn more about it. 

Closure:

There’s another article in the books! As mentioned, it’s just a very limited look at cURL. To do a full tutorial would take days and days worth of articles and I’m much happier just exposing new users to the basic functionality. Even if you already have it installed and know how to use it, be sure to curl the sample.txt!

Thanks for reading! If you want to help, or if the site has helped you, you can donate, register to help, write an article, or buy inexpensive hosting to start your own site. If you scroll down, you can sign up for the newsletter, vote for the article, and comment.

How To: Stop, Pause, and Resume Processes Running in Your Terminal

As you learn Linux, you’ll possibly find yourself using the terminal more often. You’ll run processes in the terminal because you need to or because you prefer to. This is how you stop, pause, and resume those processes running in your terminal.

There are any number of reasons why you’d need to do this. I’ll give you an example in the main part of the article, but there are all sorts of reasons to know and use this information. There are a few generic reasons to do so, of course.

First, you’d want to stop processes because you don’t just want them to keep running forever. That’s the easy one, though they’re all easy. Speaking of which, this article should be pretty short and easy.

Second, you’d possibly want to not stop but rather pause a running process because you expect to return to it. This is different than stopping the process. It’s very much like pausing a movie.

Third, obviously, will be resuming the above mentioned process. If you’ve paused a running process then it only makes sense to know how to resume said process. If you don’t intend to resume it, it doesn’t make much sense to pause it.

This article will explain how to do all three of these operations!

Stop, Pause & Resume Terminal Processes:

So, we’re going to need both a practice exercise and an open terminal. Let’s start by getting the terminal open by using your keyboard and pressing CTRL + ALT + T.

That should open your default terminal. Assuming it does open your terminal, I want you to run the following command:

Once started that command will keep running over and over again. I assume you don’t need to keep pinging forever, so you can stop it with CTRL + C. That’s it. Once you issue that command, the process will stop.

What if you don’t want to stop it – you just want to pause it for a little while? Well, run the ping command again and this time use CTRL + Z. When you issue that key combination, the running process will pause and be pushed into the background.

If you want to resume running that process in the terminal, in that same terminal, you just use the following command:

Unlike the first two, it’s text that you enter into the terminal before you press enter. There’s no CTRL + anything that you use. You just literally type ‘fg’ (think foreground) and press enter. That brings the paused process back into the foreground and resumes running it.

The above commands, when run in succession, should look a little something like this:

terminal
It should look a little something like that. Those are the commands from above.

You can do this with all sorts of applications that run in the terminal. You can stop, pause, or resume, as needed by moving the running process into the background and then bringing it back into the foreground.

If you look carefully at the above image, you’ll see that it counted five packets as being transferred. This indicates that the process doesn’t keep running in the background. It’s truly paused. Typing ‘fg’ and pressing return brought the process back to the foreground, where it continued pinging this site.

Closure:

There you have it. It’s another article in the books! This one tells you how to start, pause, and resume processes running in a terminal. Hopefully, you can find some use for it. If you have any ideas for articles, feel free to leave a comment. My publication schedule seems to be working, so you can expect another article every other day.

Thanks for reading! Your readership and feedback helps keep me motivated! If you want to help, or if the site has helped you, you can donate, register to help, write an article, or buy inexpensive hosting to start your own site. If you scroll down, you can sign up for the newsletter, vote for the article, and comment.

Subscribe To Our Newsletter
Get notified when new articles are published! It's free and I won't send you any spam.
Linux Tips
Creative Commons License
This work is licensed under a Creative Commons Attribution 4.0 International License.