How To: Disable CPU Cores

This is not something everyone is interested in doing but you might as well learn how to disable CPU cores. This is something that’s easily done and easily reversed, so you might as well have an article on the subject.

Why would you do this? Well, maybe you have a low-power project and want to save energy. You may have more CPU horsepower than you need and you prioritize energy use. This might even be something you do to increase the battery life in your mobile devices. Maybe you want to lower the heat output from your CPUs.

There are valid reasons why you might want to disable CPU cores.

It’s just that this isn’t going to apply to most of you. I’d say that 99% of you aren’t going to want to disable your CPU cores.

What are cores? Well, you probably have one single CPU chip in your computer. That computer is then probably broken down into multiple cores. Each core looks like a single CPU to the hardware and operating system.

Of course, each core may also have multiple threads. Threads would also represent themselves as individual cores. If you disable a CPU core, you’ll also disable the threads on that core, if you use a multi-threaded CPU.

NOTE: Moden CPUs may have high-power and low-power CPUs. I have no clue which will be disabled if you follow this article. I don’t have a fancy CPU to test with. You can test and let us know the results! It’s easily reversed. You can add your cores back with no problems.

GRUB:

GRUB is the application we’ll be playing with. I should also mention that GRUB stands for Grand Unified Bootloader and is the default bootloader for most Linux distributions.

GRUB controls how your system boots and GRUB can also give you the option of which operating system to boot if you use a multi-boot system. It’s one of those things that you can modify pretty heavily. You can even modify your boot screen’s appearance when you’re using GRUB.

Trying to access the GRUB man page is interesting. It isn’t your traditional man page and isn’t accessed in the same way. If you want to check the man page, you use this command:

If you run that command you’ll see what looks like an index page. That’s because it is an index page. Use your arrow keys to navigate and use the enter button to open a category page. It’s pretty simple to navigate but there’s a whole lot of information there.

If you’re a newbie, you might just want to look and see that info page. Trying any of that out may result in a system you can’t boot. You have been warned. Tinkering blindly with GRUB will eventually break your system unless you know what you’re doing. Not even I understand everything – but that’s true about a lot of things.

This article assumes that you have GRUB and Nano installed.

So, now that you know what we’ll be using, let’s get into the article!

Disable CPU Cores:

If you didn’t figure it out from the ‘Nano’ mentioned above, this is one of those things you do in the terminal. More often than not, you can open a terminal by pressing CTRL + ALT + T on your keyboard. If that doesn’t work, look in your application menu to find your terminal and open it.

Next, you need to know how many CPUs you have. You should probably already have that information. If you don’t have that information, you can use something like ScreenFetch to find that information. (I used lscpu to find my information, but I’m trying to keep it simple for you.)

Just run this command (once you’ve installed ScreenFetch):

The output should tell you how many cores you have available. Like so:
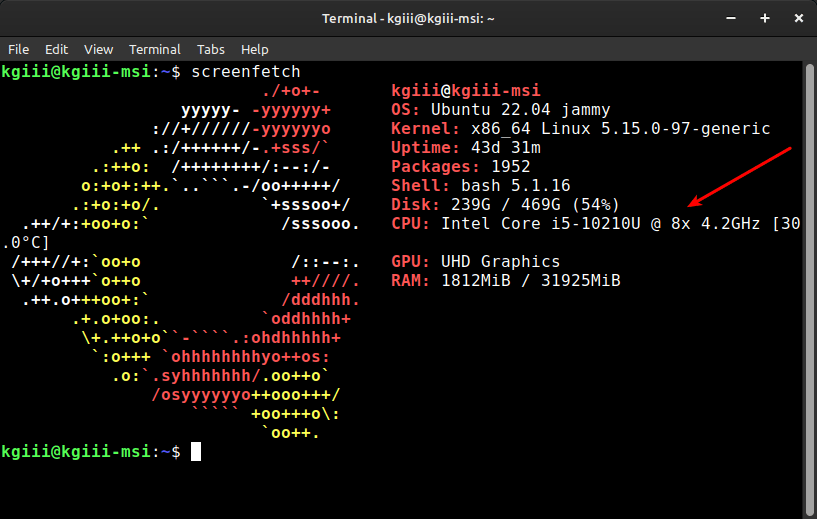
screenfetch showing CPU cores
This should be easy enough for anyone to figure out! You can find this information easily.
The Exercise Itself:

Now that you know how many cores you have, you can modify GRUB.

Find the following line:

Change that line to something like this:

As you saw above, this system has 8 CPUs listed. Let’s say I wanted to cut that in half, perhaps to save battery life while I’m on a trip and not doing any computationally heavy tasks. I’d change that line to match this:

Now that you’ve made the edit, you need to save the file. As you’re using Nano for this, you save files by pressing CTRL + X, then Y, and then ENTER.

The next step is to update GRUB, telling GRUB to reconfigure itself because you’ve changed some of the information. This step is essential but simple.

Next, you reboot the system for the changes to take effect:

When you next open your system, run screenfetch again to confirm that you’re using fewer cores and that you’re using the number of cores you specified.

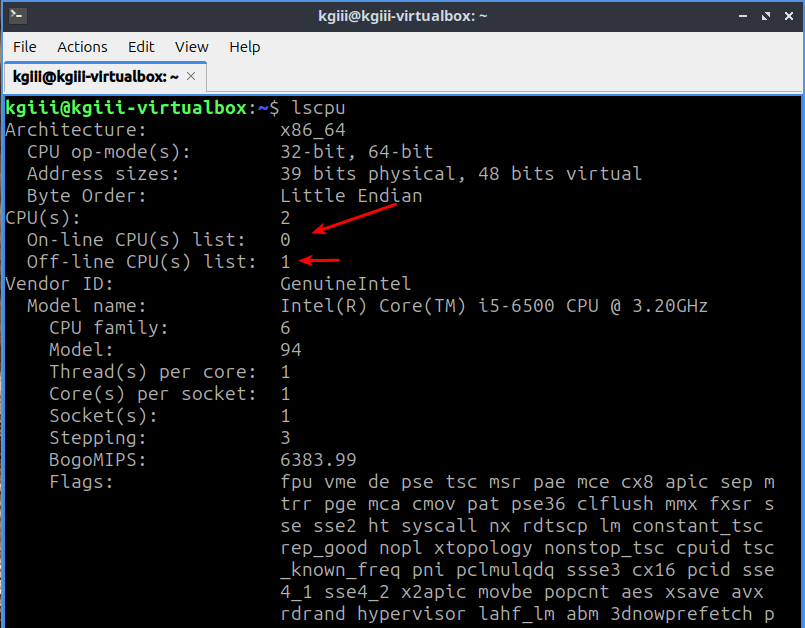
I did this in a virtual machine with 2 CPUs. This was done to confirm that it works and to provide you with some screenshots. When I did so, I did so with lscpu and not ScreenFetch. I hadn’t thought of ScreenFetch and I’d already taken the screenshots. So, that’s what you get.

The Results:

The original configuration:
using lsusb to show the number of CPU cores
As you can see, there are two cores in this instance. Core 0 and Core 1.

After the change:

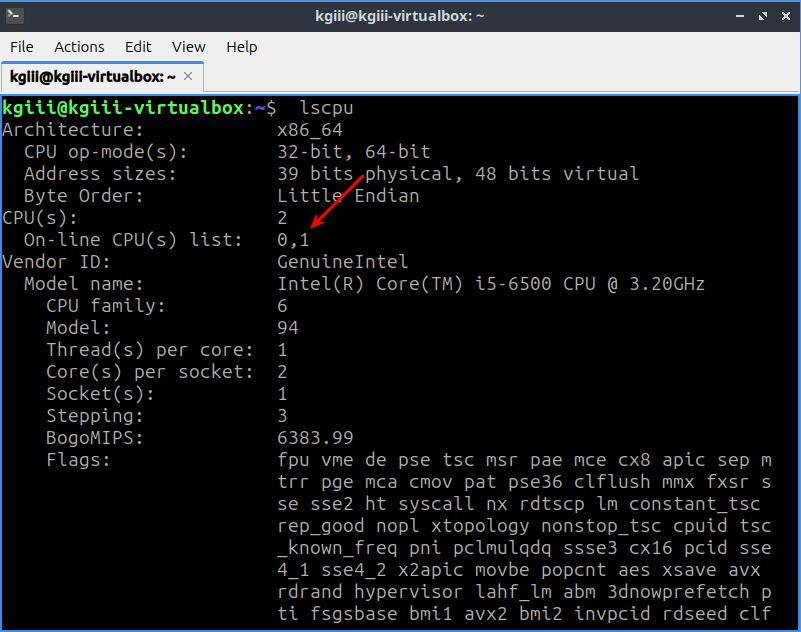
using lscpu to show that there are now fewer cores loaded
Sure enough, there are now fewer cores in use than there were before. It’s just core 0.

As you can see from the screenshots (again, taken in a virtual machine), it’s easy enough to disable CPU cores in Linux. Well, assuming you’re using GRUB… I’m sure it’s possible with other bootloaders but I don’t have any real experience with them in the memorable past. I’ve used GRUB, more or less exclusively, for quite some time.

If you want to undo this change, or if you want to change the CPU cores to some other number, just remove or edit the added text. If you do that, be sure to run sudo update-grub again to ensure that your changes take effect. If you don’t remember to do that, any changes made will be lost. So, it’s important to update GRUB when you’ve changed any of the information – not just this information.

Closure:

Well, I’m not sure how many Linux users are going to want to change their CPU cores to a lower value. It was in my notes and seemed like a fine article to share with you. I can see doing this in a few instances, such as when you want to save power. Of course, modern operating systems are pretty good at saving power on their own, but it’s still something one might consider.

If you have any other reasons as to why one might want to disable CPU cores, leave a comment. I’m a bit curious. I’d probably do it if I needed longer battery life while on the road or something. I don’t do too many computationally heavy tasks these days. So, I could get away with it on some systems.

Also, this is from my notes. My notes predate the modern CPUs. Quite literally, I have no idea how this will work on systems that have cores that are different, such as high-power and low-power cores. Feel free to test and let me know what you learn. Again, leave a comment. I promise I won’t share your information with anyone and I’ll never send you an email you didn’t ask for.

Thanks for reading! If you want to help, or if the site has helped you, you can donate, register to help, write an article, or buy inexpensive hosting to start your site. If you scroll down, you can sign up for the newsletter, vote for the article, and comment.

Seeing as you’re here, why not visit our friends at Blunix?

“Blunix GmbH offers Debian and Ubuntu focussed Linux Emergency Support 24/7, Project-based Linux Consulting, FOSS-based Managed Hosting on your company IaaS provider account as well as custom Training and Workshops. We prioritize fair business partnerships and employee quality of life over profit. We focus on reasonable security by default and encourage your employees and developers to keep things secure enough to avoid 99% of security issues with automated attack vectors. We focus exclusively on this and do partner with other companies to refer customers that do not fit exactly what we do, or where we require additional help (for example we have a security-focused company that we partner with for higher risk factor hosting setups).”

Click to visit Blunix GmbH

How To: Find Your CPU Information

Today’s article shouldn’t be all that long, as it’s a subject touched on before, as we discuss how to find your CPU information. This will be in the terminal, of course. There are also many ways to find your CPU information. This article will just cover another way that I don’t think we’ve already covered.

I’ve touched on this subject before:

One Way To See CPU Information

In that article, we simply used the ‘cat’ command to read information from a text file. It’s a pretty handy way to find CPU information, but it is not the only way.

You can also get some basic information about your CPU with Screenfetch or Neofetch. I’ve written about those as well:

Screenfetch vs. Neofetch, You Decide!

I’ve even covered ‘lscpu’ in the past. You can read that article here:

A Little About The ‘lscpu’ Command

So, as you can see, there are lots of ways to find out what CPU you’re working with. You can do it graphically, that is in a GUI, if you’d rather. It’s as simple as installing an application called ‘HardInfo’ and you can read more about it here:

Graphically Examine Hardware Info With HardInfo

See? There are all sorts of ways to get information about your CPU. You have all sorts of choices and this article is going to simply detail yet another way to gather this information.

Why? Well, I like to be the kind of person that gives you options. I like that there are so many ways to accomplish a task in Linux.

Why would you want this information? Perhaps you bought a new computer. Then again, you might have paid for a server (virtual or real) and want to confirm that you’re getting what you paid for. You could have multiple devices, such as myself, and not remember what hardware is in each of those devices. 

There are all sorts of reasons why you might want to know your CPU information. There are all sorts of ways to get this information. Today can have a shorter article than we’ve had lately, as we cover this topic yet again.

Find Your CPU Information:

As mentioned in the opening of this article, we’ll be doing this in the terminal. My regular readers will be used to this and will know how to open the terminal. If you don’t know how to open the terminal, you can almost always just press CTRL + ALT + T, and your default terminal will open up. You may otherwise need to open a terminal from your application menu.

With your terminal open, we’ll be using the ‘lshw’ command. You shouldn’t need to install anything. The ‘lshw’ should come pre-installed as it’s a rather basic piece of the common Linux toolbox. If you check the man page (with man lshw), you’ll see that the program is just like many of the other ‘ls* applications, in that it lists hardware. Specifically, it says this:

lshw – list hardware

That’s an accurate enough short description. The actual description says this:

lshw is a small tool to extract detailed information on the hardware configuration of the machine. It can report exact memory configuration, firmware version, mainboard configuration, CPU version and speed, cache configuration, bus speed, etc. on DMI-capable x86 or IA-64 systems and on some PowerPC machines (PowerMac G4 is known to work).

So, the lshw tool is a pretty good tool to have handy when you’re wanting to know information about your hardware. I once botched an article on lshw! I’m sure I’ll botch another one eventually!

Specifically, you simply want to use the command as follows:

You want to run the lshw command with sudo (or as root, if sudo is not available) so that you have the elevated permissions to retrieve full information in the command’s output. If you try to run lshw without elevated permissions, it will remind you that you should do so.

On the man page, you will discover a bug. I’ve yet to see this bug in real life, but there is a bug. The man page explains it like this:

Not all architectures supported by GNU/Linux are fully supported (e.g. CPU detection).

So, that’s something to be aware of. I doubt it’s going to impact (m)any of my readers because we’re almost always using fairly common CPUs. It should correctly identify your CPU.

Closure:

Well, it’s a pretty basic subject and an easy enough command to keep in mind. If you want to find your CPU information, there are a ton of ways to do so and we’ve just covered one more way. This seemed like an easy article to write and I could use an easy day. I think we could all use an easy day once in a while, but the show must go on and you get yet another article for your enjoyment.

I have been making the articles longer. I’m trying to share more information along with the directions. I think it’s good for understanding and it doesn’t take that much more time. If you have an opinion on the matter, please leave a comment.

Thanks for reading! If you want to help, or if the site has helped you, you can donate, register to help, write an article, or buy inexpensive hosting to start your site. If you scroll down, you can sign up for the newsletter, vote for the article, and comment.

A Little About The ‘lscpu’ Command

In today’s article we’re going to do what the title says, we’re going to learn a little about the ‘lscpu’ command. We’ll just touch the ways you’re likely to use ‘lscpu’ and that’s it. Then again, there’s not much more to it than that, so it’s going to be easy enough for a new Linux user to understand. You’re invited to read on…

As mentioned in the last article, and in the article before that, I’m going to take some time to cover some of the basic commands. However, I’m going to try to intersperse them, that is mix them up a bit, so that it’s not too boring for myself and my regular readers who are beyond this level.

The first of these articles was:

A Little About The ‘lsusb’ Command.

This article will cover ‘lscpu’. If it’s not obvious, this command will list information about your CPU. In fact, the man page describes ‘lscpu’ like:

lscpu – display information about the CPU architecture

And, sure enough, that’s the information we’re after in this article.

Of course, this is another command that gets run in the terminal. It’s an application that comes with ‘util-linux’ and is something you shouldn’t need to install. You should be able to use the ‘lscpu’ command without installing anything. So, there’s that…

Rather than drag the intro out, let’s just jump into it…

About The ‘lscpu’ Command:

As I mentioned in the intro, ‘lscpu’ is a terminal command. Of course, this means you need an open terminal. You should open one now. If you don’t know how to open your terminal, just press CTRL + ALT + T and your default terminal should open.

With your terminal now open, simply run the ‘lscpu’ command:

Tada! You have all the information you really need to know about your CPU – and quite a bit more information. So, let’s see what else we can do with the ‘lscpu’ command.

Let’s say you want some extended information. You can go about that with the -e flag. That’s easy enough to do, a simple command. It looks like this:

The outcome from that command would probably look a bit like:

the output of lscpu
As you can see, this CPU isn’t anything all that fancy. It’s effective and efficient!

As you can see, there’s nothing too fancy there.

You can actually select the fields you want to output from that command. For example, you can see the CPU and the CORE fields like this:

The only other way you’re going to use ‘lscpu’ is likely to be with grep. For example, if you want to know what architecture your CPU supports, you can run this command:

There’s more to ‘lscpu’, but you’re not likely to really need it for anything. If you do need more from ‘lscpu’, you just check the man page like so:

The man page should help you with anything more than what’s covered in this article. There’s not all that much more that’s useful, we’ve at least examined the ‘lscpu’ command.

Closure:

Yup, there’s another article. This article does what it attempted to do – which is share the most useful ways to use the ‘lscpu’. If you find yourself in a position where you need fairly detailed CPU commands, then ‘lscpu’ is the command you’re looking for.

Thanks for reading! If you want to help, or if the site has helped you, you can donate, register to help, write an article, or buy inexpensive hosting to start your own site. If you scroll down, you can sign up for the newsletter, vote for the article, and comment.

A Few Ways To Count CPU Processors Or Cores

So, in today’s article we’re going to learn a few ways to count CPU processors or cores. This is something you might already know about the system in front of you, but may want to verify with a remote system.

To the Linux system, there’s little difference between an individual processor or a core, or even a thread. Each core will appear as its own processor – and that’s exactly how it should be. Linux will treat each as its own processor and do its best to take advantage of multi-core/multi-CPU systems.

Now… Hmm… I shouldn’t need to explain this, but your computer has a processor called a CPU. It may have more than one, though that’s unlikely in a personal computer. Instead, your CPU may have multiple processors on it – each functioning more or less independently as ‘cores’. Additionally, your CPU cores may have multiple threads and each of those threads will appear as its own CPU.

That’s a very simplistic overview and I have to do things like limit how many characters are in the title of the article – and I don’t really want to try to explain everything. 

For example, you could have a 4 core CPU that’s dual threaded. 4 x 2 = 8, so your system will see 8 CPUs. There’s only one physical processor, but you’re effectively working with 8 of them. (By the way, you can *sometimes* compile software optimized by the number of cores available.)

Count CPU Processors Or Cores:

(or threads, I suppose)

This article requires an open terminal, like many other articles on this site. If you don’t know how to open the terminal, you can do so with your keyboard – just press CTRL + ALT + T and your default terminal should open.

Now, there are so many ways that you can count the CPU processors or cores. We’re just going to cover a few of them. Feel free to leave other solutions as a comment. I’ll approve the comments as quickly as I can.

Solution #1

We just recently used the ‘cpuinfo‘ file to learn about your CPU. So, we’ll start with that one first. We’ll process it with ‘grep’ and then do some counting:

It might look something like this:

output showing there are 8 CPUs available
You’ll have to use your imagination for the rest. I’m only making one screenshot.

Now, those are individual threads that it’s counting – on the same physical CPU. But, to the system they appear to be individual CPUs. I can assure you, I do not have 8 physical CPUs in my laptop.

Solution #2:

Now, your computer does technically know if it’s a physical CPU, CPU core, or CPU core thread. It just normally doesn’t much care. If your CPU and OEM vendor did things properly, you can learn that information using ‘dmidecode‘.

They do not always implement this properly and you will sometimes find mistakes when using ‘dmidecode‘. Let’s hope for the best when we run this more convoluted command:

That one uses egrep and picks out multiple words to include. If you run that command, you should find out that your computer really can tell the difference between cores and threads – and physical CPU count (though not with this command).

Solution #3:

This final solution is nice and easy. If you’re gonna memorize one of these, this would be the one to memorize. In fact, if you’re going to need to count CPU processors or cores, you might just as well use this one. It’s easy and effective.

That one will output the total number of CPUs, cores, or threads. That’s all it will output, just a single number. That number is how many CPUs (effectively) your computer sees – and that’s it. It’s pretty much perfect.

Closure:

There you go. You have another article, this one explaining how to count CPU processors or cores (or threads, really). It’s handy information to know, though you probably already know it. Like I mentioned above, you can optimize C/C++ code to run on the specific number of cores – and there are other reasons you might want to know this. 

Thanks for reading! If you want to help, or if the site has helped you, you can donate, register to help, write an article, or buy inexpensive hosting to start your own site. If you scroll down, you can sign up for the newsletter, vote for the article, and comment.

One Way To See CPU Information

Today, we’re going to explore one way to see CPU information. On the original site, I had a couple of articles about this sort of stuff but we didn’t cover this method. It’s a short and sweet process, though I’ll show you a couple of ways to process the output.

The date that this will be published is July 4th. That’s a holiday in the United States. Not only do I live here, the vast majority of my readers live here (according to the stats I have). So, this will be a nice and easy article. For those of you who reside elsewhere, you’re welcome. You won’t have to work too hard today to understand what’s going on.

Anyhow, we’re not going to use any special tools. We’re not going to use any applications that you don’t already have installed. While we likely could, there really isn’t any need to. This being Linux, the information we’re after is already in a file. All we need to do is read that file.

So, let’s get to it…

How To See CPU Information:

This article requires an open terminal, like many other articles on this site. If you don’t know how to open the terminal, you can do so with your keyboard – just press CTRL + ALT + T and your default terminal should open.

With your terminal now open, let’s go ahead and read the file we need if we want to see the CPU information:

That’ll output a ton of text. You can read it as it is, or you can actually get it in a more readable form using the ‘less’ command. To do that, you just change out the ‘cat’ command, like so:

Now, just use the arrows on your keyboard to scroll down (or back up) through the text. When you want to close the output and return to the terminal, just press Q and it will close.

Closure:

That’s it. That’s all there is to this article that tells you how to see CPU information. It’s not a very tough article, and it’s quick. So, I met those goals! Yay me! Enjoy your holiday, even if the holiday is just a nice quick article that doesn’t require much thinking. Me? I’ll drink some beer and char some dead animal flesh.

Thanks for reading! If you want to help, or if the site has helped you, you can donate, register to help, write an article, or buy inexpensive hosting to start your own site. If you scroll down, you can sign up for the newsletter, vote for the article, and comment.

Subscribe To Our Newsletter
Get notified when new articles are published! It's free and I won't send you any spam.
Linux Tips
Creative Commons License
This work is licensed under a Creative Commons Attribution 4.0 International License.