Today’s article has a theme that may seem familiar, as I recently wrote an article about how to compare two text files side by side. That article was well received and I figured I’d share another way to compare two text files side by side. After all, this is Linux and there are usually many paths to the same destination.
You can use a variety of tools to compare files. It’s not hard to check two files to see the differences between them. However, you can visually compare them quite easily. All you need to do is to show those two files in a side-by-side manner.
The previous article can be read here:
Show Two Text Files Side By Side
So, that’s one way to show two text files side by side. This article is going to show you another way. Why? Because I can! Also, I’d like to write this article while it’s still fresh in my memory. If I don’t write it soon, I’ll have forgotten to write it at all. Age will do that to a person. It is what it is.
Preparation:
In the previous article, I had you download two files. I’m going to suggest that you do so again. That way, we’re on the same page.
Download these two files to your ~/Documents directory:
Those two files should be the same in every way. Byte for byte, they should be the same (with maybe a slight difference in metadata like last accessed time).
The tool we’ll be using is sdiff and you almost certainly have this installed by default. It’s part of the diff tools, so it is likely installed by default. You can verify that sdiff is previously installed with the following command:
1 | sdiff -v |
The output should show you that sdiff is just a part of the diff utilities. It should say something similar to this:
sdiff (GNU diffutils) 3.8
Those are the only tools you’ll need. Well, that and a terminal emulator of your choosing. It’ll be easy enough for anyone to follow along with this article.
Compare Two Text Files Side By Side:
As I mentioned above, you’ll need an open terminal. For most distros, you can just press
If you followed the above directions and downloaded the two files, you will first need to change your directory to your ~/Documents directory. That’s easily done with this command:
1 | cd ~/Documents |
Then, you can simply compare the two files. The syntax is like this:
1 | sdiff <file_1> <file_2> |
So, in this case, the command would look like this:
1 | sdiff sort.txt sort1.txt |
As you can see the files are the same.

Let’s mix things up…
Change One File:
We already have the terminal open, so let’s see this sdiff in action with a changed file. Let’s edit the sort1.txt file with Nano. Run this command:
1 | nano sort1.txt |
Now, scroll to the bottom and add the following line:
1 | New York |
Then, you need to save the updated sort1.txt file. As we’re using Nano, you can do that by pressing
Now, let’s run the sdiff command a second time so that we can compare two different text files side by side.
1 | sdiff sort.txt sort1.txt |
You’ll see a different output. It should look like this:

The > character indicates that there’s a difference. Specifically, it indicates that there’s a new line that isn’t in the first text file.
On the other hand…
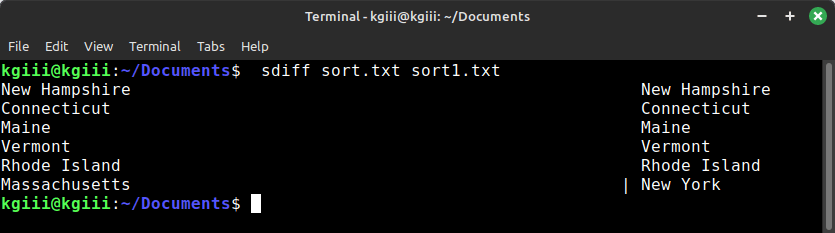
The | character shows that the lines are different. This is a different character that shows that there’s a new line. Instead, this one is indicating that the text on that line is different than the file it is being compared with.
See? Pretty simple stuff!
Closure:
Well, this is another way to compare two text files side by side in the Linux terminal. There are so many ways to accomplish a goal in Linux and this is just another way that you can do this operation on text files. This sort of stuff would be handy in dealing with revisions or easily spotting differences in readme files. You can apply this skill to all sorts of situations. Feel free to comment telling me how you use the sdiff command.
Thanks for reading! If you want to help, or if the site has helped you, you can donate, register to help, write an article, or buy inexpensive hosting to start your site. If you scroll down, you can sign up for the newsletter, vote for the article, and comment.