Today’s article isn’t going to be all that long and it’s definitely not going to be complicated, as we just discuss how to add a new line with curl. It’s just an annoyance factor and something I was reminded of today. Lacking a better idea, I decided I’d use this annoyance and recollection as a reason to write an article about how to add a new line with curl.
First, this obviously requires a terminal.
Second, this obviously requires curl. You almost certainly have curl installed, so you won’t have to install anything.
If you’re curious, you’ll find that the curl man page defines the application as:
curl – transfer a URL
You’ll understand why I’d use that in a second, but you can imagine that it’s a pretty handy tool to have in your Linux toolbox. We’ve previously used curl in many articles. Here’s a sampling of those articles:
Let’s Have a Limited Look at Linux’s cURL Application
Weather In The Terminal? We can do that!
How To: Find Your IP Address Through Your Terminal
… and more!
So, in this case, I show ads on the site. To do this, Google relies on a file known as ‘ads.txt’ being in your web’s root folder (often called ‘public_html’). If the file is not there, there’s an ad inventory issue and Google won’t show ads.
Well, if you read the previous article you’d know that there was an outage. During this outage, it appeared that the site was still reachable – except it wasn’t. It was during this time that AdSense decided to check and see if the ‘ads.txt’ file is there. (This is nothing private. Everyone using AdSense has an ads.txt file.)
Because of this, I decided to verify that the ads.txt file existed and contained the appropriate information. To do this, I simply used the following command:
1 | curl https://linux-tips.us/ads.txt |
It gave me the answer I wanted, but I disliked the formatting of the output. But, it was enough for me to determine that the file existed and that I just had to wait for Google to confirm this.
The formatting was horrible. I’ll show you an image in the next section and you’ll see…
Add A New Line With curl:
So, when I saw the output from the above command (feel free to run it on your computer), it just ran the line into the next prompt. I had to dig through my ~/bash_history file because I couldn’t remember how to fix the formatting.
A picture is probably going to describe this best. In the picture, you’ll see the ugly formatting and you’ll see the solution.
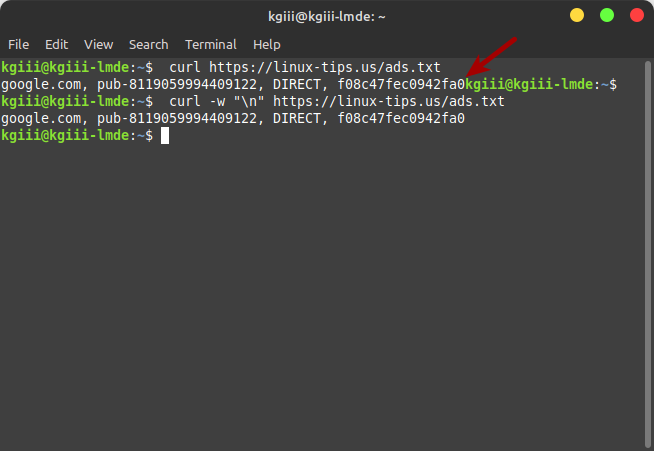
So, to make sure you have a new line, you use the -w (write-out) flag and add the character for a new line in quotes – which is "\n". It’d look like this:
1 | curl -w "\n" <URL> |
As you can see (and I hit the enter button between commands to start on a fresh new line) the output is much nicer. So, instead of curl starting a new line, a command entry line as it were, you’re starting with a nice fresh new line.
I messed with this way too long before I started digging into my bash history to find other curl commands used over time. Eventually, I found it, but I’d already verified that the file existed and that Google would notice the next time they checked.
Closure:
Well, it’s not the greatest of articles – but it’s useful if you want to know how to add a new line with curl. It’s a much tidier output this way. I just need to remember to do it without having to dig through my bash history each time I want to have a clear curl output.
Meh… I’m sure it’ll eventually be handy for someone…
Thanks for reading! If you want to help, or if the site has helped you, you can donate, register to help, write an article, or buy inexpensive hosting to start your site. If you scroll down, you can sign up for the newsletter, vote for the article, and comment.