Check Your NIC Speed In The Terminal

Today’s exercise is a nice and simple exercise where we check your NIC speed in the terminal. Anyone can do this, but it’s less useful for you if you don’t use a NIC and rely on wireless. If you’re using a wireless controller, this isn’t the article for you.

I’ll make this article short.

What is a NIC?

computer NIC
An example of what a NIC might look like.

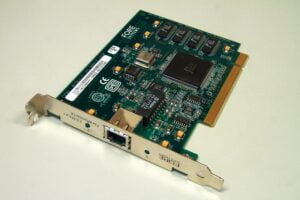
NIC stands for Network Interface Card and is how you connect to a wired internet connection. They come in various speeds with gigabit being a fairly common speed these days. There are a number of reasons to use a wired connection, including security and maximum speeds.

The tool we’ll be using is ‘ethtool’. We will also use the ‘ip’ command. If you don’t have ethtool available immediately, you must install it. The ‘ip’ command works by default (unless your system is rather old).

ethtool:

As I said, if you don’t have ethtool you’ll need to install it. I just checked a couple of distros and it appears to be a fairly common application, installed by default. If you check the man page, you’ll see this:

ethtool – query or control network driver and hardware settings

So, if we want to check your NIC speed in the terminal this is a good tool for the job. We will use another command along the way…

ip:

There’s another command we’ll be using. This will be available by default in a modern system. This is, of course, the ‘ip’ command. We’ll just use the ip command to identify our NIC. If you check the man page, you’ll see this:

ip – show / manipulate routing, network devices, interfaces and tunnels

That’s exactly what we need to do! So, this is the correct tool for identifying your NIC. You used to be able to just assume that it was eth0 but those days are no more. Now it’s a longer string of characters.

Check Your NIC Speed:

As mentioned above, this is a terminal-based article. You’ll need an open terminal, of course. You can usually press CTRL + ALT + T and your default terminal will open. Try that before checking in your application menu. It’s not quite a standard but it’s pretty common.

With your terminal open, we first identify our NIC. In this case, we’ll use the following command to show our network devices:

From there, find your NIC’s name. It’s probably going to start with enp and then be followed by some letters and numbers. Mine is enp0s31f6 for example. 

You then take that information and use it with the ethtool command. This command requires elevated permissions, so we’ll be using sudo. The syntax is as follows:

Then, you’re looking for ‘Speed:’, which will tell you the currently connected speed. There’s additional information that will tell you things like supported speeds, but this section tells you the current speed. 

I suppose you could use grep for this…

Or, using my case as an example:

Which looks like this:

That’s it. That’s all you need to know for this article…

Closure:

Well, if you ever need to know your NIC’s speed you can refer back to this article. I don’t expect you’ll need to check your NIC speed often enough to commit this one to memory, though it is relatively short and easy. If you don’t remember it, you’ll know where to find it. There’s that…

Thanks for reading! If you want to help, or if the site has helped you, you can donate, register to help, write an article, or buy inexpensive hosting to start your site. If you scroll down, you can sign up for the newsletter, vote for the article, and comment.

How To: Test Your Bandwidth From The Terminal

There are all sorts of ways that you can test your bandwidth rate from the terminal. This article is going to cover just one of them. As far as articles go, this one should be pretty easy for anyone to follow and understand. It should also be relatively quick.

So, there’s that…

Which is nice…

The tool we’ll be using is known as ‘speedtest-cli’. You may be more familiar with their website, speedtest.net. If you, like most, visit the site, you can have your bandwidth tested in a number of ways and from a variety of servers. You can do that from the terminal, if you want.

Speedtest.org is pretty handy, though I’d probably recommend librespeed.org to folks who are testing via the web. The latter has no Java, websockets, nor Flash. It is also open source. On the other hand, it lacks a way to easily test it in the terminal.

So, what is speedtest-cli? It’s a way to access the speedtest.net tests via the terminal. There are a number of options and I’ll cover the most important of those options below. For now, speedtest-cli defines itself as:

speedtest-cli – Command line interface for testing internet bandwidth using speedtest.net

That’s a pretty accurate description of what it does. It’s also the tool we’ll be using. It’s just easier and fancier than other ways. Sure, you can download a large file in the terminal and get a good idea of what your download rate is, but it’s not much of a test and doesn’t include things like your upload speed.

Test Your Bandwidth:

As stated above, you will test your bandwidth rate in the terminal. To do this, you’ll obviously need an open terminal. To open your terminal with a keyboard shortcut, just press CTRL + ALT + T and your default terminal should open.

Install speedtest-cli:

So, speedtest-cli is unlikely to be installed by default, you’re going to have to install it. If you go to their official download page, you’ll get to download a script form of the application for pretty much every architecture out there. Those will work just fine and have directions about how to use them.

But, you can probably properly install speedtest-cli. For example, if you want to install it on Ubuntu, your installation command would look like this:

I didn’t check every other distro, but it sure looks like it’s available in the default repositories for a bunch of them. Even in Manjaro, I was able to install speedtest-cli with this command:

And all was good with it installing without any need to mess around with scripts or installing it manually. As near as I can tell, it works the same for Fedora and even CentOS. Just use your package manager to do the installation and it’s probably in there.

Test Your Bandwidth With speedtest-cli:

Next, you’re going to want to run speedtest-cli. If you’re familiar with the web interface, the terminal interface won’t seem too terribly foreign. By default, the bandwidth test will be done with the closest servers to you (based on IP address geolocation). You can also pick the server you want it to test your bandwidth with, overriding the default choice.

If you want to run the command that’d give you the results you’d get by using the defaults on the web page, you just run the command without any flags at all. It looks like:

If you want to list servers based on distance from your location, then you first need to run this command:

That will show you servers and their associated server number. Using that number, you can pick which server you want to use with this command:

Those commands will happily give you the test results right there in the terminal, but you can also opt to generate an image. To do that, you use the --share flag. So, a basic command would look like this:

After it spits out the results, it will give you a URL to an image generated based on your individual results. I suppose this is good for bragging rights or for demonstration purposes when complaining about your throughput to your ISP. An image generated from a VPS of mine looks like:

speedtest-cli results from a VPS
That’s obviously from a VPS. My bandwidth isn’t that good! It’d be pretty sweet if it was!

You can use that image to show off to your friends or, as mentioned, a demonstration for how poorly our ISP is serving you. This is one of a few ways you can tell if your provider is actually providing you with the services you purchased.

Those are pretty much the only ways you’re going to use speedtest-cli in the real world. There are a few more options, so be sure to check the man page. As a general rule, most folks are going to just want those options and those results.

Closure: 

And there you have it. You now have a new article. This one is telling you how to test your bandwidth with speedtest-cli, a test you may find useful from time to time.

The bandwidth from my house? Well, I have a lot of stuff using the ‘net on this line right now – but it’s still enough bandwidth for my needs. It’s not nearly as impressive and the results look like this:

speedteest-cli results from my home
As you can see, it’s not that high. That’s actually a bonded DSL line and twice what it used to be!

It’s useful testing to see if you’re actually getting the bandwidth you paid for. Sadly, ISPs are aware of the IP addresses speedtest.net uses and folks tell me that they’re prioritizing traffic from that service (meaning giving you better results than reality would give you) but I have no idea if that’s true or not. To be fair, it does sound sleazy enough for an ISP to do it, though I’ve had pretty good luck with the service providers I currently use.

Thanks for reading! If you want to help, or if the site has helped you, you can donate, register to help, write an article, or buy inexpensive hosting to start your own site. If you scroll down, you can sign up for the newsletter, vote for the article, and comment.

Subscribe To Our Newsletter
Get notified when new articles are published! It's free and I won't send you any spam.
Linux Tips
Creative Commons License
This work is licensed under a Creative Commons Attribution 4.0 International License.