Today, we’re going to show you how to install the full version of Vim in Ubuntu. Along the way, you may learn a few other things, but the process is simple enough. Even a new user can follow this article – I’d assume. I mean, I could follow it. I think…
Though, I’m not sure that a new user would opt for learning Vim. Either way, some of us will learn something from this article, even if it’s just me learning something from writing it. After all, if I read the headline aloud to you, our conversation might realistically start with this:
“But, KGIII, Ubuntu already comes with Vim installed!” You might say. “You don’t need to install it. D’uh!”
To which I’d respond, “You’d think so, and it appears to, but it actually only comes with a limited version of Vim. Watch, I’ll show you! Then we’ll install the full version of Vim.”
NOTE: We won’t be worrying about a GUI version of Vim. Maybe we can cover that in another article, but you can probably figure that one out on your own.
Now, Vim stands for Vi Improved, with Vi being a really, really old text editor (circa 1976) and Vim is an improvement on it. You’ll see it written as ViM or VIM from time to time, but if you go by the description in the man page, it’s simply “Vim”. Because of that, I’ve decided to spell it that way.
Actually, now that you know the initially installed Vim is just the small version (hint: tiny version), you can probably figure out the rest on your own. I have faith in you, my dear readers. Yes, yes I do… Still, I’ll tell you how, otherwise it’d be a pretty silly article!
Install The Full Version of Vim:
You’re going to want an open terminal for this one. If you don’t know how to open the terminal, you can do so with your keyboard – just press
With your terminal open, run the following command:
1 | sudo apt remove vim-tiny |
Next, we want to install a full version of Vim. To do that:
1 | sudo apt install vim |
There are also some GUI versions of Vim that may be in your default repositories. You can opt to install those, but we’ll not be covering those in this article. This article is just about how to install the full version of Vim.
Hmm… Well, that’s really all there is to it. I suppose you could string the commands together, all nice and fancy like…
1 | sudo apt remove vim-tiny -y && sudo apt install vim -y |
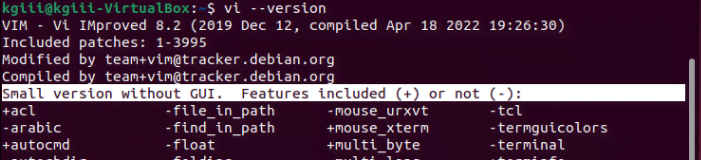
Yeah… So, really, that’s all there is to this. However, the important thing is that most folks don’t realize that it’s not the full version of Vim that has been installed by default. It’s just the tiny version, which is lacking in features. If you want, you can verify the currently installed version of Vim with this command:
1 | vim --version |
Assuming you’ve installed the full version of Vim, the output will look similar to:

Closure:
Well, there you have it. You now know that Ubuntu’s initially installed version of Vim is just the tiny version of Vim. You also now know how to install the full version of Vim in Ubuntu. If you’re a fan of Vim, or would like to start learning Vim, this is probably a good thing to know.
Thanks for reading! If you want to help, or if the site has helped you, you can donate, register to help, write an article, or buy inexpensive hosting to start your own site. If you scroll down, you can sign up for the newsletter, vote for the article, and comment.