Gather Storage Disk Information With ‘smartctl’

This will be a fairly universal article, useful for various distros, for those who want to gather storage disk information with smartctl. This is not a very taxing article, and more could be written, but we’ll simply be using smartctl to gather basic storage device information.

Habit means I want to type ‘hard disk’. I’ll refrain from doing so. I guess I could call them ‘storage drives’ but I’m just going to call them ‘storage disks’, or ‘disk’ when I am referring to the singular.

This isn’t going to get you information about the health of your storage disks or anything like that. Depending on the disk, it will give you information about things like the physical size, trim status, serial number, RPM (for spinning disks), and things like that.

The tool we’ll be using is smartctl, but that’s installed by installing smartmontools. This is going to be an easy install for many distros and I’ll try to detail that as best as I am able.

smartctl:

The tool we’ll be using is smartctl and it’s a terminal-based application. This tool is useful for a variety of things. We’ll just be gathering basic information about our storage drives. 

If you had smartctl installed already, you could check the man page. Doing so would reveal that the application is described like so:

smartctl – Control and Monitor Utility for SMART Disks

I suppose this could be considered controlling the drives (they’re not all disks anymore) but it’s definitely the tool for the job. Trust me on this! I wouldn’t steer you wrong, at least not intentionally. Oh, I do make mistakes, but they’re mostly harmless.

We’ve previously used this tool. Here’s a couple of articles for you:

How To: Check A Disk For Errors
How To: Use S.M.A.R.T. To Check Disk Health

So, in the weirdness of weirdness, if you want to use smartctl, you have to first install smartmontools. So, let’s cover that…

smartmontools:

First, you’re going to need to install smartmontools. We’ll cover how to do this, but it will be done via the terminal. You can use your GUI installer or you can (more often than not) just press CTRL + ALT + T and your default terminal will open.

With your terminal now open, pick the correct command to match your distro:

Debian/Ubuntu/etc:

OpenSUSE/SUSE/etc:

RHEL/CentOS/etc:

Arch/Manjaro/etc:

If you use a mainstream distro, one of the above commands should install smartmontools and give you access to smartctl. There are other distros out there, but I think I’ve covered those appropriately.

Find Storage Information In Linux:

From here on out, the rest is pretty easy. With smartmontools installed, you can check the man page with this command:

The flag we’re interested in would be the -i flag.

Before we go any further, we must first identify the disks we want to learn more about. For that, we’ll run the following command: 

Here’s an example output:

We’re not interested in partitions. We’re just interested in physical disks. (Now that I’m this far through the article, I should have stuck with ‘drives’ instead of disks.) 

If you pay attention to the output, you’ll see that the information we’re after is stuff like sda, sdb, or sdc. Those are all in the /dev/ directory which means that we can check storage disk information with this syntax:

Or, to provide an example…

This is a pretty good way to gather storage disk information. Here’s an example of the output from the previous command:

See? All sorts of information is available behind a simple terminal command! This is even something you can memorize in just a few minutes.

Closure:

I’m not sure when you’ll want to know this information, but it’s information and it is information that’s easily available to you. You simply need to install an application and run the commands listed above. I’m sure you can figure this out. 

Thanks for reading! If you want to help, or if the site has helped you, you can donate, register to help, write an article, or buy inexpensive hosting to start your site. If you scroll down, you can sign up for the newsletter, vote for the article, and comment.
Monitor Your Wi-Fi In Linux

If you use a wireless connection on your computer, or wi-fi for short, you might want to monitor your wi-fi. This is a simple task in the terminal and won’t take too long to learn. So, if you’ve ever wanted to monitor your wi-fi, this is the article for you!

There’s more to your wireless connection than just the throughput. There are things like link quality and signal strength that might interest you. It doesn’t stop there, there are all sorts of other bits of information you can learn if you decide to monitor your wi-fi in Linux.

I’ve written a few similar articles, each using a different technology. If you’re interested in those articles, click one of the following links:

Visualize Your Network Traffic With ‘darkstat’
‘vnStat’ A Tool For Monitoring Your Bandwidth Usage
Monitor Bandwidth In Real Time
Monitor Bandwidth With nload

Those are all about monitoring bandwidth and your network connection speed. They’re all fit for purpose, but this article covers wavemon, which is quite different and more specifically about monitoring your wi-fi connection as a whole. This isn’t very complicated or anything. You’ve got this!

This will be done in the terminal, so you might as well prepare yourself for that. So many of my articles do indeed require an open terminal.

wavemon:

The tool we’ll be using is known as wavemon. Like most of these articles, it’s another tool that’s fit for purpose. We want to monitor the waves, radio waves that is. This is one of the tools for the job. In fact, you’ll find the man page describes wavemon like so:

wavemon – a wireless network monitor

To install wavemon, we’ll need an open terminal. You can frequently just press CTRL + ALT + T to open your default terminal emulator. Give that a go. If it doesn’t work you can find the shortcut in your application menu.

With your terminal now open, we need to install wavemon.

Debian/Ubuntu/etc:

RHEL/CentOS:

Arch/Manjaro/etc:

Fedora:

I think I have all of those correct. If not, please leave a comment down below so that I can fix it. If you’d like to add the code to install wavemon on other distros, please leave a comment below. I’m pretty good at getting back to commentators and tend to be quick at fixing articles.

Anyhow, wavemon is the tool you’ll want to use to monitor your wi-fi!

Monitor Your Wi-Fi In Linux:

Leave your terminal open from the installation phase.

This section of the article will be nice and quick. You don’t need to do anything else besides run the command. You don’t even need elevated permissions (such as sudo) for this.

With your terminal open, just enter the following command:

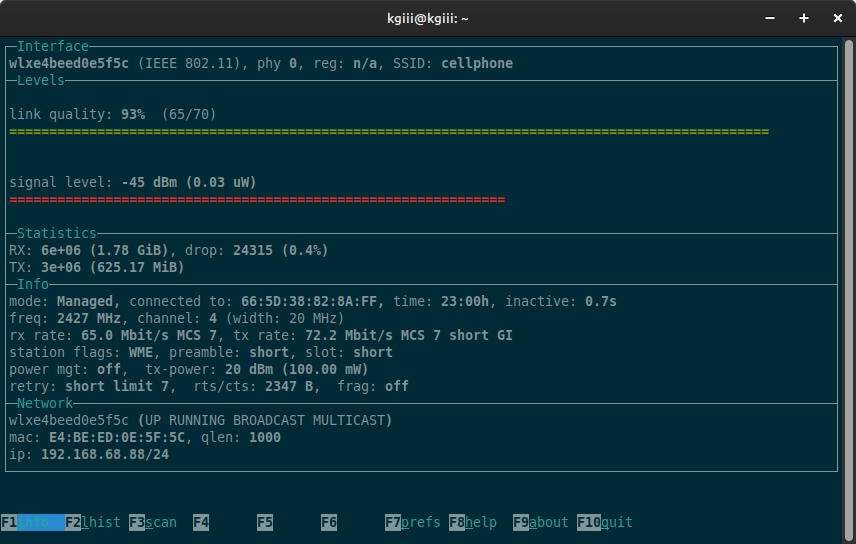
You’ll get a handy output (it may help to resize your terminal for this one) that’s full of information. An example of that output would be this:

using wavemon to monitor wi-fi in the Linux terminal.
It’s fairly easy to understand the output from the wavemon command.

I can’t get F1 to do anything, but F2shows a histograph.

If you do start wavemon with sudo, you can scan for wireless networks with the F3 button.

You can change some settings with F7 if you want.

The F10 button should quit the program. 

If that doesn’t work, CTRL + C will exit wavemon.

But, you can see how much data you’ve received (during this session) and how much data you’ve sent (during this session). It’s all pretty basic stuff and wavemon is a nice and easy way to monitor your wi-fi in Linux.

Closure:

Well, that’s one way to monitor your wi-fi in Linux. If you use a wireless connection and want more information about that connection, wavemon is an acceptable tool for the job. There are certainly other tools out there and this is just one of them. It’s an easy tool to use and I find it’s familiar enough for anyone to understand with relative ease.

I did say that this would be a fairly easy article. It is indeed a fairly easy article! This is one of those things you can learn in just a few minutes. You never know when this information will come in handy. Then again, you might just be curious and want to know this information. You can customize it a bit but I didn’t need to do so.

Thanks for reading! If you want to help, or if the site has helped you, you can donate, register to help, write an article, or buy inexpensive hosting to start your site. If you scroll down, you can sign up for the newsletter, vote for the article, and comment.

Short: Fix Typos With A Caret

Today’s article is labeled ‘short’ for a reason, and that reason is that we’re just going to cover how you fix typos with a caret. If you’ve ever made typos in a terminal command, you might be interested in fixing typos with a caret. 

This is labeled ‘Short’ for a reason. I’m trying something new. It will be an intentionally brief article. If there’s any benefit to this, I’ll do more short articles in the future.

If you don’t know, the ^ character is a caret.

If you don’t know, you can fix typos with a caret. It’s not difficult and every single one of us has made typographical errors in a terminal command. That means each and every one of us can benefit from fixing typos with the caret character.

You might also be interested in:

Fix Terminal Command Mistakes

It’s really simple to fix typos with a caret. You’ll see…

Fix Typos With A caret:

This article requires an open terminal. Just press CTRL + ALT + T to open your default terminal emulator.

The syntax is as follows:

That doesn’t make much sense, I’m sure. Let me show you an example. We’ll use the ‘uptime’ command.

Let’s say you made a typo and instead of ‘uptime’ you entered:

This will, of course, throw an error. 

You can use the caret character to fix this. For example:

The output from those commands would look like this:

As you can see, you’re replacing uplime with uptime and using the caret character to do so. This is pretty simple and a great way to save typing time when you make a typo in the terminal – especially if it’s a long command.

It doesn’t need to be the first word or anything like that. Let’s make an example out of the following command:

This is, of course, going to throw an error. So, enter the following:

That will re-run the previous command but will substitute the changed text for the matching text in the erroneous command. It doesn’t matter where the typo is in the previous command. It can be anywhere within the command and doesn’t need to be the first word or anything like that.

Closure:

So, this is a short article. Indeed, it’s called a ‘short’ in the title. If it does well, we may see more of them. If it doesn’t do well, you can expect them to disappear without much of a wrinkle in time. They may catch on. I don’t know. I don’t dare speculate, so your opinions really matter in this case.

I do welcome your opinions on the matter. I also don’t mind typing short articles now and then. As far as I can tell, writing an article takes me about the same amount of time, regardless. So, do let me know your thoughts on the matter. Without you, the reader, this site is pretty pointless. Thus, your thoughts on the matter are of interest to me.

Thanks for reading! If you want to help, or if the site has helped you, you can donate, register to help, write an article, or buy inexpensive hosting to start your site. If you scroll down, you can sign up for the newsletter, vote for the article, and comment.

The Differences Between APT and APT-GET.

Today will be a brief essay-type of article where we simply discuss the differences between APT and APT-GET. This article is really only useful to you if you use a distro that supports this. Those would be distros in the Debian family, so distros like Ubuntu or Linux Mint.

This will be a brief article and an article where I cheated. I let AI write most of this for me. It seemed like a good task for ChatGPT. So, it was largely written by an ML (Machine Learning) model.

If you’re interested in this sort of thing, read on! Who knows, if it takes off I’ll do more of these types of articles. They don’t save much time because I still need to format the output and crafting the input can be a bit tricky.

Ah well… It’s still fun and informative!

The Differences Between APT and APT-GET:

Debian’s package management system has evolved over time, and two widely used tools for managing packages and software updates are apt-get and apt. Both tools serve similar purposes, but they differ in terms of user experience, functionality, and underlying technology.

apt-get was the traditional command-line tool used in Debian-based systems to handle package management tasks. It has been a reliable workhorse for system administrators and users alike. However, it had some limitations and lacked certain user-friendly features.

apt, on the other hand, stands for “Advanced Package Tool” and was introduced as a more user-friendly alternative to apt-get. It was designed to provide a more intuitive and streamlined user experience while retaining all the functionalities of apt-get.

One of the key differences between apt-get and apt is the command structure and user interface. apt-get commands are generally longer and less intuitive, while apt commands are more concise and easier to remember. For example, to install a package using apt-get, you might use:

Whereas with apt, the command becomes simpler:

Both commands perform the same function of installing the specified package, but apt provides a more user-friendly syntax.

More Differences:

Another notable difference is that apt has a more modern and user-friendly progress bar during package downloads and installations. It offers clearer and more informative output, making it easier for users to track the progress of their package operations.

Additionally, apt supports various new features and functionalities that were not present in apt-get. For instance, apt includes the apt autoremove command, which helps in removing unnecessary dependencies that were automatically installed but are no longer needed. This feature simplifies package management and helps keep the system clean by removing residual dependencies.

Furthermore, apt also integrates the functionality of other apt-get commands like apt-cache and apt-config, providing a more unified and cohesive package management experience. Users can perform tasks like searching for packages, checking their metadata, and managing configurations more efficiently within a single tool (apt).

Despite these differences, both apt-get and apt use the same underlying package management libraries and repositories. They share a common package database and can perform all the essential package management tasks such as installing, updating, upgrading, and removing packages.

In summary, apt is an evolution of apt-get, offering a more user-friendly interface, improved output readability, and additional functionalities while utilizing the same package management backend. Users transitioning from apt-get to apt will find the latter more intuitive and efficient, but both commands remain viable options for managing packages on Debian-based systems.

Closure:

Well, AI did a pretty good job of this. If you wanted to know the differences between apt and apt-get, now you do! You can decide for yourself which you prefer. As you’ve seen throughout these many articles, I default to apt. 

I also wrote this article with AI because I have a storm coming. I want to get this scheduled ahead of time. My brain only works for so long and I run out of ideas to write about. I flip through my notes and they look like articles I want to write, but I can’t figure out what to write about.

Basically, I only have so much creative energy and these articles consume that energy pretty quickly. Sometimes, I have spurts of creative energy and can write a few articles ahead, but that’s not something I can count on. Articles are generally written the night before they’re published. By then, I’ll have enough creative energy again.

I needed to do this the same day that I published an article because Mother Nature doesn’t care about my publication schedule. I’ve had a few years without major outages. It seems like that’s going to be different this year. I suppose I can be grateful for those times when I had no major outages. I’ll be warm, secure, and have electricity – I just may not have internet.

Thanks for reading! If you want to help, or if the site has helped you, you can donate, register to help, write an article, or buy inexpensive hosting to start your site. If you scroll down, you can sign up for the newsletter, vote for the article, and comment.

Create A New User In Linux

If you’re familiar with Linux, you’ll already know that Linux is a multiuser system and today we’ll learn how to create a new user in Linux. This shouldn’t be a very complicated article. In some more advanced operations, you may be required to create a new user. This article will be about that.

If you aren’t already aware, you have a whole lot of users on your Linux system. You have more users than just your user account and certain things can be done by certain users. You can generally use an elevated account (or sudo) to overcome those user restrictions.

There may come a time when you want to share your device with another person. So, there’s another reason to create an additional user. If you’re managing a server with multiple users, there’s another reason to create a new user in Linux. There are any number of reasons why you’d like to create a new user and we’ll go over that process today.

We’ll just be using a couple of tools today. It’s not complicated.

useradd:

The main tool we’ll be using is the useradd command. This is a tool that’s certainly installed by default on any major distro. It’s a part of the basic building blocks we use to manage Linux, so this doesn’t require any installation. You can verify that you have useradd available with the following command:

The output should be:

If you check the man page, you’ll see this:

useradd – create a new user or update default new user information

So, as our goal is to create a new user, you can see that this is the correct tool for the job. I can’t think of a better tool for the job, as it should do everything behind the scenes as well.

passwd:

We’ll also be using the passwd command. This isn’t strictly necessary, but it’s in your best interest to set a user’s password. Once again, you won’t need to install anything and the following command will confirm that:

The output should match this output:

The text alone should let you know that this is a tool for setting passwords, but you can always refer to the man page to learn more. This is how passwd is described:

passwd – change user password

As I said, you don’t have to undergo this step but it’s in your best interests, from a security standpoint, to assign passwords to users who have any access to your system. And, as you can see, this is the right tool for the job of setting a user’s password.

Create A New User In Linux:

Of course, this is done in the terminal. As a general rule, you can press CTRL + ALT + T and your default terminal should open. That’s a fairly common shortcut that I mention often. You can also find a terminal in your application menu, pretty much regardless of which desktop environment you’re using and whichever Linux you’re using.

Creating The New User:

With your terminal now open, you’ll need to use elevated privileges, and the syntax is quite simple. To create a new user in Linux, the syntax follows:

This should be lowercase as Linux doesn’t like capital letters in usernames. So, for my username, the command would look like this:

You can confirm that you’ve added the user with the following command:

For example:

With your user firmly in place, you should set a password. Let’s do that next.

Set A Password For Your New User:

You’re almost always going to want a password for your new user. That’s easily done and also requires elevated permissions. You’ll need to continue using the terminal when you want to set a new password for the user.

The syntax for setting a password for your new user is as follows:

After you authenticate, the system will have you type in the password twice. It does this to ensure you’ve not made a mistake while typing, though it could be that you’ve made the same mistake twice.

So, be careful with this step. Otherwise, you have to find some way to reset the new user and the quickest way to do that would be to delete the user and start again.

Closure:

Yeah, I guess this counts as a short article. My most recent articles have been longer than this one. This one is about the length of my earliest articles, maybe slightly longer. The site has evolved!

Anyhow, you’ve learned how to create a new user in Linux. It shouldn’t matter which distro you’re using. The kernel you’re using shouldn’t impact this at all. It shouldn’t even matter what shell you’re using, this should simply work. If you want to create a new user, this is how you do it.

Thanks for reading! If you want to help, or if the site has helped you, you can donate, register to help, write an article, or buy inexpensive hosting to start your site. If you scroll down, you can sign up for the newsletter, vote for the article, and comment.

Linux Tips
Creative Commons License
This work is licensed under a Creative Commons Attribution 4.0 International License.