Remove Files By Extension

This should be a quick and easy article, easy enough for anyone to follow, as it covers how you can remove files by extension in Linux. There are a few tips and tricks you can use for this and we’ll be managing files in the Linux terminal. Read on to learn more!

As an aside, I’m thinking about doing some ‘shorts’, which would be short articles that cover a simple topic and do so concisely. If you have any thoughts on this, feel free to opine in a comment.

While Linux doesn’t necessarily care about file extensions, you’ll still often have file extensions. They’re useful for the user, as a way to visually determine a file’s usage quickly. If you see a .sh file, you can guess that it’s a script. When you see a .deb file, you can be reasonably sure it’s a package. You can assume a .png file is an image file.

Today, we’ll be using the ‘rm’ command and wildcards. We’ll be learning how to remove files by extension in the terminal. So, be prepared for that.

The ‘rm’ Command:

You won’t need to install anything for this article. You certainly won’t need to install the rm package. The rm package is a part of the core utilities. You can confirm that rm is available by entering rm --version in the terminal. (I do wish that was consistent, but it is not.)

If you don’t know, you can check the man page, to see the rm command is described like so:

rm – remove files or directories

As the goal is to remove files by extension, this seems like it’d be a good tool for the job at hand. Sure enough, it is!

Remove Files By Extension In Linux:

If you read the intro, and so few of you do, you’d know that we’re going to remove files by extension in Linux – with the terminal. So, open a terminal. More often than not, you can just press CTRL + ALT + T and your default terminal should open.

With your terminal open, the syntax is as follows:

Let’s use .deb as an example. If you want to remove all the .deb files in the folder you’re in, try this command:

The wildcard (the asterisk) means any characters can be there. You’ll remove foo.deb and bar.deb with the above command.

While that’s all there is to it, you can use wildcards for other things.

You can use a wildcard to match other patterns. If you had fle_1_foo and file_2_foo, you could remove them with this command:

If you had file_foo_1 and file_foo_2, you could remove them all with this command:

Pretty sweet, huh?

There’s more to the rm command. If you wanted to do this with folders, you’ll find that rm doesn’t do that by default. So, just add the -r flag to your command, like so:

If you’re having issues removing something with the rm command, there’s a flag you can use to force it. That flag is the -f flag and it’s used something like this:

I guess this article is more about the wildcard than it is about learning how to remove a file by extension. That’s just one way to introduce people to the concept, now that I look at it this way.

The wildcard is a pretty powerful tool in Linux, a tool that’s very useful in the terminal and while doing advanced file management. Knowing how (and when) to use a wildcard will do you well. If you have any questions, you can always ask and I’ll see if I have an answer.

Closure:

So, we’ve covered how to use a wildcard to remove a file by extension. You can do this with folders and other files, not just by extension. What you’d be doing would be pattern recognition and Linux is more than happy to help you along the way. It’s a pretty powerful tool and a tool that every Linux user should be familiar with.

Hmm… I guess 700+ words is short these days. Ah well…

Thanks for reading! If you want to help, or if the site has helped you, you can donate, register to help, write an article, or buy inexpensive hosting to start your site. If you scroll down, you can sign up for the newsletter, vote for the article, and comment.
Monitor USB Bandwidth

Most of us use USB devices regularly, even using USB thumb drives to install Linux, and today we’ll learn how to monitor USB bandwidth. What we don’t tend to do is monitor the bandwidth of our USB devices. Today, we’ll be doing that and just that. It shouldn’t be a long article.

When I say bandwidth, you could also say throughput, I speak of the speeds at which data moves from one place to another. In this case, it’s the speeds supported by your USB devices.

When you move data from one place to another, it does so at various speeds. These days, you have better speeds with USB devices, now that we have USB 3.1 and USB C. Those are pretty speedy.

If you don’t know, USB stands for Universal Serial Bus and USB has been around since 1996. There are a number of standards for transferring things across the bus lines and USB is just one of them. USB is a ratified standard that gives us uninversal connections shared among manufacturers. There’s even USB4 that I’m entirely unfamiliar with.

I suppose I don’t really need to explain this. We all understand USB well enough, I’d think. Still, we may not know some of the details and we may have never thought about monitoring USB bandwidth. Well, that’s what we’re doing and we’ll be doing it in the terminal.

What will we be using?

usbtop:

We’ll be using a nifty application known as ‘usbtop’ for this exercise. While there’s a tiny bit more to it than we’ll cover, we’ll at least use it to monitor USB bandwidth. If the ‘top’ aspect looks familiar, it should. This usbtop is familiar in the sense of top, htop, or atop. All of which are applications I should cover but haven’t. If you’re already familiar with those, you’ll have the right sort of expectations.

The usbtop application runs in the Linux terminal. I know that it’s available for more than just the Ubuntu family, but I’ll be testing this in Linux Mint. That’s just the device I’m using at the moment, though I’d normally be using Lubuntu.

If you’re using Linux Mint (or Debian, Ubuntu, Lubuntu, or even ElementaryOS) you can install usbtop easily. I had to refer to the Arch AUR page for this article, so I’m sure this is available elsewhere – though I think it might be in AUR for Arch derivatives like Mandriva.

But, seeing as we’re using Linux Mint, you can install usbtop with this command:

(Don’t try running it just yet. It won’t work properly.)

Once installed, you can type man usbtop to read the manual but that doesn’t appear to do a darned thing. No, I do not know why. If you want, you can try something like gibberish – like usbtop -help which won’t actually work but will be kind enough to spit out the two options you have with this usbtop application.

Monitor USB Bandwidth:

Well, I’ll assume you were able to run the installation command above. It’s run in the terminal. If you go this far, you didn’t need help opening the terminal. See? You’re getting better with this Linux stuff already!

Now, it’s not going to run. Feel free to try it. If you try, it will spit out an error that looks remarkably similar to this:

No USB bus can be captured thanks to libpcap. Check your name filter and make sure relevent permissions are set !

Don’t blame me. I’m just the messenger. Instead, start with this command:

Now you can run the following command:

Yes, you want elevated permissions to run usbtop.

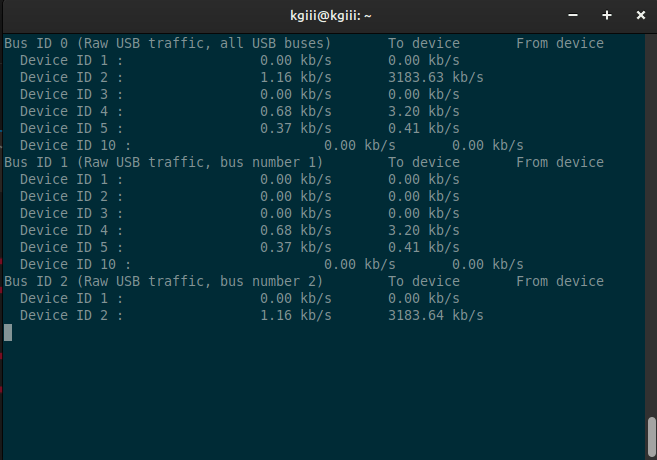
With usbtop now up and running, you can try transferring something to a USB drive, or something from one USB drive to another USB drive, or anything involving your USB drive. You can even start up a USB webcam and monitor the bandwidth that uses.

I took a crappy screenshot… You’re welcome!

monitor USB bandwidth with usbtop
See? It’s easy enough to monitor USB bandwidth with usbtop. It’s not too difficult to use.

If you want to exit that screen, press CTRL + C. For some reason, the Q doesn’t quit. Then again, what do you expect from a project that can’t even sort out their man page. So, it is what it is. Again, don’t blame me. I’m just the messenger!

Nah, it’s a perfectly usable application. It doesn’t do much. You can expect it to do what it says and just what it says. If you checked the fake help page above, you’ll see that you can monitor a single device and you can list the devices. Those can be monitored individually, but you might as well monitor USB bandwidth on all the devices at once. It’s not too confusing, I swear.

Closure:

Well, now you know how to monitor USB bandwidth. I’m sure the application is available for other distros, but I did not test that. If you do test that, feel free to leave comments so that other people can learn from your labor. It’s a community, so share the wealth of knowledge in a comment.

I promise, it won’t be used as a way to spam you. I’ve been almost 500 articles and I’ve never spammed anyone so far – even with hundreds of comments and a bunch of people signed up to the newsletter. I just don’t see me violating that trust. If I ever do have a commercial message, it’ll just get attached to the newsletter – like a sponsor or something like that.

Thanks for reading! If you want to help, or if the site has helped you, you can donate, register to help, write an article, or buy inexpensive hosting to start your site. If you scroll down, you can sign up for the newsletter, vote for the article, and comment.

When Did I Install Lubuntu

This won’t be a complicated article, nor will it be a very long article, as we answer the question of, “When did I install Lubuntu?” It’s a rather specific question and one you can answer with a couple of different commands. Fortunately, this is also going to apply to Ubuntu, Mint, Debian, and all the rest that are set up in this manner.

You may not recall the exact date and time when you installed Lubuntu. That’s okay, most of us don’t keep track of that information. At some point, you may want to know that information. It’s not a major data point, but knowing when you installed Lubuntu can be useful.

Yes, this article is about Lubuntu. It’s specific to Lubuntu because I use Lubuntu as I type this. There are other distros where this will work perfectly well. Tomorrow is my birthday and I’m not going to test a bunch of distros.

If you’re unfamiliar with Lubuntu, it’s a Linux distro that I’m a big fan of. It’s not the best Linux distro, it’s the best distro for me. I’ve written a whole lot of Lubuntu articles!

List Installed Software In Lubuntu
Benchmark Your GPU In Lubuntu
How To: Zip Files In Lubuntu
Let’s Mount An .iso In Lubuntu
Disable Window Grouping In Lubuntu
(And many more Lubuntu articles…)

Lubuntu is a great distro that has a familiar interface, great support, a wonderful community and is easy to adapt to. A Windows user can be up and running Lubuntu in an hour – if they take their time. As I say, “Things are where you’d logically expect them to be.

Anyhow, the question is when did you install Lubuntu…

When Did I Install Lubuntu:

This is going to require an open terminal. As we’re using Lubuntu, you can open your default terminal by pressing CTRL + ALT + T on your keyboard. The tools you need will be already installed.

Now, you can identify your storage drives with lsblk but we’ll use the following command, as it’s easier for this task.

From there, you want to find your / partition. For example, here’s my output:

In this case, the output is /dev/nvme0n1p1 and not any of the other choices.

If you were using something like Mint, the output might be similar to this:

In that case, the output is /dev/sda2 largely because I’m using UEFI on that system and the first partition is occupied with that data.

The syntax you’re looking for to find out when you installed Lubuntu is pretty simple. You have two choices that will work. They are as follows:

Or:

So, on my Lubuntu system, the command would look like:

While on Mint it would look like this:

Of course, you can switch it up with the dumpe2fs command, per the instructions.

NOTE: This works on ext* formatted partitions. If you did some sort of weird, non-default, installation, then it may not work for you. I can’t be 100% certain because I didn’t test this.

The tools we’ve used are tune2fs, which is already installed and is described as:

tune2fs – adjust tunable file system parameters on ext2/ext3/ext4 filesystems

And, we’ve used the dumpe2fs command which is already installed and described as:

dumpe2fs – dump ext2/ext3/ext4 file system information

So, I can only assume that other drive formats aren’t going to work and that information simply won’t be stored. They might work. I simply do not know and haven’t taken the time to look into it. That means this will work for the vast majority of users.

Closure:

If you have ever asked yourself, “When did I install Lubuntu?” This is the article for you. I admit, it’s rather specific, but it is what it is. If you want to try this with other systems, go ahead! It won’t break anything and it just might work. If you’ve partitioned your drives with a different formatting, it’s probably not going to work but trying these commands will not break anything.

Thanks for reading! If you want to help, or if the site has helped you, you can donate, register to help, write an article, or buy inexpensive hosting to start your site. If you scroll down, you can sign up for the newsletter, vote for the article, and comment.

How To: Show User Information In The Linux Terminal

There comes a time in many Linux journeys when you want to know how to show user information in the Linux terminal. Well, if you’ve been waiting for such an article, this article is for you. After all, knowing about the various users might be important information for you.

You may not realize this, but your Linux system has all sorts of users. They belong to varied groups, sometimes more than one group at a time. Unless you’re already familiar with this subject, you probably have more users than you realize. 

That’s perfectly okay. It’s entirely normal to have different users. Linux is a user-oriented operating system. Users have varied permissions and can perform different tasks based on those permissions. 

This actually shouldn’t be a complicated article. It’s just a couple of commands, though the command may not be well-known among the newer Linux users. New users should familiarize themselves with the concepts of a multi-user system and with groups.

Anyhow, you shouldn’t need to install anything. The tools we’ll be using should be installed by default. You will need an open terminal. So, you have been warned. After all, it was right there in the title!

lslogins:

The tool we’ll expose you to today is ‘lslogins‘, which should be installed by default. You can verify that lslogins is installed with this command:

And, if you check the man page (with man lslogins) you’ll see this:

lslogins – display information about known users in the system

So, sure enough, that looks like it’s the correct tool for the job. Our goal is to show user information in the Linux terminal. This looks like a good way to go about it.

Show User Information In The Linux Terminal:

Yes, we’re doing this in the terminal. You can frequently open your terminal by pressing CTRL + ALT + T. Otherwise, you’ll find a terminal emulator somewhere within your application menu. It’s likely to be in the admin section of said menu.

With your terminal open, you can start with the basics. That is, we’re going to show all the known users with the lslogins command. That syntax is so simple.

You’ve got a lot of users. You may not know it yet, but you do. Here’s an example output from my system:

Now, that’s all well and good.

But…

Let’s say you only want to show user information about one single user. That’s fine and you can do that in a variety of ways. You can also do it just as easily with the lslogins command, simply by using the -u flag. 

The syntax is as follows:

An example output might look like this:

And there’s the information about the root user. You can try with your username and get information about things like the groups you belong to and more. Go ahead and give it a shot, you won’t break anything. I promise you won’t break anything with this command!

Closure:

You never know when you’re going to want to show user information in the terminal. It is useful information, especially when debugging things like permission errors. You may find you need to add yourself to a group or things like that. So, store this command away in your mental bank and save it for when you need this information.

Thanks for reading! If you want to help, or if the site has helped you, you can donate, register to help, write an article, or buy inexpensive hosting to start your site. If you scroll down, you can sign up for the newsletter, vote for the article, and comment.

Find Out If A Package Is Installed In Debian

Today we’ll have a quick and easy article where we find out if a package is installed in Debian. There are times when you’re unsure of which packages are already installed. Today’s article looks to help with that, letting you know how to find out if a package is already installed.

Depending on where you live, yesterday was a holiday. A nice and easy article seems like a good idea. It’s actually a holiday as I write this, but that’s okay. I’d probably have written it ahead of time but Mother Nature was having her way with me and my neighbors. So, this is being written on Christmas Day. That’s another good reason to keep this short.

If you’re unaware, Debian is a Linux distro. Debian is one of the elders among distros, having just turned 30 not long before writing this article. It’s a very popular distro that has stood the test of time.

Debian also has a whole lot of derivatives. Then, there are derivatives of Debian derivatives. For example, there’s Ubuntu (and all the flavors) which has many derivatives, such as Linux Mint. While less common, there are probably derivatives of derivatives. By now someone has probably at least made a derivative of Linux Mint! (I did not look.)

That means that today’s article will apply to almost all of them. There’s bound to be an outlier, but anything still using apt or dpkg is good to go and will be able to use the information in this article. You won’t need to install anything, but you will need an open terminal.

Find Out If A Package Is Installed In Debian

Today’s article will involve the terminal. You can easily use a GUI for this. Just open your software manager to search for the package name. In this case, we’ll use a terminal and you can usually open your terminal by pressing CTRL + ALT + T.

You won’t need to install anything to determine if a package is installed in Debian. Everything you need, all the tools you’ll need, should be preinstalled. The tools you’ll be using:

dpkg:

You can use dpkg as one tool for this job. Given my preferences, this is the tool I’ll use for this job, simply because I like the output better. If you check the man page, you’ll see dpkg is described like so:

dpkg – package manager for Debian

That’s a pretty good-sounding description for the task. After all, we want to find out if a package is installed in Debian.

The syntax to do this with dpkg is quite simple:

For example (in Mint):

As you can see, Firefox is indeed installed. You should also remember that this operation is case-sensitive. This generally means you want lowercase letters.

apt:

You can also use apt to find out if a package is installed in Debian. If you don’t already know, apt is one of the tools you can use to manage packages in Debian. Think of apt (and apt-get, the stable cousin) as a front-end for Debian’s dpkg. The man page isn’t all that descriptive at first:

apt – command-line interface

But, if you look a little further, you’ll see:

apt provides a high-level commandline interface for the package management system.

So, apt is another fine tool to use for finding out if a package is installed in Debian. It too has a rather simple syntax and it looks like this:

For example (in Mint):

In this case, you can safely ignore the warning. Again, this is case-sensitive and you’ll almost certainly want lowercase letters in your command.

Closure:

See? A nice and easy article for you. It’s not all that difficult to find out if a package is installed in Debian. This is something you can do quite quickly with an open terminal emulator. It’s something easy enough to remember, as well.

Today’s article was nothing too taxing and is something that can come in handy because, if you’re like me, you can’t possibly remember all the packages you’ve installed. Then, when you do install packages, you’re often installing dependencies.

Keeping track of all of those packages manually would be a tedious process! Just a little bit of terminal knowledge makes quick work of this and the commands are easy enough to memorize. Try them a few times and you might just remember them by rote.

Thanks for reading! If you want to help, or if the site has helped you, you can donate, register to help, write an article, or buy inexpensive hosting to start your site. If you scroll down, you can sign up for the newsletter, vote for the article, and comment.

Linux Tips
Creative Commons License
This work is licensed under a Creative Commons Attribution 4.0 International License.