How To: Have Infinite Bash History

Today we’re going to have a good time because we’re learning how you can have infinite Bash history. There’s a bit more to it and not all of you will want an infinite Bash history. But, for those that do, we’re going to accomplish that right here in this article!

First, I’m assuming you’re using Bash as your shell. The odds are really good that you’d know if you’re not using Bash, as Bash is pretty much the default. Bash is the interactive shell you’re using, known as Bourne Again Shell. If you don’t know what shell you’re using, I covered that in an article about determining the shell you’re using.

Side Note: I sometimes write articles that are meant to preface another article, but then I forget and don’t write the additional article. I suppose that helps keep things interesting…

So, as you know, when you type a command into the terminal that command is stored in a file typically called ~/.bash_history – a hidden file in your home directory. Well, there’s a limit to how much history that file will retain and this is Linux – meaning that, of course, you can change that value. Today, we’ll be changing that value – making it ‘infinite’.

No, of course, it’s not really infinite. There’s a finite amount of disk space you have. This being a plain text file, it takes up very little space. While it’s not technically infinite you can store a whole lot of entries in your Bash history. We’ll set it to infinite, but I’ll show you how to set it to any value you want.

Ready?

Infinite Bash History:

As you can see, this is a Bash thing. That’s a good sign that you’ll need an open terminal. You can press CTRL + ALT + T and your default terminal should open. See? We’re already making progress!

With your terminal open, we’re going to edit another hidden file. The name of this file is .bashrc and it’s a file that stores things like terminal settings.

The tool we’ll be using is ‘nano‘. Click that link to learn about Nano, including how to install Nano should Nano not come preinstalled in your chosen distro. As you may know, Nano is one of my favorite text editors. We use Nano a lot around here.

Start with opening the ~/.bashrc file with nano, like so:

Scroll to the bottom and add the following lines:

Any negative value, in this case, -1, will result in an infinite history. However, you can make that value any number you want. When you’re done adding those lines, you have to save the file. Remember, to save a file in Nano, you just press CTRL + X, then Y, and then ENTER.

You could make the value 5000, for example. That’d simply look like this:

The sky is the limit. You can make that value any number you want, but all negative values will be treated the same. If the value is negative, it means you’ve got an infinite Bash history. Don’t forget to save any changes with Nano, as instructed above.

Now, you could reboot or log out to make the new settings take effect, or you can simply tell your system to reload the file to make the changes take immediate effect. That’s an easy command, simply use:

As you can see, infinite isn’t infinite (nothing is in the real world, according to current observations) and you don’t have to choose the infinite setting. You can pick whatever numbers you fancy and the process is the same.

Closure:

There you go, you now know how to set up your system to have an infinite Bash history. Well, an infinite ~/.bash_history if you prefer. With that setting engaged, you’re limited only by your creativity, fanaticism, and disk space. Go nuts with it! They make bigger disks! (Also, it takes up very little space.)

Thanks for reading! If you want to help, or if the site has helped you, you can donate, register to help, write an article, or buy inexpensive hosting to start your site. If you scroll down, you can sign up for the newsletter, vote for the article, and comment.
Let’s Make A Directory Tree

Today we’re going to install a nifty application and then we’re going to make ourselves a directory tree. We’ll learn a couple of other things along the way, as we often do. Linux is great like that, and so we’ll have some fun along the way – including generating an entirely pointless text file that takes up too much space and takes too much time! That sounds fun to me!

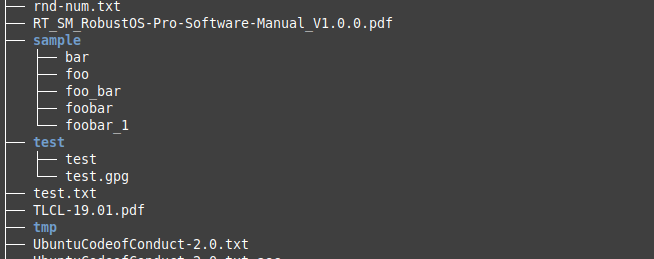
So, what is a directory tree? Well, you start in one directory and then make a “tree” of all the directories below it. The directory you start in will be the top of the tree, and the directories below will be the branches. In its simplest form, it might look a little like this:

using the tree command to make a directory tree
As you can see, that’s part of the tree – with various directories and sub-directories.

You can’t see the parent directory, but there is one. That’s just a piece of the tree, which should be enough to explain this tree concept.

The tool we’ll be using is known as ‘tree’, of course. The man page describes it as being:

tree – list contents of directories in a tree-like format.

You may not have ‘tree’ installed and you will need to install it. It should probably be a default tool, but it is not. Use your package manager, search for ‘tree’, and install it. In Ubuntu/Debian/Derivatives, you can try:

That should get you started and, with tree now installed, we can…

Make A Directory Tree:

If you had your terminal open to install ‘tree’, you might as well leave it open. You’ll need it for the rest of this article. If your terminal is not open,  you’ll need to open it. Just press CTRL + ALT + T. Tada!

Now, the first thing we’re going to do is right there in your home directory, simply make a directory tree with the following command:

That will make a lovely tree. The -d flag means that it will only show directories in the output. That’s what we wanted, a directory tree. However…

You can make a tree with the files included. Just drop the -d flag and try this:

Now, let’s send that output to a file. If you want a tree (with or without files listed in it) as a saved text file, you can try this command:

Now, for some fun, you can try this (it will take a long time):

You need ‘sudo’ for that command so that it can traverse and list the various directories for which you have no permissions. It will take a long time. I want to say that it took about 30 minutes, but I currently have a bunch of external stuff hooked up to this device.

It will also generate a giant text file. Mine was over 500 MB in size. Opening it is a slow and painful process, but it’s not too bad once it is open. There are other options for the tree command, just type man tree to learn more about the tree command.

Closure:

So, now you know how to create a directory tree. You also know how to make your directory tree include files and how to make a directory tree of your entire computer’s file system. I don’t know why you’d need to know this, but now you do. They do make good text documents for small sections of the tree, especially if you need to quickly see the directory structure for some other task.

Thanks for reading! If you want to help, or if the site has helped you, you can donate, register to help, write an article, or buy inexpensive hosting to start your site. If you scroll down, you can sign up for the newsletter, vote for the article, and comment.

List The Files In A Directory

Today’s article is only going to be useful if you are a new user and don’t yet know how to list files in a directory. This is, of course, something you do in a terminal. I do believe this will be a quick and easy article, so read on if you don’t yet know how to list files in a directory.

If you’ve used Linux for more than a month, you can safely ignore this article.

Yes, this has been covered all over the web. This isn’t anything remotely new, nor is it anything all that complicated. However, this is a holiday weekend and I figure it’s a good article for new users who happen to be just browsing around. I’ve also covered some ‘ls’ commands before.

On the other hand, it should be a short article! So, there’s that!

List The Files In A Directory:

Of course, this article requires an open terminal, like many other articles on this site. Should you not know how to open the terminal, you can do so with your keyboard. Press CTRL + ALT + T and your default terminal should open.

With that terminal now open, let’s try a simple command:

That will list all the files in the directory. If you’d like to see the output in columns, you can always try this command which lists the output in a denser manner.

That command doesn’t list dot (hidden) files. Seeing as you’re in the home directory, you should have some hidden files. If you want to use the ‘ls’ command to show files, you need the -a flag. You can combine it with the above and use this command:

That’s the command I use more often than not. This being Linux, you get to decide which how to use the command. I think I type the ‘ls -la‘ command out of habit.

Closure:

Well, you got an article. Sure, it’s a simple article but someone may find this important information. Of course, they could just use the man page   – but what’s the fun in that?

Thanks for reading! If you want to help, or if the site has helped you, you can donate, register to help, write an article, or buy inexpensive hosting to start your site. If you scroll down, you can sign up for the newsletter, vote for the article, and comment.

A Fun Way To Check If Your Network Devices Are Connected

Today is going to be a fun article, mostly good for lazy people, where we discuss a way to check if your network devices are connected. There are far easier ways to do this, assuming you’re local to the device. If you’re not local to the device, the fact that you’re connecting to it likely means that the network is at least somehow connected!

But, in the spirit of being lazy, let’s head into the world of sheer, unadulterated laziness. I mean, if you want to know if your wireless is connected there’s an icon. Of course, you can see if your ethernet is connected. To check that ethernet connection all you probably have to do is look at the back of the computer and maybe wiggle the cable a little bit.

This, of course, presumes that said network adapters are in working condition. If they’re broken, this tool might give you a bit of debugging information. But, still, this is a command that calls itself a “beat connector”. It’s mostly used to check to see if your network devices are connected – as in physically connected to your computer.

The tool we’ll be using will be ifplugstatus and it defines itself as this:

ifplugstatus – A link beat detection tool

At least as far as I use it and the man page indicates, it checks to see if your network devices are connected. Seeing as that’s what the title suggests, it means we’re probably off to a good start!

Check If Your Network Devices Are Connected:

First things first… You’ll almost certainly find that ifplugstatus is not installed by default. You’ll need to install ifplugstatus if you want to use it. To do that, you’ll need an open terminal – which you’ll need for the rest of the article. To open your terminal, press CTRL + ALT + T and your default terminal should open.

Now, I’ve only ever used this command with Lubuntu and similar. Because of this, I don’t know if it’s the same on other distros. (Feel free to leave a comment.) But, at least in Lubuntu, not only is ifplugstatus not installed by default, that’s not the name of the package you need to install. No, that’s a different name and to install ifplugstatus you will want to run the following command:

You’ll need to adjust that command to match the distro you’re using.

Anyhow, with ifplugstatus installed, you can check if your network devices are connected with just the following command:

But wait! There’s more! You can get a lot more information about your network devices by adding the -v (verbose) flag to the command. That flag automatically assumes the -a (all) flag, so it’s just:

There you have it… Instead of just looking in the status bar section to see if wireless is connected, or even looking around the back to see if the cable is connected, you can just check all that right there in the terminal – without having to move much more than your hands! You’re welcome!

Closure:

Heh… There you have it! You have another article. If you ever want to check for a beat, that is to check if your network devices are connected, you now know how to do so. You can even SSH into another device and check to see which of its network devices are connected (beyond the obvious one you’re connecting with). You don’t even have to leave your seat.

Thanks for reading! If you want to help, or if the site has helped you, you can donate, register to help, write an article, or buy inexpensive hosting to start your site. If you scroll down, you can sign up for the newsletter, vote for the article, and comment.

How To: Prevent A File From Being Deleted*

Today, we have another simple article, where we discuss how to prevent a file from being deleted. It’s not quite true and I’ll explain in a moment, but for the most part, it makes it so you can’t remove a file by accident or the like.  So, if you want to prevent a file from being deleted* read on.

Now, let me be more clear. I’m a bit sorry for the cheesy headline, but there’s a reasonable character limit. I included an asterisk just to make sure. A user with root permissions (eg a user with sudo privileges) can still delete the file – but it takes an extra step to do so. They have to know and work at it to delete the file.

The tool we’re going to use is called chattr. While it looks like ‘chatter’ and I want to type ‘chatter’ every time I use it, it is a tool that you use to change a file’s attributes. It’s a handy tool but we’ll only be examining one specific use for chatter. If you’re curious, the man page defines chatter as:

chattr – change file attributes on a Linux file system

If you’re using a mainstream distro, you shouldn’t need to install chattr. You should find it already installed. Some of the more lightweight distros may not include it by default, but you can verify that it’s installed by running the following in your terminal:

If you do find that chattr isn’t installed, go ahead and install it. It’s in your default repos. I’m sure of it!

Prevent A File From Being Deleted:

You guessed it. You’ll need an open terminal for this one. That’s easy, just press CTRL + ALT + T and your default terminal should open. See? Pretty easy!

Now, I’m going to show you how to use chattr to set an immutable bit. It’s not difficult and just uses the +i flag. Let’s start with creating a file:

With the file created, let’s set the immutable bit with chattr:

Now, let’s try to remove it with the rm command:

No luck? Well, let’s grab a hammer. We’ll try to remove the file with sudo:

Surprise! You still can’t delete it, even with sudo or logging in as root. To delete the file, you have to first remove the immutable bit, like so:

After that, you can happily (and trivially) remove the file with:

In case that’s not very clear, I’ve made you an image. That should help!

prevent a file from being deleted
See? If the words aren’t useful, perhaps the picture will explain it better.

That should explain it well enough. The file can still be deleted, it just requires sudo and removing the immutable bit from the file’s attributes. Pretty neat, huh?

Closure:

Of course, there’s always a way for a root user to be able to remove a file. However, you can make it difficult should you want to prevent a file from being deleted. A skilled user will check the file’s attributes and know how to delete the file, so it’s more about protecting a file from being deleted unless you want to.

Thanks for reading! If you want to help, or if the site has helped you, you can donate, register to help, write an article, or buy inexpensive hosting to start your site. If you scroll down, you can sign up for the newsletter, vote for the article, and comment.

Subscribe To Our Newsletter
Get notified when new articles are published! It's free and I won't send you any spam.
Linux Tips
Creative Commons License
This work is licensed under a Creative Commons Attribution 4.0 International License.