Today’s article is going to tell you how to find a program’s PID. PID stands for “Process Identification” and every running process has one. It’s in numeric format and knowing the PID makes it easy to manage processes. So, today we’ll be covering that. It’s a quick and easy article, useful perhaps for a future article to reference or as just a quick note as a reminder.
We’ll mostly be using a program called ‘pidof’ and you can figure out why it is named what it is pretty easily. It defines itself as:
pidof — find the process ID of a running program.
As we will just be covering general usage, we really won’t have to be all that verbose. There’s a man page for pidof, which you can (and possibly should) reference. The usage we’ll be covering is just that of a lone admin on their bog-standard home computers. If you have anything other than that, you might want to read the man page.
So, with that in mind, let’s learn how to…
Find A Program’s PID:
This article requires an open terminal, like many other articles on this site. If you don’t know how to open the terminal, you can do so with your keyboard – just press CTRL + ALT + T and your default terminal should open.
With that terminal now open, you can find a program’s PID with the following command:
1
pidoff <application_name>
That should spit it out. It looks like this:
That’s a nice and easy one!
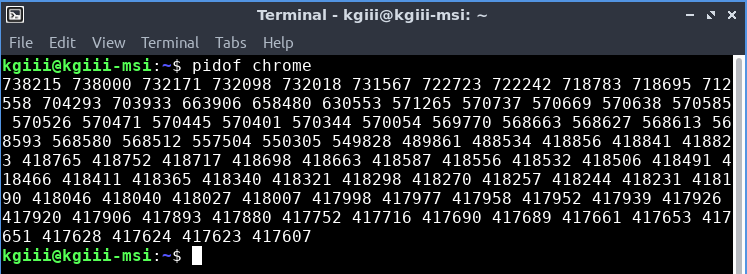
On the other hand, it can look like this:
That’d be the PIDs of Google Chrome when you have a ton of crap open.
Now, you can do a lot with that information – things best suited for another article perhaps. Either way, you’ve learned how to find a program’s PID. It really was that easy! You’re welcome and thanks for reading!
But wait, there’s more!
I’m not sure where I came across the gem, but it’s pretty awesome. There are some variations (I tried to find my source for this to give credit where credit is due, but it’s out there in a few places – none older than my notes on the matter) but this one is nice and easy.
Ready? Enter this into your terminal:
1
xprop | grep PID
That should turn your cursor into a cross-hairs. Go ahead and click on an application and then check the output in the terminal. It should, among a few other tidbits of information, help you find a program’s PID with just a simple point and click. (Useful mostly on applications that only have one or two instance running.)
By the way, if you’re looking to find a script’s PID that you have running, you just need to add the -x flag. It’d look like this:
1
pidof -x <script_name>
Which is pretty much all a basic home-user is ever going to need to know. Again, check the man page if it’s more complicated than that.
Closure:
Congratulations! You now know how to find a program’s PID. From there you can do stuff like kill it! I’d expect an article in the future that reaches back to this one, using it as a reference, that makes it all come together a little better. Until then…
Thanks for reading! If you want to help, or if the site has helped you, you can donate, register to help, write an article, or buy inexpensive hosting to start your own site. If you scroll down, you can sign up for the newsletter, vote for the article, and comment.
Today’s article is going to teach you how to install PIP in Linux. PIP is a reverse acronym meaning ‘PIP Installs Packages” and it’s a handy tool for the installation and management of Python applications. This article should be pretty short and easy for anyone to understand.
This article is going to be pretty basic, merely telling you how to install PIP and not a whole lot more. The reason I write this article is because it needs to be written. I should also point out that Python is a programming language, though I’d expect most visitors to know that already. But, yes, this article needed to be written.
See, I wanted to tell you about a lovely piece of software (or three), but they all need to be installed with PIP. So, rather than write out the long installation instructions for various distros and package managers each time, I figured I’d make a single article that told you how to install PIP.
That’ll save some time and effort. I can refer back to this when those articles are written. There are many Python applications that can be installed with relative ease – just like you’re installing from your regular Linux repositories. PIP’s Python applications can be installed and uninstalled in the terminal while using PIP, so it’s quite easy.
So then, let’s learn how to…
Install PIP In Linux:
Installing PIP requires a terminal. If you don’t know how to open the terminal, you can do so with your keyboard – just press CTRL + ALT + T and your default terminal should open.
Once you have the terminal open, you can install the appropriate PIP. Most folks will be using Python 3, but a smattering of people will still be using Python 2. I will list the installation instructions, where applicable, with Python 2’s instructions first.
The basic usage of PIP is pip install <package>, pip uninstall <package>, and pip search <package>. My readers are smart enough to understand that without further instructions. You can also learn a lot by using man pip. Now you know how to install PIP in Linux.
Closure:
And there you have it. You have an article telling you how to install PIP in Linux, enabling you to install Python packages/programs quickly and easily inside the Linux terminal. It’s also one more article in my series of articles. I’m now well within a month of when the project is allowed to end and I still have a lot of articles left in me, so I’d expect it to keep going for long into the future. Or at least until someone steps up and takes the site over for me.
Thanks for reading! If you want to help, or if the site has helped you, you can donate, register to help, write an article, or buy inexpensive hosting to start your own site. If you scroll down, you can sign up for the newsletter, vote for the article, and comment.
Today, we’re going to learn to clear the terminal screen. This is generally done for privacy’s sake. You don’t want people to be able to scroll up and see what you’ve been reading in the terminal. This probably isn’t as important if you’re the only user and you’re in your house, but you may still like to keep things clean and tidy.
We’ll go ahead and cover two ways to clear the terminal in this article. They’re both rather easy commands and you’ll find this article is definitely not all that complicated, or even very long. This is pretty much one of the first things folks should have learned when they started using the terminal. We might as well cover it here.
Rather than make this long-winded, we’ll just make this into a short and easy article to read. Let’s all learn how to…
Clear The Terminal:
To be clear, this just erases the text in the terminal. It clears the scrollback content so that folks can’t scroll up and see the previous terminal contents. Again, it’s a good idea to do if you’re in a multi-user environment where people may have access to your screen and you don’t want them to know what has been written to the terminal.
Obviously, you need a terminal for this article. Just press CTRL + ALT + T and your default terminal should open.
I suppose we’ll need some content, so let’s try using this command:
1
ls -la
That should fill your terminal up.
Now, to clear it you can use either of the two following commands:
1
clear
Or you can also use:
1
reset
(Though reset may leave a little text at the top, it still removes the terminal’s scrollback history.)
Both of those will do the job, with ‘clear’ being the obvious winner = but it’s nice to have options. They’ll clear the scrollback in the terminal, preventing folks from scrolling up to read what has previously been written there. Of course, they could potentially still press the arrow up button and see what commands you’ve written, so you can try to prevent that as well.
Closure:
See? I told you that it’d be a quick and easy article. It’s not all that taxing to learn how to clear your terminal and that’s all that this article is meant to cover. Both of the two commands have a man page, but they’re not very useful commands for anything else but clearing the terminal. Have an easy day, a day where you can (maybe) say you learned something and not have to read a long article. After all, it was a quick and easy day for me!
Thanks for reading! If you want to help, or if the site has helped you, you can donate, register to help, write an article, or buy inexpensive hosting to start your own site. If you scroll down, you can sign up for the newsletter, vote for the article, and comment.
Today’s article is about one of my favorite terminal emulators, Terminator.Terminator is one of my favorite terminal emulators, and I’d like to use this opportunity to expose more users to it. For lack of a better category, we’ll say this is a review. Why not? It’s my site, I’ll call it a review if I wanna! I’ll make it a review!
So, we call it a terminal emulator because it emulates the terminals of old, back when terminals were the main way for a person to interface with their computer. They are not true terminals, but they perform similar functions. Long gone are the days of just green-screens. Today, we have graphical user environments and there’s less focus on the terminal for some folks. From here on out, I’ll just be calling it ‘terminal’ for simplicity and brevity sake.
There are some die-hard folks who still cling to the terminal – and I’m one of them, at least for certain tasks. At any given moment, I have at least two terminal instances open, each a different piece of software. One of those is usually Xfce4 and the other is often Terminator. Today’s article is about the latter.
Chances are good that you can install Terminator with ease. It’s likely in your default repositories. For example, on Ubuntu you’d install it with this command:
1
sudo apt install terminator
Go ahead, give it a shot… If not immediately available, you can look here for more information. If you’re really energetic, you can read the documentation. In this case, it’s going to be a positive review (obviously), so I’d not recommend it (such as I am) if I wasn’t a fan… So…
Why Terminator:
You’ll not be even remotely surprised when you open Terminator for the first time, and that’s a good thing. You’ll see your standard terminal looking thing, complete with a title bar. Truthfully, it’s kinda ugly looking until you make it your own (more on that in a minute). It looks like this:
Terminal (terminal emulator) without any customizations.
What you’re looking for is in the right mouse-button click – the preferences menu. Once you open that, you’ll see all sorts of options.
Once in the options, you’ll start to understand why I like Terminator. You can make it visually appealing, use multiple tabs, group tabs, auto-run commands when opened, and have all the various profiles you could possibly want. If you’re working on multiple servers at the same time, this is definitely a great help.
You have infinite theme options, but there are a number of them that are built in – the standard types like solarized dark or light. If I’m not taking screenshots, I like mine to look like this:
As I’m often in a dark room, this is excellent for my eyes.
That is so much nicer on my eyes. And, if the Terminator theme didn’t clue you in, yes I am using a computer that I don’t normally use. It’s a long story, but nothing is broken beyond my ‘net connection. But, that’s why the screenshots look different. I am also using Flameshot instead of my beloved Shutter.
So, that’s not enough? Seriously – go through and check the preferences. You have global options and then you have all sorts of preferences that you can pick – each contained in their own distinct profiles. When you get to the profiles, you’ll see how much customization is really possible. Allow me to show you:
As you can see, there are a whole lot of options with Terminator.
What does Terminator offer? A whole lot… Not only are there tabs, you can set it up in a more traditional grid fashion. These layouts can be moved with drag-and-drop. The list of keyboard shortcuts is extensive – and you can probable tell I’m just reciting the documentation. Layouts are even saved from session to session.
But Wait, there’s more!
Anyhow, all those preferences, not just layouts, can be saved from session to session. Once you get it configured the way you want, it’ll let you retain those settings. Many of these are all extensions of the profiles feature, so it’s highly customized if you want it to be.
I especially like the individual profiles – not seen on this computer’s screenshot. If I paid a bit more attention, I could just copy the config from ~/.config/terminator, but I’m slacking and this situation is temporary. (I’m amazed that I’ve still been able to keep up my publication schedule!) I did not, so you get a different set of screenshots.
If you want, you can even find plugins for Terminator. You can write your own, if such is your desire. If you click here, you’ll see a bunch of plugins that you can use to extend Terminator even further. (Quite a few plugins exist, so do check the link.)
As I said, there are quite a few plugins and some of them are quite useful – especially for system admins and programmers, or DevOps folks I guess. They’re universally free, in every sense of the word. They’re also easy to install – just drop them into ~/.config/terminator/plugins/ and they’ll be available to enable from the preferences menu.
If nothing else, go ahead and install Terminator to see if you like it. I dare say that you won’t be disappointed, unless you’ve got some weird edge-case and even then it’s about the best you’re going to get.
Rating Terminator:
Terminator does everything you can want in a terminal, more or less. If it doesn’t do what you want, plugins are easily developed and someone else may have scratched that itch for you already.
I honestly can’t think of anything it’s missing that I personally need or want. It can be a bit boxy and the look is dated, but it should match your theme fairly well, or better if you do some work customizing it.
I appreciate how easy it is to configure it to work with my eyesight. I’m partially colorblind (not the way you’re probably thinking) and have difficulties with the spaces between the primary colors. I can see green, but yellow-green may appear as either yellow or green to me. So, some of the themes (again, you can customize them as much as you desire) are wonderful for my eyes.
Yeah, try as I might, I just can’t think of anything bad to say about it. I’m reluctant to give anything a 10/10, but this is really close to being the perfect application for the task it is designed for. I’d even go so far as saying that it’s feature-complete, but some folks must not agree ’cause they keep writing plugins and that means they want more features.
So, I’m going to give this a 9.5 out of 10. That’s the highest I’ve ever rated anything on this site and I’d not expect to see that score for anything else. I knock the 0.5 because obviously people expect more from it – options they feel should be defaults. A few of the plugins are indeed handy (even to me, a simplistic user). Yeah, I’ll knock off the points for that. That sounds good. It gets a 9.5/10. That’s pretty much a gold medal winner, right there!
Closure:
And there you have it… You have another article – this one a review, and a review of not just one of my favorite pieces of software but of a piece of software I use many, many times a day. Even if you have a favorite terminal, give Terminator a try. You won’t be disappointed – probably… If you are, you’re just weird!
Thanks for reading! If you want to help, or if the site has helped you, you can donate, register to help, write an article, or buy inexpensive hosting to start your own site. If you scroll down, you can sign up for the newsletter, vote for the article, and comment.
In today’s article, we’re going to explore a couple of other ways to generate strong passwords in Linux. It’s going to be a pretty easy task and one most everyone can learn from. It shouldn’t even be a very long article.
Weak passwords are easy to crack. You don’t want that, for obvious reasons. If you want to see how approximately how long it’ll take to brute force passwords, you can check sites like this one. Remember that the time given by that is more or less the maximum time it could take, and your password could be brute-forced (by repeated guessing) much sooner than that.
I’ve previously written an article about generating a sufficiently complex password. That’d be one way to generate strong passwords, but this article will cover a couple of other easy ways to generate strong passwords in the Linux terminal.
Generate Strong Passwords:
This article requires an open terminal, like many other articles on this site. If you don’t know how to open the terminal, you can do so with your keyboard – just press CTRL + ALT + T and your default terminal should open.
With your password open, we’re first going to use GPG to create a strong password. Everyone should already have GPG installed, so there’s no reason to cover that in this article. So, to do so, you’d use a command something like this:
1
gpg --gen-random --armor 1 16
It’ll have an output similar to this one:
Obviously, you don’t want to use that password specifically! Use your own!
You can change the 16 to any length you want. It’s obviously the number of characters.
You can also use OpenSSL, which you likely have installed, to generate a complex password. It’s actually pretty easy and the command is:
1
openssl rand -base64 24
Again, you can change the 24 to anything you darned well please. Sometimes sites will have a maximum password length, which might seem kinda silly – as I think I recall there being a hard limit of 256 characters that the kernel will accept. Either way, the output would be similar to this one:
That one is 24 characters long. Yay!
Feel free to mess around with changing the length. OpenSSL is likely installed by default and you don’t have to install pwgen. Both of the tools in this article will likely be installed by default.
Closure:
And there you have it! Another article said and done. This one is about teaching folks how to generate strong passwords in Linux. It’s an easy enough task and this article shouldn’t be too complicated for even the most n00b of the n00bs!
Thanks for reading! If you want to help, or if the site has helped you, you can donate, register to help, write an article, or buy inexpensive hosting to start your own site. If you scroll down, you can sign up for the newsletter, vote for the article, and comment.