Weather In The Terminal? We can do that!

Weather in the terminal? There are people who pretty much live in the terminal! They do everything there, including checking the weather! This article will show you how to get your local forecast in your terminal, because why not?

Where I live, they have a saying, “If you don’t like the weather, wait a minute.” The weather is constantly changing and is responsible for killing quite a few people every year. We have some pretty extreme weather. Because of this, I pay fairly close attention to it – but, really, I don’t tend to check it in the terminal. I use a more robust solution. This article is for those folks who want to. You’re welcome!

First, a little poem:

Whether the weather be fine, or whether the weather be not,
Whether the weather be cold, or whether the weather be hot,
We’ll weather the weather, whatever the weather,
Whether we like it or not.  — anonymous

See? Who says we’re uncultured here?

Anyhow, this is just going to be a pretty brief article. It’s pretty simple to check and it requires just your terminal and a tool called ‘cURL‘ (which has been covered already, so click that link to save some time). If it turns out to be something you like, you can always alias it for regular use or just commit the short commands to memory.

Weather In The Terminal:

Seeing as this is ‘weather in the terminal’ we should probably start with opening the terminal! That’s easy enough, just press CTRL + ALT + T and your default terminal will open.

Once you have it open, you’ll be using a website known as WTTR.IN. You can actually just click that link and get the weather in your browser. It should be your local-ish weather, unless you’re using a VPN. The site is using IP Address Geolocation to show your local weather and a VPN presents a different IP address, meaning it may not actually be your local weather. The same is obviously true in the terminal.

Start with just a basic example, try:

That should be ‘close enough’, depending on where you live and how accurate the geolocation is. If it’s not, you can add some information – such as town and state (or province, or whatever your country uses). It’d look something like:

The output from that command would look a little something like this:
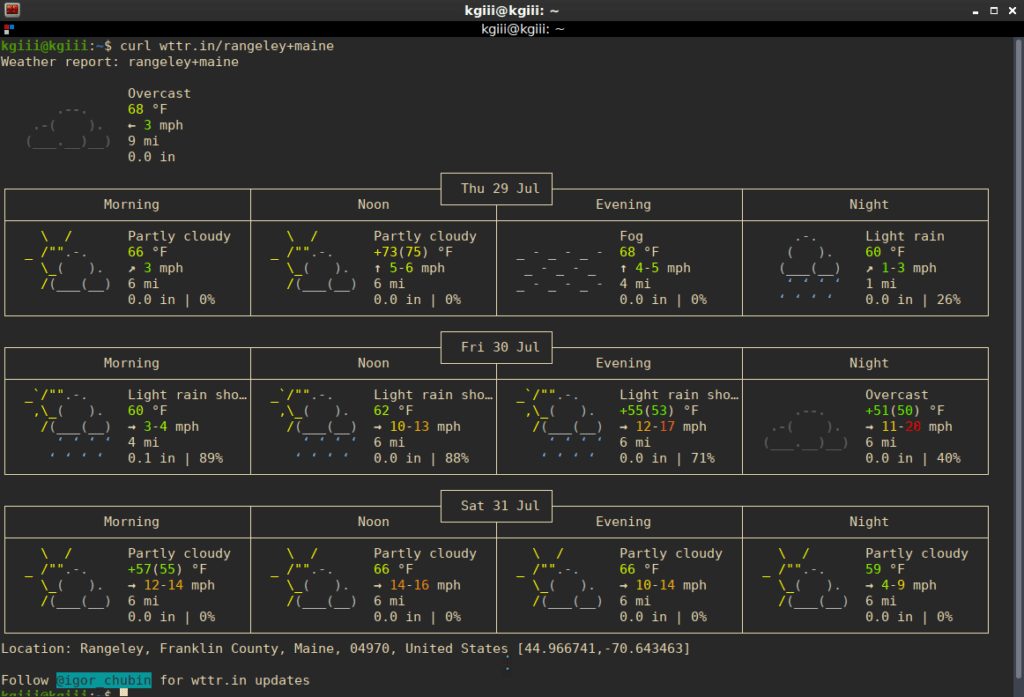
weather forecast in the terminal
See? It even knows I’m in the USA, so it uses the correct units. Neat, huh?

You can even use some landmarks and it will try to figure it out. For instance, you can check the output from this command:

If you’re in the US, then it will show you the results in our goofy units – even if metric is used at the location. Well, it will try to – within the limitations of geolocation. If you want to change it up, you use a ‘u’ or an ‘m’. To force the above with metric units, you enter:

Anyhow, there’s so much more that you can do. Frankly, the above are all I really use it for – and I seldom bother with that. Living where I do, I get my weather in a browser and with a browser extension. So, be sure to use the following to learn more:

You can also just visit https://wttr.in/:help to get that same information in your browser. It’s up to you, but you’re already in the terminal so you might as well keep using it!

Additional info: GitHub repo is located here.

Closure:

And there you have it. Another article is in the books, this one showing you how to use your terminal to check the forecast and current conditions. There are a ton of options that I didn’t bother covering, but options that you may find useful. Be sure to check the help page and keep up with the project on GitHub.

Thanks for reading! If you want to help, or if the site has helped you, you can donate, register to help, write an article, or buy inexpensive hosting to start your own site. If you scroll down, you can sign up for the newsletter, vote for the article, and comment.

How To: Use S.M.A.R.T. To Check Disk Health

Disk health is an important matter. Your storage media has a useful lifespan and the clock is ticking it from day one. Either hard disk drive (HDD) or solid state drive (SSD), your storage media has a limited lifespan.

You should plan on your drives failing because, given enough time or use, they will fail. This is a known limitation and there are ways to monitor disk health. Heck, in theory, many systems are supposed to monitor disk health and alert you of impending failure (see some BIOS options), though I’ve personally had poor luck relying on automated alerts. I periodically perform manual disk health checks.

We’ll be using “S.M.A.R.T.” (Self-Monitoring Analysis and Reporting Technology) and “smartmontools” for this exercise. It’s actually pretty accurate data – sorta… If it tells you there’s a problem, chances are good that drive health is an issue. However, drives are perfectly happy failing without giving you any warning at all. As I said in the opening paragraph, there’s a limit to how long your drives will last – but it will eventually and certainly fail.

At the same time, there are probably many of us who have ‘magical’ drives. I have an external HDD that gets used constantly – and it’s well over a decade old. On the other end of the spectrum, I’ve had drives fail within weeks of the warranty ending – and sometimes before the warranty ended. Drive failure is real and you should be prepared for it. The best way to be prepared for it is to have spares and a good backup plan.

So, let’s get started! (Also, click on the Wikipedia link above.)

Install ‘smartmontools’:

As I said above, we’ll be using ‘smartmontools’ to check the disk health with S.M.A.R.T. reporting. It’s a fairly robust application and is available for the major distros. Smartmontools is easily installed with your package manager, or you can do it in the terminal. If you want to do that, first open the terminal with CTRL + ALT + T and, once open, enter the appropriate command.

Debian/Ubuntu:

RHEL/Fedora:

Arch/Manjaro:

Any of those will work on the appropriate systems. If you use a distro that’s not listed, it’s probably available in your repositories. It’s a fairly common tool and disk health is important!

This doesn’t work with NVMe drives. If you’re looking for NVMe support, look up ‘nvmi-cli’. I’ll probably write an article on the subject sometime in the future.

Anyhow, the tool you’ll be using from smartmontools is ‘smartctl’. It’s included with the package and is pretty easy to use. Read on to see how!

Check Disk Health With ‘smartctl’:

First, you should check to see if the device reports disk health by looking to see if the device has S.M.A.R.T. enabled. You can run this command:

Where ‘/drive/path’, it’s often something like ‘/dev/sda’. You can look up your drive’s path easily enough. If it’s not enable, you can turn it on with:

Now, you can go ahead and check the status. To do that, you run:

That should output some data. Remember how I highly recommended you click the Wikipedia link above? Well you should. The data in the report is fairly well-covered on the Wiki page. If you didn’t click it above, you can click now.

Anyways, the data in the report above might be old because the command may output some stale information. To refresh the data in the report, you can run a short (or long) test. In this first case, we’re going to run a short test (lasting 2 minutes or less) with this command:

Wait the couple of minutes as prompted and then run the original command again to get a report with the updated information:

You can also run a long test. That’s done by changing the short to long, as in the command used above. It’s done like this:

That’ll take up to 10 minutes and you can check the results after that time has passed. Once again, you will simply run the same command you’ve been using all along:

Anyhow, pay attention to the results in that report. They’ll give you a lot of information. You can check the results and technical details against the Wikipedia link. With that information in hand, you can keep a reasonable eye on your disk health.

There’s more to smartctl and even smartmontools, but not a whole lot that’s terribly interesting or important. Simply run man smartctl and look through the options. The most interesting/valuable disk health checks are covered above, but there’s nothing wrong with knowing more about your tools.

Closure:

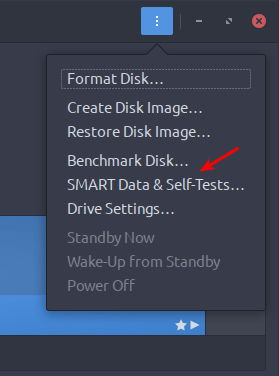
You know, if you install ‘gnome-disks’ then you can just do all of this graphically. Chances are good that all the distros out there that have smartmontools also have gnome-disks. If that’s more your style, just install it and poke around. It’s right there in the ‘three dot’ menu. Like so:

gnome-disks - check disk health with  SMART status
A nice GUI way! Give it a shot if you want!

But, that’d be cheating! It’d also be a much more basic article and where’s the fun in that? Nowhere. That’s where the fun isn’t. Seriously, the GUI method with gnome-tools works just fine for this if you’d prefer to go that route. Again, check your results against the Wikipedia link posted throughout the article. 

Anyhow, there’s another article in the books. One more article said and done, in my attempt to keep this going for a full year. It has been pretty fun. This article is about disk health and reminds me that I need to write one about backing up your data. That’s good, ’cause it means I’ve still got all sorts of ideas for articles! 

Don’t forget, you too can write articles. I don’t mind and it’d help me reach the year goal going!

Thanks for reading! If you want to help, or if the site has helped you, you can donate, register to help, write an article, or buy inexpensive hosting to start your own site. If you scroll down, you can sign up for the newsletter, vote for the article, and comment.

EDIT: Edited on 06/29/23 to correct spelling.

Make Ubuntu Provide Feedback (Asterisks) When Typing Passwords In The Terminal

By default, Ubuntu doesn’t show anything when you type passwords in the terminal. They made this decision for security reasons. Shoulder-surfing is a thing. People looking over your shoulder could see how many characters you entered, thus narrowing down the number of possible passwords.

This article will show you how to show asterisks on the screen, as some folks prefer, when you enter your passwords in the terminal. This tip is actually rather easy and shouldn’t take very long. It’s not even all that advanced, and it can be undertaken by most anyone. You should at least understand the implications before changing the behavior.

Frankly, it’s a perfectly acceptable choice to not show anything when typing sensitive material, but others prefer to have some feedback. It makes it easier for slower typing people to keep track of where they are, for example. On top of that, there are many situations where you really don’t have to worry a whole lot about people shoulder surfing.

When you’re using a computer that’s never going to be out in public, it’s probably not much of an issue if you show asterisks. If it’s a laptop that you use in coffee shops and you’re security conscious, you may want to leave it the way it is. You have a choice. You can leave it the way it is, or you can go ahead and change it. Linux is pretty awesome like that. You get to make the decisions!

Passwords With Asterisk Feedback:

First, let’s crack open the terminal. Press CTRL + ALT + T and your default terminal should open so we can edit the sudoers file. It’s done like this:

Enter your password and hit enter, of course. (Mark it on the calendar! This should be the last time you enter your password in the terminal without some visual feedback!)

Use the down arrow until you’re at the start of the line that says:

Press the ENTER button. This should move that line down and leave a blank line above it. Use the arrow button to move up to that blank line and enter:

Note: This spacing isn’t technically required. It is done for convention and to aid in ease of reading/processing information-dense more accurately and swiftly. You can also probably put the new line anywhere in that file. For some reason, that’s how I have it in my notes.

When you’re done, you will then need to save the file. As this is nano, press CTRL + X, then Y, and then ENTER.

That’s it. That’s everything. You will probably need to close and reopen all of your terminals to notice the difference. Then you can test it by opening a new terminal window and tying in:

Type your password when prompted and you’ll hopefully see some asterisks as feedback. It should look a little like this:

password with asterisk feedback in the terminal
See? Asterisks for passwords feedback in the terminal.

As mentioned above, Ubuntu made this change for security reasons. If you change this, you’re making it so that people can see how many characters you typed when you entered your password. Of course, they can also count how many times you pressed a key on your keyboard. Just be aware of it and decide for yourself.

Closure:

And there you have it, another article published. This one is about the passwords you type and if they’ll give you any feedback by appearing as asterisks on the screen. It’s a decision that you get to make, and the security implications are real – but not universal. You may prefer asterisks when typing your passwords, or you may prefer the defaults.

Thanks for reading! If you want to help, or if the site has helped you, you can donate, register to help, write an article, or buy inexpensive hosting to start your own site. If you scroll down, you can sign up for the newsletter, vote for the article, and comment.
‘traceroute’ in Linux, Let’s Take a Closer Look!

This article will explain a little about ‘traceroute’ as a network diagnostic application. We’ll give a few traceroute examples, enabling you to figure out some networking issues.

Whenever I find myself unable to connect to a networked device, including websites online via the internet, one of the first tools I reach for is called ‘traceroute’. It’s not exclusive to Linux and you may know of the tool ‘tracert’ in Windows that does the same thing.

traceroute defines itself as this:

traceroute – print the route packets trace to network host

More realistically, it shows you the hops (devices) you go through in order to make a connection. See, when you connect to a different computer over the network, you don’t generally do so without going through other devices. Your data will travel through multiple devices to reach the source device and all those hops along the way are potential points of failure.

Sometimes those devices are under your control and you can actually do something about it. Other times, it’s just informative and all you can do is wait, or inform someone else and hope they fix it. If nothing else, you’ll know where your packets stopped or slowed down to the point of uselessness.

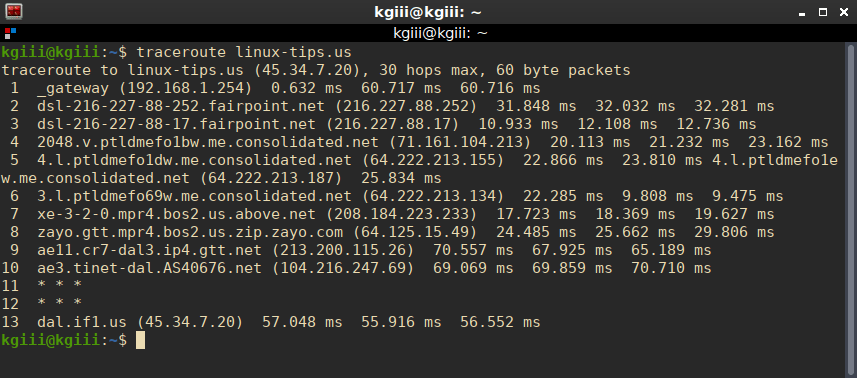
For example, there 13 hops (devices) between me and linux-tips.us.

traceroute in action
See? There are 13 hops to reach my destination. 

So, while that picture should explain it well enough, let’s get a little deeper.

Using traceroute:

You may find that traceroute isn’t already installed. If it isn’t, it’s absolutely in your default repositories. However you would normally install software is how you install this. If you look, traceroute is sure to be in there. So, go ahead and install it if it’s not already installed. For example:

Just adjust that to your package management system and it’ll be in there. It’s that important a tool that I’m sure it’s in there. In fact, I’m a bit surprised that it’s not always installed by default, but it isn’t.

Now, the most basic usage is just like you saw in the image above.

So long as you’re within 30 hops and use 60 or fewer packets, that’s going to work well enough. The information it spits out is what devices it has traveled through (their hostname and IP address) and RTT – Round Trip Times. There are three of them because three packets are sent. Ideally, you’ll see your destination listed last. If not, you’ll see the closest you got to your destination.

If you see an asterisk, that means the device didn’t respond as expected. Frequently, this means the device is blocking ICMP. You can try to get around this by using ICMP ECHO (-I) or TCP (-T) packets. However, both of those will require elevated permissions, or the use of sudo.

All of this is mostly informative – unless you’re in control of the network and devices.

When it’s a network and devices under your control, you can use this information to troubleshoot. You can see the device names and time taken for packet transit, narrowing down your choices for troubleshooting.

When you’re using this over the public internet, you’re subject to other people who control the devices. If you find a break along the way, about all you can do is wait – or maybe use the data to contact your ISP (or hosting provider, if it’s your site that you’re trying to reach).

There are other options with traceroute. You can change the port you use, you can send more or fewer packets, you can not resolve hostnames, and more. To see the rest of the traceroute options:

That will fill you in with the many other choices you have. I find I don’t really need the advanced options, but system admins may need some of the features. As a regular user, I just use it to troubleshoot my own connections on my private network or when I am having web hosting/connectivity issues.

Closure:

And there you have it. Another article is in the books, and this time it’s just a nice easy article about the venerable traceroute. If you don’t already have this tool in your toolbox, it’d be worth adding and adding a basic familiarity to your mental toolbox.

Thanks for reading! If you want to help, or if the site has helped you, you can donate, register to help, write an article, or buy inexpensive hosting to start your own site. If you scroll down, you can sign up for the newsletter, vote for the article, and comment.

How To: Properly Delete a User’s Account

Today’s article will show you how to properly delete a user’s account. It’s a pretty basic task and an astute observer would note that I’ve not yet written an article about creating user accounts. I may have to write said article at some point, because why not? This promises to be a pretty easy and brief article!

When you install some software, it may add a user. When you remove that software, it may just leave that user behind. You may have multiple people using your devices, or you may be working in a corporate environment. Either way, there comes a time when you may want to clean house and delete user accounts that are no longer necessary.

It can be just a little tricky to properly delete a user’s account, so I figure it’s something worth covering. The tool we’ll be using is ‘userdel‘ and my checking indicates it’s universal. Let’s get to it!

Delete A User:

I’m gonna assume that you already know the name of the user you’d like to remove from your system. With that information in hand, let’s open the terminal by pressing CTRL + ALT + T on your keyboard. 

Once you have the terminal open, you can do a basic user delete with:

If the user has a /home/user directory, you can delete that at the same time with this:

Seems nice and easy, right? Well, before you should run any of those commands you should be sure that the user is both not logged in and has no processes running in their name. If you do have either of those things, you will want to run this command before running either of the userdel commands above:

You can also try the -f (force) option with the userdel, but I’ve never had good luck with that. So, your better using killall before you use userdel. If you’d like to try it, here it is:

And that’s actually everything. There’s likely to also be a graphical way to delete users and that’ll depend on your desktop environment. Rather than play around with learning and documenting all those, you can just do it in the terminal where it’s easy enough and equally effective.

Closure:

And now you know how to delete a user account, and how to do it properly. Indeed, this is another article in the books and hopefully this one will help people for years to come. It’s a good idea to not have pointless users around on your system. If they exist, they can be used.

Thanks for reading! If you want to help, or if the site has helped you, you can donate, register to help, write an article, or buy inexpensive hosting to start your own site. If you scroll down, you can sign up for the newsletter, vote for the article, and comment.

Linux Tips
Creative Commons License
This work is licensed under a Creative Commons Attribution 4.0 International License.