As you learn Linux, you’ll possibly find yourself using the terminal more often. You’ll run processes in the terminal because you need to or because you prefer to. This is how you stop, pause, and resume those processes running in your terminal.
There are any number of reasons why you’d need to do this. I’ll give you an example in the main part of the article, but there are all sorts of reasons to know and use this information. There are a few generic reasons to do so, of course.
First, you’d want to stop processes because you don’t just want them to keep running forever. That’s the easy one, though they’re all easy. Speaking of which, this article should be pretty short and easy.
Second, you’d possibly want to not stop but rather pause a running process because you expect to return to it. This is different than stopping the process. It’s very much like pausing a movie.
Third, obviously, will be resuming the above mentioned process. If you’ve paused a running process then it only makes sense to know how to resume said process. If you don’t intend to resume it, it doesn’t make much sense to pause it.
This article will explain how to do all three of these operations!
Stop, Pause & Resume Terminal Processes:
So, we’re going to need both a practice exercise and an open terminal. Let’s start by getting the terminal open by using your keyboard and pressing
That should open your default terminal. Assuming it does open your terminal, I want you to run the following command:
1 | ping linux-tips.us |
Once started that command will keep running over and over again. I assume you don’t need to keep pinging forever, so you can stop it with
What if you don’t want to stop it – you just want to pause it for a little while? Well, run the ping command again and this time use
If you want to resume running that process in the terminal, in that same terminal, you just use the following command:
1 | fg |
Unlike the first two, it’s text that you enter into the terminal before you press enter. There’s no
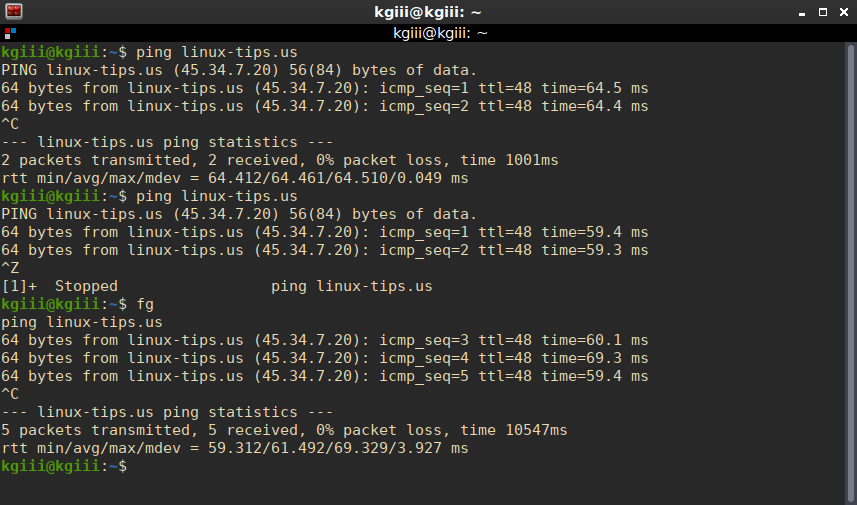
The above commands, when run in succession, should look a little something like this:
You can do this with all sorts of applications that run in the terminal. You can stop, pause, or resume, as needed by moving the running process into the background and then bringing it back into the foreground.
If you look carefully at the above image, you’ll see that it counted five packets as being transferred. This indicates that the process doesn’t keep running in the background. It’s truly paused. Typing ‘fg’ and pressing return brought the process back to the foreground, where it continued pinging this site.
Closure:
There you have it. It’s another article in the books! This one tells you how to start, pause, and resume processes running in a terminal. Hopefully, you can find some use for it. If you have any ideas for articles, feel free to leave a comment. My publication schedule seems to be working, so you can expect another article every other day.
Thanks for reading! Your readership and feedback helps keep me motivated! If you want to help, or if the site has helped you, you can donate, register to help, write an article, or buy inexpensive hosting to start your own site. If you scroll down, you can sign up for the newsletter, vote for the article, and comment.