How To Install Krita In Ubuntu

Krita is an image authoring application. Some people compare Krita with GIMP. While the two programs have overlaps, the two programs are not the same and really shouldn’t be compared. Where GIMP is meant for image manipulation, Krita is more aimed at people who want to create images from scratch.

GIMP and Krita probably shouldn’t even be compared with each other. In fact, to save some time, you can read an article from the good folks at GIMP Tutorials for a good description of the benefits from either as well as why the two applications, GIMP and Krita, should not be compared with each other.

If you want to create digital art, Krita may be the software you’re looking for. When you’ve got a pointing device and plan on using the software like you’re painting, then Krita is the kind of software you’re looking for. Should you plan on creating from the ground up, not modifying memes or photoshopping dicks on pictures of previous politicians, you probably want Krita.

As luck would have it, this article will teach you how to install Krita on your Ubuntu-based system. It should also work for Debian, the official Ubuntu flavors, and Ubuntu derivatives like Mint or ElementaryOS. However, I tested in exactly none of those other systems. If you it doesn’t work, don’t say I didn’t tell you.

This process will have you installing it through your package manager. If you don’t want to do so, then there are an AppImage and Snap package that you can grab by going here. The way we will be installing Krita is a bit more ‘traditional’, so to speak.

Install Krita:

This article requires an open terminal. If you don’t know how to open the terminal, you can do so with your keyboard. Press CTRL + ALT + T and your default terminal should open up like magic.

The first thing we need to do is add the PPA. That’s a Personal Package Archive that adds itself to your regular repositories. A PPA is meant for software that’s not in the default repos. It’s meant for personal use – but we’ve bastardized the use to make it a way to easily install 3rd party software. That’s not important right now. What is important is that you then use this command:

When asked, you can finish adding the repository by pressing ENTER. That should then trigger apt, making it check for new software. If it doesn’t, you can run:

After that finishes, you can go right ahead and just install Krita from the terminal. (It’d also appear in your software manager, but we’re in the terminal so we might as well just finish in the terminal.)

Krita is a pretty large and complicated bit of software, so it’s a sizable download. Once downloaded and installed, you can bring out your inner Leonardo da Vinci! It’s really as simple as that, and nothing more.

Installing Krita this way will keep Krita up to date as the repository is updates. You do have a Flatpak and an AppImage available if either of those is your preference. If not, you can go right ahead and install it the old fashioned way.

Closure:

DING! There’s another article done and done. This one just was a passing fancy, pulled more or less randomly from my notes. It’s a great way to install Krita, for those looking to do so. It’s pretty painless and it’s a solid piece of software.

Thanks for reading! If you want to help, or if the site has helped you, you can donate, register to help, write an article, or buy inexpensive hosting to start your own site. If you scroll down, you can sign up for the newsletter, vote for the article, and comment.
Change Your Hostname In Linux

This article will tell you how to change your hostname in Linux. It’ll give you a couple of options to use. Both methods are pretty easy, and both are approachable by your Linux newbie. Read on for more information!

If you don’t know what your hostname is, or why you have one, you can take a look at this article. Basically, it’s a handy computer name that you use when you’re using things like SSH or FTP. (The first of those three links would be the best page to learn more about your hostname, but it’s basically just a name for your computer.)

Your hostname is probably something you set during the installation process and seldom thought about again. Unless you’re working with your devices remotely, perhaps with the terminal, it’s not really something that you think about all that often. Well, this article is how about you can change your hostname to something else. 

Why would you want to change it?

Well, you could have duplicated it on another device it by mistake. You may have added more devices and need a new device-naming convention. You may have picked something silly and now want to make it more serious. Your device may be moved to a new network where the name isn’t allowed or already belongs to an existing device. There are any number of reasons why you might want to change your hostname. The key point here being that you can change your hostname.

Onto the article!

Change Your Hostname:

This article, like many, requires an open terminal. You can open the terminal with your keyboard – just press CTRL + ALT + T and your default terminal should open. I’ll start with the easiest of the two ways (that I know) to change your hostname.

Method #1:

The first tool we’ll use to change the hostname is the aptly named ‘hostnamectl’ and to use it, you’d use a command like this:

After that, you’ll need to reboot the system for the changes to take effect. Seeing as you’re already in the terminal, you can actually just reboot the system with this command:

This is the very easy way, and it’s the way I’m going to recommend – even if you’re an advanced user. Alas… There’s another way, albeit a bit more messy, to accomplish this.

Method #2

You can edit ‘/etc/hosts’ and ‘/etc/hostname’, changing the hostname manually. This is also handy if you don’t have hostnamectl as an option. Like above, you’ll need to have a terminal open.

Your first command will be editing the hosts file, and we’ll use ‘nano’ for this. Simply enter the following:

There, you’ll see your hostname (which may also be your username, and often is your username). Just delete that and replace it with your desired new hostname.

When you’re done editing, and seeing as we’re using nano, you can save and exit the editor. Just press CTRL + X, then Y, and then ENTER. (It’s seemingly a little complicated, but not too bad.)

Next, you need to edit the hostname file. The command is similar to the one above, just with a different filename. Enter this:

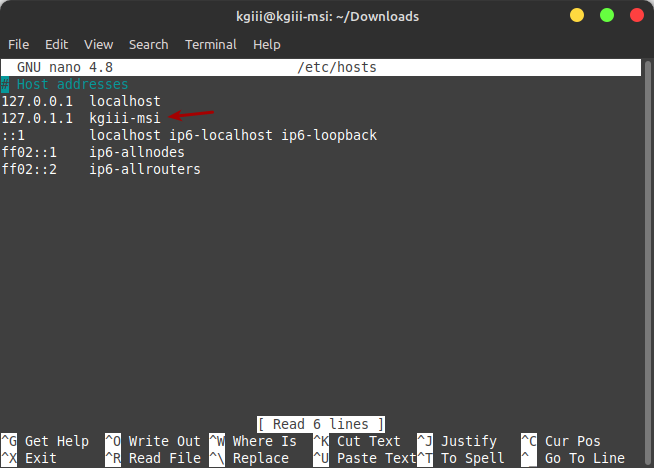
Find the line that begins with ‘127.0.0.1’ and ends with your current hostname. Erase just the hostname and change it to your desired hostname. To make it more clear, here’s a picture:

change the hostname
Just erase the existing hostname and make it your new hostname. Pretty easy, huh?

Once you’re done with that, just like before, you need to save it. Again, you just press CTRL + X, then Y, and then just hit ENTER. That should save your new hosts file and you’re pretty much done changing your username.

There’s one final step. These changes won’t take effect until after you reboot the system. To change your hostname, you will need to reboot the system after changing these files. That’s usually a painless process and you should be able to use the new hostname after the system is rebooted.

Closure:

Well, it’s another article. If I’m paying enough attention (and if you’re curious about milestones), this marks the 100th article posted on this site. This time, the article tells you how to change your hostname. It’s not something you should have to do often, but these are a couple of ways to change it.

Thanks for reading! If you want to help, or if the site has helped you, you can donate, register to help, write an article, or buy inexpensive hosting to start your own site. If you scroll down, you can sign up for the newsletter, vote for the article, and comment.
Guest Article: Repetitive Stress Injuries (RSIs)

We tech workers (and enthusiasts) tend to spend many hours at our desktops, performing the same physical and mechanical motions over and over again, making us susceptible to Repetitive Stress Injuries (RSIs). That’s what this article is going to be about, oddly enough. It’s a good subject to consider, for all of us.

RSIs are caused by doing the same thing, over and over again. That’s just not good for the body. There are ways to minimize the risk of injury, but the prevalent wisdom includes everything from breaks to ergonomically designed equipment.

According to this recent link, 2/3rds of all workplace injuries are repetitive stress injuries. One quote from the article that rings true is, “Today, the main causes of RSIs are manual labor, office work, and the overuse of computers, leading to injuries localized in the upper body.” (Emphasis mine.) We geeks certainly tend to fall into that category, using computers for much of our awake time, both at work and at home.

I don’t really want to give much in the way of medical advice, so I’ll say that you should spend some time looking up ways to reduce your chances of getting an RSI. They’re a pretty serious risk. To this day, I still have flair-ups in my right wrist. I wear a wrist-wrap but the flair-ups are so bad that even turning a door knob is uncomfortable. Surgery was the recommended solution, but I’ve been chopped open enough.

When I saw someone on Reddit offering to do medical articles, I asked them to write an article about RSIs. The output from that request follows below the links and disclaimer.

This article was provided by the owner, operator, and writer for “Daily Remedy“. The author of this site offers no opinion on the content of the linked site, I’m just happy to have the article about RSIs. Don’t forget that you too can write an article. A special thanks goes out to the author of this article. I hope that you readers enjoy it as much as I do.

Repetitive Stress Injuries (RSIs):

A push of a thumb, a flick of a finger, and a wrangling with a wrist – just some of the many actions we undertake when using the latest gadgets promised to improve our health.

But with the influx of these new gadgets, we enter a brave new world. In which consumer electronic devices are not defined by traditional principles of consumerism, but consumed with healthcare data – often using awkward, inconvenient gadgets to obtain such data.

Device manufacturers tout the importance of healthcare data when marketing the devices. And consumers eagerly acclimate to the lack of ergonomics when purchasing the devices. Simply put, device manufacturers often develop medical devices that are uncomfortable for consumers, who in turn accept such discomfort as acceptable practice for medical devices – all in the name of data.

But when does the discomfort of the device supersede the value of the data? – when the discomfort harms patients while using the device.

Known as repetitive stress injury (RSI), it is a medical condition that affects many office workers throughout the country. Normally ascribed as work-related overuse injuries, ostensibly from desktop computer use – be it the mouse or the keyboard – RSI is often treated with braces or work restrictions as a first line treatment.

But with healthcare growing to encompass a larger part of the economy, and more patients utilizing peripheral monitoring devices at home for chronic diseases, we will soon see a rise in new forms of RSI – coming from the medical device use itself.

In a 2019 study, continuous positive airway pressure devices, known as CPAP machines, used for patients with obstructive sleep apnea (OSA), were evaluated for device design and ergonomics. The study found many of the CPAP devices were poorly designed, incorporated little to no user feedback in device design, and were built using an antiquated engineering-centric focus of device design.

The same study, while attempting to present solutions to the problem of CPAP machine designs, acknowledged particularly unique difficulties in designing an ergonomic CPAP machines – which include engineering hurdles and psychological barriers to effective use.

Clearly there is more to effective device design in healthcare than traditional ergonomic principles. In fact, we should begin to study ergonomics in healthcare as a unique field in its own right, something I propose to call, healthcare ergonomics.

Healthcare ergonomics accounts not only for the engineering barriers that go into medical device design, but also for the psychological barriers patients face when using the device. In other words, healthcare ergonomics accounts for device use from the perspective of a consumer and that of a patient, a veritable dual identity of the end user.

Healthcare ergonomics balances the ease of use with the value of the data gleaned, further complicating device design, since the design itself is not the only consideration, but also the ability to glean the necessary data as well.

Some devices seem to have succeeded. The Apple Watch is an early test case of such success. Consumer Reports analyzing the latest iteration of Apple Watches find the device consistently excellent in various reviews.

Interestingly, the report notes the Apple Watches’ ability to optimize most mundane tasks: “But they do it by performing the routine jobs just a little better than the Series 4; notching top ratings for step counting, heart-rate tracking, and ease of use.”

Apple is known for their prowess in device design, so these reports should come as no surprise. But it is still commendable that a traditionally consumer oriented technology company could adapt to healthcare ergonomics so readily. And their ability to make such a transition should be emulated among other companies considering entering the healthcare space.

But it was not easy. Apple had more than its fair share of missteps – something the company openly acknowledges. The early versions of its heart rate monitoring and EKG (heart rhythm tracing) were wildly inaccurate. But they persisted – both in the device design and in the data gleaned – and for their persistence they are rewarded with first mover status into a healthcare market with spectacular market potential.

Apple balanced device design from the perspective of a patient and a consumer, and they weighed design with data, noting the importance of high fidelity data trends. They engaged in clinical studies with academic medical centers to study their watches. They actively sought direct feedback from early adopters to glean design improvements – in fact, every aspect of the device design centered on healthcare ergonomics.

The contrast in CPAP design and Apple Watches is worth noting for entrepreneurs and executives seeking to enter or to gain market shares in the healthcare consumerism market. To truly succeed in healthcare, you have to understand the complexities of the end user and balance design needs with data quality.

Not an easy task, and likely why few have succeeded. But the roadmap is set, and the opportunity is there for anyone enterprising enough to pursue it – the burgeoning field of healthcare ergonomics.

SOURCES:

https://www.tandfonline.com/doi/pdf/10.1080/14606925.2019.1595446
https://www.consumerreports.org/smartwatches/final-test-results-apple-watch-series-5/

Closure:

There you have it, another article in the books. This time, it was a guest article. I picked the subject because it’s important, especially for us, to be mindful of our health. As a group, we’re not the most healthy of people, and adding an RSI to the list of our ailments isn’t a good idea. Trust me, you don’t want carpal tunnel.

So, take care of yourself. Read up on your devices and learn how to use them safely. Read up on best-practices so that you can try to minimize your risks. Even if you feel good now, that doesn’t mean you will always feel good and healthy.

Thanks for reading! If you want to help, or if the site has helped you, you can donate, register to help, write an article, or buy inexpensive hosting to start your own site. If you scroll down, you can sign up for the newsletter, vote for the article, and comment.
Let’s Install Ubuntu Restricted Extras

If you’re using Ubuntu and want to use some patent/license encumbered features, such as playback for certain media formats, you need to install Ubuntu Restricted Extras. This is fairly normal and is done because the software licenses prevent Ubuntu from releasing the distro with that software. In some cases, you also will need to agree to different user-agreements. This is unlike most other software you will use on Linux, as software should never ask you to agree to anything.

Because of the license Ubuntu is released under, and according to their legal council, they just don’t include these sort of things by default and you’ll need to install them later, on your own. On the other hand, if you don’t need to use patent-encumbered files, then you don’t need to install the ‘ubuntu-restricted-extras’ metapackage at all.

This shouldn’t be a very long article, though I’ll break it up a bit. If you’re new to Ubuntu (or an official Ubuntu flavor) then you might as well install the restricted extras. If you are morally opposed to software patents, restrictive software licenses, or binary blobs then you may wish to avoid installing it.

About Ubuntu Restricted Extras:

When you install the ubuntu-restricted-extras, you’re actually installing a metapackage. It’s one package but installing it will install multiple packages, all relatively related by license restrictions. In this case, they’re packages that wouldn’t be installed by default and may help with your computing experience. They’re not all multimedia codecs, but most of them are.

So, what’s in the metapackage? As I said, it’s a package with multiple things in it that will also download along the way. These are the contents of ubuntu-restricted-extras:

gstreamer0.10-ffmpeg
gstreamer0.10-fluendo-mp3
gstreamer0.10-pitfdll
gstreamer0.10-plugins-bad
gstreamer0.10-plugins-ugly
gstreamer0.10-plugins-bad-multiverse
gstreamer0.10-plugins-ugly-multiverse
icedtea6-plugin
libavcodec-extra-52
libmp4v2-0
ttf-mscorefonts-installer
unrar

As you can see, it’s some fonts, a bunch of codecs (so that you can play patent-encumbered media files), software that lets you open .rar compressed files, and use Java applets in the browser. It’s some pretty handy stuff, but because it’s all non-free/non-FLOSS Ubuntu doesn’t include it by default.

Install Ubuntu Restricted Extras:

For starters, you won’t even find the ‘ubuntu-restricted-extras’ unless you enable the ‘multiverse’ repository. An easy way to do so is to open the terminal (press CTRL + ALT + T) and enter the following:

Next, you need to make sure that your system knows about the new software choices. It might do this automatically, after adding the repository above, but it can be manually done with this:

With that done, you install the Ubuntu Restricted Extras with:

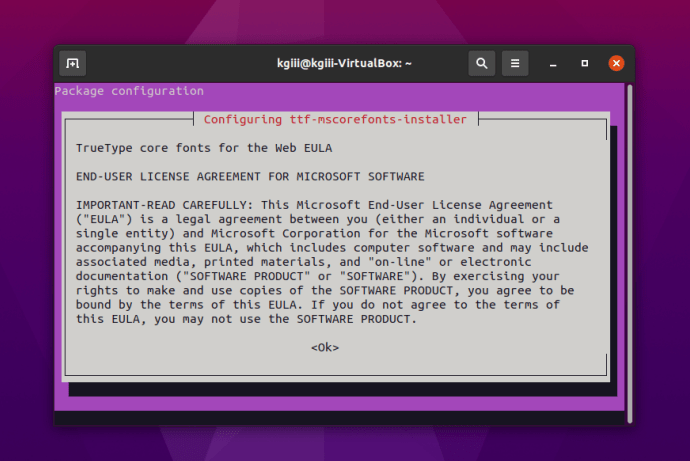
That downloads a bunch of stuff and shows a screen that trips up a lot of newer users. There’s no obvious way to use a mouse and, indeed, you have to use your keyboard to agree to the user agreement. Like this:

accept the eula
Yes, you have to agree to proceed. It’s pretty easy, but it is also mandatory.

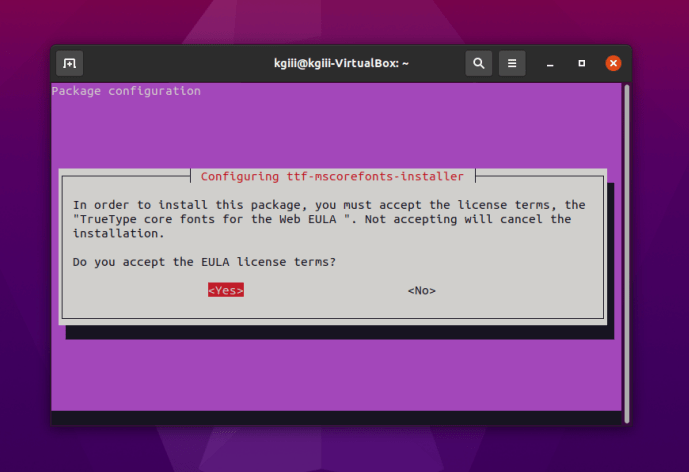
You can use your TAB (or arrows) key to make selections and use the ENTER button to submit your answers. The same on the next screen.

more eula
Use the tab or the arrow keys and the enter to agree. You got this!

That one will download some files with fonts in them, so that it can extract them to the right directories – just so that you can use them. These things are free as in beer, but not free as in libre.

Closure:

There it is, another article in the books and this one is about installing Ubuntu Restricted Extras. Most folks do this so that they can play encumbered media files, and I have no issues with doing so. If your morality doesn’t let you watch encumbered media, then there’s really no reason for you to care about any of this.

Thanks for reading! If you want to help, or if the site has helped you, you can donate, register to help, write an article, or buy inexpensive hosting to start your own site. If you scroll down, you can sign up for the newsletter, vote for the article, and comment.

How To: Create And Enable A Swapfile

Today’s article is about how you can create and enable a swapfile. It largely ignores the debate about whether a swapfile is needed or not, though I make it clear that this is something I prefer. I know that others will have different views, but I also make it clear why I enable it.

A swapfile, or swap partition, isn’t just where the OS crams stuff when it has run out of RAM. It’s more complicated than that. Sometimes, the OS knows where it wants to store cached items and prefers the swap partition or swap file.  The OS can put items in swap while freeing up RAM for other bits that need caching. 

To make it abundantly clear, you absolutely can use Linux without a swapfile. You can also use Linux with a swapfile. If you want to enable a swapfile, read on. I’ll touch on this a little bit later in the article.

Some Swapfile Background:

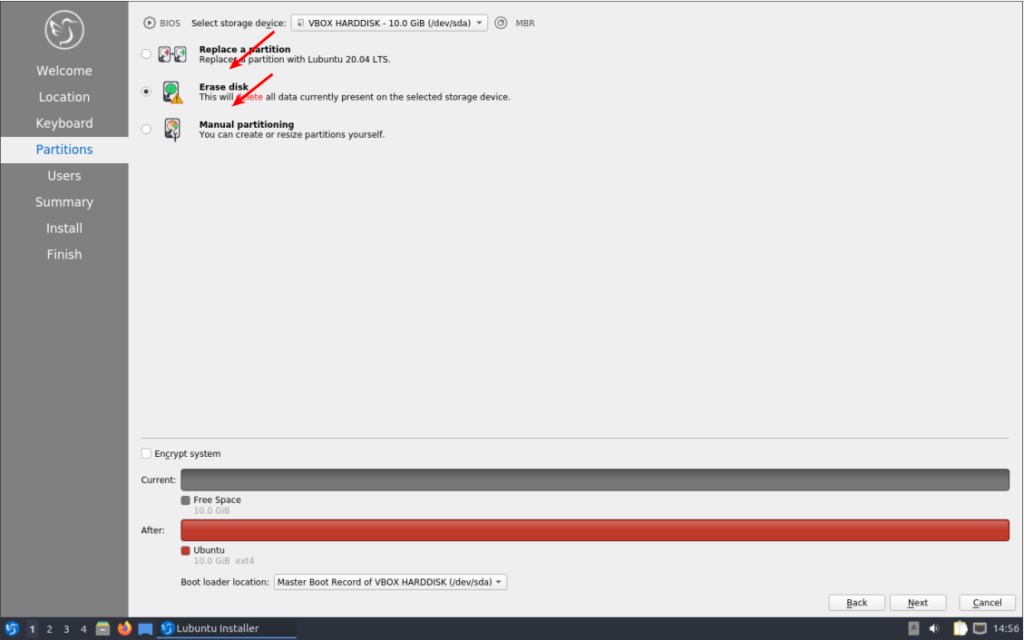
I have a modern, large SSD and more RAM than I’ll ever possibly use. I still want to use swap, in this case a swapfile. Imagine my dismay when I installed Lubuntu 20.04 and found there’s no swapfile available during the basic installation? (It’s there in 21.04 and proceeding versions.)

no swapfile
See? There’s nothing there!

I could have manually made a swap partition during installation, but that didn’t seem like something I wanted to do – and messing with manual partitioning can be tiresome and tedious. I knew I could enable a swapfile later, which is what I did.

Again, trying to avoid the debate – just sharing my reasoning; I have ample disk space and storage is cheap. If it has any chance of helping, it’s a small investment. I should also mention that swap is far more complicated than ‘a place where the kernel sticks stuff when there’s no more RAM left’. In fact, it’s a lot more complicated than that. It’s where the kernel pages content that’s seldom used, and it’ll happily use swap even when there’s plenty of RAM available.

Since the option to enable a swapfile isn’t there during the installation, we might as well learn how to add a swapfile to Ubuntu. It’s a pretty painless process. 

Is Swap Already Enabled?

You should first check to see if you already have swap enabled. The process is the same with both a swap partition and a swapfile. To check we first need to open your terminal emulator. You can do that by pressing CTRL + ALT + T.

Now, let’s check to see if you’ve already got some swap going on.

If the output of that command shows nothing but a new line, you have no swap. If it says anything else, you’ve got swap enabled already and this article is not one you need to read. As this article is only about a swapfile, it won’t be helpful for questions about a swap partition. This article also won’t tell you how to resize your swapfile, though you could put some pieces together and figure it out for yourself.

Let’s Make A Swapfile:

Seeing as you already have your terminal open from the previous step, you can just leave it open. That’ll make this easier. Start with this first command and work your way through the article – making sure to not skip any steps.

Why 8 gigabytes when I have ample RAM and an SSD? Because I don’t want to worry about it ever it again. I should be able to open up every app I have and leave them open for a month. You do you and decide how big you want it to be!

Now that we’ve allocated space for the swapfile, we need to set some permissions. We don’t want anyone and their kid brother writing to swap, we only want root writing to swap.

Next, we need to let the OS know that’s swap space, to be used as a swapfile.

Then you turn it on with:

And you now have swap in the form of a swapfile and it’s turned on.

Permanently Enable A Swapfile:

I suppose we should make this change permanent, as it’d be an unneeded step to have to do it every time the system reboots. To make this permanent, we need to edit fstab and nano is a good tool for this.

And add this at the bottom of that document:

Those are 0, the digit, in case the font here makes it confusing. And seeing as we’re using nano, you save your by pressing CTRL + X, then Y, and then ENTER

At the end of this exercise, you should have a swapfile that gets loaded on reboot.  You shouldn’t even have to reboot for it to effect, it should already be currently loaded and working. You can next edit the swappiness value, if that’s something you feel like you want to do – or have a reason to do. In Ubuntu, it is a default of 60. If you want to edit it, you’ll have to wait for another article.

Closure:

There you have it! We’re on the downhill side of this project and it’s an article about how you enable a swapfile. If you don’t use swap, that’s fine. This article is for those who do want to use swap.

Thanks for reading! If you want to help, or if the site has helped you, you can donate, register to help, write an article, or buy inexpensive hosting to start your own site. If you scroll down, you can sign up for the newsletter, vote for the article, and comment.

Linux Tips
Creative Commons License
This work is licensed under a Creative Commons Attribution 4.0 International License.