The following article is a guest-written article from Andy Brooks (aka captain-sensible) about SSH keys. So, let’s put our hands together for a guest author and appreciate that I got a break from writing articles! Thanks, Andy!
There are a few articles about SSH already:
Install SSH to Remotely Control Your Linux Computers
Enable x11 Forwarding With SSH (Remotely Use GUI Applications)
How To: Change The Port SSH Uses
What Are SSH Keys?
Recently, I created an account for the AUR (Arch user repository) with a view to taking over an maintaining an Aurphan AUR package. On the registration form, which included the usual user name etc, was a text box asking for my SSH public key? You might wonder what is that, why do the AUR want it, and how are they going to use it?
Well the AUR would hold my public key and that would be associated with my user account. What I would want to do with the AUR for a package would be update the PKGBUILD file and get those changes published on AUR repository. So basically that would require getting access to the server of the AUR by logging in and then pushing up my changes to it.
So how are SSH keys involved in that process ? Well on my PC in my home folder there is a directory called .ssh inside are two text files called id_rsa id_rsa.pub. The information held inside the id_rsa.pub, the AUR has a copy of.
If and when I access AUR to make changes, to any package on the repo, there is an exchange of information over my terminal that I am using as a communication channel via ssh. The server sends a challenge, which is to see if my private key matches up with the public key which the AUR server is holding a copy of.
A couple of points are the process involves encryption and the only key that should be “given out” to anybody is the public key. The private key should be, well kept private and out of peoples hands. Putting it simply, ssh-keys are a way of securely giving users access to remote servers. Secure Shell was created in 1995 by Tatu Ylönen a Finnish national following a password-sniffing attack at his university.
Now for registration for accounts such as with the AUR, there are really only two things you need to do.
1) create as a “once off” a pair of private & public keyserver-options.
2) Give the details of the public key to the AUR server.
Creating SSH Keys:
Lets start with item 1):
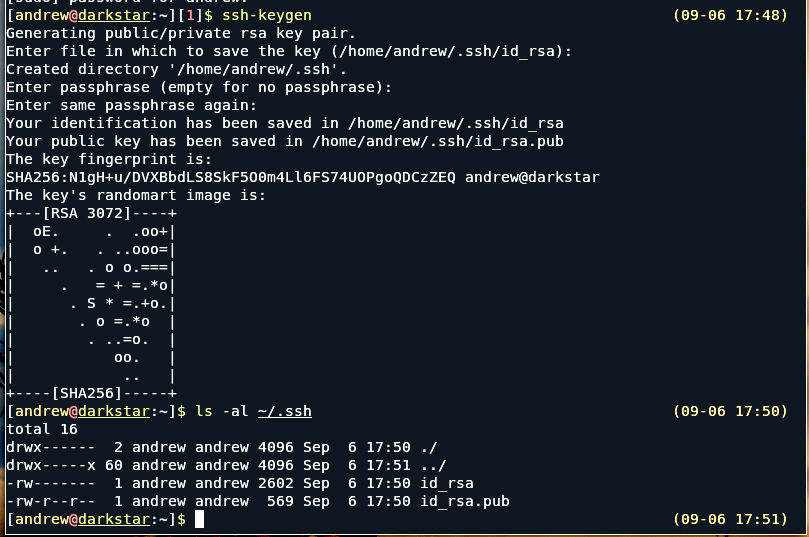
ssh-keygen is a utility of openSSH so you need to install that, then from a terminal simply issue the command (as a normal user not sudo): ssh-keygen
To keep things simple, you can accept the defaults by hitting return button.
At the end you should see something like in the adjacent image.
Now lets look at 2):
From your terminal, check you are in your home folder, or cd to it eg ($ cd ~ )
Then change directory into the .ssh directory with cd .ssh
Then get contents via cat
cat : [andrew@darkstar:~/.ssh]$ cat id_rsa.pub
You should get something like : ssh-rsa AAAAB3NzaC1yc2EAAAAD… There will be something like 569 chars in all.
From the terminal you can just copy starting from the ssh-rsa ….. to the end; then you can just paste that into a text box asking for your public key.
A quick warning the two keys generated are a matched pair. Once you submit your public key, don’t just repeat the default way of generating keys otherwise the keys will be overwritten and then you will be rejected from getting access to where you last put your public keys.
Also to see the .ssh directory in your home folder, you may need to click view hidden files and dirs.
Closure:
And there you have it, a guest-authored article about SSH keys! I’m very grateful for the help. If you’re interested in writing an article, you can do that. The easiest way for you is to use the Contribute Your Article link at the top of any page. The easiest way for me is if you just register and ask to be made an author. Either is awesome and even if you’re an author I will still need to edit and schedule posts.
Thanks for reading! If you want to help, or if the site has helped you, you can donate, register to help, write an article, or buy inexpensive hosting to start your own site. If you scroll down, you can sign up for the newsletter, vote for the article, and comment